• Hi Guest !

    Welcome to the 500Eboard forum.

    Since its founding in late 2008, 500Eboard has become the leading resource on the Internet for all things related to the Mercedes-Benz 500E and E500. In recent years, we have also expanded to include the 400E and E420 models, which are directly related to the 500E/E500.

    We invite you to browse and take advantage of the information and resources here on the site. If you find helpful information, please register for full membership, and you'll find even more resources available. Feel free to ask questions, and make liberal use of the "Search" function to find answers.

    We hope you will become an active contributor to the community!

    Sincerely,
    500Eboard Management

HOW-TO: Replacing Odometer Gears

Post number 59 has been selected as best answered.

ok started working on its own.

clicking though. I'll look into that grease I saw above

This is a very useful thread.
 
GSXR,

You saved my bacon, I ordered my gears in June 2016 before your post have the wrong 48/16 gear set. My odometer is making a grinding noise and 183k miles and time to change out gears and lube them up. I just re-ordered to get 48/17. Now on to figure out the dash lights.
 
My odometer recently quit ('95 E420) and I just received gears from Garagistic. Their 48/17 gear does not have the shoulder on the back side of the gear like my original. Mattson at Garagistic assures me the gear will work properly. I like the $19 price but not if there is clicking or slop in the gears. Stay tuned.
 
I like the $19 price but not if there is clicking or slop in the gears. Stay tuned.

I used Gleitpaste on one car and no Gleitpaste on the other. It really did make a difference. On the car without Gleitpaste, I could hear the gears clicking when driving on a smooth road.
 
What are reset contact points?
The cone-shaped plastic bulb on the end of the shaft that you push inward to reset the trip odometer. You lubricate slightly this plastic bulb along with the point where it contacts the lever that it pushes to reset the trip odo.

it’s all apparent when you remove everything.
 
Here is my How-To for replacing Odometer Gears (on a 1994 E500).

1) Order your 3 gear set from Garagistic.com. Search for their generic gears and order the 48x17 combination.
Link as of 11/10/2019

Per GSXR
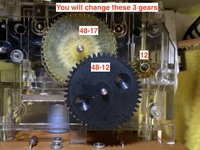
E1 = 12 (small 12 tooth gear)
E2 = 48x12 (48 tooth outer gears with small hub gear with 12 teeth)
E3 = 48x17 (48 tooth outer gear with small hub gear with 17 teeth)

Step 0: DISCONNECT YOUR BATTERY IN THE TRUNK OF YOUR CAR BEFORE PROCEEDING

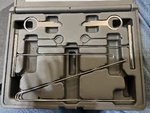
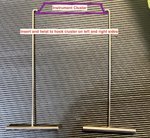
2). You need a W124 gauge cluster puller . I ordered OTC 6711 kit.
Extend the steering wheel as far out as it will go to give yourself the most room.
Watch the first three minutes of this Youtube video: https://youtu.be/ldVrW7LB__Y

90030-7c60a51ea0a9a5187cdd95dc643d28d1.jpg90031-e40cc54177401f26e9f26fcfe8148492.jpg90032-7556b022f13ae4fc4ccf95f9fed23ac6.jpg

3) After you pull the instrument cluster out such that all the electrical connection are exposed on the back, then I found it easier to work on the passenger side of the vehicle.

All the bulbs connections on the right side of the vehicle are numbered along with their wires, 1, 2, 3, 4 and 5. You can pop those out. You can then loosen the harness holder with a screwdriver to free up that wiring harness a bit more. Look at the pictures below. Just be slow and methodical and take pictures along the way with your smartphone (iPhone 11 Pro used for these). All connectors are removed by hand and pop off with minimal force.

90033-c9f4c0a1bc0c7e1da6a542a68c221257.jpg90035-262aa0292e3aca84776c4c50a600bad8.jpg90036-088c5763d8afc1543d9398c54fa65eed.jpg90037-360ac9d50b8106df5d7377fa57a5175e.jpg90038-d3ec5818b70fba5b56e4985e30d65122.jpg90039-f8996595bba66adfc576d3a11c68b056.jpg

4)Now you can remove the instrument cluster and move to a very clean place to work. Remove the 6 screws shown in the photo. Note the one is longer than the others.

90041-b574088e6a3e19bb5225e7e53ff95d04.jpg
 

Attachments

  • IMG_0166.jpeg
    IMG_0166.jpeg
    1.1 MB · Views: 43
  • IMG_0167.jpeg
    IMG_0167.jpeg
    1.3 MB · Views: 32
  • IMG_0169.jpeg
    IMG_0169.jpeg
    1.2 MB · Views: 33
  • IMG_0174.jpeg
    IMG_0174.jpeg
    1.2 MB · Views: 33
  • IMG_0175.jpeg
    IMG_0175.jpeg
    1.4 MB · Views: 32
  • IMG_0178.jpeg
    IMG_0178.jpeg
    663 KB · Views: 39
  • IMG_0177.jpeg
    IMG_0177.jpeg
    439.8 KB · Views: 49
Last edited:
5) Now remove the LCD temperature display module. It will slide right out after the bottom two screws were removed.
90052-e0d4015e13154dc3481de8f4bfc28406.jpg

6)You know have to remove another bulb and its wire that is hooked to the back of the speedometer.
90054-67fcc9171139c48b08f469439177e7b7.jpg 90055-6f30e6acc03ebee20abac26b6f7b01e4.jpg

7)Now remove this white bit that was screwed in with the longer screw.
90053-dff9663b1172ee6de62aedc749ebccd7.jpg

8)The speedometer can come out now. But it doesn't just lift straight out. The odometer trip reset lever requires you to finesse it out. Look at photos.

Cover the speedometer opening now with a clean towel so you don't introduce dust into the instrument cluster area.

90056-473a0960b44319da6b005bc5049ad55d.jpg90057-6317916b6b775d9a97134cb105dde9e3.jpg
 

Attachments

  • IMG_0181.jpeg
    IMG_0181.jpeg
    781.7 KB · Views: 30
  • IMG_0186.jpeg
    IMG_0186.jpeg
    725.7 KB · Views: 33
  • IMG_0182.jpeg
    IMG_0182.jpeg
    607.2 KB · Views: 32
  • IMG_0185.jpeg
    IMG_0185.jpeg
    533.7 KB · Views: 30
  • IMG_0213.jpeg
    IMG_0213.jpeg
    707.5 KB · Views: 35
  • IMG_0188.jpeg
    IMG_0188.jpeg
    998 KB · Views: 39
  • IMG_0164 (1).jpeg
    IMG_0164 (1).jpeg
    530.8 KB · Views: 36
  • IMG_0220.jpeg
    IMG_0220.jpeg
    652.9 KB · Views: 31
Last edited:
9) After removing the 4 screws on the back of the speedometer cover you can remove it but it will still be connected by a wire. That's ok it will give you plenty of room to work.
90064-90c560ae2df7ffb82cae921b41712482.jpg

10). Now remove the two small screws holding the odometer gears in place
90065-63e594dfa5b612e22adbbba3466a195f.jpg90066-b02e8e5a2e83b5b2a12d91ad8fffb724.jpg

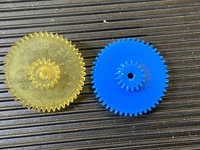
11)You will change the 3 gears shown in the photo. Remove 48-12 by hand. It will slide off. Remove 48-17 by hand, it will slide off.
90067-0e45ea7d9f62417ed8e24e69464548bd.jpg90070-d2f8e1d6c69e07765965e31d2bfc6e6c.jpg

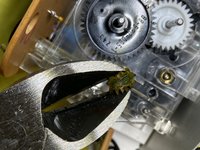
12) THANK YOU TO GSXR for letting us know how to remove the small twelve tooth gear that does not just slide off. I used Side Cutter just like GSXR says to cut through the brass bushing so that it will then slide off with your fingers. The replacement gear does not need the brass bushing.

90072-82b7ce6dbcd44fef8100a5bf05dff14e.jpg90071-cedfc9ff07e86627ece7c3301aeeee47.jpg
 

Attachments

  • IMG_0190.jpeg
    IMG_0190.jpeg
    830.4 KB · Views: 53
  • IMG_0191.jpeg
    IMG_0191.jpeg
    728.6 KB · Views: 51
  • IMG_0194.jpeg
    IMG_0194.jpeg
    611.9 KB · Views: 52
  • IMG_0195.jpeg
    IMG_0195.jpeg
    668.8 KB · Views: 51
  • IMG_0199.jpeg
    IMG_0199.jpeg
    725.3 KB · Views: 58
  • IMG_0208.jpeg
    IMG_0208.jpeg
    690.5 KB · Views: 63
  • IMG_0205.jpeg
    IMG_0205.jpeg
    700.2 KB · Views: 59
Last edited:
13) Make sure you need gears match the old ones. I think my 48-12 was the one making the gear noise.
90081-6f973da990e93f6aa73008f7fb3c5c10.jpg90083-3aeeb1ff64ce842eb7bd196c87402e81.jpg

14)You can lubricate the new gears with Gleitpaste, but don't go overboard. I had to clean up my lube job a bit after application.
90084-1f55f05495fcec737317baf2760e3a60.jpg90085-78b7f872394c9b556227887890dda491.jpg90086-6d086b8a854be44f476ceef53242fd7e.jpg

15)Re-install everything by following instructions in reverse.

BONUS: Changing your Instrument Cluster Lights.

16) There are two main bulbs illuminating the instrument cluster at night. These are 3W bulbs. W3W I did not change to LED as I'm trying to keep my car stock. I am pretty sure I am still on the original bulbs. There were a bit burnt out looking and the new ones are crystal clear.

And upon re-installation, my odometer gears are SILENT and everything works!!

90087-51035acc3ed0931959407d86cbad1aa9.jpg90088-20d507f67258c19fbf201da4be1e2e78.jpg90089-73fca22b23617d2b07c45aa572f7ac2f.jpg
 

Attachments

  • IMG_0197.jpeg
    IMG_0197.jpeg
    898.1 KB · Views: 27
  • IMG_0196.jpeg
    IMG_0196.jpeg
    660.9 KB · Views: 28
  • IMG_0200.jpeg
    IMG_0200.jpeg
    1.2 MB · Views: 28
  • IMG_0209.jpeg
    IMG_0209.jpeg
    914.8 KB · Views: 29
  • IMG_0212.jpeg
    IMG_0212.jpeg
    754.7 KB · Views: 29
  • IMG_0177 (1).jpeg
    IMG_0177 (1).jpeg
    414.7 KB · Views: 31
  • IMG_0214.jpeg
    IMG_0214.jpeg
    836.6 KB · Views: 32
  • IMG_0217.jpeg
    IMG_0217.jpeg
    1.6 MB · Views: 34
Last edited:
Can anyone clarify the ordering process for me. The mix and match page shows only options on the E3 gear. If I choose the 48/17 will they include the E1 and E2 gears automatically? I see no where else to make the selection. Not a great website.

drew
 
Last edited:
No, just push the 12 tooth gear on with your thumb. Its a press fit. My original twelve tooth gear looked fine. In retrospect there was no need to replace. I think it was the original black gear I changed out that caused problems.
 
Thanks, Ricardo! And if I forget anything on reassembly, as i'm likely to, I'll have your writeup to reference.

drew
 
No, just push the 12 tooth gear on with your thumb. Its a press fit. My original twelve tooth gear looked fine. In retrospect there was no need to replace. I think it was the original black gear I changed out that caused problems.
Interesting. My 12-tooth was in pieces and my black gear had one tooth gone. Wonder if one took out the other.

Looking forward to getting this done but also find myself procrastinating. Gears have been sitting on my desk for days. Oh well.
 
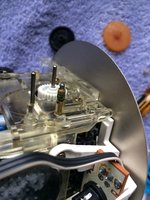
Replacement of the gears is not difficult. There is a small brass retainer sleeve that holds the small gear on. This sleeve comes off with pliers. [GSXR edit: Do not pull off the sleeve with pliers! Deform it with side-cutters so it slides off the shaft with finger pressure only. Forcing it off with tools will damage the motor.] You DO NOT need the sleeve with the replacement gear. It slides on with enough friction to stay in place. You can access the sleeve and small gear without removing the clear plastic cover. The other two gears require removal of the plastic cover. I removed the sleeve and small gear without first removing the cover because I had only intended on changing the small gear, until I saw that a large gear had a tooth missing too and I determined that all three gears should be replaced.
Okay, I'm stuck. I look at the brass sleeve on the spindle that is closest to the camera and while I do not want to yank on it, I do not understand the side-cutters procedure. Do I snip at it like I would cut an electrical wire with the side cutters? I just don't want to screw anything up. Thx for any advice
 

Attachments

  • IMG_0824.JPG
    IMG_0824.JPG
    771.8 KB · Views: 30
If you look at post #61 above I have a photo of gear 12 in my wire cutters. According to GSXR if you try and pry that gear in the direction of its shaft you could damager the motor. Instead with a pair of wire cutters you can "cut the gear in half" as shown in the photo. What happens is the brass bushing deforms / breaks and you can pop off the gear easily. You are crushing that brass bushing from the sides. It scared the crap out of me to do this so hopefully the photos helped.
 
Oh okay, thanks for that. I missed post #61 and yes the photo shows how scary it looks.
 
You just need to barely deform the sleeve, just enough so it's not gripping tightly on the shaft. As soon as it starts to deform, it should slide off with minimal effort. The whole idea is to not use any force on the shaft, and also not to cut into the shaft either (damaging the surface).

:sawzall:
 
Sam SL, I recently finally did this project. Try not to sweat the brass bushing too much. It's just like has been said, just crimp it slightly, rotate, crimp again, etc. Eventually it loosens and you can slide it off easily with your fingers.

When it's behind you, you'll see there was no need to overly worry.
 
It’s not a horrible job. Just use the thread as a guide and follow carefully. It’s largely self-explanatory once you’re in there.
 
Sliding the E1 12 tooth gear onto the shaft is requiring more effort than I'm comfortable with. I bought the part from Garagistic so I trust it is the correct part. It is so snug I cannot even get it started onto the shaft let alone slide it down. Is there a trick?
 
Sliding the E1 12 tooth gear onto the shaft is requiring more effort than I'm comfortable with. I bought the part from Garagistic so I trust it is the correct part. It is so snug I cannot even get it started onto the shaft let alone slide it down. Is there a trick?
Installation of the new gear, without the brass sleeve, will require some force... but because the new gear is supposed to be a friction fit, this is normal.
 
Yes, that's exactly what I did. I threw the gear into boiling water and with the expansion the piece slipped on no problem. A little moisture on the centre hole helped to slide it in place as well. As an added measure I placed the speedo assembly inside a bag in the fridge over night. All good!
 
What is a "side cutter" as it pertains the the removal of the small gear? Everything else is straight forward, I hesitate to use any force to remove the brass collar.
 
Nevermind. I figured it out. Keep crimping with needle nose pliers until it slid off.
Thanks to all contributing to this thread
 
@emerydc8 | @RicardoD - Great contribution with this HOW TO. I was able to get into my cluster this evening and replace 3 gears (as others have in this thread). Full failure was on the smaller gear which has the brass insert. One of the larger gears had one tooth missing along with them having what seems like dried up paste / lubrication on them. As @RicardoD, I also replaced the instrument cluster W3W bulbs and they were a great add-on to the process.

Sadly, I completed the task twice due to installing one of the gears not fully seated into the assembly, hadn't ensured it was fully seated while putting things together, but second time around I caught it. After second install - I went on a test drive and didn't have a working speedometer. Pulled the cluster back out and found the speedometer connection hadn't fully seated on install and had pried loose on its own. Buttoned things back in - everything working now.

Finally able to track the mileage on my car is a great addition. I didn't want to wind the mileage ahead due to the previous owner putting on 5 years ~20k miles on the car without a working odometer at this time. But maybe in the future I do so (who knows).
 

Attachments

  • PXL_20210515_023957147.jpg
    PXL_20210515_023957147.jpg
    2.1 MB · Views: 25
  • PXL_20210515_002836045.jpg
    PXL_20210515_002836045.jpg
    1.6 MB · Views: 23
Thank you @emerydc8 and all who contributed to this thread, was helpful as I replaced mine today. Will have an in depth video out soon for those who may find it helpful.
 
Does anyone have a chart for accurately changing the gear ratio after say installing a different differential ratio?
Yes, these charts come with the instructions when you purchase a speedo correction box, so that you can correctly calibrate the new gear ratio with the existing speedometer. I have posted on this topic before, as I did this with my 560SEC about 15 years ago, when I switched from the stock 2.47:1 final drive ratio, to a 3.07:1 sourced from a W116 450SEL.

 
Tha
Yes, these charts come with the instructions when you purchase a speedo correction box, so that you can correctly calibrate the new gear ratio with the existing speedometer. I have posted on this topic before, as I did this with my 560SEC about 15 years ago, when I switched from the stock 2.47:1 final drive ratio, to a 3.07:1 sourced from a W116 450SEL.

Thanks Gerry!
 
Here is the calibration table, that is used with the Abbott Tach product that I have had installed in my 560SEC:

 
Does anyone have a chart for accurately changing the gear ratio after say installing a different differential ratio?
The gears are for the odometer only.

The speedometer can't be adjusted via gearing.

When changing axle/differential ratio, [for an electronic speedometer] you need an electronic converter box like YellowBox (on backorder) or Abbot & Costello ERA, which Gerry linked above. This will adjust both speedometer & odometer automatically, and works if you are not changing the speedo faceplate scale (i.e, if you change from a 160mph to 190mph faceplate, custom modifications are required - not DIY'able AFAIK).

:rugby:
 
The gears are for the odometer only.

The speedometer can't be adjusted via gearing.

When changing axle/differential ratio, you need an electronic converter box like YellowBox (on backorder) or Abbot & Costello ERA, which Gerry linked above. Th is will adjust both speedometer & odometer automatically, and works if you are not changing the speedo faceplate scale (i.e, if you change from a 160mph to 190mph faceplate, custom modifications are required - not DIY'able AFAIK).

:rugby:
Thanks for the great info and clarification as always! 🍻

My choices never seem to be easy 🤦🏼‍♂️
 
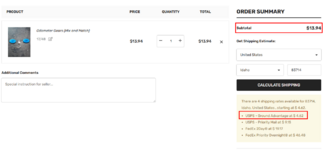
The odo died on my beater 95 E420 with 242kmi. Haven't taken it apart yet but assume it's the odo gears. Just ordered a set from Garagistic. Back in 2016 the cost was ~$18 delivered.

As of Jan-2022 the price has increased to $26 delivered for the same items (17/48 third gear).
As of Jan-2024 the price has decreased to ~$20 delivered.

New URL:

1707146115718.png
 
Last edited:
You didn’t have a set or two in your spare parts stock?

Tsk tsk.
I know, I know... but I've only had these fail once, ever, on any car over nearly 3 decades of MB ownership. I do have spare speedos in stock but didn't want to bother taking apart a used one, to likely find the used gears were the consistency of stale Oreos.

In hindsight I should have ordered 2-3 sets. OOOPS.

:doh:
 
Hello all. My odometer stopped working a while ago so today I took the odometer apart to see which gears I had to replace and the three gears made with the soft material were completely disintegrated...

My 500E is a euro 1992 model with an odometer in KM/H. I'm using the two pages recommended in the previous posts to get the new gears (garagistic and odometer gears) but I don´t know which gears to buy. Does anyone know which gears I must get?

The other two gears that are not replaceable seem different from the ones I´ve seen in this thread (see attached), is it because my car is in KM?
 

Attachments

  • WhatsApp Image 2022-07-27 at 12.44.20 AM.jpeg
    WhatsApp Image 2022-07-27 at 12.44.20 AM.jpeg
    282.4 KB · Views: 7
Hello all. My odometer stopped working a while ago so today I took the odometer apart to see which gears I had to replace and the three gears made with the soft material were completely disintegrated... My 500E is a euro 1992 model with an odometer in KM/H. I'm using the two pages recommended in the previous posts to get the new gears (garagistic and odometer gears) but I don´t know which gears to buy. Does anyone know which gears I must get?
See post #34 in this thread.


The other two gears that are not replaceable seem different from the ones I´ve seen in this thread (see attached), is it because my car is in KM?
You should not need to replace E4/E5 gears, and yes they would be different than USA/MPH speedometers.
 
Back
Top