• Hi Guest !

    Welcome to the 500Eboard forum.

    Since its founding in late 2008, 500Eboard has become the leading resource on the Internet for all things related to the Mercedes-Benz 500E and E500. In recent years, we have also expanded to include the 400E and E420 models, which are directly related to the 500E/E500.

    We invite you to browse and take advantage of the information and resources here on the site. If you find helpful information, please register for full membership, and you'll find even more resources available. Feel free to ask questions, and make liberal use of the "Search" function to find answers.

    We hope you will become an active contributor to the community!

    Sincerely,
    500Eboard Management

1993 400e rescue

Holy hell at least I have some answers!!
Been chasing my tail for weeks!

I've had to pull the trans on 3 of my MB's at this point, this would be the 4th car. I can manage.

Do you think this car can be safely driven 20 minutes to a family members garage? It is better suited for a large job like this. Otherwise I'm pulling the trans in my driveway or towing I guess. Don't want to destroy or damage the engine in any way.
 
Last edited:
Do you think this car can be safely driven 20 minutes to a family members garage? It is better suited for a large job like this. Otherwise I'm pulling the trans in my driveway or towing I guess. Don't want to destroy or damage the engine in any way.
If the car is drivable at all, it should be ok for the 20 minutes. Probably with the vacuum hose NOT connected, and go as easy on the throttle as you can. Towing would be preferred though. If you have any friends/family with an AAA membership, they can get it towed for you, for free - they just need to be present when the tow truck arrives.

Pulling the transmission on the V8 isn't fun. Pro tip: Remove the throttle linkages at the back of the intake manifold, and remove the center plastic/foam partition panels forward of the wiper mechanism. This will give you room to access the top 2 bellhousing bolts from above, instead of below. This is much easier than using a bunch of extensions & swivels to try and get them from below.

The entire exhaust may have to come out, assuming you have factory cats, be really careful separating the resonator/muffler assembly from the cat pipe - don't break off the end of the cat pipe. (Don't ask how I know.) Alternately you can lower the entire exhaust in 1 piece but ugh, that's miserable and requires the car to be 6 feet in the air on a lift.

:duck:
 
If you drive it just be careful and listen to spark knock. These are tough engines but running with over 60 degrees of advance at idle will be more as RPM’s increase. Keep your engine speeds low and use light throttle. preferably towing the car would be your best option.
 
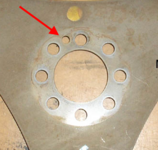
I think the answer to what happened lies here:


When I google images of m119 flywheels, some have the ring gear riveted to the flex plate, others appear to be bolted to the flex plate.
 
Oh my! I think you are right they Could have removed the ring gear from the center support. I remember when I pulled my transmission in the W126 it had this style of flywheel. It will be easy to see once you are under the car and have the cover removed to remove the torque converter bolts. Maybe once out you can look at the picture file gsxr posted and determine the clocking.
 
I found this video on YouTube of a 1992 400e. It has bolts NOT rivets.

Watching this video, I definitely think I know what happened. Ring gear and flex plate were definitely separated.

I even been wondering if I could somehow fix this without dropping the trans. Unbolt the ring gear from the toque converter while it is still installed but no way to get to the backer nut...oh well

I'm going to gather up some parts before I drop this. New flex disk, rear main etc.

I'll keep this thread updated over the coming weeks.

 
Last edited:
Big update.

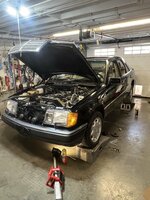
After months of screwing around with the 300e (never did figure out electrical gremlin), I finally pulled the 400e into the garage yesterday. We had a bunch of snow this week so it was a good day to stay in the garage and get to work.

Yesterday I started with a buff and wax/paint correction, cleaned interior. Paint came out excellent, I am very pleased with the results and will finish it off with a ceramic coat and some coco mats.
IMG_9860.jpeg
IMG_9861.jpegIMG_9862.jpegIMG_9863.jpegIMG_9864.jpeg
 
Last edited:
On to the transmission. Put the car up on ramps and got it pulled out with my harbor freight jack. I am very sore.

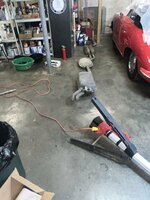
Exhaust was a real bitch to remove without a lift but it can be done in one piece.

IMG_9855.jpegIMG_9858.jpegIMG_9854.jpegIMG_9888.jpegIMG_9887.jpegIMG_9889.jpeg


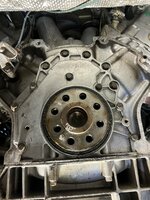
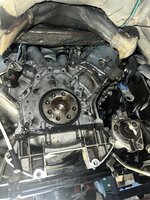
DO YOU SEE THE ISSUE? HYPOTHESIS CONFIRMED!!!!

My 1993 came with bolts, not rivets holding the ring gear.

When the previous owner installed the rebuilt transmission, they installed the ring gear clocked incorrectly causing the wrong ignition timing. Car would still (barely) start but was running at 70 degrees BTDC.


BIG RELIEF, we now know what is wrong


Screenshot 2024-01-20 at 10.51.25 PM.jpg
 
Last edited:
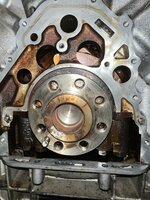
May as well do the rear main seal while I am in here..

IMG_9925.jpegIMG_9926.jpeg


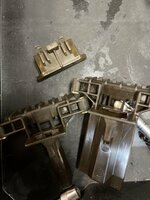
Also I removed the old cracked radiator, new radiator to be installed tomorrow. This plastic shroud is a piece of crap, had to melt out the rivets and install bolts and washers. Backer nuts were spinning in the plastic.


IMG_9865.jpeg
IMG_9869.jpegIMG_9868 2.jpegIMG_9874.jpeg


Also I removed the valve covers and installed new timing chain upper guides and valve cover gaskets. Also worked on spark plug routing

IMG_9929.jpeg
IMG_9928.jpegIMG_9930.jpegIMG_9931.jpegIMG_9932.jpegIMG_9933.jpeg


Also worked on getting my plastic covers reinstalled. I've put in about about 15 hours so far.

New tires will be here monday, hope to be on the road in a few more days.

I'll keep this thread updated with the final results but so far things are looking good.
 
Last edited:
May as well do the rear main seal while I am in here..
Good idea. What brand seal will you use, and what sealant for the rear cover?


Also I removed the old cracked radiator, new radiator to be installed tomorrow. This plastic shroud is a piece of crap, had to melt out the rivets and install bolts and washers. Backer nuts were spinning in the plastic.
Pro tip: Before reinstalling, glue/weld the nuts back into the plastic, then tap them so the threads are clean enough for the bolt to spin easily with your fingers. Then apply anti-seize when installing the bolts, and they should always come out easily in the future. This problem begins when the bolts corrode and seize in the nuts...


Also I removed the valve covers and installed new timing chain upper guides and valve cover gaskets. Also worked on spark plug routing
Plug wire routing will be a challenge if the wires are not OE and/or are not exactly the correct lengths...


I'll keep this thread updated with the final results but so far things are looking good.
Looks great so far!
 
Good idea. What brand seal will you use, and what sealant for the rear cover?


Pro tip: Before reinstalling, glue/weld the nuts back into the plastic, then tap them so the threads are clean enough for the bolt to spin easily with your fingers. Then apply anti-seize when installing the bolts, and they should always come out easily in the future. This problem begins when the bolts corrode and seize in the nuts...


Plug wire routing will be a challenge if the wires are not OE and/or are not exactly the correct lengths...


Looks great so far!
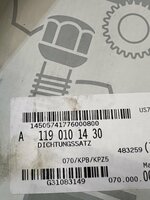
I used a genuine MB rear main seal with genuine sealant. I wish I had Hylomar on hand but this MB sealant should do. I used a very very thin coat so as not to squish out everywhere.


IMG_9936.jpegIMG_9935.jpeg
 
Cool - that is the Loctite 5900 equivalent stuff, it is a correct alternative to the anaerobic sealant specified in the FSM. You would NOT use Hylomar for this application. Actually, there's almost zero use for Hylomar on the M119, except for the ETA gasket.

Make sure the crank seal is perfectly level/flat in the housing or it can leak (don't ask how I know). Also clean the crankshaft threads of all oil residue. New crank/flywheel bolts with pre-applied / microencapsulated sealant are recommended. You'll need to get creative to lock the flywheel enough to torque the bolts to spec + 90°.

:banana1:
 
I’m thinking I will buy a new pan gasket and cut the very rear section off and install it
YES. This is what I would do: ^^^

Use the same OE Black sealant at the junction of old/new gasket. I'd probably apply a thin coat to each side of the gasket also. And then when everything is installed and sealant has set, maybe apply a thin external bead as well. You do not want to pull the transmission again if it leaks...

:wormhole:
 
I don’t think my OCD would allow me to live with that. I know it’s a pain and will probably work but I would drop the pan while the trans is out and replace the gasket. However I would never be critical if you chose otherwise. It is after all a daily driver.
 
It's extremely difficult - if not impossible - to replace the upper pan gasket without pulling the engine out of the car. So, in this scenario, I understand the Band-Aid approach. And if the engine comes out, scope creep can put a big dent in the ol' wallet...


200.gif
 
I would also pull the pan and do the whole gasket, especially since you're already in as far as you are. That's just me though. I'm dumb. I'm confident that you could reseal just that back edge and have it last many years without an issue. Do it the way Dave suggested. It'll work.
 
I have replaced the whole gasket on my M117 (450sl) but the m119 looks much, much more difficult.

The alternator and ac compressor are way down low on the engine, cant reach any of the pan bots without total removal. Also the crank pulley looks like it would have to come off to reach bolts in the front.

That means removing the fan, belts, everything. At that point I may as well just pull the whole engine out with my hoist.

If i ever have to pull this engine out, you better believe I will replace it with a 5.0L. No question about that. I will still probably swap it eventually..
 
If i ever have to pull this engine out, you better believe I will replace it with a 5.0L. No question about that. I will still probably swap it eventually..
Yup... get a 5.0L on an engine stand and do a full refresh/reseal, then it's a (relatively) simple swap over a couple of weekends. Just avoid 140 chassis donors, the oil pan & manifolds are different.
 
I cut in the new gasket and got it sealed back up. I used permatex ultra black on the oil pan gasket and the genuine MB sealant stuff between the flange. For some reason the MB brand sealer doesn’t seem to harden? Maybe it is moisture cured or anerobic? Hard to find info on what it actually Is. I left it overnight and it was still tacky.

The permatex set up nice and firm within an hour. I feel very confident it will not leak.

Got the trans and starter reinstalled and bolted back in.

The lazy previous owner didn’t install the two upper bolts on the trans.. they are missing. So I need to try and source a replacement for those 2.

Last hard part is the exhaust…
 
Genuine MB sealant usually sets up fast when fresh. Is there a date code on the tube? Depending how old it is, it may take days or weeks to cure. Don't start the engine until it's cured enough to not feel tacky or really soft. It will be fine if you let it cure long enough. I had the same problem, btw... with a many-years-old tube of MB sealant.

Install the top 2 bolts from above, not from below. Remove the throttle linkage bracket at the rear of the intake manifold for better access. WAY easier than messing with feet-long extensions and U-joints from below.

:banana1:
 
Genuine MB sealant usually sets up fast when fresh. Is there a date code on the tube? Depending how old it is, it may take days or weeks to cure. Don't start the engine until it's cured enough to not feel tacky or really soft. It will be fine if you let it cure long enough. I had the same problem, btw... with a many-years-old tube of MB sealant.
Shit, yes the tube is a year or two old, previously opened. It didn’t seem hard at all after a days. Plan to fire it up probably by this weekend. Oh well too late at this point. Hope of doesn’t leak.
 
Pulling those bolts looks fairly reasonable. I'll try to get those out later this afternoon after work.
Thank you for the offer, I’ve got an om617 w123 parts engine I may be able to pull some bolts from. Probably the same? Ill check tonight but I really appreciate it.
 
Does the rear main seal plate get subjected to full engine oil pressure or is it just oil “splashing” against it ?
 
I guess I have to rescind my offer of bolts. I just went out and removed the throttle linkage and reached back to find... my parts car is also missing those two bolts.

Apparently the same guy worked on this car at some point.

It's possible that some of the other bolts are the same. If so, and if you want me to fetch them let me know.
 
Sitting at work today I mulled over this non hardening sealant issue. The date code on my tube of MB sealant is 2020 and it has been open for at least a year.
Also read some other things online about it expiring.

When I got home I stuck my finger in some of the sealant on my work bench and it has not hardened not one little bit. In 24 hours zero hardening.

Im going to have to drop this trans again and use a different sealant, the thought of having to do the job totally over again because of failed sealant is sickening.

Fuck this MB brand sealant. What a crock of shit, I’ve never heard in my life of sealant expiring like this.

I will use permatex from now on.
 
So for the good news,

I got the car totally put back together. Exhaust was brutal from floor jacks. Also I had a motor mount bolt snap off, had to drill and tap it out. Very painful, I suggest buying new bolts every time you remove them. I also had this happen on my w123 some time ago and ended up having to replace the entire engine arm on that car.

Good news is the 400e runs flawlessly. Engine now starts, runs, and idles perfectly, like new.

I installed my brand new genuine radiator that I bought from the dealer a few months ago and it has a major leak at the side tank seal!

Factory defective.


IMG_9960.jpeg

This is the same radiator if I recall that a member of this board bought out and hoarded all the remaining stock globally. Happened after I bought mine and posted in a different thread about it being available…I won’t make that mistake again.

So I will call the dealer tomorrow and tell them I need a refund. Since it is now NLA I guess they will just give me my money back.

I found one last genuine radiator on eBay, $200 markup over dealer price. I bought it before posting this message to prevent another hoarding frenzy.

Hopefully I can go for my maiden voyage next week.
 
Last edited:
Good to hear it's all sorted out! Did you break a lower (smaller) engine mount bolt, or the upper (larger) bolt? First I've heard of one breaking.

That's a bummer about the DOA new radiator. Just as an FYI, Reseda Radiator should be able to repair that by replacing the tank seal. At a minimum, don't return it until you receive the replacement from eBay, just in case. BTW, I can't find the radiator you bought on eBay - got a link?

:watermelon:
 
I called mboemparts.com to discuss the bad radiator they sent. They were totally unwilling to help me. Said that I need to go to my local dealer to deal with all returns or warranty issues with my order.

What in the fuck? I will never buy from that website again.
 
I called mboemparts.com to discuss the bad radiator they sent. They were totally unwilling to help me. Said that I need to go to my local dealer to deal with all returns or warranty issues with my order.
Whaaa...? That is odd. @nocfn , have you ever had to deal with a Naperville warranty/return?

:confused:
 
called again and demanded a manager. I have to send rad back and they will issue refund. There are no more radiators worldwide
That's better. I'd still not return the radiator until you receive the new eBay replacement. If the eBay unit is lost/damaged/incorrect, I'd get the new MB unit repaired. The tanks come off and the seal can be replaced. It's fixable. After you send it back, they'll scrap it.

:mushroom:
 
Alright so I JB welded my old radiator. Seems to be holding for now. Adjusted the Bowden cable. Been driving around all day. I really like this car a lot, pulls like a freight train. Put on some new tires, very quiet.

Now I get to figure out what else needs attention.


Oil light: oil light is on but oil level is good, oil is clean. I’m getting good oil pressure at the instrument cluster gauge. Does the same sensor control both the idiot light and the pressure needle? Pressure needle shows good/normal oil pressure. Bad sensor somewhere?


Coolant light: same issue, coolant is full, car running at correct temp, but idiot light is on. Bad Sensor ? It is plugged in
 
Assuming you mean the oil level light, you'll have to trace the harness to the starter / alternator, which also has the wiring for the oil pressure and oil level sensors. If that harness is original (which is likely), the insulation will be coming off... if it's shorting out, that could be the cause of the light. Inspecting / replacing the sensor requires dropping the lower oil pan. The O-ring for the connector at the block is a common leak, but if you drop the pan, a new sensor (which comes with new O-ring) is only like $60 total...

Coolant light: Good possibility of a dead sensor. Check it with an ohm meter. I forget if it should be open or closed when full of coolant. New OE/OEM sensor only, if it needs replacement. I don't think this is likely to be a wiring issue, but check the wires for grins.
 

Who has viewed this thread (Total: 2) View details

Back
Top