This is an extremely informative "HOW TO" for performing DIY headlight wiper / washer circuitry testing on the W124. Just be cognizant to use E500E-specific wiring diagrams in performing these procedures.

Headlight Wiper / Washer System Diagnostics and Repair
Jon B Kanas
MBCA Mile-Hi Section
September 13, 1998
If you have a 6yr old son, and he thinks your car is neat, he will request that you show off some of the unique features (like the headlight washer / wiper system) at every opportunity. If you are unable to comply for technical reasons, you may be chastised. So that you will not have to endure this public humiliation, I humbly offer the following:
This procedure is to assist in the diagnostic and repair of the headlamp wiper/washer system as installed on a 1988 Mercedes-Benz 300TE. I believe that it is directly applicable to 124 series Mercedes cars, and probably many others similarly equipped. For descriptive purposes, left refers to the driver's side, front means the end of the car where the headlights are!! I had the factory body manual (Vol 2) and the electrical troubleshooting manual open to the appropriate diagrams throughout this process. The diagrams of the headlight washer / wiper system are different approaches to the two systems, and the two together are a wonderful reference tool.
Special thanks to George Murphy of MBCA for his assistance in pointing me in the right direction when I was first starting on this adventure.
SYMPTOMS:
- Headlight washer / wiper system does not work at all. (Do the whole procedure)
- One headlight wiper doesn't work (Fix only the offending motor)
- Headlight wiper move slowly (Fix only the offending motor(s))
- Fuse # 3 blows immediately (Do the whole procedure)
- Fuse # 3 blows after headlight wiper operation cycle starts (Bad Diode)
- Headlight washer / wiper system wipe / wash timing is off (Problem in Right side motor)
- Headlight washer / wiper system won't turn off (Fix only the offending motor(s))
TOOLS:
8mm Socket, ratchet and extension.
Many extra 8amp (white) fuses.
Stubby Phillips screwdriver.
Volt-Ohmmeter (VOM)
12V Power Supply (like a car battery)
4 jumper wires, 1 foot long, alligator clip on each end, different colors
WD-40 cleaner / lubricant
Small wire brush (toothbrush size)
Fundamentals of Operation:
When you press on the windshield wipe / wash stalk on the steering column, you send 12V+ to the headlight washer / wiper system relay. The relay closes connecting fuse # 3, which is live when the right side parking / tail lights are on, to the headlight wiper motors. The wiper motors start. When the motor begins to move, a set of gears in each motor triggers a set of contacts which supplies the motors with power from the ignition switch. This allows the headlight wiper motors to complete their operation cycle after you have released the stalk. The right side headlight wiper motor contains a second set of contacts which supplies power to the washer pump squirting liquid onto the headlights at specific points in the operating cycle. A cycle consists of two complete wiper strokes, and four (I think) squirts.
System Test Procedure:
(I'm 5'3"; If you're taller, you probably want to tilt your hood to 90 degrees before you begin this.) Remove Fusebox cover, verify that there is a good fuse in # 3. Turn parking lights ON. Turn ignition ON. While watching the fuse, reach through the driver's window and press washer stalk. Both the windshield wiper and the headlight washer / wiper system should operate. You may have to run (fast) to the front of the car to see what's happening to the headlights. Turn lights and ignition off as soon as the test cycle is complete.
Blown Fuses:
Find and unplug the wiring pigtail on both of the headlight wiper motors, and the headlight washer pump. The headlight washer pump is on the left (driver's side) of the washer tank. The pump can be unintentionally (and easily) pulled out of the washer tank, resulting in the contents of the tank going onto the garage floor; hold the pump with one hand and pull the connector free with the other.
Perform the System Test. If the fuse does not blow, one of the components you have disconnected is the problem. Reconnect the right headlight wiper motor. Perform the system test. If the fuse blows, you need to repair or replace the right headlight wiper motor. Re-connect the washer pump. Perform the test. The washer pump is actuated by a set of contacts in the right headlight wiper motor, and will not operate unless both the motor and pump are connected. If the fuse blows, the problem is in the washer motor, or in the wire between the right motor and the washer motor. If the fuse doesn't blow, disconnect the right motor and connect the left motor. Now does the fuse blow? If it blows you need to repair or replace the left motor.
If the fuse blows immediately, you have a Relay / Harness problem. If the headlight washer / wiper system works for a short period of time, then blows the fuse you probably have "slow motor syndrome" or a diode failure. See if you can determine which motor has the problem by performing individual system tests with only one motor connected. If you have a motor which tests properly on the bench, but blows the # 3 fuse when it�s in the car, it has a diode failure.
Relay / Harness Problem:
Remove the cover to the relay panel, immediately behind the fusebox. It is held in place with 6 phillips head screws, two of which are inside the fusebox. You will have now exposed a row of identical rectangular silver cans in a line parallel to the car's direction of travel. The one closest to the front of the car is the one you are interested in. Remove it from the fuse panel by pulling straight up on the relay.
Understanding the Relay:
A relay is an electric switch. Stamped on the side of the relay there is a descriptive diagram showing how the relay works. Look at this diagram while you read; Contact # 85 is connected to ground. Contact # 86 is connected to the circuit that becomes active when you push the wiper stalk. When power is applied to #86, the relay closes, creating a connection between contact #30 (hot from fuse # 3) and contact # 87 which connects to the headlight wiper motors. You need to know which pin is which to perform the Relay Test and the Harness Test.
Relay Test:
Set your VOM to measure ohms. Touch the test leads of the meter to each other and verify that the meter is showing continuity properly. Connect one test lead to contact #30 and the other to contact #87. Your meter should read no continuity. If the meter reads as if there is some type of connection between #30 and #87, the relay is stuck closed (unlikely) and must be replaced.
Use a jumper wire to connect contact # 86 to 12V+. Connect another jumper wire to 12V-. Touch this to contact # 85. The relay should click audibly, and the VOM should show that # 30 and #87 are connected whenever you touch contact # 85 with your jumper. If the relay does not click, it's coil is deceased and the relay must be replaced. If the relay clicks, but the VOM does not indicate that a connection is established, the contact inside the relay are not working, and the relay must be replaced.
Harness Test:
Get a piece of paper and draw a picture of the relay socket (The relay can only plug into the socket in one orientation). Looking at the relay, number each one of the socket holes with it's appropriate contact number. Set your VOM to measure ohms. Connect the black test lead to the negative pole of the car battery. Touch the red test lead to something metal on the chassis of the car to verify that the meter is showing continuity properly. When you are testing the socket side, remember that the edges of the holes are where the electrical contacts are, not the bottoms!
Continuity test #1: Touch the red test lead to the socket contact # 85, it should show connected (continuity). If this fails, the relay is not getting ground (-), and will not operate.
Continuity test #2: Touch the red test lead to the socket contact # 87; it should show no connection. If this fails, there is a short to ground in the wiring harness between the relay and the headlight wiper motor(s).
Reset your meter to read DC voltage, in a range appropriate to show 12 volts for the following tests:
Voltage test #1: Make sure there is a good fuse in #3. Turn on parking lights. Touch the red test lead to the socket contact # 30, it should show 12V+. Turn off lights. If this fails, the relay is not receiving any power to send to the headlight motors.
Voltage test #2: Turn on ignition. Touch the red test lead to the socket contact # 86. Press the wiper stalk. While the stalk is being pressed, you should see 12V+ on # 86. If this fails, the relay is not receiving voltage when the wiper stalk is depressed.
Removing and Replacing the headlight wiper motor:
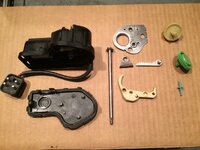
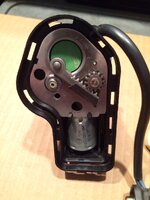
The procedure for removing the motor is simple, and is the same for left and right sides. Pull the wiper arm forward, and remove it by loosening the 8mm nut. Carefully pull the washer hose free from the trim panel, not the wiper arm. Remove the large plastic "nut" on top of the front cross-member, above the headlight, by turning it 90 degrees then pull upward. Remove the front turn signal assembly by squeezing the plastic tabs on the back of the assembly, and pushing the assembly forward. Unplug the wiring harness from the light, and mark it with masking tape. Remove the three 8mm sheet metal screws that you have exposed. Remove the two 8mm sheet metal screws that are on the radiator side of the headlight assembly. One screws into the headlight, one screws into the trim plate through which the headlight wiper motor shaft passes. Keep track of which screw goes where... they are different!! Pull the entire light / wiper assembly forward. There will be one electrical plug in the upper corner that you will unplug, the headlight wiper motor cable pigtail to unplug, and the washer hose to carefully pull free as you remove the unit. Mark the electrical connections with masking tape so you know what goes where when you put it back together. Remove the wiper motor from the headlight assembly by loosening the 17mm nut. Note the order of the 17mm nut, washer and rubber shaft seal. Note that this rubber seal is very important and replacement motors do not come with them. If it is hard and brittle, buy a new one. This is the # 1 place where water gets into the motor and transmission causing problems.
Note: Mercedes dealers sell all of the headlight assembly mounting hardware (screws, clip-on receptacles for screws, big black nut thing) as a kit. (for a 124 it's part #124.826.01.00) for about $6.00. It�s a nice kit. If you have an oops, find anything missing or otherwise fouled up, buy a kit and replace the hardware.
Cycling / testing the Motor:
In order to test the entire operating cycle of the motor, and get it to park properly, you must follow these instructions exactly. Using a small, flathead screwdriver, pry the top off of the square connector. Write down which colored wire is in which hole so you can get them back into the correct locations if they try to escape. Using one jumper, connect the brown wire to -12V. Connect the black wire to +12V. With another jumper, momentarily connect the red wire to +12V. As soon as the motor starts, disconnect the red jumper. If everything is working right, the motor will continue to run through two wiper "strokes", then park. On the right motor, the blue wire provides +12V to the washer motor at different times during the run cycle. You can check this operation by connecting a test light between the blue and brown wires. Note: If you have a motor which tests properly on the bench, but blows the # 3 fuse when it's in the car, it has a bad diode.
Repairing the headlight wiper motor and transmission:
Before you embark on this, remember that the motor and transmission assembly (as of September 1998) is about $65.00. Pulling the motor apart is an interesting exercise, the implementation of the timing of the contacts and cycles is neat, and you can probably fix it if it is stuck, or running very slowly. This is time consuming though, don't rush it! If your objective is to get the thing working quickly, just replace the motor with a new one. Internal parts for the motors and transmission are not available, so if you discover something bad, you get to buy a new motor. This is not an item I would buy used unless you're absolutely certain that the replacement works perfectly. Do NOT disassemble both motors at once, as many the parts are unique to left and right sides; you don't want to mix them up.
Using a small, flathead screwdriver, pry the top off of the square connector. Write down which colored wire is in which hole so you can get them back into the correct locations if they try to escape. On the right side motor there will be four wires: red, blue, brown and black. On the left side motor there are three wires: red, brown and black.
Put the motor in a vice, shaft pointing downward. With a small screwdriver, press each of the clips holding the cover onto the motor assembly, and work the cover off of the motor. I broke a couple of the clips during this process; you will too. Don't worry about it.
With the cover off, the first things you will see are a small metal gear that is attached to the top of the wiper shaft connected to a toothed slide. Note the relative position of this gear and the metal slide. Draw a picture of what you see. If you reassemble the slide and gear in the wrong position, the wiper will run backwards when you re-install it (care to guess how I know this??)! The other end of the metal slide contains a pin which rests in a hole on the colored drive gear. On my car, it was yellow on the right and green on the left. This works like the drive rods on a steam locomotive; it changes rotational motion to reciprocating motion.
Do the next part someplace relatively clean, where small parts cannot run away and hide. Remove the motor from the vice, and press the wiper shaft towards the motor. Try to get the shaft and slide to come out first, without the metal plate. If the plate containing the colored gear begins to come out, watch for a small light blue gear that may try to escape. The slide mechanism will disengage from the colored drive gear, and come off with the shaft. Clean and lubricate the wiper shaft and slide mechanism. The slide mechanism should move very freely.
Next is the plate with the colored drive gear. The interface between the metal plate and the colored gear was the problem with my one slow, and one seized headlight wiper motors. The plate has a raised lip which fits into a groove cut into the colored gear. The gear should turn against the plate. It does not turn freely, but it should turn with a little effort. On BOTH of my motors, the metal plate had rust pits which had, over time, bound the gear tight against the plate. Carefully pry the colored gear away from the plate. Clean and lubricate the raised ring on the plate where the gear rides, and the groove on the gear. I found that mounting the gear in a power drill, then mounting the drill in my vice, made it possible to sand out the groove in the gear fairly easily, resolving the binding problems.
Look inside the body of the headlight wiper motor for a small light blue gear. As the large colored gear turns, nibs on it's backside contact this small blue gear, turning it about � turn. It has ridges on it which open and close a set of contacts which run the motor through it's cycle after it has been triggered by the relay. On the right side motor, there is a second set of contacts which send power to the washer pump to trigger the washing action. Turn this gear by hand and watch to see that the contacts are opening and closing. If this mechanism is dirty or broken this will cause timing problems and may cause your headlight wiper to not turn off once it starts. Clean and lubricate as required. Specific contacts can be tested using the VOM.
Still in the body, you will find an ivory gear, and the electric motor with a worm gear pressed onto it's shaft. Above the motor you will see where power comes from the contacts to the motor. You will also see a small wafer, about 12mm square, and 3mm thick between the contacts directly above the motor. This is a thermal breaker. If the motor jams, this thing interrupts the flow of current to keep the motor from getting fried. Test the motor by applying +12v to the red wire and -12V to the brown wire at the main connector. If the motor doesn't run, pull out the thermal breaker with a pair of needle nose pliers, and jam a piece of wire between the contacts where the thermal breaker was and test the motor again. If it still doesn't work, it's time to head for the dealer. You can check the thermal breaker for continuity with the VOM. If there is no continuity, it's fried. A similar part should be available from an electronics supply house.
After everything is cleaned and freshly lubricated, reassemble the transmission. I found it easiest to put the ivory gear and the light blue gear into the transmission body first. Then attach the colored gear to the metal plate, and carefully position the metal plate onto the body. Note that the top of the light blue gear is held in place by a small hole in the plate. Once you have this much assembled, you need to run the motor through one full cycle to align the gears and switches and get it into the park position. It is important that you follow the "Cycling / testing the Motor" procedure exactly. Note that the motor will attempt to push the plate out of the transmission body when it runs, so you will have to hold it in place by hand while you run the test. Once the motor has stopped at the end of the cycle, install the shaft and slider, making sure that you have the relative position of the slider and the shaft gear correct. Reinstall the cover. I put a long wire-tie around it since I broke a couple of the snap clips when I took it apart.
Re-attach the headlight wiper motor to the headlight assembly, making certain to reinstall the rubber cap on the shaft. Attach the wiper arm to the shaft. Run the "Cycling / testing the Motor" procedure, and make sure that the wiper goes the right way. If it goes backwards, take the cover off of the motor, and put the shaft gear at the other end of the slider.
Once this final test is successful, put the whole assembly back in the car, and relax with a tasty beverage. You can now demonstrate, to your 6yr old's complete satisfaction, that all is well.
About Diodes:
There is a diode in each headlight wiper motor which prevents -12V from coming up the # 30 circuit when the motor is not in the park position. If this diode fails closed, circuit # 30 will see ground, which will blow fuse # 3 when the headlight washer / wiper system cycle is part way through it's run. The diode is buried under a glob of silicone where the wiring pigtail enters the headlight wiper motor. Using the wiring diagram on page 162 of the electrical troubleshooting manual for the series 124 cars, it is clear where in the circuit the diode is placed, and what it does. The problem is that you can't solder a new diode in the right place electronically. You can test the diode by running the motor momentarily, then stopping it in a "non-parked" position, then checking between the red and the brown wires with the VOM at the connector. If current flows both ways, the diode is shorted.
Headlight Wiper / Washer System Diagnostics and Repair
Jon B Kanas
MBCA Mile-Hi Section
September 13, 1998
If you have a 6yr old son, and he thinks your car is neat, he will request that you show off some of the unique features (like the headlight washer / wiper system) at every opportunity. If you are unable to comply for technical reasons, you may be chastised. So that you will not have to endure this public humiliation, I humbly offer the following:
This procedure is to assist in the diagnostic and repair of the headlamp wiper/washer system as installed on a 1988 Mercedes-Benz 300TE. I believe that it is directly applicable to 124 series Mercedes cars, and probably many others similarly equipped. For descriptive purposes, left refers to the driver's side, front means the end of the car where the headlights are!! I had the factory body manual (Vol 2) and the electrical troubleshooting manual open to the appropriate diagrams throughout this process. The diagrams of the headlight washer / wiper system are different approaches to the two systems, and the two together are a wonderful reference tool.
Special thanks to George Murphy of MBCA for his assistance in pointing me in the right direction when I was first starting on this adventure.
SYMPTOMS:
- Headlight washer / wiper system does not work at all. (Do the whole procedure)
- One headlight wiper doesn't work (Fix only the offending motor)
- Headlight wiper move slowly (Fix only the offending motor(s))
- Fuse # 3 blows immediately (Do the whole procedure)
- Fuse # 3 blows after headlight wiper operation cycle starts (Bad Diode)
- Headlight washer / wiper system wipe / wash timing is off (Problem in Right side motor)
- Headlight washer / wiper system won't turn off (Fix only the offending motor(s))
TOOLS:
8mm Socket, ratchet and extension.
Many extra 8amp (white) fuses.
Stubby Phillips screwdriver.
Volt-Ohmmeter (VOM)
12V Power Supply (like a car battery)
4 jumper wires, 1 foot long, alligator clip on each end, different colors
WD-40 cleaner / lubricant
Small wire brush (toothbrush size)
Fundamentals of Operation:
When you press on the windshield wipe / wash stalk on the steering column, you send 12V+ to the headlight washer / wiper system relay. The relay closes connecting fuse # 3, which is live when the right side parking / tail lights are on, to the headlight wiper motors. The wiper motors start. When the motor begins to move, a set of gears in each motor triggers a set of contacts which supplies the motors with power from the ignition switch. This allows the headlight wiper motors to complete their operation cycle after you have released the stalk. The right side headlight wiper motor contains a second set of contacts which supplies power to the washer pump squirting liquid onto the headlights at specific points in the operating cycle. A cycle consists of two complete wiper strokes, and four (I think) squirts.
System Test Procedure:
(I'm 5'3"; If you're taller, you probably want to tilt your hood to 90 degrees before you begin this.) Remove Fusebox cover, verify that there is a good fuse in # 3. Turn parking lights ON. Turn ignition ON. While watching the fuse, reach through the driver's window and press washer stalk. Both the windshield wiper and the headlight washer / wiper system should operate. You may have to run (fast) to the front of the car to see what's happening to the headlights. Turn lights and ignition off as soon as the test cycle is complete.
Blown Fuses:
Find and unplug the wiring pigtail on both of the headlight wiper motors, and the headlight washer pump. The headlight washer pump is on the left (driver's side) of the washer tank. The pump can be unintentionally (and easily) pulled out of the washer tank, resulting in the contents of the tank going onto the garage floor; hold the pump with one hand and pull the connector free with the other.
Perform the System Test. If the fuse does not blow, one of the components you have disconnected is the problem. Reconnect the right headlight wiper motor. Perform the system test. If the fuse blows, you need to repair or replace the right headlight wiper motor. Re-connect the washer pump. Perform the test. The washer pump is actuated by a set of contacts in the right headlight wiper motor, and will not operate unless both the motor and pump are connected. If the fuse blows, the problem is in the washer motor, or in the wire between the right motor and the washer motor. If the fuse doesn't blow, disconnect the right motor and connect the left motor. Now does the fuse blow? If it blows you need to repair or replace the left motor.
If the fuse blows immediately, you have a Relay / Harness problem. If the headlight washer / wiper system works for a short period of time, then blows the fuse you probably have "slow motor syndrome" or a diode failure. See if you can determine which motor has the problem by performing individual system tests with only one motor connected. If you have a motor which tests properly on the bench, but blows the # 3 fuse when it�s in the car, it has a diode failure.
Relay / Harness Problem:
Remove the cover to the relay panel, immediately behind the fusebox. It is held in place with 6 phillips head screws, two of which are inside the fusebox. You will have now exposed a row of identical rectangular silver cans in a line parallel to the car's direction of travel. The one closest to the front of the car is the one you are interested in. Remove it from the fuse panel by pulling straight up on the relay.
Understanding the Relay:
A relay is an electric switch. Stamped on the side of the relay there is a descriptive diagram showing how the relay works. Look at this diagram while you read; Contact # 85 is connected to ground. Contact # 86 is connected to the circuit that becomes active when you push the wiper stalk. When power is applied to #86, the relay closes, creating a connection between contact #30 (hot from fuse # 3) and contact # 87 which connects to the headlight wiper motors. You need to know which pin is which to perform the Relay Test and the Harness Test.
Relay Test:
Set your VOM to measure ohms. Touch the test leads of the meter to each other and verify that the meter is showing continuity properly. Connect one test lead to contact #30 and the other to contact #87. Your meter should read no continuity. If the meter reads as if there is some type of connection between #30 and #87, the relay is stuck closed (unlikely) and must be replaced.
Use a jumper wire to connect contact # 86 to 12V+. Connect another jumper wire to 12V-. Touch this to contact # 85. The relay should click audibly, and the VOM should show that # 30 and #87 are connected whenever you touch contact # 85 with your jumper. If the relay does not click, it's coil is deceased and the relay must be replaced. If the relay clicks, but the VOM does not indicate that a connection is established, the contact inside the relay are not working, and the relay must be replaced.
Harness Test:
Get a piece of paper and draw a picture of the relay socket (The relay can only plug into the socket in one orientation). Looking at the relay, number each one of the socket holes with it's appropriate contact number. Set your VOM to measure ohms. Connect the black test lead to the negative pole of the car battery. Touch the red test lead to something metal on the chassis of the car to verify that the meter is showing continuity properly. When you are testing the socket side, remember that the edges of the holes are where the electrical contacts are, not the bottoms!
Continuity test #1: Touch the red test lead to the socket contact # 85, it should show connected (continuity). If this fails, the relay is not getting ground (-), and will not operate.
Continuity test #2: Touch the red test lead to the socket contact # 87; it should show no connection. If this fails, there is a short to ground in the wiring harness between the relay and the headlight wiper motor(s).
Reset your meter to read DC voltage, in a range appropriate to show 12 volts for the following tests:
Voltage test #1: Make sure there is a good fuse in #3. Turn on parking lights. Touch the red test lead to the socket contact # 30, it should show 12V+. Turn off lights. If this fails, the relay is not receiving any power to send to the headlight motors.
Voltage test #2: Turn on ignition. Touch the red test lead to the socket contact # 86. Press the wiper stalk. While the stalk is being pressed, you should see 12V+ on # 86. If this fails, the relay is not receiving voltage when the wiper stalk is depressed.
Removing and Replacing the headlight wiper motor:
The procedure for removing the motor is simple, and is the same for left and right sides. Pull the wiper arm forward, and remove it by loosening the 8mm nut. Carefully pull the washer hose free from the trim panel, not the wiper arm. Remove the large plastic "nut" on top of the front cross-member, above the headlight, by turning it 90 degrees then pull upward. Remove the front turn signal assembly by squeezing the plastic tabs on the back of the assembly, and pushing the assembly forward. Unplug the wiring harness from the light, and mark it with masking tape. Remove the three 8mm sheet metal screws that you have exposed. Remove the two 8mm sheet metal screws that are on the radiator side of the headlight assembly. One screws into the headlight, one screws into the trim plate through which the headlight wiper motor shaft passes. Keep track of which screw goes where... they are different!! Pull the entire light / wiper assembly forward. There will be one electrical plug in the upper corner that you will unplug, the headlight wiper motor cable pigtail to unplug, and the washer hose to carefully pull free as you remove the unit. Mark the electrical connections with masking tape so you know what goes where when you put it back together. Remove the wiper motor from the headlight assembly by loosening the 17mm nut. Note the order of the 17mm nut, washer and rubber shaft seal. Note that this rubber seal is very important and replacement motors do not come with them. If it is hard and brittle, buy a new one. This is the # 1 place where water gets into the motor and transmission causing problems.
Note: Mercedes dealers sell all of the headlight assembly mounting hardware (screws, clip-on receptacles for screws, big black nut thing) as a kit. (for a 124 it's part #124.826.01.00) for about $6.00. It�s a nice kit. If you have an oops, find anything missing or otherwise fouled up, buy a kit and replace the hardware.
Cycling / testing the Motor:
In order to test the entire operating cycle of the motor, and get it to park properly, you must follow these instructions exactly. Using a small, flathead screwdriver, pry the top off of the square connector. Write down which colored wire is in which hole so you can get them back into the correct locations if they try to escape. Using one jumper, connect the brown wire to -12V. Connect the black wire to +12V. With another jumper, momentarily connect the red wire to +12V. As soon as the motor starts, disconnect the red jumper. If everything is working right, the motor will continue to run through two wiper "strokes", then park. On the right motor, the blue wire provides +12V to the washer motor at different times during the run cycle. You can check this operation by connecting a test light between the blue and brown wires. Note: If you have a motor which tests properly on the bench, but blows the # 3 fuse when it's in the car, it has a bad diode.
Repairing the headlight wiper motor and transmission:
Before you embark on this, remember that the motor and transmission assembly (as of September 1998) is about $65.00. Pulling the motor apart is an interesting exercise, the implementation of the timing of the contacts and cycles is neat, and you can probably fix it if it is stuck, or running very slowly. This is time consuming though, don't rush it! If your objective is to get the thing working quickly, just replace the motor with a new one. Internal parts for the motors and transmission are not available, so if you discover something bad, you get to buy a new motor. This is not an item I would buy used unless you're absolutely certain that the replacement works perfectly. Do NOT disassemble both motors at once, as many the parts are unique to left and right sides; you don't want to mix them up.
Using a small, flathead screwdriver, pry the top off of the square connector. Write down which colored wire is in which hole so you can get them back into the correct locations if they try to escape. On the right side motor there will be four wires: red, blue, brown and black. On the left side motor there are three wires: red, brown and black.
Put the motor in a vice, shaft pointing downward. With a small screwdriver, press each of the clips holding the cover onto the motor assembly, and work the cover off of the motor. I broke a couple of the clips during this process; you will too. Don't worry about it.
With the cover off, the first things you will see are a small metal gear that is attached to the top of the wiper shaft connected to a toothed slide. Note the relative position of this gear and the metal slide. Draw a picture of what you see. If you reassemble the slide and gear in the wrong position, the wiper will run backwards when you re-install it (care to guess how I know this??)! The other end of the metal slide contains a pin which rests in a hole on the colored drive gear. On my car, it was yellow on the right and green on the left. This works like the drive rods on a steam locomotive; it changes rotational motion to reciprocating motion.
Do the next part someplace relatively clean, where small parts cannot run away and hide. Remove the motor from the vice, and press the wiper shaft towards the motor. Try to get the shaft and slide to come out first, without the metal plate. If the plate containing the colored gear begins to come out, watch for a small light blue gear that may try to escape. The slide mechanism will disengage from the colored drive gear, and come off with the shaft. Clean and lubricate the wiper shaft and slide mechanism. The slide mechanism should move very freely.
Next is the plate with the colored drive gear. The interface between the metal plate and the colored gear was the problem with my one slow, and one seized headlight wiper motors. The plate has a raised lip which fits into a groove cut into the colored gear. The gear should turn against the plate. It does not turn freely, but it should turn with a little effort. On BOTH of my motors, the metal plate had rust pits which had, over time, bound the gear tight against the plate. Carefully pry the colored gear away from the plate. Clean and lubricate the raised ring on the plate where the gear rides, and the groove on the gear. I found that mounting the gear in a power drill, then mounting the drill in my vice, made it possible to sand out the groove in the gear fairly easily, resolving the binding problems.
Look inside the body of the headlight wiper motor for a small light blue gear. As the large colored gear turns, nibs on it's backside contact this small blue gear, turning it about � turn. It has ridges on it which open and close a set of contacts which run the motor through it's cycle after it has been triggered by the relay. On the right side motor, there is a second set of contacts which send power to the washer pump to trigger the washing action. Turn this gear by hand and watch to see that the contacts are opening and closing. If this mechanism is dirty or broken this will cause timing problems and may cause your headlight wiper to not turn off once it starts. Clean and lubricate as required. Specific contacts can be tested using the VOM.
Still in the body, you will find an ivory gear, and the electric motor with a worm gear pressed onto it's shaft. Above the motor you will see where power comes from the contacts to the motor. You will also see a small wafer, about 12mm square, and 3mm thick between the contacts directly above the motor. This is a thermal breaker. If the motor jams, this thing interrupts the flow of current to keep the motor from getting fried. Test the motor by applying +12v to the red wire and -12V to the brown wire at the main connector. If the motor doesn't run, pull out the thermal breaker with a pair of needle nose pliers, and jam a piece of wire between the contacts where the thermal breaker was and test the motor again. If it still doesn't work, it's time to head for the dealer. You can check the thermal breaker for continuity with the VOM. If there is no continuity, it's fried. A similar part should be available from an electronics supply house.
After everything is cleaned and freshly lubricated, reassemble the transmission. I found it easiest to put the ivory gear and the light blue gear into the transmission body first. Then attach the colored gear to the metal plate, and carefully position the metal plate onto the body. Note that the top of the light blue gear is held in place by a small hole in the plate. Once you have this much assembled, you need to run the motor through one full cycle to align the gears and switches and get it into the park position. It is important that you follow the "Cycling / testing the Motor" procedure exactly. Note that the motor will attempt to push the plate out of the transmission body when it runs, so you will have to hold it in place by hand while you run the test. Once the motor has stopped at the end of the cycle, install the shaft and slider, making sure that you have the relative position of the slider and the shaft gear correct. Reinstall the cover. I put a long wire-tie around it since I broke a couple of the snap clips when I took it apart.
Re-attach the headlight wiper motor to the headlight assembly, making certain to reinstall the rubber cap on the shaft. Attach the wiper arm to the shaft. Run the "Cycling / testing the Motor" procedure, and make sure that the wiper goes the right way. If it goes backwards, take the cover off of the motor, and put the shaft gear at the other end of the slider.
Once this final test is successful, put the whole assembly back in the car, and relax with a tasty beverage. You can now demonstrate, to your 6yr old's complete satisfaction, that all is well.
About Diodes:
There is a diode in each headlight wiper motor which prevents -12V from coming up the # 30 circuit when the motor is not in the park position. If this diode fails closed, circuit # 30 will see ground, which will blow fuse # 3 when the headlight washer / wiper system cycle is part way through it's run. The diode is buried under a glob of silicone where the wiring pigtail enters the headlight wiper motor. Using the wiring diagram on page 162 of the electrical troubleshooting manual for the series 124 cars, it is clear where in the circuit the diode is placed, and what it does. The problem is that you can't solder a new diode in the right place electronically. You can test the diode by running the motor momentarily, then stopping it in a "non-parked" position, then checking between the red and the brown wires with the VOM at the connector. If current flows both ways, the diode is shorted.


") yes, it’s normal behavior. There’s a valve needed after the pump which splits the hose into 2 (each goes to one headlight wiper)
yes, it’s normal behavior. There’s a valve needed after the pump which splits the hose into 2 (each goes to one headlight wiper)