This is a very overlooked service item IMO. This year alone I have helped people with 2no different cars that had sudden no start condition. In both cases the battery terminals had slight corrosion on them which made the car go dead momentarily.
This is TOTALLY avoidable. Your car needs a nice clean connection to the battery at all times. This thread is intended to give a little info on what I do to all of my cars to ensure I don’t have avoidable voltage issues or non start situations:
PART 1: The Battery.
You will need:
Conventional batteries contain a liquid “electrolyte” which is a mixture of sulfuric acid and water. The plates in a lead battery contain an active material that should be continuously bathed in electrolytes while oxygen and hydrogen gas are released during charging.
While a battery should only be filled after it is completely charged, you should check the water level before charging. Before charging, make sure there is just enough water to cover any exposed plates. After charging, add enough water to bring the level to the bottom of the vent, about ¾ below the top of the cell.
It’s important to note that battery owners should never add sulfuric acid to their battery. During normal operation batteries will only consume water – and not sulfuric acid. When your battery’s electrolyte is observed to be low, filling the battery with water will keep the battery healthy and safe for use.
Step 1:
I like to periodically remove the battery from a car in my fleet at least every 6 months for a full recon / maintenance charge. Check the levels of electrolyte first just to ensure all plates are covered inside the battery at this point - and fully charge (Your favourite Noco or CTEK charger is ideal) This should extend the life of your battery long term. A fully charged battery will have a voltage of over 12.6 volts or above.

Step 2:
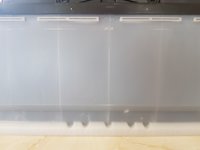
When fully charged start by checking and topping off the electrolyte levels in the cells. The level should be between the min & max markings on the battery body. On the S600 battery here I had one cell lower than the rest. It was at the min mark whereas all other cells were at Max. Therefore I decided to top off.
ONLY use De-ionised water available at Auto Parts Stores. You may have to cut plastic decals to expose the cell cap(s):
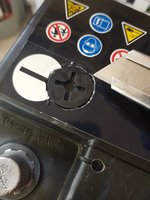
Carefully top off until all cells are even. Indicative photo showing the cell level indicators on this Varta Battery:
Step 3:
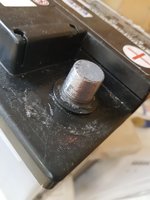
Use a battery terminal cleaning tool and take the worst of the tarnish off of both terminal posts:
Before:

Using Tool:

Step 4: Use the electrical contact cleaner and Fine scotch brite pads to carefully buff the terminals clean and shiny without removing any material. (Don’t use sandpaper as you will wear the lead posts away)
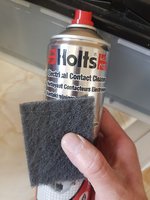
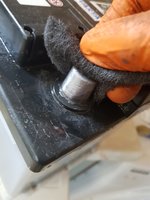
Step 5: I like to clean the battery down at this stage, Using a detail brush, APC and hot water with a microfiber towel to pat dry.
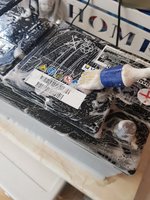

Step 6: Apply Battery Terminal Grease to fully coat both battery posts. Don’t go nuts this just has to exclude any air between the battery terminal in the car and the post to maintain and prevent corrosion from forming in the future.
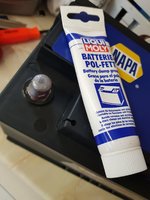
At this stage you should have a JC220 approved Battery

However there is more to do in car.....
This is TOTALLY avoidable. Your car needs a nice clean connection to the battery at all times. This thread is intended to give a little info on what I do to all of my cars to ensure I don’t have avoidable voltage issues or non start situations:
PART 1: The Battery.
You will need:
- Battery Terminal Grease
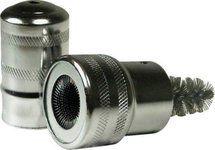
- Battery Terminal Cleaning Tool – like this:

- Fine scotch brite pads
- De-ionised Water
- Electrical Contact Cleaner
- Gloves & safety squints – you are dealing with acids here be careful…
Conventional batteries contain a liquid “electrolyte” which is a mixture of sulfuric acid and water. The plates in a lead battery contain an active material that should be continuously bathed in electrolytes while oxygen and hydrogen gas are released during charging.
While a battery should only be filled after it is completely charged, you should check the water level before charging. Before charging, make sure there is just enough water to cover any exposed plates. After charging, add enough water to bring the level to the bottom of the vent, about ¾ below the top of the cell.
It’s important to note that battery owners should never add sulfuric acid to their battery. During normal operation batteries will only consume water – and not sulfuric acid. When your battery’s electrolyte is observed to be low, filling the battery with water will keep the battery healthy and safe for use.
Step 1:
I like to periodically remove the battery from a car in my fleet at least every 6 months for a full recon / maintenance charge. Check the levels of electrolyte first just to ensure all plates are covered inside the battery at this point - and fully charge (Your favourite Noco or CTEK charger is ideal) This should extend the life of your battery long term. A fully charged battery will have a voltage of over 12.6 volts or above.

Step 2:
When fully charged start by checking and topping off the electrolyte levels in the cells. The level should be between the min & max markings on the battery body. On the S600 battery here I had one cell lower than the rest. It was at the min mark whereas all other cells were at Max. Therefore I decided to top off.
ONLY use De-ionised water available at Auto Parts Stores. You may have to cut plastic decals to expose the cell cap(s):

Carefully top off until all cells are even. Indicative photo showing the cell level indicators on this Varta Battery:

Step 3:
Use a battery terminal cleaning tool and take the worst of the tarnish off of both terminal posts:
Before:

Using Tool:


Step 4: Use the electrical contact cleaner and Fine scotch brite pads to carefully buff the terminals clean and shiny without removing any material. (Don’t use sandpaper as you will wear the lead posts away)


Step 5: I like to clean the battery down at this stage, Using a detail brush, APC and hot water with a microfiber towel to pat dry.


Step 6: Apply Battery Terminal Grease to fully coat both battery posts. Don’t go nuts this just has to exclude any air between the battery terminal in the car and the post to maintain and prevent corrosion from forming in the future.

At this stage you should have a JC220 approved Battery


However there is more to do in car.....
Last edited:












![[500Eboard] 0214101723-00.jpg [500Eboard] 0214101723-00.jpg](https://www.500eboard.co/forums/data/attachments/106/106767-810710c27a6ca5ea1865c6c8ce91e4fd.jpg?hash=gQcQwnpspe)
![[500Eboard] photo.JPG.jpg [500Eboard] photo.JPG.jpg](https://www.500eboard.co/forums/data/attachments/106/106768-4e6632c9d0b3d2cca2be1c2f546c23cb.jpg?hash=TmYyydCz0s)
![[500Eboard] image.jpg [500Eboard] image.jpg](https://www.500eboard.co/forums/data/attachments/106/106769-c6b9918e5cea2a81f7a086cc02a7f494.jpg?hash=xrmRjlzqKo)


