Early W463 G-wagen models, from 1990 through about 2000, share their headlight switches with MB sedan models such as the W124, 202, and so forth. This is the standard round switch with the pull-off knob, foglight indicator light in the center, and so forth.
With age and sometimes use, these switches can go bad as the plastic inside that forms the detents gets brittle and cracks, resulting in an inoperable/mushy switch that rotates in a notchy manner, or not at all.
I noticed late this past winter that my G-wagen's headlight switch was starting to lose the crispness of its detents when I moved it from mode to mode. It still worked fine, but it was notchy and at times a bit difficult to move.
New/replacement switches are not that expensive to buy new, and are certainly available from MB and the usual aftermarket discount houses, but I happened to have a spare or two in my parts stock, and a quick check of the EPC showed the G-wagen part number (for my truck, at least) was the same as the switches that I had in my parts stock. The one that I located came from an early W202 model.
Below is the procedure for replacing the headlight switch. It can be accessed either from above or below. From above, on the early G-wagens, it can be removed through the top-dashboard speaker hole. From below, one must remove the driver's side dashboard vent and then access the switch by reaching upward through the vent hole.
I decided to access the switch from above. Below is the procedure to do this. The job takes approximately 20 minutes to complete.
TOOLS REQUIRED:
The first step is to take a deep breath and get a visual overview of the area you'll be working in. Since it's up close to the nearly vertical windshield, quarters are a bit tight, but shouldn't be a problem.
Here are a couple of views of the driver's side dashboard area where the headlight switch is located:


The first step is to remove the knob. It comes off with a stout pull directly outward:


Next, after removing the knob, use your pliers to loosen the retaining nut, which is on the shaft of the headlight switch. After loosening it, you can remove it with your fingers. Also, be sure to remove (and don't mis-place) the round washer behind the retaining nut.


The next step is to remove the headlight switch bezel. It just pulls straight off after you remove the retaining nut and washer.


From there, you need to remove the left-hand trim piece directly underneath the windshield. This is held to the top of the dashboard by two plastic expansion pins -- one pin at each end. Use a Mercedes instrument cluster removal hook on the slot at each end of the trim strip, pulling straight upward to pop the pin out of its socket. You can see the process below. Start with the side of the trim strip that is closest to the driver's side door; then pop the right end (center of the dashboard) upward with the tool. (In my case, I needed to remove the gray-market G-wagen VIN tag, which was affixed to the top of the trim strip).


Here are a couple of views of the retaining pins.


Note that the right-hand end of the trim strip has a tab that extends 1-2 mm from the end of the strip. This must be inserted UNDERNEATH the right-hand dashboard trim strip -- an important thing to do upon re-assembly.

After removing the trip strip up and off of the dashboard, the next step is to remove the speaker grill. It is held onto the top of the dashboard by a single Philips head screw, and two plastic tabs on the underside of the grill that slide into slots in the top of the dash.
Remove the single Philips head screw, and carefully lift the grill off of the dashboard, as shown below.


Note the small hole for the side window defroster vent, in the edge of the dashboard.

Removing the speaker grill exposes the speaker. Remove it by unfastening it from the dashboard, and lift it out of the way so that it is not in your work area. My aftermarket MB Quart tweeter had enough wiring that I could just move it to the top of the dashboard, as shown.


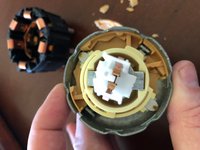
This is what the switch looks like once the bezel is removed.

Rotate the switch in its holder, so that the two tabs are free, and then carefully push the switch backward toward the front of the truck. Lift it vertically straight out of the speaker hole, as shown below.


After the switch is clear of the dash, CAREFULLY unplug and separate the large round plug from the rear of the switch.

Here are a couple of views of the old and new switches, side by side. They are identical in every respect except for a burned-in four-digit number on the side plastic.


Installation is exactly the reverse of removal.
Enjoy your new, working headlight switch!
Cheers,
Gerry

With age and sometimes use, these switches can go bad as the plastic inside that forms the detents gets brittle and cracks, resulting in an inoperable/mushy switch that rotates in a notchy manner, or not at all.
I noticed late this past winter that my G-wagen's headlight switch was starting to lose the crispness of its detents when I moved it from mode to mode. It still worked fine, but it was notchy and at times a bit difficult to move.
New/replacement switches are not that expensive to buy new, and are certainly available from MB and the usual aftermarket discount houses, but I happened to have a spare or two in my parts stock, and a quick check of the EPC showed the G-wagen part number (for my truck, at least) was the same as the switches that I had in my parts stock. The one that I located came from an early W202 model.
Below is the procedure for replacing the headlight switch. It can be accessed either from above or below. From above, on the early G-wagens, it can be removed through the top-dashboard speaker hole. From below, one must remove the driver's side dashboard vent and then access the switch by reaching upward through the vent hole.
I decided to access the switch from above. Below is the procedure to do this. The job takes approximately 20 minutes to complete.
TOOLS REQUIRED:
- Philips screwdriver, medium, stubby preferred
- Medium pair of pliers
- MB instrument cluster removal hook (or homemade equivalent)
The first step is to take a deep breath and get a visual overview of the area you'll be working in. Since it's up close to the nearly vertical windshield, quarters are a bit tight, but shouldn't be a problem.
Here are a couple of views of the driver's side dashboard area where the headlight switch is located:
The first step is to remove the knob. It comes off with a stout pull directly outward:
Next, after removing the knob, use your pliers to loosen the retaining nut, which is on the shaft of the headlight switch. After loosening it, you can remove it with your fingers. Also, be sure to remove (and don't mis-place) the round washer behind the retaining nut.
The next step is to remove the headlight switch bezel. It just pulls straight off after you remove the retaining nut and washer.
From there, you need to remove the left-hand trim piece directly underneath the windshield. This is held to the top of the dashboard by two plastic expansion pins -- one pin at each end. Use a Mercedes instrument cluster removal hook on the slot at each end of the trim strip, pulling straight upward to pop the pin out of its socket. You can see the process below. Start with the side of the trim strip that is closest to the driver's side door; then pop the right end (center of the dashboard) upward with the tool. (In my case, I needed to remove the gray-market G-wagen VIN tag, which was affixed to the top of the trim strip).
Here are a couple of views of the retaining pins.
Note that the right-hand end of the trim strip has a tab that extends 1-2 mm from the end of the strip. This must be inserted UNDERNEATH the right-hand dashboard trim strip -- an important thing to do upon re-assembly.
After removing the trip strip up and off of the dashboard, the next step is to remove the speaker grill. It is held onto the top of the dashboard by a single Philips head screw, and two plastic tabs on the underside of the grill that slide into slots in the top of the dash.
Remove the single Philips head screw, and carefully lift the grill off of the dashboard, as shown below.
Note the small hole for the side window defroster vent, in the edge of the dashboard.
Removing the speaker grill exposes the speaker. Remove it by unfastening it from the dashboard, and lift it out of the way so that it is not in your work area. My aftermarket MB Quart tweeter had enough wiring that I could just move it to the top of the dashboard, as shown.
This is what the switch looks like once the bezel is removed.
Rotate the switch in its holder, so that the two tabs are free, and then carefully push the switch backward toward the front of the truck. Lift it vertically straight out of the speaker hole, as shown below.
After the switch is clear of the dash, CAREFULLY unplug and separate the large round plug from the rear of the switch.
Here are a couple of views of the old and new switches, side by side. They are identical in every respect except for a burned-in four-digit number on the side plastic.
Installation is exactly the reverse of removal.
Enjoy your new, working headlight switch!
Cheers,
Gerry


")