• Hi Guest !

    Welcome to the 500Eboard forum.

    Since its founding in late 2008, 500Eboard has become the leading resource on the Internet for all things related to the Mercedes-Benz 500E and E500. In recent years, we have also expanded to include the 400E and E420 models, which are directly related to the 500E/E500.

    We invite you to browse and take advantage of the information and resources here on the site. If you find helpful information, please register for full membership, and you'll find even more resources available. Feel free to ask questions, and make liberal use of the "Search" function to find answers.

    We hope you will become an active contributor to the community!

    Sincerely,
    500Eboard Management

HOW TO: Replace Rear Subframe Bushings with Miller Tools

Note the original Sportline bushings appear the same as pedestrians, but have stiffer rubber (?) and some other minor differences when compared side by side. The ones you installed are a superceded design that is very different. But the ones you removed may have been originals, only way to confirm would be reading the part number off the rubber.

Glad you got all 4 replaced! Fun stuff, eh?

:jono:
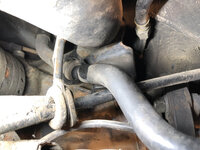
This makes sense, they for sure looked collapsed based on pictures you provided earlier in this thread + a lack of air gap on all 4 corners.

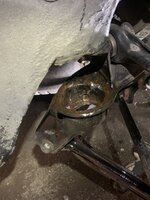
As far as a fun job, I'd rate this one a 7/10 for the shade tree mechanic. Need to have the right tools + heat + patience to get these all square. I'd say @JC220 notion of dropping the whole subframe -> replace arms/ bushings on the ground might be the best move in the future. Lots more "while I am there" jobs when the subframe is dropped though. That's how you end up with an LSD in the car.
 
With the right tools. Dropping the subframe and changing the bushings was easy. Installation of the subframe took less than 30 minutes using the transmission jack I got from HF. I did use Miller 9110 and 9111 to remove and install the bushings.
 

Attachments

  • 87F9C718-5FF0-4465-814E-2EBBEA9C42AE.jpeg
    87F9C718-5FF0-4465-814E-2EBBEA9C42AE.jpeg
    3 MB · Views: 38
@RicardoD and I just replaced the forward and aft rearsubframe bushings on his car.
It only took all day. 🤣 6 hours for one side while we were futzing around with trying to figure out how to get enough clearance to use the Miller tools, and then 2 hours for the other side. Meanwhile,
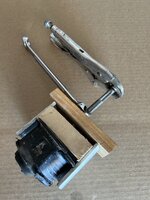
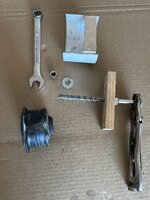
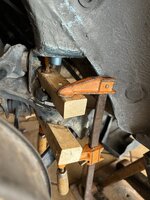
 @dionphaneuf was working on his Roman War-Chariot, I mean, 560SEC, in some cool, methodical fashion basically rebuilding his whole friggin' suspension and replacing hydraulic fluid quickly .... all while @RicardoD and I were futzing around.

Special thanks toe @gsxr, @emerydc8 for their instructions here, and particular mention to @Kyiv for his genius idea that made getting the forward rear subframe bushing out a super-fast affair.

Key learnings:
  • Not needed to drop rear subframe. The way to get enough clearance at the top of the aft bushings to use the Miller tools is to:
    • Take out both aft bushing bolts completely
    • Support the diff with a pole / screw thing from the ground
    • Take out forward bushing bolt on side 1
    • Take out, HALF WAY, forward bushing bolt on side 2, but leave enough threads to have some engagement.
    • You can now access the top of aft bushing side 1.
  • GRIND AND MODIFY the top plate of M9110 to make aft bushing extraction ultra easy without clearance issues.
  • Do not push in new aft bushings using the weight of the car to seat the bushing - this does not work and will lift the car off the jackstands or lift arms or whatever you are using. Use M9110 to sandwich pull in the bushings.
  • For us, removal of forward bushings on Ricardo’s 200Kmile car was piece of cake due to lack of rubber ripping and @Kyiv ’s awesome idea.
I'm going to post these pictures here to remind @RicardoD and myself on how we did this job so that when we do my car we aren't complete idiots again. We had a lot of idiotic moments today. 🤣 Hipefully these diagrams are super clear,


IMG_2609.jpeg IMG_2610.jpeg IMG_2612.jpeg IMG_2613.jpeg IMG_2614.jpeg IMG_2611.jpeg IMG_2611c.jpeg IMG_2620.jpeg IMG_2621.jpeg IMG_2622.jpeg IMG_2623.jpeg IMG_2624.jpeg IMG_2625.jpeg IMG_2628.jpeg IMG_2629.jpeg IMG_2632b.jpeg IMG_2633.jpeg IMG_2633.jpeg IMG_2633b.jpeg IMG_2634.jpeg IMG_2634b.jpeg IMG_2635 1.jpeg IMG_2635 2.jpeg
 
Last edited:
Great work, guys! Thanks for posting all the photos! :love:

Tip for installing "tall-tab" front bushings:

Use the 9111 "rectangle" plate on top of the bushings, as shown in the attached photo. This will press directly on the outer shell of the bushing. If you use the threaded 9110 piece it will push against the rubber tabs which compress, and contact a smaller section of the metal shell. This is less of an issue on the short-tab bushings, as seen in your photos.

Also, there is a round piece of the 9111 tool not seen in any of your photos. This round piece fits neatly into the bottom subframe hole, eliminating the need for the ISS (Impact Socket Spacer).

:jono:

1667136841895.png
 
When I do this job, I'm going to remove the entire subframe from the car and do it off the car. Seems like it will be much easier in terms of access with the subframe removed.
Yes - with the subframe removed, all the clearance issues are eliminated. HOWEVER, you also lose the ability to pry against a "fixed" object, the car chassis. This is primarily a concern for removing the forward/smaller bushings. Everything else should be a breeze. Also with the subframe removed, you can replace the two large differential mount bushings without tool clearance issues.

:sawzall:
 
Tip for installing "tall-tab" front bushings:

Use the 9111 "rectangle" plate on top of the bushings, as shown in the attached photo. This will press directly on the outer shell of the bushing. If you use the threaded 9110 piece it will push against the rubber tabs which compress, and contact a smaller section of the metal shell. This is less of an issue on the short-tab bushings, as seen in your photos.

Also, there is a round piece of the 9111 tool not seen in any of your photos. This round piece fits neatly into the bottom subframe hole, eliminating the need for the ISS (Impact Socket Spacer).

:jono:

View attachment 156391

Ohhh thanks! I've got the tall-tab front bushings. Will use your method for mushing the front bushings in from the top on my car --- that looks better than our jury-rigged collection of M9110/M9111 pieces ...... your way will avoid compressing the tall tabs!


When I do this job, I'm going to remove the entire subframe from the car and do it off the car. Seems like it will be much easier in terms of access with the subframe removed.

To be honest, after we figured out what we were doing with the right side first, the left side was SOOOOOOOO FAST. Access is not a big deal at all actually ---- just need to remove three of the subframe bushing bolts and halfway remove the fourth in the front. Right now I think @RicardoD and I could to two cars (all four subframe bushings) per day, now that we have modified the top plate of the M9110 tool. That part was key in getting the aft bushing out. Pictures #5 #6 and #7 in post #53 took us a looong time to figure out ---- if you follow those three pictures, removal of the first aft bushing will go superfast.

Yes - with the subframe removed, all the clearance issues are eliminated. HOWEVER, you also lose the ability to pry against a "fixed" object, the car chassis. This is primarily a concern for removing the forward/smaller bushings. Everything else should be a breeze. Also with the subframe removed, you can replace the two large differential mount bushings without tool clearance issues.

Picture #12 in post #53 shows the @Kyiv-documented awesome way to remove the front bushing. Once we figured out the right tools to do this, front bushing removal took 5 minutes ..... it was so easy (note the inner rubber didn't rip at all for us). Taking the subframe out eliminates this method.
 
Last edited:
When I do this job, I'm going to remove the entire subframe from the car and do it off the car. Seems like it will be much easier in terms of access with the subframe removed.
The only advantage I see to this if you want to also change out all the diff mount bushings which we didn't touch in my car. And with the subframe removed I am sure you can figure out a way to get the front bushings removed, or have some custom thick large washer made of the right size.

My old bushing looked fine but felt rock solid after 28 years and 200k miles in the car. Remaining in the temperate California climate definitely helped.

Are there also special tools to replace the diff mount bushings? I have the bushing but they will remain in my parts cabinet for now.
 
Are there also special tools to replace the diff mount bushings? I have the bushing but they will remain in my parts cabinet for now.
Yes. The diff mount bushings (p/n 129-351-18-42, possibly now with -64 suffix) must be set to the exact depth as the originals - measure the old ones BEFORE removal. The factory tool is complex and sets the depth. The aftermarket tool requires you to set the depth manually. If not set, the diff will be "crooked", left/right, and not aligned with the driveshaft. The Miller tool shown below has a center shaft that will not fit through the bushing center, so it either needs a thinner threaded rod, or drilling the bushing slightly.

The 034/036 uses larger diff bushings (66mm) than non-V8 models (45mm), make sure to use the correct tool.

1667162741281.jpeg 1667162787280.jpeg
 
this job is coming up very quickly, while I was under there, looking at my rear differential, I realized that I am desperately in need of these bushings. I also have a 2.65 diff to put in, which I am I’ll probably do at the same time.

Big question: as I’ve been reading, it seems about 50% of the work, utilizes, the Miller tools, whereas the other half doesn’t. I have an acetylene, torch set up, access to a press, a full ball, joint kit, as well as various jacks. Is this something that a well-equipped mechanic could handle without these tools, or does anyone know where I might be able to rent them? I certainly don’t see myself replacing these bushings again in the near future, so I’d rather not purchase the tools if it all possible. This is on my 92 400e, btw.

As far as parts go, I will be buying the Mercedes-Benz, banded plates and bolts as gsxr as suggested, but what about the bushings? I’ve seen some folks use OE, others use Febi/Bilstein.
@RicardoD and I have never replaced the differential bushings. However, in our case, when we did the four subframe bushings in his car as per Post 53 we did not need a torch, nor did we need a press. It seems straightforward enough that I am thinking about inviting @RicardoD sometime to come join me and suffer a whole day joyously help replace the 4 bushings in my own car in the medium term future. 😂
 
@RicardoD and I have never replaced the differential bushings. However, in our case, when we did the four subframe bushings in his car as per Post 53 we did not need a torch, nor did we need a press. It seems straightforward enough that I am thinking about inviting @RicardoD sometime to come join me and suffer a whole day joyously help replace the 4 bushings in my own car in the medium term future. 😂
Sorry I didn’t realize I confused the subject- I am in need of the sub frame bushings. I ALSO need to swap diffs and will do that at the same time.

Just gauging whether the miller tools are worth the extra expense and time to get.
 
As far as parts go, I will be buying the Mercedes-Benz, banded plates and bolts as gsxr as suggested, but what about the bushings? I’ve seen some folks use OE, others use Febi/Bilstein.
For most any parts related to the subframe, you'll want OE/Genuine, with some exceptions. If you can confirm the Febi item is reboxed OEM, that's great. And for the smaller/forward bushings, if you prefer the "tall tab" bushing, the only way to get those is to buy the Febi kit... and it might need to be old stock, as I'm not sure if current Febi kits still have the OEM Boge bushings as referenced elsewhere on the forum.

The larger rear subframe bushings are NLA and pretty much unobtanium for either OE or OEM, so you're stuck with either aftermarket copies like Carus from Europe (I think?), gambling on the cheap Super China stuff hawked by most vendors now, or using the standard/non-Sportline OE/Genuine bushings.

:sawzall:
 
I'm eyeing this for the wagon. Have that mysterious clunk in the rear. I'm hoping that most of the feedback here will transfer to that chassis, will report of any differences.

I couldn't find details on why the "long" tab bushing was preferred over the "short". Is this 034/036 specific or across all 124s?
 
I couldnt find details on why the long tab bushing was preferred over the short. Is this 034/036 specific or across all 124s?
The tall tab bushing was introduced, IIRC, with the M104 engine. It was meant to reduce bushing movement (up/down) with more powerful engines. I believe the tall tab was standard from the factory on all 124 chassis with M104 or M119 engines. MB should have consolidated to only carrying the tall tab, and eliminating the short tab, instead of the other way around.

:yayo:
 
The tall tab bushing was introduced, IIRC, with the M104 engine. It was meant to reduce bushing movement (up/down) with more powerful engines. I believe the tall tab was standard from the factory on all 124 chassis with M104 or M119 engines. MB should have consolidated to only carrying the tall tab, and eliminating the short tab, instead of the other way around.
Thanks @gsxr. But if I can't find Boge from Febi or equivalent this certainly isn't a go/no-go, right?
 
The larger rear subframe bushings are NLA and pretty much unobtanium for either OE or OEM, so youre stuck with either aftermarket copies like Carus from Europe (I think?), gambling on the cheap Super China stuff hawked by most vendors now, or using the standard/non-Sportline OE/Genuine bushings.

:sawzall:
I want to clarify-are the standard rear bushings still available or are the Sportline’s not available?
 
I want to clarify-are the standard rear bushings still available or are the Sportline’s not available?
Your choices now are OE standard rear bushings, Reproduction sportlines from Europe ($), or reproduction sportlines from Japan ($$$$).
If you want a set of OE standards I am happy to sell them to you - I have new ones on the shelf never used. Or you could go with the sportline reproductions.
 
Your choices now are OE standard rear bushings, Reproduction sportlines from Europe ($), or reproduction sportlines from Japan ($$$$).
If you want a set of OE standards I am happy to sell them to you - I have new ones on the shelf never used. Or you could go with the sportline reproductions.
I just don’t think that this car is the one to put the Sportline bushings in, so I would definitely be interested in the factory standard bushings. If you’d like, message me, and let’s start a conversation.
 
The tall tab bushing was introduced, IIRC, with the M104 engine. It was meant to reduce bushing movement (up/down) with more powerful engines. I believe the tall tab was standard from the factory on all 124 chassis with M104 or M119 engines. MB should have consolidated to only carrying the tall tab, and eliminating the short tab, instead of the other way around.
Found it in the 1990 Introduction manual. Besides the noise reduction, the tabs also press against the frame floor and restrict movement.

1679348459090.png
1679348521068.png 1679348552538.png
 
This thread is super helpful, much appreciate all the photo details! Will be doing this on both or ours R129 cars as soon as the quickjack gets here.

Thank you very much everyone!

Regards,
D
 
this job is coming up very quickly, while I was under there, looking at my rear differential, I realized that I am desperately in need of these bushings. I also have a 2.65 diff to put in, which I am I’ll probably do at the same time.

Big question: as I’ve been reading, it seems about 50% of the work, utilizes, the Miller tools, whereas the other half doesn’t. I have an acetylene, torch set up, access to a press, a full ball, joint kit, as well as various jacks. Is this something that a well-equipped mechanic could handle without these tools, or does anyone know where I might be able to rent them? I certainly don’t see myself replacing these bushings again in the near future, so I’d rather not purchase the tools if it all possible. This is on my 92 400e, btw.

As far as parts go, I will be buying the Mercedes-Benz, banded plates and bolts as gsxr as suggested, but what about the bushings? I’ve seen some folks use OE, others use Febi/Bilstein.
Always OE for suspension parts.
 
Always OE for suspension parts.
I’d like to but from what I understand the rear OEM bushings are NLA.

There are so many part numbers for bushings, it’s hard to be sure which one is needed. @gsxr Are the 500e pedestrian versions the same as the 400e? There are “w124 subframe bushings“ on Amazon and eBay but they pull up different part numbers than I’ve seen in these subframe bushing threads. I love that my local Benz dealer is close, but they always price their parts at close to 60% over Msrp. Any suggestions on where to get the correct part number and best place to get the parts? I have the part numbers for the plates and bolts.
 
Rear sportline bushings are NLA. Pedestrian bushings are available from the dealer.

If you'd like to go with sportline bushings (which are factory installed) only option is the aftermarket bushings as @Jlaa mentioned earlier.

There are only few places to source them, from Japan Metech-restorations W124 S124 オリジナルパーツ (€€€) or Europe (€€) Rubber bearing set rear axle carrier R129 / W124 rear sports suspension | eBay

I ended up to buy European ones since they look like as same as Japan ones. (Which are originally sourced from Europe)
 
Last edited:

Would these be the correct ones for the front bushings? They also have a febi/bilstein front set for double the money, but if it’s worth it I’m in. Per @gsxr ill get new mb bolts and plates.

@jnes I messaged the Bulgarian seller through that link for a shipping quote. Thank you for the help!
 

Would these be the correct ones for the front bushings? They also have a febi/bilstein front set for double the money, but if it’s worth it I’m in. Per @gsxr ill get new mb bolts and plates.
Those are the correct style bushings, although I'd consider OE at lower cost. I don't know if Lemforder is still made in Germany, unless you get old stock. I also don't know if the Febi kits still have the OEM Boge tall-tab bushings or not.

OE bare short-tab bushings (no hardware) are 124-351-19-42, two required, ~$11/each from Napsterville plus bolts/stops:

 
Rear sportline bushings are NLA. Pedestrian bushings are available from the dealer.

If youd like to go with sportline bushings (which are factory installed) only option is the aftermarket bushings as @Jlaa mentioned earlier.

There are only few places to source them, from Japan Metech-restorations W124 S124 オリジナルパーツ (€€€) or Europe (€€) Rubber bearing set rear axle carrier R129 / W124 rear sports suspension | eBay

I ended up to buy European ones since they look like as same as Japan ones. (Which are originally sourced from Europe)
I contacted Carus on eBay from the link above- the parts are not terribly expensive at 70 euros but he wants 100 euros shipping on top. These are impossible to fine, I suppose I’m just gonna bite the bullet, even though that sounds way too high!
 
I contacted Carus on eBay from the link above- the parts are not terribly expensive at 70 euros but he wants 100 euros shipping on top. These are impossible to fine, I suppose I’m just gonna bite the bullet, even though that sounds way too high!
€100 S&H? That better be 2-day express delivered by supermodels!

200.gif
 
Right? I dabble in selling parts on eBay and have shipped to Europe from the US on several occasions. It is a little bit more of an effort, I will admit, but shipping costs themselves only run about $40-$60, depending on size and weight.
@Quick4door - I've got a couple sets of these subframe bushings in the states. Should be able to get them shipped to you for a cheaper amount. Give me a PM and we can figure things out.
 
Just finished this job with the help of may of you, plus the kind rental of the tools from another member here- WHAT A DIFFERENCE. The left forward bushing was totally shot (see pics). My 400e has probably 300k on it and now rides like a proper Mercedes. BIG thank you to everyone that helped!
 

Attachments

  • C5AE0FF5-D8CD-4CB1-B07C-A3F77AA70534.jpeg
    C5AE0FF5-D8CD-4CB1-B07C-A3F77AA70534.jpeg
    995.1 KB · Views: 42
  • FD7DE282-7211-4847-9CD8-BFA11BBFF9AA.jpeg
    FD7DE282-7211-4847-9CD8-BFA11BBFF9AA.jpeg
    784.7 KB · Views: 43
  • B45F2FD9-ED35-4B61-9A94-F7873BD145EA.jpeg
    B45F2FD9-ED35-4B61-9A94-F7873BD145EA.jpeg
    1.8 MB · Views: 48
  • CC1764AA-6305-49F6-A848-85A9285C578B.jpeg
    CC1764AA-6305-49F6-A848-85A9285C578B.jpeg
    1.5 MB · Views: 45
  • D1ABF362-EF23-4C2C-B45C-CF2EBCF13609.jpeg
    D1ABF362-EF23-4C2C-B45C-CF2EBCF13609.jpeg
    5.2 MB · Views: 45
  • C81BF46E-6E59-45AA-872F-636BE9B9502B.jpeg
    C81BF46E-6E59-45AA-872F-636BE9B9502B.jpeg
    5.7 MB · Views: 34
  • B6BC8E9E-61AC-4876-8366-1BBFEBB506AB.jpeg
    B6BC8E9E-61AC-4876-8366-1BBFEBB506AB.jpeg
    4.4 MB · Views: 33
  • 74A19ED5-239B-4B5B-8589-2BB6488D8FF4.jpeg
    74A19ED5-239B-4B5B-8589-2BB6488D8FF4.jpeg
    4 MB · Views: 42
When I do this job, I'm going to remove the entire subframe from the car and do it off the car. Seems like it will be much easier in terms of access with the subframe removed.
I am with you. And you will be able to do a thorough inspection and replace any other iffy parts you might see.

You might even to a little clean up and paint...
 
In today's episode of "Don't Do What Donny Don't Does":

I replaced the rear subframe bushings in my beater 034, as they were completely collapsed. I remembered from previous times doing this job that the fuel tank feed hose would be put under tension as the subframe was lowered, since the bracket for the hose is part of the subframe. The hose was already old and tired, tugging on it didn't seem like a good idea. So, I had the (not-so) brilliant idea to pull the hose+grommet out of the bracket.

Yeah, don't do that. Or at least, protect the hose if you remove it from the bracket. When the subframe was lowered, the 'ear' of the bracket punctured the hose. See photos below. This hose was 32+ years old and fossilized, but otherwise wasn't leaking or cracked. Fortunately I only had a couple of gallons of gas in the tank and was able to drain it without issues. If you had more than ~5 gallons in the tank and/or did not have empty gas jugs around to drain into, this could have been messy.

On the bright side, I have a new hose on the shelf, the hose is still available new, and as noted here this hose is far easier to replace on the 034 vs the 036. On the down side, it's ~$120 that I wasn't planning to spend on a beater.

Be careful out there...
 

Attachments

  • fuel_hose_puncture1.jpg
    fuel_hose_puncture1.jpg
    189.3 KB · Views: 13
  • fuel_hose_puncture2.jpg
    fuel_hose_puncture2.jpg
    182.2 KB · Views: 13
In today's episode of "Don't Do What Donny Don't Does":

I replaced the rear subframe bushings in my beater 034, as they were completely collapsed. I remembered from previous times doing this job that the fuel tank feed hose would be put under tension as the subframe was lowered, since the bracket for the hose is part of the subframe. The hose was already old and tired, tugging on it didn't seem like a good idea. So, I had the (not-so) brilliant idea to pull the hose+grommet out of the bracket.

Yeah, don't do that. Or at least, protect the hose if you remove it from the bracket. When the subframe was lowered, the 'ear' of the bracket punctured the hose. See photos below. This hose was 32+ years old and fossilized, but otherwise wasn't leaking or cracked. Fortunately I only had a couple of gallons of gas in the tank and was able to drain it without issues. If you had more than ~5 gallons in the tank and/or did not have empty gas jugs around to drain into, this could have been messy.

On the bright side, I have a new hose on the shelf, the hose is still available new, and as noted here this hose is far easier to replace on the 034 vs the 036. On the down side, it's ~$120 that I wasn't planning to spend on a beater.

Be careful out there...
Oooofffff! Seems like collateral damage is always the case with these old cars!
Curious - how bad were the aft bushings relative to the forward bushings? It feels like (from limited forum-data-sample-set) the forward bushings are often in worse shape (and they are smaller)?
 
Oooofffff! Seems like collateral damage is always the case with these old cars!
Curious - how bad were the aft bushings relative to the forward bushings? It feels like (from limited forum-data-sample-set) the forward bushings are often in worse shape (and they are smaller)?
The rears were some of the worst I've ever seen, likely original from 1992. I was a little surprised the metal stop plate was not bent downward.

The forward "tall tab" bushings are in surprisingly good condition, enough so that I was wondering if they might have been replaced in the past? Guess I should check if a date code is visible on any of them. The fronts are much less fun to replace (they rarely push out as easily as they did for you and Ricardo) so I opted to leave them alone, for now, because this is still a beater. On a nice car, I'd have absolutely replaced all four.

EDIT: There was no visible date code on the old rear/collapsed bushings. I need to check the forward bushings next.

:klink:
 
Last edited:
With the right tools. Dropping the subframe and changing the bushings was easy. Installation of the subframe took less than 30 minutes using the transmission jack I got from HF. I did use Miller 9110 and 9111 to remove and install the bushings.
If you are looking for the 'pancake' subframe bushings, part number 1243511342, a seller on eBay has 6 NOS. These are NLA from the dealer.

Moderator edit: The part number above is for 6-cylinder models, not the 400E / 500E.

1715030114993.png
 
Last edited by a moderator:
Also make sure you order the right FORWARD bushings:

Following are the SHORT TAB MB BRANDED FORWARD BUSHING 124-351-19-42 which comes in kit 124-350-04-41. Don't use these bushings. (all documented on @gsxr's website) HOWEVER, DO use the bolts and stop plates that come with the kit.

Instead, use the TALL TAB BUSHING BOGE 2-33-001003 which is the same as MB 124-351-15-42 but you must buy FEBI 10154 to get this reboxed BOGE BUSHING. Don't use the stop plates and bolts that come with the Febis (BOGEs). Use the stop plates and bolts that came from MB.
When I replaced the subframe bushings in my 1995 E320 back in 2022, I used the Short Tab MB Branded Forward Bushing 124-351-19-42, which was included in Kit 124-350-04-41. After reading your post, I decided to drop the subframe again two weeks ago and only replaced the front bushings this time. I opted for the Tall Tab Bushing BOGE 2-33-001003, which is equivalent to the MB 124-351-15-42. To get this re-boxed BOGE bushing, I bought the FEBI 10154. Surprisingly, my ride is now firmer in the rear. I'm curious to know why you advised against using the 124-351-19-42 in your post.
 
Back to this topic. I'm currently hoarding spare parts for Oettinger's subframe rebuild and purchased Febi kit 10155 but unfortunately bushings were unbranded.

Has anyone lately purchased successfully FEBI kit 10154 or 10155 with proper Boge bushings? Or if anyone has a new spare Boge set for sale I'm intrested
 
I think the current Febi inventory will have aftermarket, unbranded bushings in the box.

Only thing you can do is try to find someone selling old stock of the Febi kit, with the OEM Boge bushings. That might take some time to find...

Harrison Ford GIF
 
Yep, tried also that Febi 10154 but no luck. Does anyone have extra set of Boge sportline bushings (tall tab) and willing to sell less than 5000 €? :pc1:
 
We’ve had some nice cool weather here in South Florida the last few days so I took the opportunity to do some wrenching. I mentioned in another post that I was in the process of a rear suspension refresh on my E500 but decided to post here because this has to do with the subframe bushings. I was able to R&R the bushings without the factory tools opting for “shade tree mechanic home brew tools”. Pictures should be self explanatory for anyone who wants to go this route. Removal of the large rear bushing was very easy with the home brew tool. I tried a similar approach for the front bushings but it didn’t work. I ended up prying the the front ones out as others have described destroying the old bushing in the process. Installing the new bushings went very easy with the home brew set up shown in the pictures.
 

Attachments

  • IMG_4046.jpeg
    IMG_4046.jpeg
    1.7 MB · Views: 19
  • IMG_4047.jpeg
    IMG_4047.jpeg
    1.9 MB · Views: 18
  • IMG_4048.jpeg
    IMG_4048.jpeg
    2.5 MB · Views: 18
  • IMG_4051.jpeg
    IMG_4051.jpeg
    1.8 MB · Views: 19
  • IMG_4052.jpeg
    IMG_4052.jpeg
    2.1 MB · Views: 19

Who has watched this thread (Total: 3) View details

Back
Top