I had to replace the monovalve on my 1995 E420, it's not a hard job but fiddly. My car has the "later" monovalve.
Tools Needed: Slotted screwdrivers medium size; small screwdrivers and/or awl and pliers for rubber bumpers, shop rags for spilled coolant, saran wrap or equivalent to create vacuum in cooling system, coolant to top up. Optional: 13 mm wrench for battery, hose pliers if you have them. Highly recommended: good shop light, it's tight in there.
Step 1: With a cool engine remove the coolant expansion tank cap and place saran wrap or equivalent on the top of the opening as Gerry explains here: http://www.500eboard.com/forums/sho...lve-on-Late-W124-(non-V8-models)-E-Class-cars
This is the monovalve in the box.
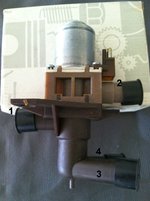
This is the monovalve removed from the box, there are four connections I have labeled them for future reference
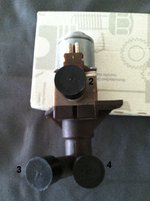
Another view There is a pin on the bottom that fits into a grommet which you can see later. You can see that the pipe for #3 is longer than the pipe for #4.
This is the monovalve in place, passengers (right) side near the firewall. There is a large cable which is part of the upper harness in front of it. I found it much easier to disconnect it and move it aside but in an abundance of caution I disconnected the negative terminal of the battery.

Disconnect the one electrical connector at the top, using a slotted screwdriver loosen and remove the hoses labeled 1 and 2 (the order is not important). As you do this the monovalve may come loose from the slots where the rubber bumpers fit. This shows #1 disconnected as well as the electrical connection.
This is looking at #2 which is the only connection on that side, you can see the slot where the bumper fits.

Now loosen but do not remove #3, once you do that you need to rotate the monovalve towards the front of the car and you will then see #4 hidden under the other bumper slot. Loosen the clamp and remove #4. Then remove #3 and lift the unit out. You have more room to wiggle #3 off if #4 is off first and it makes it easy to rotate the valve. It may work in reverse but for me it was easier to do it in that order. This is what you will see;
 You can see the grommet with a hole and the hoses. You can see the second metal slot for the rubber plug, notice it is oriented left-right as opposed to the one on the other side which is oriented front-back. Hose #4 is hidden until you rotate the monovalve. Some coolant will have spilled out, now is the time to wipe it up.
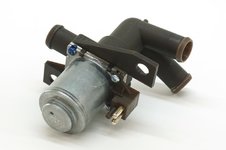
Old and new:

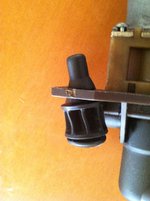
Now we need to transfer the rubber plugs (bumpers) from the old unit to the new. The bell shaped part at the top has a lip that holds it in place, you need to push that lip down into the hole, then use pliers to grab and pull it down.

Once you have the plugs out you need to install them in the new unit, a little liquid soap helps ease them in.
Installation is the reverse, connect hose 3 first but don't tighten the clamp. Once you get hose #4 on, tighten it and then tighten hose #3 then 1 and 2. At some point you will need to get the bumpers back in the slots. There is a slot at the bottom that seems to be for the metal opening.
Reconnect the electrical plug, remove the coolant expansion tank cap and the plastic you used to create the vacuum, reinstall the cap. If you disconnected the harness reconnect it and the battery.
Start the car and check for leaks. I did not top off the coolant right away but did so the next day. I did not try and repair my monovalve, it was worth it to no longer have hot air blasting ever time I turned on the a/c.
Tools Needed: Slotted screwdrivers medium size; small screwdrivers and/or awl and pliers for rubber bumpers, shop rags for spilled coolant, saran wrap or equivalent to create vacuum in cooling system, coolant to top up. Optional: 13 mm wrench for battery, hose pliers if you have them. Highly recommended: good shop light, it's tight in there.
Step 1: With a cool engine remove the coolant expansion tank cap and place saran wrap or equivalent on the top of the opening as Gerry explains here: http://www.500eboard.com/forums/sho...lve-on-Late-W124-(non-V8-models)-E-Class-cars
This is the monovalve in the box.

This is the monovalve removed from the box, there are four connections I have labeled them for future reference

Another view
 There is a pin on the bottom that fits into a grommet which you can see later. You can see that the pipe for #3 is longer than the pipe for #4.
This is the monovalve in place, passengers (right) side near the firewall. There is a large cable which is part of the upper harness in front of it. I found it much easier to disconnect it and move it aside but in an abundance of caution I disconnected the negative terminal of the battery.

Disconnect the one electrical connector at the top, using a slotted screwdriver loosen and remove the hoses labeled 1 and 2 (the order is not important). As you do this the monovalve may come loose from the slots where the rubber bumpers fit. This shows #1 disconnected as well as the electrical connection.

This is looking at #2 which is the only connection on that side, you can see the slot where the bumper fits.

Now loosen but do not remove #3, once you do that you need to rotate the monovalve towards the front of the car and you will then see #4 hidden under the other bumper slot. Loosen the clamp and remove #4. Then remove #3 and lift the unit out. You have more room to wiggle #3 off if #4 is off first and it makes it easy to rotate the valve. It may work in reverse but for me it was easier to do it in that order. This is what you will see;
 You can see the grommet with a hole and the hoses. You can see the second metal slot for the rubber plug, notice it is oriented left-right as opposed to the one on the other side which is oriented front-back. Hose #4 is hidden until you rotate the monovalve. Some coolant will have spilled out, now is the time to wipe it up.
Old and new:

Now we need to transfer the rubber plugs (bumpers) from the old unit to the new. The bell shaped part at the top has a lip that holds it in place, you need to push that lip down into the hole, then use pliers to grab and pull it down.

Once you have the plugs out you need to install them in the new unit, a little liquid soap helps ease them in.
Installation is the reverse, connect hose 3 first but don't tighten the clamp. Once you get hose #4 on, tighten it and then tighten hose #3 then 1 and 2. At some point you will need to get the bumpers back in the slots. There is a slot at the bottom that seems to be for the metal opening.
Reconnect the electrical plug, remove the coolant expansion tank cap and the plastic you used to create the vacuum, reinstall the cap. If you disconnected the harness reconnect it and the battery.
Start the car and check for leaks. I did not top off the coolant right away but did so the next day. I did not try and repair my monovalve, it was worth it to no longer have hot air blasting ever time I turned on the a/c.
Last edited:


