Navigation
Install the app
How to install the app on iOS
Follow along with the video below to see how to install our site as a web app on your home screen.
Note: This feature may not be available in some browsers.
More options
Style variation
-
Hi Guest !
Welcome to the 500Eboard forum.
Since its founding in late 2008, 500Eboard has become the leading resource on the Internet for all things related to the Mercedes-Benz 500E and E500. In recent years, we have also expanded to include the 400E and E420 models, which are directly related to the 500E/E500.
We invite you to browse and take advantage of the information and resources here on the site. If you find helpful information, please register for full membership, and you'll find even more resources available. Feel free to ask questions, and make liberal use of the "Search" function to find answers.
We hope you will become an active contributor to the community!
Sincerely,
500Eboard Management
You are using an out of date browser. It may not display this or other websites correctly.
You should upgrade or use an alternative browser.
You should upgrade or use an alternative browser.
OWNER MY911S
- Thread starter MY911S
- Start date

Headlight switch panel icon indicator?Anyone know where this little light bulb goes to? Working on removing all the NOS wiring


Looks like there's already a bulb in that locationHeadlight switch panel icon indicator?
AC vents?Looks like there's already a bulb in that location
Oh yeah much simpler with all that removed- found this pic onlineI think all this comes out too - bits circled in red. Can someone confirm. Was going to look at 500 E pics of normal engine bay
View attachment 200531
Attachments

From many years ago when I was replacing the upper wiring harness:I think all this comes out too - bits circled in red. Can someone confirm. Was going to look at 500 E pics of normal engine bay
View attachment 200531
Attachments
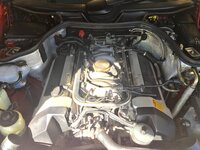

That's part of the NOS system. It's an RPM "window" switch, not related to the glass panes in the doors.
All part of the nitrous kit... if you are selling that, make sure it's complete or the buyer will have a real mess to sort out!I think all this comes out too - bits circled in red. Can someone confirm. Was going to look at 500 E pics of normal engine bay
View attachment 200531


Thank you!From many years ago when I was replacing the upper wiring harness:
Headlamp switch area illumination?Anyone know where this little light bulb goes to? Working on removing all the NOS wiring
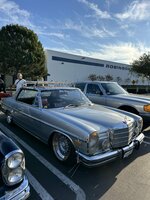
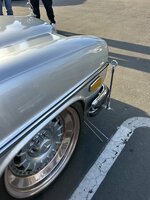
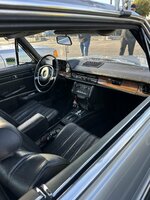
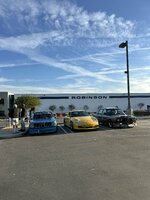
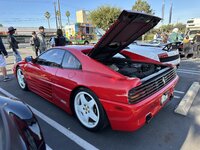
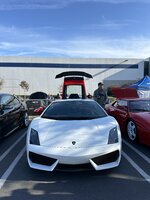
Took a break this morning to check out the FCP Euro car show with the wife. We brought Miss Bee.
Attachments
-
 IMG_8293.jpeg1.8 MB · Views: 11
 -
 IMG_8294.jpeg2.1 MB · Views: 11
 -
 IMG_8296.jpeg1.9 MB · Views: 10
 -
 IMG_8295.jpeg1.7 MB · Views: 10
 -
 IMG_8297.jpeg2.6 MB · Views: 11
 -
 IMG_8299.jpeg2.3 MB · Views: 11
 -
 IMG_8290.jpeg1.9 MB · Views: 11
 -
 IMG_8310.jpeg2.8 MB · Views: 10
 -
 IMG_8314.jpeg1.9 MB · Views: 9
 -
 IMG_8318.jpeg1.8 MB · Views: 10
 -
 IMG_8313.jpeg1.7 MB · Views: 12
Last edited:
After the show dived into- actually under the car and replaced Sauce's WALBRO pump and filter and went back to the dual setup.
Then tonight since wife went to bed early replaced all the spark plugs.
Quick question- does it matter what the orientation is of how the metallic piece is clocked relative to the pump outlet - for the fuel line that connects the 2 fuel pumps?
Then tonight since wife went to bed early replaced all the spark plugs.
Quick question- does it matter what the orientation is of how the metallic piece is clocked relative to the pump outlet - for the fuel line that connects the 2 fuel pumps?
Attachments


@MY911S,Took a break this morning to check out the FCP Euro car show.
Was that carshow in the Robinson Helicopters parking lot in Torrance.
BTW, I was in San Pedro w/ my wife Saturday and we ran across a huge car show down by the docks across from the yacht harbor. It was breaking up when we discovered it around 3:30 PM.
Yes it was. Interesting I wonder what the San Pedro event was. I go there a lot. We used to live there and aren't too far away.@MY911S,
Was that carshow in the Robinson Helicopters parking lot in Torrance.
BTW, I was in San Pedro w/ my wife Saturday and we ran across a huge car show down by the docks across from the yacht harbor. It was breaking up when we discovered it around 3:30 PM.
Well darn. I got all the bits connected including running next door to pelican for a fuel pump cap nut Part #: 123-990-00-53-MBZ and the proper sized hose clamp size only to start the car and...nothing...doesn't turn over. The pumps aren't making any sound and I measured voltage at the terminals an 0 Volts. I assume that the Walbro pump has the same connections and it should measure 12 V between terminals? Any help appreciated. Might try to check for a short and access the relay and jump it next.
In actuality after watching this I'll video the startup and see if i have sound.
In actuality after watching this I'll video the startup and see if i have sound.
Last edited:
Do you mean the starter doesn't engage? That's a different issue not related to the fuel pumps. Or do you mean it cranks but won't fire?
The fuel pumps will only run for 2 seconds when the key is turned on. The LH module triggers the relay below the rear seat. Remove the rear passenger seat cushion, you should hear the relay click on/off when the key is turned to position 2.
You can remove the relay and jumper the appropriate sockets to force the pumps to run. Don't mess up and jumper the wrong pins or you could damage the LH module. Only jump from +12V battery (#30) to the fuel pump feed (#87). Diagram at link below.
starter is turning over the engine. cranks but wont fire..anymore. it ran right before i replaced the pumps and the plugs. thanks guys i'll try the above. i stuck my phone under the car...didnt seem to hear any pump coming on at all at any time. Mercedes source also does it this way alternatively
oh sorry if i caused confusion - that's not my car---it's just a sample video--that shows what to listen to (pump sound that's working)@MY911S,
Carlo, Is the starter turning over the engine? It doesn’t sound like it to me. Maybe my hearing is fooling me but to me it sounds like a dead battery to me. OR are you just turning the key off before the engine turns over?

Yup, that is for the M120 V12, and yes it is for a 1993-95 S600.Anyone know if this is a WOT LH from a S600 date code 92 from a 1993 car. @gsxr
Won't work with an M119 of course...

Any M119 V8 LH module can be used for testing, from any year/model with LH-SFI engine management (through 1995 USA model year).Ah I thought I had read in this forum that would still work.
The M120 V12 modules are designed to only control 6 cylinders (two modules are used to control all 12 cylinders) and these won't work on a V8 engine.


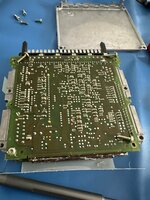
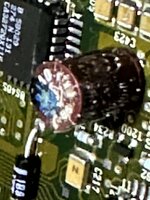
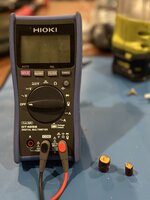
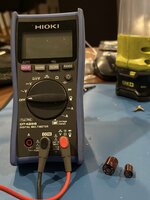
A little messy with all the conformal coating crumbling off.
Took one large and one small capacitor off. One of the small caps seems bad.
Took one large and one small capacitor off. One of the small caps seems bad.
Attachments
-
 IMG_8402.jpeg1.5 MB · Views: 8
 -
 IMG_8405.jpeg885.4 KB · Views: 5
 -
 IMG_8406.jpeg1,012.2 KB · Views: 6
 -
 IMG_8407.jpeg1.4 MB · Views: 6
 -
 IMG_8408.jpeg1.6 MB · Views: 6
 -
 IMG_8409.jpeg1.2 MB · Views: 6
 -
 IMG_8410.jpeg798 KB · Views: 9
 -
 IMG_8412.jpeg1.5 MB · Views: 8
 -
 IMG_8413.jpeg1.5 MB · Views: 9
 -
 IMG_8414.jpeg1.3 MB · Views: 8


Crawled under the car to install these rubber plugs for the fuel pump terminals that finally arrived. Hopefully I can get the car off the ramps tomorrow.
Got some NIB lenses from Sauceman today so might be ready to put the headlights back on. Still deciding if I sell the existing Euro lights or just assemble and have a spare set.
Also need to figure out what bulbs they take.
Got some NIB lenses from Sauceman today so might be ready to put the headlights back on. Still deciding if I sell the existing Euro lights or just assemble and have a spare set.
Also need to figure out what bulbs they take.
Attachments


The plastic arrows are just a visual aid to line up the throttle vs transmission linkages (and, this can be tweaked to fine-tune upshifts/downshifts to your personal preference).Car runs but needs adjustment. Idles too high and doesn't shift or super late. Reinstalled another accelerator cable and found this crack in the bracketry.
Throttle cable adjustment should NOT have any effect on idle speed! At idle the throttle cable should have zero tension on the linkage and the ETA lever should be fully at rest on the idle stop. Idle RPM is controlled electronically. If adjusted wrong you'll end up with limp mode where the first half of throttle pedal travel does nothing.

I'm not seeing any cracked piece. The plastic arrows are the tips of the metal brackets, see additional red arrows in screencap below.
These plastic tips should be aligned, which they are in your photo. See FSM step 5.1 also.
This is for the transmission control cable adjustment, NOT the throttle linkage to the ETA. Adjust turnbuckle / sliding linkage #2 to increase/decrease shift RPM's, but first you need to get idle speed normal, NOT be in limp mode, and have shift points normal-ish.
Hmm I thought the arrows were as explained in this video
@gsxr Going back to my picture and the circled area - that black tab that looks to be broken in half is actually not a break? It looks like it. Here's a closeup.

Thanks for fixing the fsm link
@gsxr Going back to my picture and the circled area - that black tab that looks to be broken in half is actually not a break? It looks like it. Here's a closeup.
Thanks for fixing the fsm link
Last edited:

Nope. That video is for the CIS-E engine, the throttle linkage is COMPLETLEY different vs LH-SFI. Basically nothing in that video applies to the 500E except the little black plastic rectangle he's replacing, which is the same/similar.Hmm I thought the arrows were as explained in this video
Now I think I understand. Those are two separate pieces, you are thinking it is 1 piece broken in half. Move the rearward piece with your finger and it might start to make sense. Those plastic tips should be lined up for the rough adjustment. In the photo, yours look ok, they are lined up within a mm or two? Can't quite tell from the angle of that photo.@gsxr Going back to my picture and the circled area - that black tab that looks to be broken in half is actually not a break? It looks like it. Here's a closeup.

What's the point of switching ignition switch on in step 6 only to switch it back to the off position at the next step
Yeah, something in there is a typo / mistake. With the ignition on, if a second person presses the pedal to the floor (not kickdown), the throttle butterfly should be almost fully open.This must be spelling mistake. WOT must be checked with ignition switched ON.
With the ignition off, you are checking that the bellcrank on the ETA is resting against the WOT stop. This is the important part, at idle the ETA bellcrank must be resting on the idle stop, and at WOT it must rest on the WOT stop.


Phew what a relief. I should have put more faith in German Engineering than to assume that was per designNope. That video is for the CIS-E engine, the throttle linkage is COMPLETLEY different vs LH-SFI. Basically nothing in that video applies to the 500E except the little black plastic rectangle he's replacing, which is the same/similar.
Now I think I understand. Those are two separate pieces, you are thinking it is 1 piece broken in half. Move the rearward piece with your finger and it might start to make sense. Those plastic tips should be lined up for the rough adjustment. In the photo, yours look ok, they are lined up within a mm or two? Can't quite tell from the angle of that photo.
")
It's looking better. Car idles, a bit rough at the start, smooths out a little when warm BUT the big thing is shifts properly seemingly now. Drove to the gas station without stalling Thanks for the key tip @gsxr of checking the stops when at idle and the plastic arrows. I had to shorten the rod slightly about 1/8 of an inch.
Thanks for the key tip @gsxr of checking the stops when at idle and the plastic arrows. I had to shorten the rod slightly about 1/8 of an inch.
Last edited:

The city light bulb is a T4... more details here.Any recommendations for a replacement bulb for the small Osram bulb next to the H4 in the Euro headlight? I went to the parts store and the Sylvania one that looked to be the same size wouldn't fit. It was slightly large in diameter.

Thank you!The city light bulb is a T4... more details here.