


This DIY will cover my rebuilding & upgrading of the wiper in my 1992 500E. The removal of the wiper itself is not included as this information is widely available – I prefer to concentrate on the wiper mechanism itself for purposes of this DIY - which involves full disassembly of the wiper mechanism in order to fully lubricate all of the moving components.
This is essential maintenance of the wiper unit to keep it operating smoothly. Also note that the internal ‘gearbox’ is made of plastic a plastic cog & gear. As the original 1992 grease ages it dries up & becomes hardened / sticky providing very little lubrication qualities. Left unattended this can lead to destruction of the plastic gears.
There are 2x variants of the w124 Wiper which are easily identified. The early versions have an aluminium cover to the outer part of the wiper. In order to get access to the sliding part of the mechanism the wiper must be completely removed from the vehicle & disassembled to access the 3x cover securing screws as circled in red below.

In the above picture the right unit is the later w124 version wiper assembly. This is easily identified by feeling the outer cover again. The later units have a plastic cover which can be easily unclipped to expose the sliding part of the inner wiper mechanism. This IMO is the only identifiable ‘enhancement’ of the later version w124 wipers.
Please note that the early VS late w124 wipers employ different window sealing setups. Ie- the plastic strips which deflect water from the windshield into the gutters. Late version wipers have a 1 piece rubber strip which also requires a plastic strip on the windshield itself for correct installation.
So in this instance I had both the original 1992 early unit & a 1995 later W124 unit available to me. I disassembled & compared both units. I discovered that the later w124 wiper arm (With the easily removable plastic cover) is 100% compatible with the early wiper bracket / gearbox assembly.


This means I can upgrade the wiper whilst it is apart in order to have easier maintenance access in the future. This DIY will cover both how to lubricate the wiper AND how to upgrade to the later plastic cover if you’re car currently has the early version wiper with metal cover.
So here are pictures & step by step details;
1; Before removing the wiper mechanism ensure it is in the ‘Park’ position with the ignition key off. With the assembly removed the first thing to do is carefully mark the position of the motor linkage to the bracket. So you know where the park position is. Next make more marks with a sharpie and / or take pictures so you know where the wiper arm park position is also. These are pictures for reference of what Park should look like.


2; Loosen the 17mm nut to the rear of the mechanism. Then pull the bracket from the spindle. This can take quite alot of force so a puller is usually required.

3; Remove the circlip & washers from the top of the spindle. Take careful note of all the shims / washer positions as you disassemble the motor – they must go back in the correct order.

4; Now you must orientate the outer wiper arm so as it is halfway across it’s swept path = pointing directly vertical with the spindle fully retracted. This is because there is one slot for the inner Nylon gear to exist the housing.

Now use a rubber mallet to tap on the spindle & withdraw the outer arm mechanism from the wiper bracket / gearbox.
5; If you have an early wiper mechanism you can now remove the 3x screws & check inside of the sliding part of the mechanism. (The later wiper plastic cover can be removed anytime)
6; This is where you can see the condition of the plastic gears and most likely the original 25+ year old grease. ALL old grease must be removed first – because it will be old & hardened. I used Hot water, dishwashing soap & a paint brush to clean all parts of the wiper then blow dry with a compressed air gun. (Be careful what you use to clean the old grease so you do not damage or soften the Nylon gears)


7; With all parts fully dried what I did next was use a high quality non evaporating oil to lubricate all pins / joints of the entire mechanism. This was oil designed for cycle chains so it will not fling off & is water resistant also. I used this oil first so it would get right inside the joints before applying the grease. Indeed the oil made a huge difference to the feel of the entire mechanism.


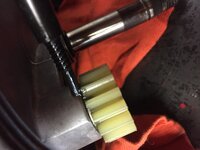


8; Now you can now grease the inner part of the ‘gearbox’ first. Don’t go crazy with the grease – just apply it where the gears will mesh. I used Synthetic grease throughout the wiper.
(NOTE- If you have the early wiper – proceed to step 13 now – as you will need to screw the metal outer cover back on before re-fitting)

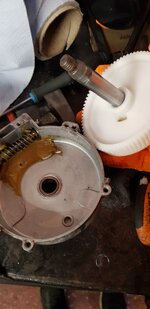
9; Grease the Nylon Gear & spindle as pictured. Be sure to place the shims & O ring as they were before removal.


Align the outer sliding mechanism so it is at bottom centre – as pictured.
View attachment 62652
10; Then re-insert into the gearbox housing facing upwards / half sweep as before.
11; Lubricate & re-fit the outer shims + retaining circlip.


12; Then align the ‘Park’ markings as made on step one before re-attaching the motor arm. Apply a little removable threadlock & tighten the 17mm nut.
13; Now grease the sliding part of the mechanism. Again no need to go crazy here – just be sure to apply grease evenly to the areas of contact + the moving joints.
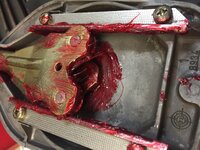
Refit the – plastic cover (Where applicable) I did also bench test the wiper at this stage which helped to apply grease through the entire sliding part of the mechanism. Should you wish to do this the pins are-
2- Ground
3- High Speed
5- Normal Speed

It is HIGHLY advisable to test the wiper before re-installing into the car. At least test it in the car before re-fitting all of the plastic gutters / trims.
One final note is there is a difference in early VS late W124 wiper arm. That is the spring arm which holds the rubber wiper blade & is secured with a 5mm Hex key. Early version wipers with the Aluminium cover have a Bosch Arm. Later units with the plastic cover have a SWF Arm – so make sure & change this part too if upgrading.
Done! Enjoy a smooth working wiper. This is essential maintenance of the Wiper – as they age the grease gets like Tar which left unattended WILL destroy the wiper mechanism. Not many car's will ever have seen fresh grease in there since they left the factory.
Comments, feedback & questions welcome!
MARCH 2021 EDIT:
I do this now when working at wipers on all benzes:
This is essential maintenance of the wiper unit to keep it operating smoothly. Also note that the internal ‘gearbox’ is made of plastic a plastic cog & gear. As the original 1992 grease ages it dries up & becomes hardened / sticky providing very little lubrication qualities. Left unattended this can lead to destruction of the plastic gears.
There are 2x variants of the w124 Wiper which are easily identified. The early versions have an aluminium cover to the outer part of the wiper. In order to get access to the sliding part of the mechanism the wiper must be completely removed from the vehicle & disassembled to access the 3x cover securing screws as circled in red below.
In the above picture the right unit is the later w124 version wiper assembly. This is easily identified by feeling the outer cover again. The later units have a plastic cover which can be easily unclipped to expose the sliding part of the inner wiper mechanism. This IMO is the only identifiable ‘enhancement’ of the later version w124 wipers.
Please note that the early VS late w124 wipers employ different window sealing setups. Ie- the plastic strips which deflect water from the windshield into the gutters. Late version wipers have a 1 piece rubber strip which also requires a plastic strip on the windshield itself for correct installation.
So in this instance I had both the original 1992 early unit & a 1995 later W124 unit available to me. I disassembled & compared both units. I discovered that the later w124 wiper arm (With the easily removable plastic cover) is 100% compatible with the early wiper bracket / gearbox assembly.
This means I can upgrade the wiper whilst it is apart in order to have easier maintenance access in the future. This DIY will cover both how to lubricate the wiper AND how to upgrade to the later plastic cover if you’re car currently has the early version wiper with metal cover.
So here are pictures & step by step details;
1; Before removing the wiper mechanism ensure it is in the ‘Park’ position with the ignition key off. With the assembly removed the first thing to do is carefully mark the position of the motor linkage to the bracket. So you know where the park position is. Next make more marks with a sharpie and / or take pictures so you know where the wiper arm park position is also. These are pictures for reference of what Park should look like.
2; Loosen the 17mm nut to the rear of the mechanism. Then pull the bracket from the spindle. This can take quite alot of force so a puller is usually required.
3; Remove the circlip & washers from the top of the spindle. Take careful note of all the shims / washer positions as you disassemble the motor – they must go back in the correct order.
4; Now you must orientate the outer wiper arm so as it is halfway across it’s swept path = pointing directly vertical with the spindle fully retracted. This is because there is one slot for the inner Nylon gear to exist the housing.
Now use a rubber mallet to tap on the spindle & withdraw the outer arm mechanism from the wiper bracket / gearbox.
5; If you have an early wiper mechanism you can now remove the 3x screws & check inside of the sliding part of the mechanism. (The later wiper plastic cover can be removed anytime)
6; This is where you can see the condition of the plastic gears and most likely the original 25+ year old grease. ALL old grease must be removed first – because it will be old & hardened. I used Hot water, dishwashing soap & a paint brush to clean all parts of the wiper then blow dry with a compressed air gun. (Be careful what you use to clean the old grease so you do not damage or soften the Nylon gears)
7; With all parts fully dried what I did next was use a high quality non evaporating oil to lubricate all pins / joints of the entire mechanism. This was oil designed for cycle chains so it will not fling off & is water resistant also. I used this oil first so it would get right inside the joints before applying the grease. Indeed the oil made a huge difference to the feel of the entire mechanism.
8; Now you can now grease the inner part of the ‘gearbox’ first. Don’t go crazy with the grease – just apply it where the gears will mesh. I used Synthetic grease throughout the wiper.
(NOTE- If you have the early wiper – proceed to step 13 now – as you will need to screw the metal outer cover back on before re-fitting)
9; Grease the Nylon Gear & spindle as pictured. Be sure to place the shims & O ring as they were before removal.
Align the outer sliding mechanism so it is at bottom centre – as pictured.
View attachment 62652
10; Then re-insert into the gearbox housing facing upwards / half sweep as before.
11; Lubricate & re-fit the outer shims + retaining circlip.
12; Then align the ‘Park’ markings as made on step one before re-attaching the motor arm. Apply a little removable threadlock & tighten the 17mm nut.
13; Now grease the sliding part of the mechanism. Again no need to go crazy here – just be sure to apply grease evenly to the areas of contact + the moving joints.
Refit the – plastic cover (Where applicable) I did also bench test the wiper at this stage which helped to apply grease through the entire sliding part of the mechanism. Should you wish to do this the pins are-
2- Ground
3- High Speed
5- Normal Speed
It is HIGHLY advisable to test the wiper before re-installing into the car. At least test it in the car before re-fitting all of the plastic gutters / trims.
One final note is there is a difference in early VS late W124 wiper arm. That is the spring arm which holds the rubber wiper blade & is secured with a 5mm Hex key. Early version wipers with the Aluminium cover have a Bosch Arm. Later units with the plastic cover have a SWF Arm – so make sure & change this part too if upgrading.
Done! Enjoy a smooth working wiper. This is essential maintenance of the Wiper – as they age the grease gets like Tar which left unattended WILL destroy the wiper mechanism. Not many car's will ever have seen fresh grease in there since they left the factory.
Comments, feedback & questions welcome!
MARCH 2021 EDIT:
I do this now when working at wipers on all benzes:
- Take photos with your phone of the wiper blade park position before taking any parts off.
- Take more park reference photos (+ a dimension if you like) with trims off.
- Once wiper is out mark all connection points as accurately as you can with a fine tip sharpie. I also use a Dremel and cut a fine line where possible. This means that through washing you won't inadvertently remove the reference lines.
- Test fit the assembly in the car - no trims or anything yet.
- Power up wiper and allow to park itself. Compare actual park position with your photos. In the case of my S280 this took about 5 goes to get back perfect the way I wanted it. Partly because I fitted a replacement motor whilst in there and therefore had no reference points. So remove, adjust and re-park until it's sitting correctly the way it was before.
- When satisfied with the park position only then proceed to re-fit all trims and gutters etc.
Last edited:


![Königsegg-one1[1].jpg](/forums/data/attachments/55/55986-4f58b5791f8edfca0c9d5508764ba9aa.jpg?hash=T1i1eR-O38)
![Königsegg mono wiper[1].jpg](/forums/data/attachments/55/55985-93e8280a352db99a731fb717d9729765.jpg?hash=k-goCjUtuZ)
![Mercedes_Monoblade[1].jpg](/forums/data/attachments/55/55984-59153ca043fe108c5330aa9cb355713e.jpg?hash=WRU8oEP-EI)
![Wipers[1].jpg](/forums/data/attachments/55/55983-acd3554710190c40185bd63cf27729d7.jpg?hash=rNNVRxAZDE)


 Definetly a must doing it this way if the cars a keeper


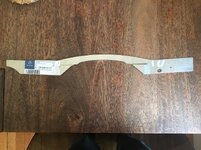


.gif "OMG :omg:")




![[500Eboard] IMG_3767.JPG](https://www.500eboard.co/forums/data/attachments/128/128695-b2ba2a8cfdaac8e978a048e75037ed3c.jpg?hash=sroqjP2qyO "[500Eboard] IMG_3767.JPG")
![[500Eboard] IMG_3767.JPG](https://www.500eboard.co/forums/data/attachments/128/128696-b2ba2a8cfdaac8e978a048e75037ed3c.jpg?hash=sroqjP2qyO "[500Eboard] IMG_3767.JPG")


