• Hi Guest !

    Welcome to the 500Eboard forum.

    Since its founding in late 2008, 500Eboard has become the leading resource on the Internet for all things related to the Mercedes-Benz 500E and E500. In recent years, we have also expanded to include the 400E and E420 models, which are directly related to the 500E/E500.

    We invite you to browse and take advantage of the information and resources here on the site. If you find helpful information, please register for full membership, and you'll find even more resources available. Feel free to ask questions, and make liberal use of the "Search" function to find answers.

    We hope you will become an active contributor to the community!

    Sincerely,
    500Eboard Management

HOW-TO: M104 / W124 Top-End Rebuild [Cylinder Head / Gasket]

And by the way, yes this is mentioned / illustrated here in this thread.

And another one here too.

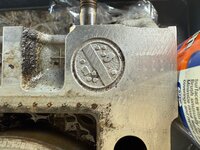
Search term: "valve cover baffle" using "advanced search" button.
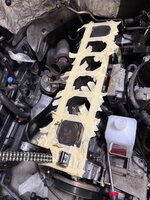
View attachment 169630

Why in the fuck do I keep creating these HOW-TOs when NOBODY ever takes the time to actually read through them and absorb / remember what is discussed. Generally I try to make the HOW-TOs pretty damn complete and illustrate them photographically as much as I can.

All to naught, I guess. People just too quick to hit the "new thread" button (ignoring our great forum search capability) and/or ask a redundant question IN THE VERY SAME THREAD WHERE THE QUESTION IS ANSWERED.
bit passive aggressive for my tastes there chief… this thread popped up upon searching, feel like I’ve provided a decent enough amount to this forum to not be torched for a simple and honest question in a related thread. Not saying your response was DIRECTLY at me, but it was the reply..
Thanks anyway, figured it out.
I can echo your sentiment (bolded text). Which is why I asked, out loud in sheer frustration, why I post HOW-TOs when nobody seems to actually read them when looking for information.

The fact that very few people actually bother to search through the wealth of existing information on this forum, has become the bane of this forum's existence. Established members here should always be leading by example.

Not saying your response was DIRECTLY at me, but it was the reply..
In this case, I'll be honest -- it was. All I ask is that people spend 3-5 minutes looking for answers before asking questions (or in many cases, starting a new thread).
 
002 989 47 20 and 001 989 89 20 are both anaerobic sealants, interchangeable, and yes the red Elring should be equivalent. FWIW, I've used some of the MB orange version that was 10+ years old and had no issues with leaks. YMMV.

003 989 98 20 is allegedly the same, or very similar to, Loctite 5900. This is supposed to be excellent sealant but I'm not sure I would use it for all applications where anaerobic was originally specified. The difference is, anaerobic sealants allow the part to be removed easily. Loctite 5900 is more similar to an RTV and can act as adhesive, "gluing" the parts together, possibly making it difficult to remove in the future. Be careful if you replace anaerobic with 5900.

Oh, and Permatex Right Stuff is supposed to be similar to 5900... not the same, but close enough. I've used Right Stuff several times with good success, from the pressurized canister. Keep in mind that 003 989 98 20 has a short shelf life (12-18 months max?) and once expired, it takes WEEKS to set up... fresh stuff sets overnight, I believe. That alone is a big hassle for DIY'ers who may take years to use up a tube of 003 989 98 20.

:seesaw:
Following up on this, both MB 002 989 47 20 and its replacement 001 989 89 20 are now both NLA from MB. The equivalent, Elring AFD2018, is still available. Since my tube of orange koala-claw goo is many years old now, I’m going to go ahead and get a bottle of the Elring stuff and will use that as the timing cover surface and cam solenoid surface adhesive.

The MB 002 989 45 20 sealant has been superseded to 002 989 45 20 89 (different supplier?) and is $45.20 a container at my dealer, so I will put some on my parts order. All of my old sealants are probably too far gone (>5 years old) to use. Although the orange koala-claw stuff may still be OK to use, if allowed a longer cure time.

I am also hearing that the clear MB RTV sealant used in a “glob” at the corner of the timing cover seal, part number 002 989 45 20 09, is also now NLA from MB.
 
I've mentioned this before, but I've used 10-12 year old orange koala-claw goo with zero issues, after letting it cure for at least 24 hours. However, I did this knowing that if it leaked, I'd need to re-do the job. If you don't want to gamble, use fresh stuff (and let it cure 24+ hours).

:jono:
 
I've mentioned this before, but I've used 10-12 year old orange koala-claw goo with zero issues, after letting it cure for at least 24 hours. However, I did this knowing that if it leaked, I'd need to re-do the job. If you don't want to gamble, use fresh stuff (and let it cure 24+ hours).
I have a couple of tubes, including a new tube. The open tube I have is from my COVID 2020 E500 Engine Bay Refresh. It may still be OK. I’ll have to check my open tube of the clear stuff.
 
Following up on this, both MB 002 989 47 20 and its replacement 001 989 89 20 are now both NLA from MB. The equivalent, Elring AFD2018, is still available. Since my tube of orange koala-claw goo is many years old now, I’m going to go ahead and get a bottle of the Elring stuff and will use that as the timing cover surface and cam solenoid surface adhesive.

The MB 002 989 45 20 sealant has been superseded to 002 989 45 20 89 (different supplier?) and is $45.20 a container at my dealer, so I will put some on my parts order. All of my old sealants are probably too far gone (>5 years old) to use. Although the orange koala-claw stuff may still be OK to use, if allowed a longer cure time.

I am also hearing that the clear MB RTV sealant used in a “glob” at the corner of the timing cover seal, part number 002 989 45 20 09, is also now NLA from MB.
Part number 002 989 45 20 is still available from MB as of 6/25/25. However, they won’t ship it due to HAZMAT regulations. Some MB dealers add a handling fee that brings the cost of a single tube up to $75. That doesn’t seem financially practical to me, so I’m opting to stick with 003 989 98 20 instead.
 
Gerry I am about to replace the tappets / lifters on my 97 E320 M104.
Do you know of a link to a DIY or to a workshop manual.
I need to know the correct sequence for removing the cam bearing caps.
I seem to remember there is a specific sequence or you risk the cam breaking.
Thanks.
How did the tappet replacement job go? I’m replacing all of mine as well, but since I’m at 150,000 miles, I’ve decided to do a complete top-end cylinder job. I've passed what Gerry calls the 'sweet' spot!
 
How did the tappet replacement job go? I’m replacing all of mine as well, but since I’m at 150,000 miles, I’ve decided to do a complete top-end cylinder job. I've passed what Gerry calls the 'sweet' spot!
Well, I finally bit the bullet and started the top-end refresh on my M104.992 engine. Let me just say—phew. When Gerry documented his teardown, he made it look like a walk in the park 😅.

After a few “motivational expressions,” I managed to wrestle the exhaust manifolds off. Is there a tool out there that makes those manifold nuts accessible without a blood sacrifice? 😀

The intake manifold, on the other hand, came off without drama—big thanks to Gerry’s incredibly helpful “How To” guide. Once I had the head off, I noticed clear signs of oil leakage at the right rear corner of the engine. Not great, but not entirely unexpected.

The pistons were pretty caked with carbon, which has me suspecting an injector issue. The underside of the cylinder head was also more grimy than I’d hoped—definitely not the clean surface I wanted to see. It’s now off to be inspected and serviced. Judging by the factory markings still visible (exactly as noted in Gerry’s write-up), I doubt the head has ever been resurfaced.

In the meantime, I’ve cleaned the block surface, wiped it down with 91% isopropyl alcohol, and carefully taped it off. I also gave each piston some much-needed attention to knock down the carbon and keep debris from falling into the cooling passages. Bolt holes have been tapped but not yet flushed—I’ll tackle that when I resume work on the block next week.

To protect everything, I sealed up the open block with tape and paint masking film to keep dust and debris out while I pause the project.

Next steps: sending the injectors out for cleaning and flow testing, and then raising the engine to reseal both the lower front cover and the sump.

This refresh is definitely a bigger job than I expected—but I’m committed. More updates soon. Wish me luck.
 

Attachments

  • IMG_5538.jpeg
    IMG_5538.jpeg
    1.5 MB · Views: 13
  • IMG_5590.jpeg
    IMG_5590.jpeg
    3 MB · Views: 13
  • IMG_5588.jpeg
    IMG_5588.jpeg
    3.3 MB · Views: 13
  • IMG_5565.jpeg
    IMG_5565.jpeg
    3.8 MB · Views: 14
  • IMG_5559.jpeg
    IMG_5559.jpeg
    2 MB · Views: 15
  • IMG_5553.jpeg
    IMG_5553.jpeg
    3.5 MB · Views: 15
  • IMG_5542.jpeg
    IMG_5542.jpeg
    1.1 MB · Views: 13
  • IMG_5539.jpeg
    IMG_5539.jpeg
    1.1 MB · Views: 12
@Seangbadee,
What type and brand of fuel has been used in this motor?

Someone here on the forum showed a photo of their spotless valves stating that it was the result of only using “Too Tier Fuel” which contains cleaning detergents.

I realize that you haven’t put all of the 180K miles in the car but am just curious what you have been using.
 
Good gasoline will help the TOP of the intake valves look like new, because the injector sprays almost directly on the top of the valves. Top Tier gas with detergents keep all the gunk away.

However, on the combustion chamber side, there's almost always deposits. I don't see any photos into the intake ports, but hopefully the intake valve tops look clean.

:jono:
Here are pictures of the intake valves.
Today is dedicated to cleaning the block surface.
 

Attachments

  • IMG_5605.jpeg
    IMG_5605.jpeg
    765.3 KB · Views: 9
  • IMG_5606.jpeg
    IMG_5606.jpeg
    848.1 KB · Views: 7
  • IMG_5607.jpeg
    IMG_5607.jpeg
    811.4 KB · Views: 6
  • IMG_5608.jpeg
    IMG_5608.jpeg
    855.9 KB · Views: 5
  • IMG_5609.jpeg
    IMG_5609.jpeg
    941.9 KB · Views: 5
  • IMG_5610.jpeg
    IMG_5610.jpeg
    825.4 KB · Views: 8
  • IMG_5611.jpeg
    IMG_5611.jpeg
    4 MB · Views: 9
Last edited:
@Seangbadee,
What type and brand of fuel has been used in this motor?

Someone here on the forum showed a photo of their spotless valves stating that it was the result of only using “Too Tier Fuel” which contains cleaning detergents.

I realize that you haven’t put all of the 180K miles in the car but am just curious what you have been using.
I’ve been going ‘cheap’ on gas. Not Walmart gas, but ….🙈
I’ve learned the hard way.
 
I’ve been going ‘cheap’ on gas. Not Walmart gas, but ….🙈
I’ve learned the hard way.
Your intake valves do not have excessive deposits (which is good!), but they're not quite as clean as I think they could be. If you switch to Top Tier, I bet they will be shiny silver next time you peek inside.

:jono:
 
Your intake valves do not have excessive deposits (which is good!), but they're not quite as clean as I think they could be. If you switch to Top Tier, I bet they will be shiny silver next time you peek inside.
This has been one of the more challenging cylinder heads I’ve worked on. Compared to previous experiences with the M110, M102, and M103, this one presented a few more complications than expected. In hindsight, I may have overlooked some early signs—particularly when the engine began running rich. Without the proper diagnostic tools at the time, I wasn’t able to pinpoint the issue.

Eventually, the tappet noise confirmed it was time to address the problem. A full top-end refresh became the clear next step. Fortunately, the detailed entries on this blog helped guide the process. Reading through the shared experiences—especially the notes about the weeping at the right rear of the head gasket, and the mileage when these issues tend to occur provided valuable insight and reinforced the decision to move forward with the rebuild.
 
Re: M104 / W124 Top-End Rebuild

I have not removed the ETA as per yet, but I strongly suspect it to be original. I have a spare from a 1995 E320 wagon (with ASR, which mine also has) that I scored here at one of the wrecking yards in Houston, and I will be sending that in to be remanufactured in the very near future. So the engine will have a fresh ETA.

There are two schools of thought in cleaning/reaming the EGR tubes on the M104 engines. The conventional way, that all of the forums talk about, is to run a speedometer cable on a drill through the length of the cable and "ream" it out.

Some months ago, after years of regular CELs pointing to a clogged EGR tube, I decided to take a different route.

I removed the crossover air tube, opened the butterfly valve on the ETA, and went straight DOWN below the ETA/butterfly valve to the place below it in the intake stack, where the EGR tube re-enters the intake system. This junction where it attaches to the intake manifold just below the ETA, is where it gets gunked up with the gasoline and carbon vapors. You can run a wire straight down and then at a right angle INTO this hole, into the end of the tube, and ream it from that direction. This is more direct and gets directly to the source of the problem.

I have not had a single EGR related code (or CEL of any type, for that matter) since doing this, and it was nearly two years ago.

When I remove the EGR tube, I will examine it. I may decide to soak it and de-gunk it, or I may decide to just replace it out of hand. A new tube is upwards of $140, so it would be one of the more expensive parts purchases for this rebuild, if I so chose to replace it. I am leaning toward a thorough de-gunking through soaking.

Cheers,
Gerry
Hi Gerry, did I read this correctly that you basically removed and deleted the EGR valve with success? no check engine like? No ECU issues? thank you

@gerryvz
 
Folks, I'm in the final stages of replacing the timing chain in my high miler 94 E320. Gerry's write up was extremely helpful. Since I didn't remove the cams or replace the side chain rails I thought I'd make a few comments for anyone else doing this job.

I was lucky to borrow the MB factory tool kit as I work PT at our local dealer. There is a 2nd tool for removing the master link which Gerry did not have. It has interchangeable metal posts ( for different size chains) which simply push out the pins in any link. I think many of the after market kits include this mandrel. This is used after you grind off the peened ends of each pin. Gerry showed this in depth. Its not necessary to grind the pins down to the end plate.

Linking the 2 chains together is not difficult. Reuse the center and end plates using the other mandrel to press on the end plate. The FSM shows widget #2 being used to press on the end plate but that is for a single row chain. The duplex chain uses widget #1. The FSM also notes there are 2 chain lengths, my 104.992 uses the 126 link chain. Note to Gerry and Dave-- the factory master link (000 997 22 98) center plate is a slip on not a press on.

With cams installed rolling in the chain proved a challenge. The new chain of course must ride on the cam gears as the crank is turned to prevent the pistons from kissing the valves. The FSM says to hold the chain on the exhaust sprocket with your hand as you roll in the new chain. I wasn't able to do this which led to a stopped crank. We backed off slightly which allowed me to bring the cams into time and then moved the crank to TDC while holding up the chain. Using zip ties to tie the chain to the gear wasn't an option as unlike some diesel engines there are no openings in the gear. I had seen vise grips used in some videos which I thought might work. I bought a small vise grip (due to space issues) and lightly clamped the chain to a lip on the gear using a shop towel for protection. We got about 5-6 inches of travel before having to reposition the vise grip. Worked perfectly; took less than 15 minutes to roll in the new chain.

Linking the ends of the new chain are as Gerry described using the mandrel. I would just note when pressing on the new end plate just watch how far the plate is moved down the pins. Match its position with an adjoing plate. I don't think it should be pressed against the link to prevent binding. Riveting is straight forward as Gerry showed. The FSM says to apply 30 NM of force to each pin.

I reset engine timing using FSM jobs 05-2230, 05-2240, 05-3100 and 05-3400.

Regards, Peter
 

Attachments

  • IMG_2760.jpg
    IMG_2760.jpg
    1.9 MB · Views: 5
  • IMG_2761.jpg
    IMG_2761.jpg
    2.5 MB · Views: 5
  • IMG_2759.jpg
    IMG_2759.jpg
    2.2 MB · Views: 5
Folks, I'm in the final stages of replacing the timing chain in my high miler 94 E320. Gerry's write up was extremely helpful. Since I didn't remove the cams or replace the side chain rails I thought I'd make a few comments for anyone else doing this job.

I was lucky to borrow the MB factory tool kit as I work PT at our local dealer. There is a 2nd tool for removing the master link which Gerry did not have. It has interchangeable metal posts ( for different size chains) which simply push out the pins in any link. I think many of the after market kits include this mandrel. This is used after you grind off the peened ends of each pin. Gerry showed this in depth. Its not necessary to grind the pins down to the end plate.

Linking the 2 chains together is not difficult. Reuse the center and end plates using the other mandrel to press on the end plate. The FSM shows widget #2 being used to press on the end plate but that is for a single row chain. The duplex chain uses widget #1. The FSM also notes there are 2 chain lengths, my 104.992 uses the 126 link chain. Note to Gerry and Dave-- the factory master link (000 997 22 98) center plate is a slip on not a press on.

With cams installed rolling in the chain proved a challenge. The new chain of course must ride on the cam gears as the crank is turned to prevent the pistons from kissing the valves. The FSM says to hold the chain on the exhaust sprocket with your hand as you roll in the new chain. I wasn't able to do this which led to a stopped crank. We backed off slightly which allowed me to bring the cams into time and then moved the crank to TDC while holding up the chain. Using zip ties to tie the chain to the gear wasn't an option as unlike some diesel engines there are no openings in the gear. I had seen vise grips used in some videos which I thought might work. I bought a small vise grip (due to space issues) and lightly clamped the chain to a lip on the gear using a shop towel for protection. We got about 5-6 inches of travel before having to reposition the vise grip. Worked perfectly; took less than 15 minutes to roll in the new chain.

Linking the ends of the new chain are as Gerry described using the mandrel. I would just note when pressing on the new end plate just watch how far the plate is moved down the pins. Match its position with an adjoing plate. I don't think it should be pressed against the link to prevent binding. Riveting is straight forward as Gerry showed. The FSM says to apply 30 NM of force to each pin.

I reset engine timing using FSM jobs 05-2230, 05-2240, 05-3100 and 05-3400.

Regards, Peter
@gerryvz really did every M104 engine owner a huge favor with that write-up. I rebuilt my engine top to bottom, and his article was my main guide. The pics he took along the way made the whole thing way easier, and honestly, pretty fun!
 
Back
Top