GSXR EDIT: Attached factory manual procedure, job 35-040, as PDF file - see bottom of post. Both factory tools referenced in the FSM are NLA. The Klann/Gedore tool, KL-0356 may have been available through 2019-2020, but is absent from their 2022-2023 catalogs, and may be NLA now.
I finally decided to try the Miller tools (9110 and 9111) I had purchased to remove and install the front and rear subframe bushings. I took lots of pictures and only did one side today since I am just recovering from walking pneumonia and it just wore me out with 105-degree temperatures outside. It took about 2.5 hours to do one side and probably an hour of that was just screwing around trying to figure out how the tools would help do the job and what I could use instead after they didn't.
Anyway, first I wanted to share some things I learned about the Miller tools, because there was some uncertainty as to whether they would work on my 124.034 (E420). I understand the 124.036 has a different rear bushing than mine, but I still think you might run into the same problems with the Miller tools -- or the factory tools for that matter, if doing this with the subframe on the vehicle.
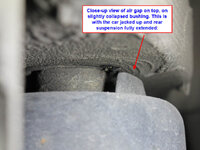
The rear tool, which is the Miller 9110 will work to extract the large rear bushing (non-Sportline in my case), but you have to do three things to get it to work. First, as Dave said, you will have to drill out the center of the old bushing and the new bushing just a smidge with a 1/2" drill bit, so the threaded tool will fit through the bushing. Second, when you remove the bushing bolts and drop the subframe on the side you're doing (by lowering the jack under the differential), you are probably not going to be able to get it down low enough to get any of the tools on the upper part, so I had to find two large brass washers about 3.8 mm thick (think those used on the transmission mount crossmember?) and drill them out to 1/2 ". The two washers will fit on the top inside of the old rear bushing and the U-part of the tool goes underneath (unlike the front tool U-part that should go on top, because the rear bushings go in and out from below and the front bushings go in and out from the top). Third, you will need to find a large nut to fit on the threads of the Miller tool., since the Miler 9110 doesn't have a simple nut like the 9111. Having done these three things, I used an impact driver and pulled the rear bushing out effortlessly. As for installing the new bushing, the tool was not as helpful due to the lack of space on top. I couldn't pull the subframe down enough to get any piece of the tool on top, so I used only the bottom cylindrical part of the tool and some jacks to push it in from below, using plenty of NAPA Sil-Glyde as lube. The rear bushing went in effortlessly. GSXR edit: No drilling is required if using the 9110 (silver-color) threaded shaft in place of the 9111 (black-color) shaft. They are different diameters. And, one of the 9110 silver plates can be used in place of the nut+washers described above.
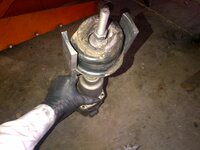
The front tool, which is the Miller 9111 was pretty worthless -- Completely worthless for removing the bushing and partly worthless for installing the new one. When I removed the center bolts and dropped the subframe on mine, the core of the front bushing stayed on the body of the car where the metal sleeve sticks down (the sleeve that the bushing-bolt screws into). The core pulled right out of the bushing as I lowered the differential, leaving me with no easy way to push or pull the bushing out even if the tool did work. I used a hammer and large screw driver to tap and pry around the lip of the bushing and then spray Liquid Wrench in there to loosen things up and get the lip about 1/8" off the base. Then from underneath, I placed the screwdriver in the center of the bushing and rapped in and up with a hammer in a few areas, further loosening it. After doing this for about ten minutes, I moved onto a large crow bar and was able to pry it right out from the top. I did nick the inside of the housing a bit with the screwdriver, but I don't think it did much damage and it didn't interfere with the installation of the new bushing. I tried to use the Miller 9111 tool on installation to draw this bushing up into the housing, but again there was simply no room on top because I couldn't get the subframe any lower, even if I tried to pry it with a large crow bar. [GSXR edit: Removing the exhaust hangers & driveshaft loop should allow the subframe to drop lower.] I ended up using one piece of the Miller tool on top of the bushing (just under the sleeve where the bushing bolt screws in) and just used the jack to carefully raise the differential and press the bushing right in. I did it in small increments to make sure it was going in straight and didn't bend the sleeve. You could probably find a piece of hard steel to do the same thing instead of part of the 9111 tool I used but that piece did fit the bushing quite well.
So, the rear tool (9110) works for extraction, but you have to drill the old and new bushings and have two (I used 3.8mm) thick washers that are drilled with a 1/2" bit. You will also have to find a large nut that matches the threads on the 9110. For installation only the bottom part of the 9110 works and just use jacks to press it in. The front tool (9111) is pretty worthless except for the small piece I sandwiched in between the top of the bushing and the sleeve where the bushing bolt goes. Then I jacked up the differential in small increments and pressed it in. GSXR edit: No drilling is required if using the 9110 (silver-color) threaded shaft in place of the 9111 (black-colored) shaft. They are different diameters.
Since, I am not too adept at using this forum software, I'll try to post the steps and individual pictures I took, but I apologize in advance that it will in no way be to GVZ, GSXR or Lowman's standards. I'm sure they can add things below if they want to clarify anything, especially as it relates to doing this on the 500E which I understand has different rear bushings and a rear self-leveling system that may get in the way.
Preparation:
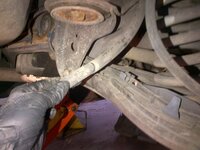
Removing/Installing Rear Bushing:
Removing/Installing Front Bushing:
Feel free to add to this post. I'm planning to do the other side soon, so I'll share any experiences I have on that.
I finally decided to try the Miller tools (9110 and 9111) I had purchased to remove and install the front and rear subframe bushings. I took lots of pictures and only did one side today since I am just recovering from walking pneumonia and it just wore me out with 105-degree temperatures outside. It took about 2.5 hours to do one side and probably an hour of that was just screwing around trying to figure out how the tools would help do the job and what I could use instead after they didn't.
Anyway, first I wanted to share some things I learned about the Miller tools, because there was some uncertainty as to whether they would work on my 124.034 (E420). I understand the 124.036 has a different rear bushing than mine, but I still think you might run into the same problems with the Miller tools -- or the factory tools for that matter, if doing this with the subframe on the vehicle.
The rear tool, which is the Miller 9110 will work to extract the large rear bushing (non-Sportline in my case), but you have to do three things to get it to work. First, as Dave said, you will have to drill out the center of the old bushing and the new bushing just a smidge with a 1/2" drill bit, so the threaded tool will fit through the bushing. Second, when you remove the bushing bolts and drop the subframe on the side you're doing (by lowering the jack under the differential), you are probably not going to be able to get it down low enough to get any of the tools on the upper part, so I had to find two large brass washers about 3.8 mm thick (think those used on the transmission mount crossmember?) and drill them out to 1/2 ". The two washers will fit on the top inside of the old rear bushing and the U-part of the tool goes underneath (unlike the front tool U-part that should go on top, because the rear bushings go in and out from below and the front bushings go in and out from the top). Third, you will need to find a large nut to fit on the threads of the Miller tool., since the Miler 9110 doesn't have a simple nut like the 9111. Having done these three things, I used an impact driver and pulled the rear bushing out effortlessly. As for installing the new bushing, the tool was not as helpful due to the lack of space on top. I couldn't pull the subframe down enough to get any piece of the tool on top, so I used only the bottom cylindrical part of the tool and some jacks to push it in from below, using plenty of NAPA Sil-Glyde as lube. The rear bushing went in effortlessly. GSXR edit: No drilling is required if using the 9110 (silver-color) threaded shaft in place of the 9111 (black-color) shaft. They are different diameters. And, one of the 9110 silver plates can be used in place of the nut+washers described above.
The front tool, which is the Miller 9111 was pretty worthless -- Completely worthless for removing the bushing and partly worthless for installing the new one. When I removed the center bolts and dropped the subframe on mine, the core of the front bushing stayed on the body of the car where the metal sleeve sticks down (the sleeve that the bushing-bolt screws into). The core pulled right out of the bushing as I lowered the differential, leaving me with no easy way to push or pull the bushing out even if the tool did work. I used a hammer and large screw driver to tap and pry around the lip of the bushing and then spray Liquid Wrench in there to loosen things up and get the lip about 1/8" off the base. Then from underneath, I placed the screwdriver in the center of the bushing and rapped in and up with a hammer in a few areas, further loosening it. After doing this for about ten minutes, I moved onto a large crow bar and was able to pry it right out from the top. I did nick the inside of the housing a bit with the screwdriver, but I don't think it did much damage and it didn't interfere with the installation of the new bushing. I tried to use the Miller 9111 tool on installation to draw this bushing up into the housing, but again there was simply no room on top because I couldn't get the subframe any lower, even if I tried to pry it with a large crow bar. [GSXR edit: Removing the exhaust hangers & driveshaft loop should allow the subframe to drop lower.] I ended up using one piece of the Miller tool on top of the bushing (just under the sleeve where the bushing bolt screws in) and just used the jack to carefully raise the differential and press the bushing right in. I did it in small increments to make sure it was going in straight and didn't bend the sleeve. You could probably find a piece of hard steel to do the same thing instead of part of the 9111 tool I used but that piece did fit the bushing quite well.
So, the rear tool (9110) works for extraction, but you have to drill the old and new bushings and have two (I used 3.8mm) thick washers that are drilled with a 1/2" bit. You will also have to find a large nut that matches the threads on the 9110. For installation only the bottom part of the 9110 works and just use jacks to press it in. The front tool (9111) is pretty worthless except for the small piece I sandwiched in between the top of the bushing and the sleeve where the bushing bolt goes. Then I jacked up the differential in small increments and pressed it in. GSXR edit: No drilling is required if using the 9110 (silver-color) threaded shaft in place of the 9111 (black-colored) shaft. They are different diameters.
Since, I am not too adept at using this forum software, I'll try to post the steps and individual pictures I took, but I apologize in advance that it will in no way be to GVZ, GSXR or Lowman's standards. I'm sure they can add things below if they want to clarify anything, especially as it relates to doing this on the 500E which I understand has different rear bushings and a rear self-leveling system that may get in the way.
Preparation:
1. Chock front tires.
2. Loosen lug bolts on both rear tires.
3. Jack up differential with a large jack.
4. Place jack stands under both rear jacking points.
5. Lower differential jack until car is resting on jack stands, then raise about an inch or two. Check jacks stands for stability (I usually try to knock it off the jack stands with all my weight).
6. Remove both rear tires ( you may be able to just remove the side you're doing).
7. Remove plastic cover on fuel pumps with 10mm socket (you will need a 1-foot extension and a 10mm deep socket for the rear nut).
8. Pull the drain hose on the right side out of the hole, so it is not damaged when lowering the subframe.
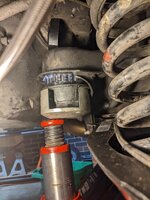
9, With an impact wrench and 19mm socket, remove the front and rear subframe bushing bolts, only on one side at a time. These will creak badly if you try to do it by hand. Plus they were in there pretty tightly. With an impact wrench there should be little to no creaking noises.
10. Lower differential down until the subframe drops away from car. It will hang down about three or four inches.
GSXR edit: Also remove rear muffler rubber donut hangers, FSM job step 2. AND, remove the rubber hangers at the catalytic converter to allow additional movement. Remove the 24mm nut for the driveshaft safety bracket, FSM job step 4, only the one side will be accessible. On a 500E, if the 3 muffler bolts are not rusted, just remove the muffler - this isn't possible on a 400E with factory rear muffler that is 1 large piece welded to the resonator.
Removing/Installing Rear Bushing:
11. Having pre-drilled the new bushings with a 1/2" drill, you also need to drill out the existing rear bushings as well, so the Miler 9110 tool will fit. GSXR edit: The *rear* bushings should not require drilling, the 9110 (silver-color) tool should fit through without modification.
12. Insert the two large pre-drilled washers (discussed above) in the hole on top of and inside the rear bushing. GSXR edit: One of the 9110 plates can be used instead of a nut with washers, however it is a VERY tight fit. The 9110 plate has a threaded center hole. This will quickly remove both early & late style rear bushings, no prybars required.
13. Use the U-piece of the 9110 on the bottom so it is facing upwards and insert the threaded bolt from below through the large 3.8mm washers and nut that you found to fit the threads of the 9110.
14. Use an impact wrench to tighten the threads and the rear bushing should pull right out. If you don't use an impact wrench you will have to hold the nut on top as you tighten the bolt from below. With the impact, I didn't need to do this.
15. Clean all surfaces of the bushing housing with brake parts cleaner and Scotch Brite. I also used fine sandpaper on the inside of the bushing housing so it was really smooth for installation. Apply NAPA Sil-Glyde to the inside of the bushing housing as well as the bushing itself.
16. Use the round cylindrical part of the 9110 on the bushing and use a jack to press it in from underneath. GSXR edit: If installing late-style bushings, use the 9110 to pull the new bushing into place (no jack required).
Removing/Installing Front Bushing:
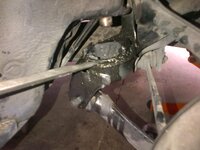
17. The Miller 9111 tool was worthless for removing the front bushing. You will pretty much have to destroy the old bushing to get it out (my limited experience). Use a hammer and screwdriver to tap around the lip and try to get some space between the lip and bushing housing. Try not to collapse the lip completely. Once you have some space, apply Liquid Wrench liberally and continue to tap around the lip as well as from below and up to loosen the bushing. You should eventually be able to pry the bushing out from the top with a crow bar, especially if the core of the bushing is out. Actually, the fact that the core was out made it easier to get the crow bar in there.
18. Clean the bushing housing as before and apply NAPA Sil-Glyde. Place the round flat part of the Miller 9111 tool (see pics) on top of the new bushing, between the bushing and the sleeve where the bushing bolt screws into. Carefully raise the differential in small increments, checking to see that the bushing presses in straight.
19. Install new bushing hardware, noting the orientation of the plates, and torque to 70NM.
20. Install, the fuel pump cover, re-insert the drain hose, install the tires and lower the car.
21. Torque the lug nuts and don't forget to remove the chocks.
GSXR edit: If the front bushing will not fully seat using the weight of the vehicle, it will be necessary to use a threaded rod & appropriate plates to pull the bushing tightly into the subframe. I've had the bushing "pop out" 1-2mm or so after pressing in, you can leave the tools in place overnight to clamp it in place, and see if that helps the new bushing remain fully seated when the tools are removed. ALSO, the 9110 (silver-color tool) has a thinner threaded shaft that fits through the front bushing hole, without drilling.
Feel free to add to this post. I'm planning to do the other side soon, so I'll share any experiences I have on that.
Attachments
-
 Remove drain hose from hole.jpg795.2 KB · Views: 168
 -
 Remove bushing bolt.jpg806.3 KB · Views: 176
 -
 Rear bushing removed Note two washers and nut.jpg902.6 KB · Views: 188
 -
 Installing rear bushing using jacks.jpg1.1 MB · Views: 185
 -
 Front bushing core.jpg1 MB · Views: 178
 -
 Front bushing remains and housing.jpg930.4 KB · Views: 177
 -
 Prying front bushing out with crowbar.jpg1.4 MB · Views: 172
 -
 Preparing to install front bushing using part of Miller tool.jpg893.7 KB · Views: 169
 -
 Installing front bushing using jack under differential.jpg196.1 KB · Views: 165
 -
 Front bushing installed.jpg182.5 KB · Views: 158
 -
 Old bushings rear at left and front at right.jpg1.2 MB · Views: 160
 -
 NAPA Sil Glyde.jpg1 MB · Views: 189
 -
 Miller 9110 & 9111 Subframe Tools.jpg131.3 KB · Views: 194
 -
 Prying Front Bushing Lip.JPG122.7 KB · Views: 184
 -
 Prying Front Bushing Lip 2.JPG92.1 KB · Views: 158
 -
35-040.pdf305.9 KB · Views: 31
Last edited by a moderator:


 .
.