• Hi Guest !

    Welcome to the 500Eboard forum.

    Since its founding in late 2008, 500Eboard has become the leading resource on the Internet for all things related to the Mercedes-Benz 500E and E500. In recent years, we have also expanded to include the 400E and E420 models, which are directly related to the 500E/E500.

    We invite you to browse and take advantage of the information and resources here on the site. If you find helpful information, please register for full membership, and you'll find even more resources available. Feel free to ask questions, and make liberal use of the "Search" function to find answers.

    We hope you will become an active contributor to the community!

    Sincerely,
    500Eboard Management

HOW-TO: Replacing door mirror boot rubber

Caught something this morning on Stu Ritter ordering them last week @$90 price.

Makes you wonder what happened.
M
 
Hi i am a new member,just bought a E60AMG and the black rubber is so hard they started to brake,i ordered from mercedes yesterday and the price is just under £120 in the UK for the pair.

Sully
 
I bought the mirror boots just a couple of months ago, they are available at any mercedes dealer (I ordered from wholesale parts division here at greenway mercedes in Houston. They were less than 100 bucks for the pair, but again that was using my friends wholesale account. Not sure on the retail cost of these.

Chris

edit: I will dig out the invoice later it lists bare cost and suggested msrp on the invoice
 
I just checked prices on parts.com for these and see the costs at $136 and $139 each, plus S/H. Sounds expensive but based on the history above, it's a deal.

Cheers,
Jim
 
It's obvious that MB saw the prices & activity on the boot sales on this site, and adjusted their prices accordingly.

:stickpoke:

:gsxracer:

Usually a dramatic price reduction portends an imminent "NLA" status on said parts.

Word to the wise -- get 'Em new now, or forever be relegated to used boots in the future.


Sent from my iPhone using Tapatalk
 
:chainyank:

The list price has not changed, they are still $242 / $238. However, these parts have a lower-than-normal dealer cost, and parts.com uses a "cost plus" matrix instead of "list minus" as most other dealers use (Gainesville, MBCC, etc). Those 2 reasons combined explains why the booties are cheaper at parts.com than other vendors. However, parts.com also charges a flat 12% shipping fee (in this case, around $34 to ship a 1-lb package) and I don't know if there is any way to avoid the ship overcharge.

If anyone orders a set from them, please let us know if the "freight - quote" option for shipping, or something similar, still exists. I was unable to get to that part of the new checkout process without entering a credit card number, which is not something I was interested in. Even with the 12% S&H overcharge, the total should be ~$310 USD delivered for a pair of booties.

Now, when the price drops to $30 each MSRP, then we can worry about them becoming permanently NLA (Slavic squish strike or something).

:chainyank:
 

Attachments

  • booty.jpg
    booty.jpg
    37.9 KB · Views: 17
For the pair: $224.91 plus shipping at Husker ($236.81). $217.35 plus shipping/handling at parts.com ($245.43). Shipping was less at Husker.
 
So I completed my mirror boot replacement last night and I concur with Derf's recommendation on removing the side mirror allows you to clean/wax the area behind the mirror.

I'll add one other insight: Removing the frame and cover makes the job so much easier. This will involve removing the mirror lens first which is as easy as pushing the part of the lens closes to the car all the way in and pulling the outer edge with your fingers -- so no tools needed. Next you have to remove the frame (first) and cover (second). GSXR highlighted the steps to do it here with pictures. All you need is a flat head screwdriver (and pay attention to which end of the frame comes off first -- the bottom is correct).

This gives you the ability to remove all of the dust/dirt which has accumulated in/under/around/behind the mirror and cover. I cleaned mine up with a wet towel with some dish soap and then wiped it down with a damp towel before spraying 303 Aerospace Protectant.

Best of all, you don't have to use your wife's pots and pans to heat up water to make the boots more pliable. Just be sure to secure the pointed end first and the rest of the boot will follow. Adding the cover and frame afterwards is easy and just snaps together (Hint: You pulled the frame off first and then the cover but on the reinstall put the frame on first and then snap in the cover).


Robert
 

Attachments

  • image.jpeg
    image.jpeg
    1.7 MB · Views: 33
  • image.jpeg
    image.jpeg
    1.6 MB · Views: 27
Ntrepid: I just read over your posting on mirror boot replacement and looked at Dave's photos. Since I just bought a used pair from Gerry I now need to install them on my E320.
Would you go over the procedure to remove the glass and plastic frame. Does the frame just pop off with pressure from the screw driver inserted on the bottom edge ? I'm afraid of cracking the plastic.
Thanks in advance.

Regards,

Peter Weissman
 
Peter, did you look at the "mirror_disassembly" folder at the link in post #3? That shows how to remove the painted plastic frame.

The glass will pop out, but I'd do that after removing the plastic so you can see what's going on at the back side.

Remember that you don't have to remove this stuff only to replace the rubber boots.

:banana2:
 
Dave: So to replace the boots the glass and frame do not have to be removed ? I assume then I would follow the soak the boot method. I did look at your photos in the earlier link which lead me to believe the frame had to be removed.
Always appreciate your assistance.

Regards,

Peter W.
 
Ntrepid: I just read over your posting on mirror boot replacement and looked at Dave's photos. Since I just bought a used pair from Gerry I now need to install them on my E320.
Would you go over the procedure to remove the glass and plastic frame. Does the frame just pop off with pressure from the screw driver inserted on the bottom edge ? I'm afraid of cracking the plastic.
Thanks in advance.

Regards,

Peter Weissman

Peter -

Removing the glass is easy as you push the mirror in as far as it will go on the outside edge (furthest from the car when mounted) and then slip all four of your fingers behind the edge which has been pushed out and gently pull it out in the direction parallel to the ground (as if it were still mounted on the car). What you are trying to disengage is a ball from a socket joint (see picture #2 in my last post)

As Dave says above, you can also wait to pull the mirror until after the casing is off.

The frame does not ”pop off” where the entire frame comes off once you get the end off. You have to work the flat head gently around the mirror starting at the bottom edge, you’ll see it will come off easily once you get it started.

Lastly, before reassembly is a great time to use some 303 Aerospace protectant to clean out years of dust/dirt deposited.

Hope that helps.


Robert
 
Last edited:
Peter, the frame does not HAVE to be removed to replace the boots, but Robert does mention in post #60 that the job is easier if you take the mirror apart first. Since it's not all that difficult to remove the glass and plastic covers, that might be the preferred method. Next time I do this job, I'll try it both ways for comparison.

:strawberry:
 
I think I understand the technique.
Anyway you can post a pic of where the putty knife is inserted?
Regards,
Don't know if this tip has been mentioned before: When I did this project, I dipped the new rubber boots in a pan of very hot water just prior to installation. Makes it much easier to stretch the new part into place.....

Also, be very careful when removing the triangular trim cover from the inside of the door. There is a plastic tab on the back side that is very easy to break. I found (after breaking a few of these) that using a flat metal putty knife works best. It allows you to apply a perpendicular (to the door surface) force right next to the tab.......

Hope this makes sense.

J. M. van Swaay
 
Tip for the plastic tab, on the interior triangle trim piece, if you can remove it intact: The tab has edges that stick out and "grab" the white plastic insert in the door metal. The tab edges are what make it so hard to remove. If you file these down so the edges are rounded, and not as tall, it will allow easier removal next time with much less worry about the tab breaking off. Done properly, the trim will still be retained tightly.

My only tip for removal is to squirt some aerosol lubricant directly at the tab area with the thin tube that comes with the can (i.e., WD-40 with the thin red schnozzle). I'll have to fiddle with a putty knife next time. I generally use a thin screwdriver to try and pry at the base of the tab. Blasted triangles are really hard to remove without breaking the damn tab.

If you don't lose the broken tab, you can re-attach it with plastic epoxy (PITA, but possible). It's almost like MB meant for the trim to break on removal and be replaced with new each time. :blink:

:sawzall:
 
Dave is correct regarding the plastic tab on the trim triangle. Very difficult to remove without breaking the tab. There's also a small guide pin that also always breaks off. The tab is located almost at the point of the triangle, set next to the A pillar ( looking at it with door closed). Stick your trim tool or putty knife half way up and lever the trim off. But don't worry if you break the tab ... a couple of small blobs of trim adhesive will hold it in place. BTDT several times.

Regards,

Peter W.
 
Dave & Robert, OK passenger side mirror boot has been replaced. The frame was easy to remove once you get it started. Didn't see a need to remove the glass. Put the new boot in hot water for a few minutes then followed Derfuror's write-up to install it. No problems. Thanks again.

Regards,

Peter W.
 
It's almost like MB meant for the trim to break on removal and be replaced with new each time.

Speaking of that tab, I think I just ordered one from Napperville but not sure I got the right part number. Is this part 124 720 11 11 8320? I have a parchment interior (not mushroom) so I asked them to double-check the part number for me. It says "Plate, Int Mirror Mou."
 
Jon all the mushroom parchment supersedes to the pre 94 version, its the way it goes. If you have the old one, and some 3m adhesive remover, you will need to gently loosen the glue around the edges of old and new, swapping the cover over to the abs that you just bought. It is about 20 minutes taking your time.
 
Speaking of that tab, I think I just ordered one from Napperville but not sure I got the right part number. Is this part 124 720 11 11 8320? I have a parchment interior (not mushroom) so I asked them to double-check the part number for me. It says "Plate, Int Mirror Mou."
Jon, color code 8320 is Palomino (pre-facelift, interior code xx4).

For Parchment (facelift, interior code xx5) the suffix should be 8F33. See attached screenshot with EPC footnotes.

The bad news is, it appears Parchment is NLA. They may have changed your order to the next closest color available (Palomino).

As Louis mentions above, you can remove the colored Tex from new + old pieces and glue your old Parchment upholstery to the new black plastic with good tabs.

BTW, looks like black is still available for both sides w/electric mirrors, plus Palomino, blue, and red for the driver side electric mirror. Search for A1247201111 at link below, items without a price are NLA:
http://partssearch.mercedes-benz-classic.com/parts/

:runexe:
 

Attachments

  • Parchment.jpg
    Parchment.jpg
    113.9 KB · Views: 27
Thanks, guys. I will swap it out if they send me the Palomino instead of Parchment.

Dave, what is the code for black?
 
Jon, interior code for black is xx1, so in the previous screen shot the 4-digit suffix for this particular part is -9045.

The 4-digit code varies by part number, so you can't presume that black will always be -9045.

:matrix:
 
Jon, color code 8320 is Palomino (pre-facelift, interior code xx4).

For Parchment (facelift, interior code xx5) the suffix should be 8F33. See attached screenshot with EPC footnotes.


Just a follow-up. I just contacted MB of Napperville and they verified that 8F33 was superseded by 8411, then 8320, which is what they are sending me, because it matches my VIN. She said it was not Palomono but Parchment. We'll see when it arrives. She said there are now three of these left in the US and 22 left in Germany. Mine is coming from New Jersey. Get them while they last.
 
Just a follow-up. I just contacted MB of Napperville and they verified that 8F33 was superseded by 8411, then 8320, which is what they are sending me, because it matches my VIN. She said it was not Palomono but Parchment. We'll see when it arrives. She said there are now three of these left in the US and 22 left in Germany. Mine is coming from New Jersey. Get them while they last.
OMG. They are so clueless. 8F33 is Parchment, 8411 is Cream-Beige, and 8320 will most definitely be Palomino. At least it's relatively cheap (compared to black!).

:oldman: :oldster:
 
Should I cal her back and ask whether the MB gurus in Germany have deemed parchment to be the "new mushroom"?
 
Should I cal her back and ask whether the MB gurus in Germany have deemed parchment to be the "new mushroom"?
No, it's just a misinterpretation by the nice lady you talked to. This is a "functional equivalent" supercession, meaning the item you will receive will work just fine. However it happens to be the wrong color. Usually the parts department folks understand this stuff, maybe she's new or helping out from a different department.

:scratchchin:
 
I'm thinkiing of retaining this Jelmerian subject-matter expert to assist me in my quest for the "real" parchment. He can't be fooled.
 
Oh, he’s proven many a’time that he can be Yoinked quite thoroughly....


Sent from my iPhone using Tapatalk
 
I talked to Napperville again today and asked them to verify that 8320 was parchment -- not palomino. He ended up admitting that it was indeed palomino and that parchment is NLA. I guess I'll be swapping out the Tex.
 
UPDATE:

I received the window piece today and, sure enough, it was palomino (8320). I decided to peel the old Tex off and transfer it to the new plastic. It was fairly easy to do once the Tex was heated with a heat gun. I used a small screwdriver to work my way around the whole piece and loosen where the Tex attaches to the back. I was careful not to use too much heat -- just enough to loosen the adhesive where the Tex attaches in back. Once the back is peeled away from the edges, the front peels right off.

Putting the old Tex on the new piece was easy enough too. I used spray adhesive and held it in place for a few minutes with large paper clips. The hardest part of the job was taking my time and heating the back edges little-by-little as I worked my way around with the screwdriver so as not to tear the Tex.

The whole operation took about 30 minutes.
 

Attachments

  • IMG-20180228-00282.jpg
    IMG-20180228-00282.jpg
    2.3 MB · Views: 22
  • IMG-20180228-00281.jpg
    IMG-20180228-00281.jpg
    2.4 MB · Views: 19
  • IMG-20180228-00280.jpg
    IMG-20180228-00280.jpg
    2.4 MB · Views: 20
  • IMG-20180228-00279.jpg
    IMG-20180228-00279.jpg
    2.3 MB · Views: 21
  • IMG-20180228-00284.jpg
    IMG-20180228-00284.jpg
    1.6 MB · Views: 19
  • IMG-20180228-00286.jpg
    IMG-20180228-00286.jpg
    2.4 MB · Views: 21
Last edited:
I just purchased and received new boots! There are so many US dealer online vendors now, and prices are just all over for OEM parts. MB Naperville & MB Classic are always reliable sources, but the lowest price I found was at MB Portland for 43% off MSRP. (There are multiple online MB dealers selling mirror boots at ~40% off)

Prices @ MB Portland: $219.21/pair ($82.36 & $136.85) + shipping
https://www.mbpartspros.com/oem-parts/mercedes-benz-rear-cap-1248110461
https://www.mbpartspros.com/oem-parts/mercedes-benz-rear-cap-1248110161

It took about 3 business days to receive the items. They had to order the parts first and the shipped out from Portland to WA.

Interestingly, one has '97 and the other has '06 manufacturing dates. 21 & 11 years old!! As can be seen in the photos, '97 one looks "old" with multiple whitish marks all over. It looks like my 20 year-old black rubber snorkel fins! '06 one looks nice and black overall. Both are definitely new and feel soft, but don't match at all! Even texture seems little different. I could probably use 303 or other rubber protectant to bring its luster back, but not sure if both will look the same after all. I wasn't planning on installing anytime soon, but to save them for future need since mine are only just starting to develop fine cracks.

For those who purchased NEW from dealers, do you remember the manufacturing years? Were they looking nice and black or were they looking old, whitish black like the '97 one in the photo? Curious if the ones being sold in Europe at more reasonable costs are more recently manufactured ones. For any rubber parts, I would want freshest parts possible! Should I try to exchange the "old" one with more recently manufactured on to match the '06 boot?
 

Attachments

  • IMG_5856.JPG
    IMG_5856.JPG
    792.7 KB · Views: 19
  • IMG_5855.JPG
    IMG_5855.JPG
    1 MB · Views: 20
Curious if the ones being sold in Europe at more reasonable costs are more recently manufactured ones.
They are all coming from the same source, so no, the ones in Europe won't be any different. Many parts have substantially different prices in USA vs Europe, but it isn't because they are drawing from separate/different stock.


For any rubber parts, I would want freshest parts possible! Should I try to exchange the "old" one with more recently manufactured on to match the '06 boot?
It would be a waste of time. There's a tiny possibility of mixed inventory, meaning for a given part number some parts in the bin may be newer than others, but even if so there's no way to request a "newer" production part. It's whatever the warehouse guy picks and trust me, he doesn't care about the date code.


Side note - This dealer isn't selling all parts at ~40% off list. Their pricing matrix is based on cost, not MSRP, and some parts have a wider range between cost vs MSRP. Mirror boots happen to be one of these parts, so certain dealers will be substantially cheaper than others. Also, this dealer has a variable cost matrix (sliding scale)... more expensive parts have larger discount, cheap parts have a smaller discount. Compare some $3 screws (for example) and you'll find Naperville will be cheaper. Napervllle's pricing is based on MSRP, not cost.

:klink:
 
Bought a pair of used boots off of eBay this week for $80. They were coming today, so I got the mirrors off the car, cleaned everything up, and when the boots arrived plunged them into a bucket of hot water for a bit. Installed them without issue, soaked them liberally in 303 to protect them from the Florida sun, and now I have some nice looking mirrors.

Before:

Drivers Mirror before.jpg

Did my Mercedes Martha Stewart thing while they were off the car:

Drivers Side Dirt.jpgDrivers Side clean and waxed.jpgCo_drivers side dirt.jpgCo_drivers side clean waxed.jpg

After:

Co_Drivers Mirror after.jpgDrivers Mirror after.jpg
 
Last edited:
I just did this job and it took all of 90 minutes for both mirrors, thanks to all the information on this post. I bought a pair of earlier "Bolshevik boots" that were more pliable so maybe it made the job that much easier.

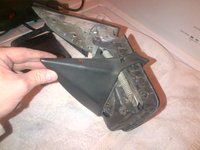
The mirror easily came off with three screws after removing the interior triangular piece. The electric plug on the passenger side was held on with a tiny center screw.

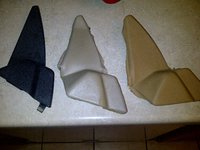
I began by removing all the old petrified rubber. Then, starting at the bottom of the mirror, I popped the end of the side trim off with a screw driver and simply worked my way around to the top until the whole trim piece was off. That left the front cover which only took a few seconds to pry loose.

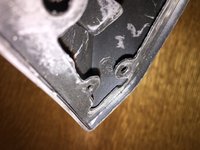
I used a heat gun prior to installation, holding it a few inches away for about two minutes and constantly moving around the whole boot to soften it up. It slid right on from the outside (end opposite the mounting frame) and I was actually surprised that there was hardly any stretching effort to get the boot onto the triangular frame. I used a flat-head screwdriver over the sharp tip of the triangular frame to prevent it from tearing the boot as I stretched it over. Once the boot was on, I installed the gasket, side trim piece, then the front cover and it was ready to reinstall on the car.

So, I think that for the short time it takes to remove the side trim and front cover, it is definitely worth the effort.
 

Attachments

  • 2.jpg
    2.jpg
    1 MB · Views: 19
  • 4.jpg
    4.jpg
    1.1 MB · Views: 19
  • 1.jpg
    1.jpg
    1.1 MB · Views: 18
  • 5.jpg
    5.jpg
    1 MB · Views: 18
  • 7.jpg
    7.jpg
    1.1 MB · Views: 20
Last edited:
MB Annapolis lowered their prices to levels even below MB Naperville and others. Unfortunately unless you are local or will pick up in person, they charge shipping. And they charge 6% Maryland sales tax on all purchases. But, their prices are among the VERY best that I've seen out there.
 
MB of Scottsdale has even better rates on these boots, but I'm not sure if they charge AZ sales tax for out-of-state purchases. I've made several orders and they have processed each within a few days. If you fill your cart and then don't buy it, they usually send you an email promo code for 20% off shipping. It has always been 20-OFFSHIPPING for me.

 
Jon, is MB Scottsdale shipping during the COVID crisis? I am seeing that a fair number of dealers (including MB Naperville and MB Portland) with low-ish prices, have stopped shipping orders in recent weeks. I know for sure that MB Annapolis is shipping orders (and making them available for pickup, if local).
 
It's not about the MB warehouses being open or not. The parts warehouses around the country pretty much HAVE to be open, to service the dealership network around the country.

My post was about whether the RevParts MB dealers are shipping orders or not. Several people have said that their Naperville orders have been outright cancelled. Even their site has a banner that says that things are having delays. MB Portland's web site also seems to be showing that they are not fulfilling orders at the present time.

Three orders in 12 days shipped from Naperville? :wtf:

So you are one of those guys that MB Naperville was saying is taking advantage of their free (now discounted) shipping, by placing multiple small-dollars orders every few days, instead of far fewer, and more consolidated, orders? Tsk tsk.
 

Who has viewed this thread (Total: 3) View details

Who has watched this thread (Total: 4) View details

Back
Top