Not Evos... NEEZ! That's, like, turning the knob to eleven.

Oof. Just now understanding what you were saying Dave.
Jlaa... my deepest apologies...
My E500Eguru epaulettes will surely be taken now!
Sent from my iPhone using Tapatalk
Follow along with the video below to see how to install our site as a web app on your home screen.
Note: This feature may not be available in some browsers.
Not Evos... NEEZ! That's, like, turning the knob to eleven.


")


There is something fascinating about how things age. How long do you think that radar unit was in there?
Beautiful headlights. Maybe now just paint the impact strip for one menacing look?
that impact strip will stay black as long as the car is under my care. And, by "as long as," I mean a long time
Installs like this one are not carried out often any longer, great job, great selection of components!!!....
Net result is that the stereo now sounds wonderful!!! ...

Speaking of... you have an ECON gauge?!
 I have compared this depth and stage perception to a Volvo that I have that came from the factory with an extra-fancy-premium-audio-system that comes with center-channel speakers in the dashboard and also has various Dolby Pro whatever modes, and I was floored to discover that the 500E, even without the benefit of a center-channel-speaker, affords the listener a superior sense of depth and stage perception. )
hahaha. Or perhaps you were using Craig or Kraco or Jensen or Realistic or or or .......... The last time I messed with this stuff it was a 70 Chevelle SS in 1983 playing Van Halen II on an 8 track and the Audiovox 100W power booster.
Jlaa,
I’m happy for. You’ve put a lot of time, $$$, effort and challenging fun into your stereo system and it sounds like your really going to enjoy it.
All of that work would be wasted on me. For me age and my wooden ear drums, I’ll stick w/ my Nakamachi and the stock system. It sounds good enough. My 2015 KIA Optima beater has a great stereo. It works w/ my 10 yr old I-Pod, has mpg which I have never used and Bluetooth for my I-Phone. What else could I ever want.
PS: I’m not deaf but I remember about 15 years ago when when my 6 year old grandson was hearing notes that I could not hear. As you age it gets worse. Similar to we can’t hear a dog whistle.
lol
Now that I've had this stereo installed for about a month, I have now had the opportunity to tune it for optimum sound quality. Let me first preface this by saying that I am not a hi-fi hobbyist at all. I do not own have a home stereo system with all kinds of fancy gear, and I have always held the opinion that I have relatively wooden ear drums, and that many hi-fi hobbyists like to geek out over the equipment more than the music. When I listen to music at home, I just play the music through my iPhone to some ceiling speakers. Casual listening.
With all that said, tuning the system in the car has made a huge huge huge difference. The sound is spectacular. Specifically, the perception that the singer is in front of you on the hood somewhere, and that the backup band surrounds you from left rearview mirror to right rearview mirror is incredible. This is very apparent when listening to Jazz, for example, Diana Krall, whom I have dryly observed in 2018 seems to be the "national anthem of the Legends of the Autobahn" events.
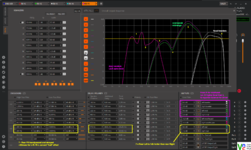
Note that tuning is accomplished entirely by software. There are no knobs or dials or switches whatsoever on the JL Audio Vx800/8i DSP/Amplifier device. I will attempt to document how this was accomplished below, and reference the screenshots with the numbers embedded in the screenshots. Hopefully this helps someone in the future (here's looking @ you, @maw1124 and @gsxr
That's it! I learned a lot in this little project on how to listen --- I had a lot of fun w/ this and I hope this helps someone in the future.
- Firstly, utilizing an all-actively-crossovered system is paramount. In that way you have way more control over which driver (driver in this sense being a woofer/tweeter/etc) is playing what, and at what level, and when. If you use a passively-crossovered system, you lose this flexibility, and this flexibility is very important for reasons you see below.
- Equalization curve for door woofers in Jehnert panels
- 1 - By low-passing this at 48 db/oct, I realized the low end bass response is very very much enhanced!! I originally had this set to 12 db/oct and while that sounded good at the time, I realize now that the slope is too shallow, Using a much steeper curve allows the low end response to be VERY much improved, and you can see a tiny little bump up I have added at around 48Hz for emphasis.
- 2 - I reduced the output in the 100Hz range as there seems to be some in-cabin resonance at this frequency range--- too much "thump". My technique to figure out where to reduce the output was to use youtube and play various test tones - i.e. youtube for "100hz test tone" or "125 hz test tone", ad nauseam.
- 3 - Around 250 hz, there seems to be a slight null in cabin response, which is why you see the peak in equalization, and then it crosses over at 300 Hz at 24 db/oct. THIS IS VERY IMPORTANT. By using such a steep slope at 300 Hz, you ensure that almost NONE of the vocal output goes through the door woofers.
- Equalization curve for scanspeak midranges in dash
- 3 - Note the midranges start at 250 Hz at 24 db/oct. THIS IS VERY IMPORTANT. This ensures almost all the output of the singer's vocal come through the midranges in the dash, and anchors the perception that the singer is on the hood. I originally had this around 500Hz and that ended up totally smearing the image perception because the bottom of the singer's voice was coming from the doors, and the middle parts of the singer's voice was coming from the dash. I didn't realize how smeared that was at the time until I changed the crossover point to 250Hz -- and this was the biggest single positive effect that I noticed. Wow. Once I made this change, the image perception improved eleventy billion. I can't overstate how incredible this sounded.
- 4 - Again, there is some in-cabin resonance around 700Hz, so I tried to EQ that out.
- 5 - Here I am boosting the output of the midranges --- note that the drivers all have different sensitivities, and so it may be that I am equalizing for that. There may also be a null again in cabin-resonance at this point. Also note that right output is 1db higher than left output, to level-match for the driver of the car who sits in the left side of the car.
- Equalization curve for focal tweeters in dash
- 6 - There is a steep cutoff (48 db/oct) at 17,500 -- I can't hear above that anyways. Note that I am running the right side 1.5db hotter than the left side as well.
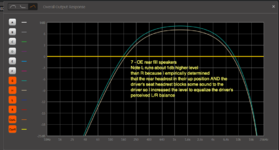
- Rear Fill Speakers (OE)
- Note the 20 ms delay to the rear adds to the "concert hall" effect. You don't hear any vocal coming from the rear because the rear channels are albegraically subtracting out the common information (L-R) and (R-L).
- Also note that the left channel is actually 1 db hotter than the right, because the front seat and rear seat headrests block some of the sound that reaches the driver's ears, and so I am using levels to compensate.
View attachment 87405View attachment 87407
This will be the last thing I will change in the reconditioning of my car. I know nothing about audio installation (I did once put a Kraco radio in a 67 Camaro) so I'm grateful for your in depth coverage. If we were closer I'd try to convince you to do the work for me! As it is I'll be able to have someone reference your work. I do enjoy my music and good audio equipment.
drew
Drew, if it’s not bothering you, well... don’t bother. On a ‘92 car it’s a lot of work. I did it as a knee jerk because I couldn’t stand the system as it was. But that was less than a month into my ownership.
maw
Well the tools to keep it and have sound adjustment via an amplifier now exist, unlike in 2011 when I did mine. Still not cheap, but JLAA has laid a splendid road map for it, IMO.I would very much like to keep the 1432.
drew


 Time to order a new plastic-fork clip (The white thing -- pic courtesy of @a777fan) Eighty-Nine Cents each.


Those white clips are broken or missing probably 75% of the time when I remove drip trays to sell to you guys from 124s in the yards.
Nice work, Jlaa!
BTW... your car is one of the late 1993 builds that has the late-style rubber strips across the bottom of the windshield. The VIN break was just before the facelift. Totally different setup before & after, make sure that channel at the base of the windshield glass doesn't crack or break, it's not available separately!
Took my time and replaced the HVAC blower motor and the blower motor regulator. Since I bought the car 3 years ago, the blower would chirp occasionally on the low fan setting. Initially it would chirp maybe 10% of the time and then go away by itself. More recently it started to chirp 50% of the time --- very irritating.
First, parts acquisition --- I was irritated that the list price for original OE parts, especially the blower regular, seemed to by off the charts! Over $400 for the regulator and over $300 for the blower. The regulator I think is just some power transistors and a big heatsink too --- c'mon, $400+?
I found the OEM (Bosch/Behr) version of the regulator with the Mercedes Logo part number still on there but the star scratched off --- and curiously co-branded with ACM --- for only $147.
I took a chance on a VDO blower (OEM is BEHR). The VDO blower was only $31 + shipping on closeout special --- curiously it was manufactured for VDO by TYC, which happens to be a Taiwanese company that manufacturers OE blowers for companies like Ford and Navistar. Oh well, $31 vs $200+ for an OEM BEHR part - I figured with the dirt cheap price, I'd try the VDO/TYC blower. the packaging was certainly very well thought through. If it breaks prematurely, I can always replace it --- an HVAC blower is not a mission critical part.
View attachment 88260 View attachment 88261 View attachment 88262 View attachment 88263
I spent 3 days doing this --- 30 mins here and there, when I had a little free time, and super slow and methodical working made for a pleasurable project with no huge eff-UPS. Basically for every n-units of time spent, 0.3n was spent actually doing the task, 0.2n was spent reading about the task and scrutinizing the pictures for the task from various HOW-TOs, and 0.5n was spent cleaning the @%$#*%$#*( grossness from 26 years of accumulated dreck off the parts!
This was just the tip of the iceberg of the grossness -- under the seals, accumulated in corners of the air intake, in the crevices of the aluminum base of the mono wiper --- ugh...
View attachment 88265 View attachment 88266 View attachment 88267
Watch my back --- I'm going in! (Ugh more gross ---- purple vacuum line is for my headlights)
View attachment 88268
Sesame is opened! (Ugh - more crumbling foam and more grossness). This has to be the original blower. So old. Motor shaft has corrosion! No wonder it squeaks / chirps --- wonder what the bearings look like. Note awesome harbor freight light.
View attachment 88270 View attachment 88271 View attachment 88272 View attachment 88273 View attachment 88276
Here is the location of the secret screw that must be removed to facilitate EASY REMOVAL AND REPLACEMENT of the regulator:
View attachment 88274
More grossness:
View attachment 88277 View attachment 88278 View attachment 88279
Rubber grommet w/ the new regulator is just tiresome and fiddly to get seated:
View attachment 88282
New stuff all mounted and running!
View attachment 88286 View attachment 88283 View attachment 88285 View attachment 88284
Getting the mono wiper foot back on with the isolation-rubber and ensuring the clamp properly clamps both the wiper bracket and the chassis bracket:
View attachment 88289 View attachment 88288 View attachment 88287
Everything is all back together again!!!!!
View attachment 88290
Annnnnnnndddddddd.... It wouldn't be a project unless I broke something. I *always* manage to fudge something up. ALWAYS. Its what I do.
View attachment 88293 View attachment 88292


Thanks! Yeah, doing this job lets me really admire some of the decisions that Mercedes-Benz engineers made. For instance, the single mustache rubber strip thing is really interesting and intricate in the way that it works. They have that lower flappy sealing thing that you have to press in to the channel, and then you are not done! You still have to put the ridge that is on the upper half of the mustache into a different channel! Such a complex rubber piece!
The white plastic forks are another piece of totally unnecessary overengineering. And, it is so strange because these two plastic forks are the only fasteners on the car that are anything like this!
On the other hand, the engineers made some really dumb decisions too. For example, that black plastic nut which holds the plastic panel in place, which is to the right of the two flower bolts is totally retarded. First, there are so many other things in the way. Second, once you get your fingers in some crazy convoluted and contorted position to reach the nut, you realize that it is so easy to drop that nut into the black hole of the engine bay. Thirdly, the stupid nut is plastic which means you cannot even use a magnet to help your poor fingers guide the nut onto and off of the threaded post!
@kiev, the VDO/TYC is yours for the cost of shipping if you'd like it! Low speed indeed is like medium speed with no real low-speed.
Nice write up Jlaa, now that my odometer gears are quiet i hear my blower motor chirping and whining as well. This is next on the list to get a super quiet interior.Took my time and replaced the HVAC blower motor and the blower motor regulator.
I enjoyed this thread especially because I am currently restoring a red w202 c43 amg yard find.
This was like a shot of motivation but its been too cold up here lately. I appreciate your attention to detail, I have that obsession as well.
Where in Northern California are you? I think it would be awesome to see your car next to mine considering they are both red which are super rare colors on both models.
You're more than welcome to start a thread in either the Off-Topic section, or AMG/Tuner car section. It fits into either one.I have one on mbworld w202 amg section. Wasn't sure if its appropriate to post here since its a 500E board.
Which wheels are you looking for?I came here looking for specific wheels for this car...

You're more than welcome to start a thread in either the Off-Topic section, or AMG/Tuner car section. It fits into either one.
Which wheels are you looking for?
I enjoyed this thread especially because I am currently restoring a red w202 c43 amg yard find.
This was like a shot of motivation but its been too cold up here lately. I appreciate your attention to detail, I have that obsession as well.
. Would be awesome to see a c36, c43, and a 500e all in red in one spot. I doubt thats been done before.