• Hi Guest !

    Welcome to the 500Eboard forum.

    Since its founding in late 2008, 500Eboard has become the leading resource on the Internet for all things related to the Mercedes-Benz 500E and E500. In recent years, we have also expanded to include the 400E and E420 models, which are directly related to the 500E/E500.

    We invite you to browse and take advantage of the information and resources here on the site. If you find helpful information, please register for full membership, and you'll find even more resources available. Feel free to ask questions, and make liberal use of the "Search" function to find answers.

    We hope you will become an active contributor to the community!

    Sincerely,
    500Eboard Management

HOW-TO: Removing and re-sealing ZF tandem pump (SLS and power steering)

gerryvz

Site Honcho
Staff member
ADMIN EDIT: I cleaved off the power steering posts from my thread on the transmission upshift issue, and created this new thread.

GSXR EDIT: Merged related threads (see post #119), re-named thread.

NOTE: If you are leaking power steering fluid, most likely you DO NOT need to remove, re-seal, or rebuild the tandem pump. If you are leaking SLS fluid and the hoses are all dry, you most likely will need to remove and re-seal / replace the tandem pump.


I was losing about a drop an hour of transmission fluid on the floor of my garage, since I changed the fluid and filter. After taking things out yesterday for a run, to be sure they were working OK, it was time to tackle the minor leak. So today I got under the car with a torch and checked to see where the leak was coming from. It was at the drain plug.

I had re-used the original drain plug (which had shown some signs of minor stripping of the 5mm hex socket from past oil changes) and washer, and it was probably the re-used washer that was causing the problem. Luckily, I'd ordered two brand-new drain plugs and four copper drain-plug washers for the transmission pan, on my parts order from AHAZ. So, I put my catch basin under the transmission pan, readied the new drain plug with copper washer, loosened the old one with one hand and immediately installed the new one with the other hand. Minimal fluid lost, and all done in less than a minute after tightening things up.

No leakage since. A careful inspection of the pan gasket around the perimeter of the pan showed no leaks whatsoever, indicating a good seal job at the pan.

So, I will consider this job done. I took some brake cleaner and cleaned around the power steering pump from up above. It appears that the pump itself is leaking, not the hoses. So, that means the pump has to come off and get re-sealed. Just the right time of year here in Texas to do this. That's my next job on the E500, and the next one after that will be to install new upper strut mounts, and the RDMTek rear lower control arms, and new upper strut rubber bushings. Oh yeah, and my 1-bump spring pads all around....

Cheers,
Gerry


========================
:update:

Hi Gerry,
Are you certain it isn't the feed hose from the power steering reservoir to the pump? Mine was leaking (and it is a very common leak) and is now fixed. Reach down below the reservoir and see if that short hose is wet. You can barely see the hose clamps if you look closely from the top with a flashlight above the pulley which drives the tandem pump.
Much simpler job than removing and resealing the pump.

I can send you some of the hose if you don't have it. Dealer wants to sell you a meter when you need 2".

When I assembled mine, I dropped 4 new clamps onto the new hose, so I could double clamp if it started to leak.

Doug


On Doug's advice, I headed out to the garage to do a little further (and closer) investigation on my leaking tandem pump assembly. Had a couple of goals ...

1) to confirm what type of pump I actually do have

2) to check closer, to see if the source of the leak could be determined

I may well have answers now, to both questions.

It actually appears as if it may well be the short hose between the reservoir and the pump body itself.

And, my pump is very definitely a ZF model, NOT a Vickers/LUK model. I was able to clearly see the green and silver plate on the outside of the pump with the ZF logo and the word "Zundfabrik," which tells me all I need to know.

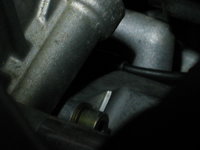
A thorough investigation of the high-pressure hoses indicated that they did NOT seem to be wet (I had not cleaned them with brake cleaner over the weekend, just the pump, pulley and under-reservoir area itself). After removing my intake tube and the black plastic distributor cap cover, I was able to see things just a bit better, and could see that there was some wetness around the short hose piece joining the pump and the reservoir. Sticking my fingers in this area confirmed this -- they came out very wet.

You can see the one sort of cloudy photo that has the best close-up I could get of the short-hose area under the reservoir. You can see that it's quite wet and gritty in there....

You can see photos from my investigation, attached below. Sorry about the quality -- hard to get a pinpoint focus on things with a 10-year-old Canon PowerShot S45. But you get the idea. You can see the areas under the reservoir that cleaned up quite nicely with the brake cleaner. From what I can see, there was no seepage after driving the car ~15 miles yesterday, or just standing over night.

After already compiling a dossier/folder of information pertaining to a pump removal and rebuild .. it is looking quite possible that I may escape from this one with just a reservoir removal and hose replacement. I guess I'll know more once I get into this job and get into it layer by layer.

First things first - need to drive the car a couple or three hundred miles to see if I can get it to leak some more PS juice.

Cheers,
Gerry
 

Attachments

  • IMG_2002.jpg
    IMG_2002.jpg
    466.6 KB · Views: 282
  • IMG_2013.JPG
    IMG_2013.JPG
    272.6 KB · Views: 194
  • IMG_2012.JPG
    IMG_2012.JPG
    289 KB · Views: 192
  • IMG_2011.JPG
    IMG_2011.JPG
    364.2 KB · Views: 202
  • IMG_2010.JPG
    IMG_2010.JPG
    291.9 KB · Views: 199
  • IMG_2009.JPG
    IMG_2009.JPG
    631.6 KB · Views: 205
  • IMG_2008.jpg
    IMG_2008.jpg
    352.6 KB · Views: 209
  • IMG_2007.JPG
    IMG_2007.JPG
    276.6 KB · Views: 207
  • IMG_2004.JPG
    IMG_2004.JPG
    438.9 KB · Views: 232
  • IMG_2003.jpg
    IMG_2003.jpg
    500.9 KB · Views: 247
  • IMG_2014.JPG
    IMG_2014.JPG
    282 KB · Views: 200
Re: Transmission problem -- VERY reluctant to upshift

It appears that the pump itself is leaking, not the hoses. So, that means the pump has to come off and get re-sealed.

Gerry, is the 500E p/s pump different than the E420? If it's the same, you don't have to remove the pump -- you just need to take the front part of the pump off.

Loosen the three pulley bolts, take the poly v-belt off and remove the front six bolts for the pump and this allows you to remove the front half. You can get to the radial seal on the front half, which is usually what leaks on the pump. Am I misreading your post?
 
Re: Transmission problem -- VERY reluctant to upshift

The 500E/E500 pump is a tandem pump, 400E/E420 pump is not. They are totally different, the tandem pump has to come off and be resealed on the bench. Not a fun job, btw... the R&R is a PITA and then the actual re-seal is no picnic either. BT, DT. Don't forget to verify which pump you have *before* buying the kit, the two different brands (ZF vs LUK) use different seal kits. I'm looking forward to Gerry's writeup + pictorial on this job!

:watchdrama:
 
Re: Transmission problem -- VERY reluctant to upshift

Wow, that's the only time I think I'd be glad to have an E420 instead of a 500E. Disregard. I'm sure Gerry's writeup will comprehensive. Do we have any new WTF avatars? I'm sure it won't be the popcorn avatar if this job is as tough you say. Well, maybe for you it would be the popcorn.
 
Re: Transmission problem -- VERY reluctant to upshift

Exactly. Popcorn for me, sweating & swearing for Gerry. Good times for all!

:deniro:
 
Re: Transmission problem -- VERY reluctant to upshift

First of all, I've got to get up the gumption to do the job! I sprayed the area around the front of the pump that was wet and dirty today, with brake cleaner, and drove the car about 15 miles. Pulled it into the garage tonight and checked for any "new" wetness but there was none. That said, I've been constantly filling up the PS reservoir for the past 18 months, little by little. I've almost gone through a full liter of PS fluid, and I'm getting darn tired of constantly checking the darned thing. So have to bite the bullet.

I started my 560SEC rebuild the night of February 28, 2010, and had a 2-month window to complete the job before the heat began to descend upon us and things start to get unbearable at night (think 85+F even at 10-11 PM with 70-90% humidity and you've got Houston weather from May through October). I'm probably looking at around the same starting date, and hopefully will give myself about 2 weeks (rather than two months) to ... as they say here in Texas ... "git 'R done."

Yes, I'll definitely document the job, step by step. I just bought a new rolling, adjustable height work-table this weekend for my garage, specifically for this job.

Cheers,
Gerry
 
Re: Transmission problem -- VERY reluctant to upshift

Exactly. Popcorn for me, sweating & swearing for Gerry. Good times for all!

:deniro:

There's a reason this job cost me over $1000 from the stealership!

Your a brave man tackling this one Gerry! :buggin: :gerry:
 
Re: Transmission problem -- VERY reluctant to upshift

think 85+F even at 10-11 PM with 70-90% humidity and you've got Houston weather from May through October

I'd seriously not survive that... I hate heat, and even heat with humidity even more ... :(

Looking forward to your job log :)
 
Re: Transmission problem -- VERY reluctant to upshift

I remember years ago I wasn't aware that the front of my 400E pump could come off without removing the whole pump and bracket. This required removing the front exhaust manifold elbow to get to the bracket bolts. At the time I was too ignorant to realize that the rebuilt pump had a tiny rubber plug in the pressure nipple that I failed to remove (I thought it was part of the connector).

Anyway, I ended up doing the job four times before I realized that the little rubber connector had pushed its way through the pressure hose and down to the banjo bolt at the gear box, where it melted nicely there and plugged the whole system. If there was anything good about the whole incident, I was able to reduce the time to get the pump and bracket off from 8 hours down to about 45 minutes. I think a lot of it was knowing what extensions to use, which side to access it from, and which way to angle my body so my arm would fit up there to get to the bolts on the back side of the pump bracket.

I hope yours goes smoothly, Gerry, and we'll look forward to the excellent how-to writeup as usual.
 
Re: Transmission problem -- VERY reluctant to upshift

Gerry, if you are losing PS fluid externally, and the front of the pump is dry, the leak may not be from the pump. The front pump radial seal leaks SLS fluid, not PS fluid. You can't really check this properly without removing the pulley.

Jon, the bracket can be removed without messing with the exhaust manifolds, but clearance is miserable. Photos on my website here show how to access the bolts. It is easier (IMO) to remove the pump from the bracket, and leave the bracket attached to the engine. It should be slightly easier on an .034 chassis since there is no SLS plumbing.

:mushroom:
 
Re: Transmission problem -- VERY reluctant to upshift

I'm not losing SLS juice, I'm losing PS fluid. I check SLS with the built-in dipshitdipstick regularly.

The front of the pump was wet, and my money's on that it's the output shaft (unless it's a short hose leak that's running down the front of the pump behind the pulley). [GSXR edit: See post #28 below; the leak source was pinpointed at the short hose between reservoir and pump. Only SLS fluid can leak out the front shaft seal on the tandem pump.]

It was DARN hard to see where the leak was coming from with the serpentine belt (and pulley) in the way though. Pulling the pulley is really almost the very first step in the process, so I'll know more once that's done. I'll plan to drive the car to and from work a few times (50 miles round trip per day) and this should get things leaking again, so I can see where the leak is coming from now that things are clean under there (for now).

I've resigned myself to just pull the pump and re-seal everything, and do new hoses. Do it right, or don't do it at all. I'll probably find some other issues as well. Lots of broken corrugated plastic wraps around the electrical and vacuum lines in that area underhood, too. So I'll have to see about taking care of that.

After some research, I'll definitely plan to just remove the pump from the bracket, rather than the bracket from the cylinder head. But I'll sure's heck clean things up nice. Luckily brake cleaner works very nicely for this. I think I'm going to buy a case of the stuff if I can find it on sale at one of the local auto parts places.

Brake cleaner IMHO is one of the very best inventions known to man, almost up there with ductape. Plus, the pleasant buzz that one gets from deep-inhaling brake cleaner when using it, makes the act of wrenching a bit more pleasurable too.

Sad really, because removing the bracket from the front of the M117 cylinder head is an absolute PIECE of CAKE... of course, the radial piston pump mounts on the front of the block too, so it's a separate unit and very easy to access, and re-seal. No tandem pump on the 126 !!!:yayo:

Good thing is that my 036's steering box appears to be nice and dry, from what I can see.... sure can see a lot without that damned encapsulation belly-pan on there. Makes it almost as nice as the 560SEC/SEL....

My job log will also include music listened to during each night's work :headbang:
 
Re: Transmission problem -- VERY reluctant to upshift

Thanks for the pics, Dave. I agree that the bracket is much harder to take off than just the two 6 mm mounting head bolts in back of the pump. It's funny that two of those pictures were of my 93 400E from 2007. I was just glad to get the bracket off. Didn't even know about the two 6 mm hex bolts until you posted your pictures of the pump back there.

Gerry, I recently ordered a case of the CRC brake cleaner because I couldn't find the chlorinated stuff in Tucson at all. The non-chlorinated stuff is crap. You might as well use water. I am thinking of ordering more just because I know the idiots at the EPA are eventually going to outlaw the good stuff.
 
Re: Transmission problem -- VERY reluctant to upshift

Jon, I had forgotten that a couple of those photos were yours! This was back when I had to do the pump re-seal on my then-new-to-me E420. I think your info was all I could find at the time - very helpful, thanks for posting!

:deniro:
 
Re: Transmission problem -- VERY reluctant to upshift

From new-to-you to M-B Mycologist in six years. That is a huge accomplishment. I wish I had a tenth of your knowledge about these cars.
 
Re: Transmission problem -- VERY reluctant to upshift

Yeah, we don't have those silly California-style rules here in Texas ... YET. They're creeping this way though ... already in Arizona, New Mexico is next, and then will hit El Paso, San Antonio and then Houston..... hopefully a few years away though.
 
Re: Transmission problem -- VERY reluctant to upshift

we don't have those silly California-style rules here in Texas

California has been ridiculous for decades. About 15 years ago, I blew a hydraulic line on landing at LAX and lost about 50 gallons of hydraulic fluid. This was over a two-mile runway. We had to be towed to the gate. The EPA dude was waiting for me as I got off the airplane. He wanted to know what I was going to do about the hazmat cleanup. I think he was offended at me for laughing when he asked me the question. No wonder our country is bankrupt. This guy was probably making 100K per year.
 
Re: Transmission problem -- VERY reluctant to upshift

Don't even get started about the entire "smog check" and CA only cats... just one of MANY reasons why I will be leaving this state very soon. :-)
 
Re: Transmission problem -- VERY reluctant to upshift

Hi Gerry,
Are you certain it isn't the feed hose from the power steering reservoir to the pump? Mine was leaking (and it is a very common leak) and is now fixed. Reach down below the reservoir and see if that short hose is wet. You can barely see the hose clamps if you look closely from the top with a flashlight above the pulley which drives the tandem pump.
Much simpler job than removing and resealing the pump.

I can send you some of the hose if you don't have it. Dealer wants to sell you a meter when you need 2".

When I assembled mine, I dropped 4 new clamps onto the new hose, so I could double clamp if it started to leak.

Doug
 
Re: Transmission problem -- VERY reluctant to upshift

The genesis of this is a true story that happened in Texas, but some editorial license is taken....

The true story, first: http://www.foxnews.com/politics/2010/04/28/texas-governor-shoots-kills-coyote-threatened-dog/

Then, the comparison of how California would do it, vs. Texas...


CALIFORNIA
: The Governor of California is jogging with his dog along a nature trail. A coyote jumps out, bites the Governor and attacks his dog.

1. The Governor starts to intervene, but reflects upon the movie “Bambi” and then realizes he should stop; the coyote is only doing what is natural.
2. He calls animal control. Animal Control captures the coyote and bills the State $200 testing it for diseases and $500 for relocating it.
3. He calls a veterinarian. The vet collects the dead dog and bills the State $200 for testing it for diseases.
4. The Governor goes to hospital and spends $3,500 getting checked for diseases from the coyote and on getting his bite wound bandaged.
5. The running trail gets shut down for 6 months while Fish & Game conducts a $100,000 survey to make sure the area is free of dangerous animals.
6. The Governor spends $50,000 in state funds to implement a “coyote awareness” program for residents of the area.
7. The State Legislature spends $2 million to study how to better treat rabies and how to permanently eradicate the disease throughout the world.
8. The Governor’s security agent is fired for not stopping the attack somehow and for letting the Governor attempt to intervene.
9. Additional cost to State of California: $75,000 to hire and train a new security agent with additional special training re: the nature of coyotes.
10. PETA protests the coyote’s relocation and files suit against the State.

TEXAS: The Governor of Texas is jogging with his dog along a nature trail. A Coyote jumps out, bites the Governor’s leather boot, and attacks his dog.
1. The Governor shoots the coyote with his State-issued pistol and keeps jogging. The Governor has spent $0.50 on a .45 ACP hollow point cartridge.
2. The buzzards eat the dead coyote.

And that, boys and girls, is why California is broke………..And, more importantly, why too much government doesn’t work.
 
Re: Transmission problem -- VERY reluctant to upshift

Hi Gerry,
Are you certain it isn't the feed hose from the power steering reservoir to the pump? Mine was leaking (and it is a very common leak) and is now fixed. Reach down below the reservoir and see if that short hose is wet. You can barely see the hose clamps if you look closely from the top with a flashlight above the pulley which drives the tandem pump.
Much simpler job than removing and resealing the pump.

I can send you some of the hose if you don't have it. Dealer wants to sell you a meter when you need 2".

When I assembled mine, I dropped 4 new clamps onto the new hose, so I could double clamp if it started to leak.

Doug
I've thought about that and that's why I'm going to drive it and force some more leakage while the area is clean ... so I can determine if it's something simple.

All I know is that the area immediately behind the pulley was the wettest, that I could see from the front and up above. I'll check tonight and see if there is any seepage since yesterday....
 
Re: Transmission problem -- VERY reluctant to upshift

FWIW... I recently had a similar conundrum with my wife's E420. I thought it was the pump at first, but the pump shaft area was bone dry. OTOH, the inlet hose was highly suspicious with a large amount of dirt, grime, and dampness. I replaced the hose and that seemed to slow the leak >90% but I haven't put the car back on the lift yet (3kmi later) to verify that it's 100%. Got my fingers crossed though.

Remember that to remove the PS pipe inlet nipple the reservoir has to come off, and if that's off, you might as well remove the plastic surrounding the distributor to carefully inspect for oil at the lower edge of the cam advance solenoid. If that area is wet too, might as well re-seal the cam solenoids while it's apart. Two [blue] birds, one stone, etc...

:5150:
 
Re: Transmission problem -- VERY reluctant to upshift

Remember that to remove the PS pipe inlet nipple the reservoir has to come off, and if that's off, you might as well remove the plastic surrounding the distributor to carefully inspect for oil at the lower edge of the cam advance solenoid. If that area is wet too, might as well re-seal the cam solenoids while it's apart. Two [blue] birds, one stone, etc...
+1 on this advice. I did remove and reseal the cam advance solenoid as well as the cam lip seal behind the distributor.
I used the MB black sealant instead of the MB (Loctite 574) orange sealant on the solenoid. so far so good.

Use Dave's papertowel method and zip tie a papertowel around the rubber feedline hose after your thorough cleaning. You'll find the leak.

Doug


PS: not sure if you have room, but only this last December I had the 2-post lift installed. I bought it from a local lift installer (technician). He is the first guy that gets called when used ones are taken out of a business - he's pulled 40 at a time out of a closed dealership. It was $1800, installed. I am so happy with it. For this one, you need about 12' ceilings in the garage. The installer said new, my lift was about $4k. It has signs of light wear, but is in excellent condition. Used was just fine with me.

I've never before been this productive (or pain free) in working on my cars. It is so easy to diagnose leaks, too. I think it has paid for itself with rear main seal job ($1100 from my indy) and center bearing / flex disk install ($1000 quote from the indy)

cheers,

Doug
 
Re: Transmission problem -- VERY reluctant to upshift

Doug, that is awesome, getting a $4k lift for $1800 installed!! Wow. I've got an El Cheapo (~$2k new) and it works great, but I didn't have the option of sourcing a used one locally. You are 100% correct about it paying for itself quickly, and many times over. The ROI is fantabulous, if you have the space, as Ferris said... "It is so choice. If you have the means, I highly recommend picking one up."

:woot:
 
Re: Power Steering Pump Leak Investigation

hello guys

i recently resealed tandem pump on my 600SEL. Resealing itself is not really big deal. I found manual how to do that and it covered the m119 and m120 tandem pump. I was left with one seal on hand when finished. I dont know where it should go but not to this pump for sure :) The worst part is to take the pump out. On m120 there are only 2 bolts that hold pump to the engine. :P M119 is much worse. Front seal is always bad and some internal seals are often too flat and too hard. I attached usefull manuals i found on the net.
 

Attachments

Re: Power Steering Pump Leak Investigation

I'm glad to mail you some of the bulk hose - just PM me your address. I bought mine from a local BMW shop. It is stamped with BMW (blasphemous, I know) and has a very thick housing, just like the MBZ. No leaks, two or three weeks after my job was complete. Saw no point in buying 39" worth from MBZ when I needed 2". I think I bought a 1' for $8. The hose grade is very high quality I'm confident.

Against Dave's excellent advice, I sprung for the $30 base gasket on the reservoir. I didn't want to do the job twice; maybe I wasted $27.
The biggest pain was removing the plastic wire loom for the ignition system. It has become somewhat brittle. I had to move the cap and wire bundle out of the way to change the cam seal and reseal the solenoid.

I used one of those pumps that you'd use to pump gear oil into your axle housing to scavenge the oil from the reservoir and power steering system. After removing the filter, the pickup slipped right down the feed line. All the fluid was gone by the time I unbolted the reservoir.

Finally, I've attached a sample of the Norma Clamps I used. If you look closely, these don't cut into the outer hose skin. You'll find most German manufacturers use these (Porsche, BMW and Mercedes). Wurth makes a very similar clamp, too.

I used four on the feed-line. Probably unnecessary, but gave me a Plan B if I found a leak after the install.

Doug
 

Attachments

  • norma clamp - non abrading.jpg
    norma clamp - non abrading.jpg
    50 KB · Views: 1,596
Re: Power Steering Pump Leak Investigation

I got the MB gasket too. Who'da thunk that a simple line of silicon around the edge of a round gasket would be worth $27! That's almost as expensive a fluid (by volume) as HP inkjet printer ink !!!

Have a nice German tubular hand pump to evacuate things, and can use a rubber hose on the end of my shop turkey baster to get down below the reservoir in the feed line. I think I will tackle the job this weekend. Thanks very much for the offer on the hose, but I already got a length (my car has a visceral reaction to non-MB and OEM parts, as evidenced by my transmission's puking with the Meyle tranny filter installed ;)

Will definitely take your advice on the clamps too, and will document the job. Hopefully this solves it ... if not, then at least I have all the hoses and everything (except the ZF pump reseal kit) to do the rest of the job...

Cheers,
Gerry
 
Re: Power Steering Pump Leak Investigation

Thumbs up. I've made a sacrifice to the MB gods. Hopefully, that will cover use of my BMW hose and the Meyle HD strut top mounts :D

Note, I aligned all of the hose clamps thinking it'd be easier to gain access when they are indexed a certain way. Post mortem, I'd have aligned the bottom and top the same and the middle two opposite of the others.

Make sure you have available female torx head sockets (the reservoir base bolts are torx) and a 12M hex head socket for the nipple. You'll also need the oring for the return line, the base gasket and AL crush washer under the 12mm nipple which extends into the stubby feedline.

good luck

Doug
 
Re: Power Steering Pump Leak Investigation

In the past few weeks, the fluid level in my pump reservoir has continued to leak down. In two weeks it's gone from the "full" mark to the lower level mark without really even driving the car. And there's a significant stain of fresh fluid on the cardboard under the engine on my garage floor (to avoid fluid stains on the concrete).

So, today I finally started the job to remove the reservoir and begin to investigate the leak. I spent about two hours beginning the job, and peeling the layers of the onion away.

Several weeks ago, I had used brake cleaner on the area around the pump and behind the pulley (see photos above) where there was a lot of grit and grime. That area was still dry today; however the area around the short hose was quite wet and gritty. In removing the plastic surrounding the distributor cap and cam advance solenoid, I found the very very beginnings of a leak at the bottom of the solenoid, although the area was moist (at worst) and definitely not leaking/substantially wet. However, it was moist enough (just barely) that I will go ahead and remove the solenoid and re-seal it with the special MB anaerobic sealant while tackling the rest of the job.

The cap looked in good shape with no carbon tracking or evidence of moisture inside of it, with the normal carbon scoring on the brassy contact areas. I haven't removed the rotor yet, but I fully expect that it will just show normal wear patterns and nothing out of the ordinary, given the condition of the cap.

From the photos below, you can see that the leak appears to be at the short hose. The pump itself seems to be dry, with no wetness around any of the hose connections. Thus, I think my plan of action will be to replace the short length of hose and re-clamp it, and to replace the PS fluid reservoir gasket and filter, and re-seal the cam advance solenoid. This should take care of the most obvious issues. The good thing is that if there are further issues, I've done the job so should be able to tear things down in rapid order. I have all of the parts necessary to remove and re-seal the pump, and change out all PS hoses.

Here's a sequence of what I found as I tore into the job today.

Most important thing first: music to do the job by...set up the iPod on the garage sound system. The complete discography of 80s hair-metal band RATT is a good place to start, methinks....
IMG_2030.JPG


Next up, removing the air intake tube (still in lady-killing condition from my recent replacement), and the two-piece fan shroud, held together by three small bolts.
IMG_2033.JPG IMG_2032.JPG IMG_2034.JPG IMG_2035.jpg


And voila! The shroud is gone!
Screen Shot 2013-03-17 at 8.32.40 PM.jpg


Next up, it's time to carefully drain the reservoir and remove the power steering fluid filter. My shop turkey baster and an empty distilled water jug works well for holding the used fluid. My Griot's Garage hooked tool worked perfectly for pulling out the filter from the bottom of the reservoir.
IMG_2037.JPG IMG_2038.jpg IMG_2039.JPG IMG_2040.JPG


Next, it's time to remove the fluid level gauge, held down by a single 10mm nut and a spring underneath. Just force the gauge down onto the spring, which gives access to the nut. From there it's simple to loosen and remove everything, exposing the filter.
IMG_2041.JPG IMG_2044.jpg IMG_2046.JPG IMG_2047.JPG


Here's what the reservoir looks like with the four female Torx fasteners that hold it down to the base, removed. You also have to remove the two 10mm bolts that hold the line to the outside of the reservoir. Using a stubby 10mm box-end wrench, turn the bolts clockwise to remove them.

From here you just pull the reservoir straight up and off, and then remove the gasket underneath. There are two versions of this gasket available - a $29 MB gasket and a $4.00 aftermarket gasket. The aftermarket gasket works fine (according to GSXR) so it's advisable to use this cheaper one.
IMG_2049.JPG IMG_2050.JPG IMG_2051.JPG IMG_2052.JPG IMG_2053.JPG IMG_2054.jpg


Here's what the mating surface of the reservoir base looks like with the gasket removed. You'll want to remove more fluid from the large hole in the base. This hole is what leads to the 2-inch rubber hose that was the culprit of my significant power steering fluid leak.
IMG_2057.jpg


Next up was removal of the distributor cap. Three 5mm Allen bolts were enough to remove the cap, after photographing and recording the locations of the plug wires in relation to where they fit on the cap's terminals. Although my plastic wasn't brittle, I'm sure many cars' plastic routing channels for the plug wires are quite brittle from heat/mileage and age, so be VERY careful when removing the plug wires from the channels along the front of the engine.

You can see some moisture at the bottom of the cap. which is probably residual leaked power steering fluid....
IMG_2059.JPG IMG_2060.JPG IMG_2061.JPG IMG_2062.JPG IMG_2063.JPG


Here's a view of the distributor / cam advance solenoid area. As you can see, no major leaks/wetness in the area, but the plastic is still on. The proof is in the pudding when the plastic surround is removed.
IMG_2064.JPG


Next up is to remove the plastic piece that surrounds the distributor cap and cam advance solenoid. It's held on by three bolts, 5mm Allen. I used a long allen key to get at them. The one on the bottom is sort of hidden, so you have to use your long Allen key to "feel" for the socket that the end of the key fits into. Once you have it in position, I used a box-end wrench on the upturned (short) end of the allen key as a lever to loosen it ... it was too tight to loosen by hand only. It worked quite well.

You also have to unplug the cam advance electrical connector, which is easy. Watch out for a brittle plastic connector though !!
IMG_2058.JPG IMG_2065.JPG IMG_2066.JPG IMG_2067.JPG


Here's a view of the solenoid with the plastic removed.
IMG_2068.JPG IMG_2069.JPG IMG_2070.JPG


And ... here are some close-up views of the short-hose area. You can see the moisture and grit from this leaky short-hose. The last photo shows me loosening the clamps at the short hose.
IMG_2071.JPG IMG_2073.JPG IMG_2074.JPG


And here's a view of the short-hose area, cleaned up with brake cleaner. Much better !
IMG_2075.JPG


More to come soon....
 
Re: Power Steering Pump Leak Investigation

Hey did you put a new copper washer on the nipple for the Hose?? The nipple comes out and it's has a 12mm allen I think. I use a flex 7 mm wrench like MB suggests for the MAS. Hazet.

Good to see a little grim on the engine.. Gerry's driving it more than washing it!
 
Re: Power Steering Pump Leak Investigation

You will probably do this right, Gerry, but I made the mistake of going too short on the short hose and couldn't get the upper hose clamp to seal right. I had to redo it and cut the hose about 1/2" longer. Had I followed Doug's (DW SD's) advice and added an extra hose clamp or two it would have saved me the effort. Thanks for the pics. Looking forward to the rest of them. BTW, slipping the poly V belt off the pump gave me some extra maneuvering room to tighten the bottom hose clamp.

EDIT: Never mind. It looks like the poly V belt is off on the last pic.
 
Re: Power Steering Pump Leak Investigation

Hi Jon,

Yep, I removed the belt albeit late in the process, when I had to, to remove the lower clamp for the short hose. I'm going to order a new one and replace it out of hand as it's been some years and probably needs to be replaced, but I'll check its condition carefully.

I ordered a couple of extra clamps and will do the Doug thang and double up on the clamps at each end. That said I have a meter of hose so I'll be sure to go longish on it....

Michael - yes I have the aluminum washer (as well as a brand new nipple!) and when everything goes together I'll make sure to replace it.

Next steps are to remove the pulley as well as the pump from the bracket, and see if the pump itself is leaking from the front seal. Since I got the pump re-seal kit, I'm probably going to just re-seal it anyway because I'll have it out of the car. That way it won't leak in the next few years, forcing me to do the pump removal again. If the hoses leak (excepting the short hose, which I'm replacing) I will be able to get to all of them without having to hassle with the tandem pump itself, thankfully.

I'm going to take my time with this job, so it's probably going to take me a couple of weeks given parts orders and such. I have to go to Austin for a couple of days later this week on business, so I'll lose a night this week due to that :(

Cheers,
Gerry
 
Re: Power Steering Pump Leak Investigation

I don't know if your reseal kit comes with the little circlip that holds the radial shaft in place, but if it doesn't, you may want to order a new one rather than reuse the existing. It's a pain to get this clip off (none of my C-clip tools seemed to work so I used a sharp screwdriver) and when it does come loose it usually shoots across the garage. Even if you don't lose it, the last one I took off bent slightly and I had to hammer it flat to reuse it.
 
Re: Power Steering Pump Leak Investigation

Thanks for thinking of this! I have a circlip for the ZF pump already in my parts stock -- ordered it along with the reseal kit for exactly the reason you said.
 
Re: Power Steering Pump Leak Investigation

Good job!

Put a small magnet (I use the telescoping type - $4 to $12 at Amazon) next to the clip when you remove it. Usually, it won't bounce away then.

Since I had the distributor torn down, too, I replaced the cam seal, proactively. It is kind of a bitch to get to as it is buried down in the cavity. Still, it is the right time to change it. Those lip seals do go bad as they age and harden. Be very careful if you change it. Take one of those sharp probe and gently work the inner lip around the cam. If you fold the lip under just a bit, the clamping spring will pop off and the seal will no longer work properly.
I think the factory used some sealant around the outer perimeter.

One more note, I ended up using a mapp torch to break that sealant bond. (they did the same thing on the rear main seal).

Amazon has a crank / cam lip seal remover that I used to remove the old one.
http://www.amazon.com/gp/product/B0..._m=ATVPDKIKX0DER&pf_rd_r=0VNSCD2A1T485JYECY2Y

One more note, I did not remove the spark plug wires from the cap. Just undid the plastic loom clips and carefully folded the wires, plastic loom and distributor cap out of the way. I also did not need to remove the fan shroud. If one is just resealing the reservoir and solenoid, these steps may save a bit of time.

Look forward to your next steps!

Doug
 
Re: Power Steering Pump Leak Investigation

More work tonight, but only about 45 minutes spent out in the garage because I have some other things to get done.

Tonight's work:
  • Removing the "nipple" and the short hose that connects the pump and reservoir
  • Removing, inspecting and replacing the driver's side rotor
  • Removing the power steering pump pulley and inspecting the front of the pump for obvious leaks
  • Scoping out the next phase of the job -- pump removal in preparation for the re-seal job in the coming days

Here's how things went, photographically....

First off, I removed the vertical rod that the level gauge, spring, and PS fluid filter go around. I did this to provide more room/access to get at the nipple, as my 12mm hex socket is 1/2" drive and quite large. The rod came out with only a moderate turn of a pair of channel-lock pliers at the base. The channel-locks didn't even score the rod.
IMG_2076.jpg


Next, inserting the 12mm hex key into the top of the nipple, backing the nipple out of the threaded portion of the reservoir base, and carefully removing it. You can see I also removed the aluminum crush washer with my hooked tool. It's highly advisable NOT to re-use this aluminum crush washer unless it is an emergency.
IMG_2079.JPG IMG_2080.JPG IMG_2081.JPG IMG_2083.JPG


Next. I gripped the top of the short hose with a pair of curved needle-nose pliers, and carefully pulled it off of the pump's flange. Note the close-up photos of the short hose. It was still pretty flexible and pliable, but it was very wet and obviously the cause of the leak. The clamps had pressed into the hose quite a way, but it had not cracked. Still, it was in need of replacement after serving a very long life.
IMG_2084.jpg IMG_2085.JPG IMG_2086.JPG IMG_2087.JPG


Then, it was time to remove the rotor to check it for wear. Three easy bolts and it was off. I closely inspected the rotor's contact surface. It was just about exactly as I expected -- some carbon scoring but not eaten or way or in any way out of line. I replaced it after the inspection. Notice the yellowish stains at the distributor protective cap. It appears as if there had been a quantity of moisture or water in there at some point. Intriguing.
IMG_2090.JPG IMG_2091.JPG IMG_2094.JPG IMG_2095.JPG


Next up, it was time to remove the pulley from the front of the power steering pump. I'd previously broken the three 13mm bolts loose when the belt was still on the pulley. It's important to do this as one of the first steps in the whole job, so that you don't have to put the belt back on the pulley to hold it so that you can loosen the pulley bolts. The bolts aren't torqued down very tight to the pump's flange, so they were very easy to break loose.
IMG_2096.jpg IMG_2097.JPG


And here are a few views of the front of the power steering pump underneath the pulley. I could NOT see any obvious moisture or fresh fluid being leaked. It appeared that the moisture was residual from the short hose's leak which was above it. That said, I am still going to remove the pump and re-seal it. The last couple of photos show the "easy to get at" bolts on the passenger side front of the pump; the other two hex socket-head bolts are located on the back of the pump, and hold it to the bracket. I am going to have to jack up the car and get underneath it so that I can get these two bolts out and release the pump from the bracket for rebuilding on my work table.
IMG_2098.jpg IMG_2099.JPG IMG_2102.jpg IMG_2103.JPG


More to come....
 
Re: Power Steering Pump Leak Investigation

Nice pictures. Tonight was the easy night. Getting to those two bolts behind the pump is going to be max no fun. Is there any way to just pull the front of the pump off like the E420?
 
Last edited:
Re: Power Steering Pump Leak Investigation

Getting to those two bolts behind the pump is going to be max no fun. Is there any way to just pull the front of the pump off like the E420?
I've got a strategy to get these bolts borne of the experience of others. I have to jack up the car on one side to get under it though, as I didn't put the car up on ramps before I started the job. The reason for this is that I backed the car into the garage to provide maximum natural light for evenings and weekends, rather than pulling the car straight into the [dark] garage and up on the ramps.

I thoroughly scoped out and felt out where the rear bolts are with my fingers, and using a flashlight, last night. And worked out a strategy to attack them. I am going to spend an 1-1.5 hours in the garage tonight working on the two rears and am hoping I can get them nailed. If I get them then I'll do the two 13mm fronts and then the pump will be off and on the work table, ready for the rebuild to begin on Friday night (and hopefully completed over the weekend).

I have a few minor parts coming in end of this week via parts.com (I have everything needed for the pump rebuild in hand) such as four new female Torx bolts for the reservoir-to-base, and a tube of anaerobic sealant for the cam advance solenoid, just to ensure that everything is fresh and new for the re-installation.

To answer your question about pulling off the front of the pump ... yes, it's certainly possible to do this. It looks like there's even room to do this, and it also appears that the front area of the pump is the part that leaks, when the pump does leak. However I'd rather just do the job right and remove the whole pump and reseal the entire thing, rather than just doing the minimum.

I think the pump cap removal from the front + front re-seal only is how some mechanics do the job to save time, but IMHO it's not honest to the intent of the job to just do the minimum and call it good. If I had that philosophy, I'd have just replaced the short hose and called it good, and not bothered with the cam advance solenoid or pump re-seal itself, and not bothered to replace hardware like the nipple and pump reservoir reverse Torx bolts. Honestly, it will all be incremental labor in the end to just do everything at one time, even though the car will be "down" for probably 2 weeks while I'm gathering the necessary parts/sealants and working at night to do the work.

My two cents.

Cheers,
Gerry
 
Re: Power Steering Pump Leak Investigation

I think the pump cap removal from the front + front re-seal only is how some mechanics do the job to save time, but IMHO it's not honest to the intent of the job to just do the minimum and call it good.

It will be interesting to see which seals are reachable with the entire pump off versus just the front. I'm looking forward to the pics and writeup. Thanks.
 
Re: Power Steering Pump Leak Investigation

Tonight I worked out in the garage for two full hours on removing the pump. Initially I was just going to TRY to remove the rear bolts, but after about an hour and 20 minutes I had succeeded at doing that, so then I got carried away with encouragement and just decided to just disconnect the pump and then remove the remaining two 13mm hex-head bolts on the front side of the pump.

I got the pump off and cleaned it up on the outside, and it's ready for disassembly on my clean work-table this weekend. I'll probably start the job on Friday night and finish it on Saturday. If I can get the pump re-installed by the end of the day on Sunday, I'll be happy because I can use the weeknights next week to complete the job of reconnecting the pump and buttoning up everything.

Overall. it wasn't a HORRIBLE job to get at those rear two bolts. The top-most one was the worst, by far, but I was able to get it by using socket extensions and a wobbly, inserting the extensions between the oilpan and cross-member. I didn't have to go BEHIND the cross-member, though I saw the angle as to how others have done this. Basically with both of the 6mm hex-socket rear pump bolts, I just used a magnet to insert the hex socket into the bolt, and then inserted the wobbly joint into the socket, attached the ratchet to the end, and loosened 'er up. Neither bolt took was hugely torqued down, and both came loose with only moderate effort thankfully.

Once I got the top-most bolt loose, I was able to remove the wobbly and extensions from the socket, and JUST get enough of my right-hand fingers up there around the end of the socket to turn it to loosen it further. The more it loosened, the more of a grip I could get on it and the faster I could turn it out. The lower bolt in the rear has a much better angle, and it was much easier to get the wobbly into the hex socket that I had already inserted into the bolt's hex head.

The two front 13mm bolts were a piece of cake, merely requiring a 13mm socket with a 3" extension on a 3/8" ratchet. The hose connections all were quite easy to remove, as well.

NOTE: There are two copper washers at the banjo bolt on the side of the pump. These are crush washers and thus, disposable. If you are doing this job, you'll want to order a couple or three of these copper washers. The banjo bolt appears to be the same type as used with the fuel filter and fuel pump connections at the rear of the car, so I have PLENTY of extra copper washers from my past fuel pump work on the 560SEC and E320 wagon, both of which take the identical pumps to the E500's.

Anyhoo, here's the skinny as to what happened tonight, via photographs. Enjoy.

Cheers,
Gerry


First off, a few shots of the lower (easier to get at) of the rear-most 6mm hex bolts. This is on the rear, driver's side of the pump body and must be accessed from below the car. You have to remove the motor mount air scoop pipe to get access upward through this area. The first photo is of the bolt itself; the second photo is of the 6mm hex socket inserted (via telescoping magnet) into the hex bolt, with the extension and wobbly attached. The third photo is of the partly removed bolt, which one can carefully reach upward with the fingers and remove by turning.

I couldn't get any decent photos of the top-most hex bolt, unfortunately.
IMG_2105.jpg IMG_2108.JPG IMG_2113.jpg


And ... here are both of the hex bolts removed. Success !!!
IMG_2114.JPG


Next up is disconnection of the hoses from the driver's side of the pump. There are three connections: a rubber hose, a large 17mm metal fitting, and a 17mm banjo bolt (identical to that used with the fuel pumps and fuel filter). Be mindful of the copper washers I mentioned - get new ones and DO NOT re-use the old ones unless in a pinch.

Also, be sure to have plastic or cardboard underneath the car to catch the power steering fluid that will leak from the pump and the hoses once you loosen them....
IMG_2115.JPG IMG_2116.JPG IMG_2117.JPG IMG_2118.jpg


Then, it's just the easy removal of the 13mm bolts on the front passenger side of the pump, and the pump comes right off the bracket !

Clean up the pump using brake cleaner. If you're not going to tear it down for a rebuild, be sure to plug the hose openings so that you don't get any dirt in the pump. These pumps require the same level of cleanliness as an automatic transmission rebuild does, so BE EXTRA CAREFUL with regard to getting dirt in things. If you are putting the pump aside, be sure to cover it so nothing gets inside of it.

here are a few views of the cleaned up pump, as it now sits (covered) on my workbench, awaiting the rebuild kit this weekend...
IMG_2120.JPG IMG_2119.JPG IMG_2121.JPG IMG_2122.JPG IMG_2123.JPG


More to come very shortly....
 
Re: Power Steering Pump Leak Investigation

Excellent pictures. It looks like one of those bolts has had the silver anti-seize compound applied to it and you mentioned that the bolts came out fairly easily. Do you think someone was there before? I'll bet you're glad the pump came off without a hitch.
 
Re: Power Steering Pump Leak Investigation

Gerry,

Great write up! I have resealed my servopump entirely, so before you take on the disassembly, please have a look at some posts in these threads:
Post #25, #33, #35, #36
http://www.500eboard.com/forums/showthread.php?1028-SLS-adjustment

Post #4
http://www.500eboard.com/forums/showthread.php?3098-Resealing-the-tandem-pump

Here is a couple of illustrative pic's from Dave's homepage too:
http://www.w124performance.com/images/M119/PS_pumps/tandem_pump/ZF_pump/ZF_pump_lock_ring.jpg
http://www.w124performance.com/images/M119/PS_pumps/tandem_pump/ZF_pump/ZF_pump_seal_kit.jpg

:banana1:
 
Re: Power Steering Pump Leak Investigation

Just got home tonight after a quick business trip to Austin.

Couple of other notes, from Tuesday night when I removed the pump:
  • I found a droplet of pink (fresh) transmission fluid on the bottom of one of the metal-coiled hoses leading to the transmission cooler. In fact it was the end of the hose where it attaches to the cooler itself. So, it appears that there may be a slight leak at this hose, so I'm going to put a new hose on my next parts order and replace it. No other transmission fluid leaks from my recent fluid replacement, which was nice to see.
  • I also noticed wetness and a fair amount of grit at the pitman arm at the steering box. This is indicative of a leak at the pitman arm shaft seal. I haven't searched and checked out things, but if this seal is leaking, it appears that it may be replaceable leaving the steering box mounted in the car, and just disassembling/removing the pitman arm and resealing it right there. Appeared that everything that needs to be accessible, should be so. In any case, I'm going to clean the area really good with brake cleaner, and drive the car and see how it looks with some mileage on it. Looks too wet to me NOT to be a leak though. I'll post some pics of the steering box/pitman arm.

Looks like Friday night I'll do the cam solenoid re-seal job, and commence the PS pump disassembly for the re-seal. The bench work will be easy to extensively document with photographs. Hopefully it goes smoothly. Hoping to get the reseal done on Saturday so that I can begin the process of re-installing the pump and finish up the job on Sunday afternoon....

Cheers,
Gerry
 
Re: Power Steering Pump Leak Investigation

I'll look forward to the pics, Gerry. I was planning to replace my ETA this weekend with a new (used) ETA made in 2002 that I bought on Ebay for $200, but I'm having second thoughts about doing so. A week ago, the idle was totally erratic and was hunting continuously up to about 1300 RPM. What is totally bizarre is that I cleared the codes out, including the ETA and NSS on pin 7 (that's a first for the NSS) and the ISC on pin 19 and it has been absolutely perfect for the past week. WTF?

So my dilemma is, should I replace the existing (now properly functioning) ETA with a used ETA that I'm not absolutely certain is any better? I'm inclined to wait it out and take the weekend off. I never have good luck fixing things that aren't broken. I always end up in worse shape and wish I'd never started it.
 
Re: Power Steering Pump Leak Investigation

So my dilemma is, should I replace the existing (now properly functioning) ETA with a used ETA that I'm not absolutely certain is any better? I'm inclined to wait it out and take the weekend off. I never have good luck fixing things that aren't broken. I always end up in worse shape and wish I'd never started it.
I'd install the newer ETA. Worst case, you can swap them back. I've yet to encounter a newer ETA that didn't function better than an original one from 92-95 vintage...

:banana1:
 
Re: Power Steering Pump Leak Investigation

Tonight I moved into pump disassembly and rebuild mode. I spent about 3 hours out in the garage disassembling the pump and got a good part of the way back toward reassembly. Unfortunately I didn't get to the cam advance solenoid re-seal, but I plan to get to that tomorrow (Saturday). I will also finalize the parts order that I need to make for the steering box seals and transmission cooler hose. Seems like a job that isn't going to be done anytime soon, mostly dependent on having to wait for parts orders.

I'll post photos below that show the pump takedown and rebuild, at least what I got to tonight.

Definitely post any comments that you have.

Cheers,
Gerry


First off, is the removal of the four bolts that hold the top cover onto the pump, which power steering fluid from the reservoir flows into the pump through. These bolts are Torx T-30 size. Removing the cover shows an o-ring
IMG_2124.JPG IMG_2125.JPG IMG_2126.jpg


From there, you have to loosen and remove the four large bolts that hold the two halves of the tandem pump together. These are T-40 Torx bolts. They were pretty tight, so I had to put the body of the pump onto some clean rags on the garage floor, with the screws on a vertical plane, to break them loose with the socket. These photos show the process of loosening and removing the four bolts.
IMG_2128.JPG IMG_2129.JPG IMG_2130.JPG


This photo shows the two halves of the tandem pump coming apart, after the four bolts holding them together have been removed.
IMG_2131.JPG


Next, the pressure plate assembly is exposed, and you need to begin working on disassembling that. The pressure plate has the two funky-shaped O-rings that are in the shape of the Bosch corporate logo....

The last photo shows the other half of the pump, which we'll get to in a moment. Next, you remove the o-rings (you're going to replace them later) and you remove the pressure plate by popping it off, by hand or with a small screwdriver.
IMG_2132.JPG IMG_2134.JPG IMG_2135.JPG IMG_2133.JPG


Pull the o-rings off by hand when you loosen them, and set them aside. You'll need them later for comparing against the new o-rings in the pump reseal kit.
IMG_2140.JPG IMG_2141.JPG IMG_2143.jpg


Then, you remove the pressure plate.
IMG_2145.jpg IMG_2146.jpg


Then, you remove the two pins from the bore assembly. The pins are marked with small marks so that you know which end goes up when you re-install them. Make sure to make a mental note about this. Then, remove the bore assembly, which unveils a very important mechanism that it surrounds....
IMG_2147.jpg IMG_2149.JPG IMG_2150.JPG


I carefully removed each of the flat pins, making a careful note of their orientation in the slots for re-assembly. Some people make a note of which slot each flat piece goes into. It's more important to get them in the right orientation, so that the more rounded outer edge of facing the correct side and direction of rotation. On my pump, the shiny part goes toward the outside.
IMG_2151.JPG IMG_2153.JPG IMG_2154.JPG


Once the flat pieces are removed, you have to "attack" the circlip that retains the shaft through the pump body. This can be VERY difficult to remove, and it is highly advisable to get a new circlip with your parts order. What I did to remove it was to use a pair of circlip pliers to slightly spread the two ends of the clip (barely enough room and leverage to do this) and then used a small, flat-bladed screwdriver to insert into the middle of the rounded (opposite) end of the clip, between the clip and the shaft (expanding the circlip ends creates a little space that you can insert a slim flat-blade screwdriver into). Then you can use the screwdriver to carefully prise the clip off of the shaft. You must be VERY CAREFUL in doing this, and you may need to use a different technique if you have a Vickers/LUK pump rather than the ZF pump that I had. In any case, this is a delicate operation and I would say it took me a good 20-25 minutes to get that clip off the shaft.
IMG_2158.JPG


You can then remove the slotted round piece (remember/record the orientation of how it fit onto the shaft, because this matters!) and then you can remove the shaft of the pump itself. You'll want to carefully examine the rotating surfaces of the shaft to ensure they are not worn or pitted. Mine were in good condition, thankfully.
IMG_2159.jpg IMG_2160.JPG IMG_2161.JPG


Next up, you go over to the other half of the tandem pump, the SLS suspension pump. You will need to remove the eight Torx T-30 bolts that hold the cover to the pump body, and set it aside. The eight screw holes of the cover only line up one way with the pump body, so it will only go on one way, which is helpful. Again, I had to put this pump body lightly in a bench vise to hold it so that I could break the bolts loose. They were fairly tight.
IMG_2161.JPGIMG_2162.jpg IMG_2163.JPG IMG_2164.jpg IMG_2165.jpg


After you remove the cover bolts, you see the piston and bearing assembly of the SLS portion of the pump. Remove the o-rings, the bearing shell/race, and CAREFULLY free up the spring-loaded pistons on the inside of that bore....
IMG_2166.JPG IMG_2167.JPG IMG_2168.JPG IMG_2169.JPG IMG_2170.JPG


Then, it's time for the large piston to come out. Remove the large flat washer at the bottom, first. You need to turn the pump body upside down, and the factory manual recommends hitting it between two blocks of wood (2x4s) placed a few inches apart. Put a lint-free towel on the ground between the boards so that the piston doesn't strike the rough pavement when it exits the bore as you hit it out.
IMG_2171.JPG IMG_2172.JPG IMG_2173.JPG


Once the large piston is out, you'll need to change its sealing ring. My piston's o-ring was quite hardened and I deliberately broke it when I removed it, and I replaced it with a new, more pliable one. There are a couple of o-rings at the bottom of the bore that you'll need to remove, and if you are daring, you can and should replace the center shaft seal as well. I was able to pry mine out and then installed the new center shaft seal with a large socket, used as a mandrel with a small ball-peen hammer.
IMG_2174.JPGIMG_2176.JPGIMG_2177.JPGIMG_2178.JPGIMG_2179.JPG


You can see the pile of used sealing rings that is starting to build up as the pump rebuild progresses, and I'm not anywhere near done yet.....
IMG_2175.JPG


Continued on next post....
 
Re: Power Steering Pump Leak Investigation

Great pics, Gerry! The tandem pump appears to be much more complex than the pump on my E420.
 
Re: Power Steering Pump Leak Investigation

Next up is the beginning of the actual pump rebuild, starting with the replacing of the o-rings and seals with the replacements....

A couple of notes - you can see I was using a small LED flashlight to inspect the bore and to ensure that things looked OK for the insertion of the two -rings at the bottom of the bore. Secondly, you can see two small bowls of power steering fluid and SLS fluid that I used to dip the seals into before installing them on the respective halves of the tandem pump.
IMG_2179.JPG IMG_2180.jpg IMG_2181.JPG IMG_2182.JPG IMG_2183.jpg IMG_2184.jpg IMG_2185.jpg IMG_2186.JPG IMG_2187.JPG IMG_2188.JPG


Moving into my last phase of work for the night, I inserted the piston into the bore and pressed it down as far as I could. After that, I used a bench vise and a large socket as a mandrel to press it down even further, and then did the reverse of before, hitting the pump body right-side-up on two 2x4s to seat the piston properly. Then I inserted the pistons back into their holes, carefully inserting the springs and the pistons together. Then I added the appropriate o-ring to the bottom of the cover.

You can see that I removed the center seal from the cover and replaced it with a new one from the pump reseal kit. This seal is a bit larger than the other one and is easier to replace.
IMG_2189.JPG IMG_2190-2.JPG IMG_2196.JPG IMG_2191.JPG IMG_2192.JPG IMG_2195.JPG IMG_2197.jpg IMG_2198.jpg


Then, you can insert the shaft into the pump body. From there you need to carefully work it in through the seals and bearing. After doing this, you install the o-rings and then bolt the cover down using the eight Torx T-30 bolts. You can see me pressing the two halves together before bolting them together. It's VITALLY important that when you put everything back together, it is fastidiously clean and also covered with a thin film of SLS hydraulic oil. Same holds true for the o-rings for the power steering half of the pump when re-assembling that
IMG_2199.JPG IMG_2200.jpg IMG_2201.JPG IMG_2202.JPG IMG_2203.JPG IMG_2204.JPG


To be continued ....
 
Re: Power Steering Pump Leak Investigation

Next up (this morning) was the cam advance solenoid re-seal. This was a fairly quick and simple job, requiring only a 5mm Allen socket in the way of tools, and the MB special anaerobic sealant that is specified for the job. GSXR has more information on this sealant at this URL.

In any case, the job involved removing the solenoid, cleaning it up (I used light passes with a wire brush, and a brake-cleaner-soaked rag to clean the sealing surfaces on the solenoid and on the end of the cylinder head), applying the sealant and then re-attaching the solenoid using the three 5mm Allen bolts. I added a few drops of blue Loctite to each bolt before inserting them; there appeared to be some type of thread locker on at least two of the bolts as they came out of the cylinder head.

Since I'm "in there" and have the tools at hand, I'm probably going to just re-seal the other cam solenoid as well. It's (of course) much more accessible on the passenger side than the driver's side of the engine, simply because there is no power steering fluid reservoir in the way....

Cheers,
Gerry


Here are a couple of photos, removing the three bolts that hold the cam advance solenoid to the cylinder head.
IMG_2205.JPG IMG_2206.JPG IMG_2207.JPG


Here's what the cam advance solenoid sealing surfaces looked like as the solenoid came off the head. You can see a little oil on there. Not a huge leak but enough that it would have entailed going back in there in the next year or two, with some mileage....
IMG_2208.JPG IMG_2209.JPG IMG_2210.JPG IMG_2221-2.JPG


Here's what the two surfaces looked like after I cleaned them with a wire brush, some brake cleaner on a rag (to clean up the residue), and a Scotch Brite pad corner soaked in brake cleaner for the cylinder head surface. I cleaned up the outside of the cam solenoid, as well.
IMG_2212.JPG IMG_2213.JPG IMG_2214.JPG IMG_2215.JPG


Here's the special orange MB anaerobic sealant, applied to the cam solenoid with a clean index finger.
IMG_2216.JPG


And, here is the cam solenoid re-installed.
IMG_2217.JPG IMG_2218.JPG


To be continued ....
 
Re: Power Steering Pump Leak Investigation

Gerry, great write up and pics. I'm certain mine has developed a leak in the last few weeks so I need to troubleshoot this as well.

Question on the brake cleaner for engine/parts cleaning. I was always under the impression that brake cleaner was aggressive on aluminum(possibly other metals, too) and discolored plastic and rubber parts(potentially breaking down plasticizers, etc). You're always detail oriented on your work, have you ever heard of negative effects using brake cleaner?
 

Who has viewed this thread (Total: 8) View details

Back
Top