• Hi Guest !

    Welcome to the 500Eboard forum.

    Since its founding in late 2008, 500Eboard has become the leading resource on the Internet for all things related to the Mercedes-Benz 500E and E500. In recent years, we have also expanded to include the 400E and E420 models, which are directly related to the 500E/E500.

    We invite you to browse and take advantage of the information and resources here on the site. If you find helpful information, please register for full membership, and you'll find even more resources available. Feel free to ask questions, and make liberal use of the "Search" function to find answers.

    We hope you will become an active contributor to the community!

    Sincerely,
    500Eboard Management

HOW-TO: Removing and re-sealing ZF tandem pump (SLS and power steering)

Re: Power Steering Pump Leak Investigation

Out of curiosity, I went to AutohausAZ and typed in p/n 000-990-25-52 and it came up with the round copper nut instead of the square one (upper picture).

The EPC shows what looks like the same nut as the nut in my pictures above (depicted as p/n 000-990-25-52) and it shows the orientation with the square part facing down into the square hole in the collector. This came from the EPC engine intake/exhaust manifold section (lower picture).
 

Attachments

  • 000-990-25-52Nut.jpg
    000-990-25-52Nut.jpg
    61.6 KB · Views: 28
  • CollectorNut.jpg
    CollectorNut.jpg
    35.7 KB · Views: 31
Re: Power Steering Pump Leak Investigation

Your photos look similar to mine, except the crimped (larger) portion has no visible serrations. The smaller diameter round portion is what goes into the manifold, and the bolt should enter the smaller round part.

:star:
 
Re: Power Steering Pump Leak Investigation

Thanks, Dave. That makes sense because I can't get the bolt to thread through the large serrated end.
 
Re: Power Steering Pump Leak Investigation

I had ordered new copper nuts from AHAZ (along with the bolts) and I got the rounded kind. I used the MB part number.

Tonight I replaced the transmission cooler hose as my final job, and then refilled the power steering reservoir and SLS reservoir with proper fluids. Turned the wheel a few times to circulate fluid, topped it back up and then started the car. The pump was a bit noisy when I moved the wheel back and forth about 15 times, but eventually settled down. The PS fluid got a bit foamy too, but settled down after a few minutes.

Took the car on several test drives and brought it back to check fluid levels underhood and also checked for leaks under the car. No leaks -- not a single drop. Looks like the operations were all successful. I'm going to leave the plastic belly panel off the car for the weekend and drive the car extensively to ensure that everything stays dry, and then I'll replace it. I think the belly pan has been off the car for almost a month and a half :)

So, seems like a successful conclusion to this endeavor. The job I want to do this weekend is now to replace the LCAs with the RDMTek LCAs on the rear, along with new 1-bump pads and new strut-top rubber bushings, and also replace the rubber upper strut mounts with new MB mounts and 1-bump front spring pads. My Klann/Miller spring compressor will come in handy for that. I have yet to use it, but samiam44 broke it in for me a couple of months ago and it seemed to work OK for him....

Thanks to everyone for all of their suggestions and support for this power steering system diagnosis and rebuild.

Cheers,
Gerry

P.S. Overall I would rate this job as a medium DIY job. It was technically not that difficult, but was more labor intensive and tedious than anything. Extreme care must be taken when disassembling and re-assembling the tandem pump -- photos are almost required so that one remembers how everything goes back. Same with the Pitman arm. The job required cleanliness, patience and a good number of special tools to do right. A straight pump re-seal and changing out the short-hose (and perhaps S-hose) I think can be done by the first-timer perhaps in a total of about 10 hours. On the overall difficulty scale, I'd put this at about a 5. It is HIGHLY advisable to at least remove the plastic and check the cam advance solenoids and if they haven't been done, to do them. The sealant is only around $25 and it's perhaps an hour or 90 minutes incremental labor to do both solenoids, so worth it. Steering box output shaft re-seal I'd give another 2-3 hours total. So, perhaps 15 hours of labor, taking one's time to do it right.

This is a messy job in terms of SLS and PS fluid leaking, so definitely have a drip pan (I used a cardboard box top about 3' x 3' square, with several layers of cardboard, as a drip pan especially overnight, on top of a mover's blanket on the concrete floor) handy for this job.


  1. Re-install the two hex bolts at the rear of the tandem pump that hold it to the bracket.
  2. Tighten all four tandem pump bolts to the correct torque.
  3. Re-install the pitman arm on the steering box output shaft in the correct location, and to the correct depth.
  4. Re-install the plastic surrounding the cam advance solenoid, and re-install the distributor cap and wires.
  5. Re-install the power steering pump reservoir.
  6. Replace the exhaust crossover pipe and install new top and bottom bolts
  7. Replace the driver's side transmission cooler line; replace with new transmission fluid as necessary.
  8. Re-install the pulley on the flange of the tandem pump. Re-install serpentine belt.
  1. Fill, bleed and prime the power steering system; check for leaks, etc.
  2. Re-install fan shroud, motor mount air duct, plastic cover over cylinder head, air intake tube, and engine plastic panel.
    [*]Re-fill SLS tank with new hydraulic fluid (in effect, a partial flush of the system to replace the fluid that leaked out of the tank once the lines were disconnected to the tandem pump)
    [*]Final check for lost tools, sockets, etc. in the engine compartment
  3. Shop-vacuum out remnants and bits of disintegrated black plastic flexible wire wrap that are in the engine compartment
  4. Cross fingers that everything is good :smile:
 
Re: Power Steering Pump Leak Investigation

The job I want to do this weekend is now to replace the LCAs with the RDMTek LCAs on the rear, along with new 1-bump pads and new strut-top rubber bushings, and also replace the rubber upper strut mounts with new MB mounts and 1-bump front spring pads. My Klann/Miller spring compressor will come in handy for that. I have yet to use it, but samiam44 broke it in for me a couple of months ago and it seemed to work OK for him....

I'll be looking forward to seeing your post on this. I have yet to try my Klann/Miller compressor too.

Isn't it nice to have zero leaks on your car? I think this is the first time I can remember that neither of my cars has any leaks. I actually resealed the driveway today with new asphalt sealer. Thanks again, Gerry, for all the detailed pics.
 
Re: Power Steering Pump Leak Investigation

I had ordered new copper nuts from AHAZ (along with the bolts) and I got the rounded kind. I used the MB part number.

[size=+2]Tonight I replaced the transmission cooler hose as my final job[/size], and then refilled the power steering reservoir and SLS reservoir with proper fluids. ....

Any pics of the trans cooler line you replaced? I'm curious what line you are referring to?


As usual, great how-to Gerry.....I definitely could have done this in my garage after reading your write up, wish I had and saved myself a grand at the stealership. Gives me some confidence to tackle those motor mounts! :sawzall:
 
Re: Power Steering Pump Leak Investigation

My 560SEC has been leak-free since I rebuilt the top-end three years ago (more than 25,000 miles ago now) and it's great. The power steering (short hose) leak had gotten pretty bad on my E500 -- to the point where it would leak a cm or two of fluid down in the reservoir over a week or two, without even driving the car. Driving the car, it would go down even faster! That design with the short-hose between the reservoir and pump is honestly, a totally bunk design. There's no bones about it -- it's a way of connecting those two items that leaves a lot to be desired. A rare weak point in MB design and this is reinforced by the fact that MB had to rather quickly issue a service bulletin on the topic.

Also, one other thing. THe steering was just fine when I got the Pitman arm back together - the steering wheel is still centered, and the car is tracking straight (like it was before this job). So obviously an alignment will make things perfect, bit it's reassuring to know from the "feel" of the car on the road, which is the same as before, that everything seems steering-wise to have gone back together as it was.

I'm going to now make a service appointment to have the car dealer-aligned in the next couple of weeks, since I've got the power steering and will have the new rear LCAs installed, and a brand-new set of tires that I really want to try to maximize life of....

I didn't take any photos of the transmission cooler hose installation -- it was a 5-minute job. Basically you get the new hose, and unscrew each end from the piping, and re-attach. Catch any pink transmission juice in a container (i only had perhaps 1-2 ounces leak out) and replace with new juice when done. There is a thread on this job at this location. The factory replacement hose no longer has the coiled wire "cage" surrounding the hose, as the original 124 part has been superseded to a 220 part number (without metal coil). However the aftermarket part via AHAZ DOES have the metal coil.

It's a good idea to replace both the right and left hoses at the same time. The part numbers are 220 997 16 52 (left hose) and 019 997 41 82 (right hose).

Cheers,
Gerry


P.S. Here's the aftermarket left-side hose. The right side hose didn't come from the factory with a protective spring.
proxy.php
 
Re: Power Steering Pump Leak Investigation

That design with the short-hose between the reservoir and pump is honestly, a totally bunk design.

I agree with you 100%. Rube Goldberg would have been envious of Mercedes' design of the ashtray door track and gears. You would think they could have come up with a better design for the short hose.
 
Re: Power Steering Pump Leak Investigation

Well, GVZ inspired me to go out and dig into my steering gear box last night. It was damp and had a few drops coming out of it, so it needed to deal with it anyway.

The instructions above were spot-on and there's not a lot I can add except that I replaced a small green O-ring on the bottom part of the gear box (picture) that I think was in Dave's writeup. I suspect Gerry also replaced it. I don't even know what it was for, but I had it in my kit and it took a few seconds to swap out.

Also, since I didn't get a chance to buy a seal installer, I ended up using a large socket, a piece of wood and a hammer. I was careful not to go too deep or damage the radial seal. As Gerry says, it's a great idea to take pictures of as much as you can, because they come in handy when you want to see what something looked like before you screwed with it. I found myself referring to my Blackberry on several occasions.

The hardest part for me was dealing with the damn cross-over pipe. This job would have taken no more than 2 hours if I didn't have to deal with that. A few years ago, I had stripped the press-in copper nut that goes into the collector from above and receives the long bolt from below (see post #101, supra). At the time, I was able to punch the stripped nut out from below and I took another long bolt with a regular nut and installed it in reverse, so the bolt head was on top and it came down through the holes in the collector and cross-over pipe and the nut secured the cross-over pipe to the collector at the bottom. I had enough access to get the nut to thread onto the bolt that way, but not the other way around.

Well, armed with new bolts and copper nuts from Mercedes, I thought I would reinstall the copper press-in nut. You can see in the picture that the nut on the left is missing. Well, after screwing with it for over two hours and using up my vast vocabulary of expletives (the monkey and football cliche kept coming to mind too), I couldn't set the nut on top of the collector and get the bolt to thread from below, up through the cross-over and collector without the nut falling off.

I tried a slide hammer because I was able to catch the nut with the bolt threads by only going through the hole in the collector (sans cross-over pipe) and I thought I might be able to yank the nut down into the hole hard enough that it would semi-press in and then I could back out the bolt and secure the cross-over to the collector. No such luck.

I even thought about trying glue to hold it place, but it was taking me so many tries just to get the nut aligned with the collector hole that I just went ahead and reinstalled the bolt from the top side like it was before. The bolt head must lodge itself against a part of the collector because I didn't even have to keep the head from turning when installing the nut from below (I doubt I could have anyway).

Maybe there's some secret way that MB has of getting the bolt to thread into the nut. There's no visibility or access from the top of the engine compartment, for sure.

Anyway, thanks to Gerry and Dave, the job of resealing was really a non-event. Here are a few pictures.
 

Attachments

  • DampGearBox.jpg
    DampGearBox.jpg
    394.5 KB · Views: 21
  • MeasuringPitmanGap.jpg
    MeasuringPitmanGap.jpg
    414.4 KB · Views: 21
  • LargeO-ring.jpg
    LargeO-ring.jpg
    493.5 KB · Views: 21
  • PressingInNewSeal.jpg
    PressingInNewSeal.jpg
    428.3 KB · Views: 22
  • OldTeflonSeal.jpg
    OldTeflonSeal.jpg
    437.5 KB · Views: 22
  • CollectorViewFromBelow.jpg
    CollectorViewFromBelow.jpg
    371.3 KB · Views: 26
Re: Power Steering Pump Leak Investigation

The instructions above were spot-on and there's not a lot I can add except that I replaced a small green O-ring on the bottom part of the gear box (picture) that I think was in Dave's writeup. I suspect Gerry also replaced it. I don't even know what it was for, but I had it in my kit and it took a few seconds to swap out.
I don't recall a green o-ring that was in the bottom part of my gearbox.

The o-rings that I replaced, included:

  • The large/thick black o-ring that was on the outside diameter of the lower cap that I removed from the steering box
    Capture.JPG
  • The white plastic o-ring that was on the inside diameter of the lower cap that I removed from the steering box
    Capture1.JPG
  • The small black o-ring that surrounded the hole between the lower cap and the steering gearbox body (top of the cap)
    Capture2.JPG

I never saw a green o-ring anywhere....

Cheers,
Gerry
 
Re: Power Steering Pump Leak Investigation

I apologize. You did mention a small O-ring above the output shaft that was easy to miss. I didn't see it in your pictures, but here's the green O-ring I was referring to. The angled screwdriver is pointing directly to the hole it came from. Thanks again.
 

Attachments

  • SmallO-ring.jpg
    SmallO-ring.jpg
    428.2 KB · Views: 31
Re: Power Steering Pump Leak Investigation

I didn't replace any o-rings on the output shaft of the steering box at all -- only the two in the cover and the one between the cover and the body of the steering box.

The small o-ring I was referring to, I did not take any photos of (GSXR has a photo of it) but you can see the place where it goes in your photo above -- the center of the three round areas of the silver sealing surface of the steering box.

Actually, you can JUST see it in the photo below, sitting in the groove in the sealing surface.

I find it interesting that your o-rings are green. The ones that came off of my pump and steering box were all black, as were the factory ones that I put on those items (exept the white plastic one).

Cheers,
Gerry

proxy.php
 
Re: Power Steering Pump Leak Investigation

That's the O-ring I was referring to. By the way, did you use any of the MB orange sealant where the cover meets the gear box? I put some on as a precaution since there was no gasket there.
 
Re: Power Steering Pump Leak Investigation

No, I only go by factory spec. The o-ring on the cover (the big one) should be enough to suffice and provide a seal. That cover extends quite far into the bottom of the box body, around that shaft.
 
Re: Power Steering Pump Leak Investigation

To close this out ... I've got about 125-150 miles on my car since I did the power steering pump re-seal, steering box reseal and now about 50 miles since I did the rear RDMTek modified LCA installation last weekend. I'm bringing my car into the dealer at MB Sugarland tomorrow (Friday) morning for a four-wheel alignment after doing the LCAs.

The last job I had to do, which I purposely neglected to do, was to replace re-install the plastic bellypan underneath the engine. This has been off the car for at least 3 months now while I was investigating and then fixing the PS short-hose leak and rebuilding the tandem pump. I wanted to leave the bellypan off the car for a spell to see, after the car had accumulated some miles, whether there were any residual leaks from the fixed items.

I am happy to report that the underneath of the car is bone-dry at the short-hose area, tandem pump, steering gearbox, transmission cooler hose that I replaced on the driver's side, and at the A/C compressor area. Bone dry. So I re-installed the bellypan in advance of heading out in the morning for MB Sugarland, a solid 50-mile drive each way from my house.

Cheers,
Gerry
 
Re: Power Steering Pump Leak Investigation

Gerry,

Any noticable change in the ride/handling after changing the rear LCA/carrier jt bushings?

Andy
 
HOW TO: Re-sealing ZF tandem pump (SLS and power steering)

OK, I fibbed a little in the thread title. This is not a hold-your-hand re-seal procedure, just some photos of the process, and a few tips. I don't think there are any other threads with this info yet. (?) EDIT: Yeah, there was, Gerry already went there and did that. Merged my piddly post with his mega mondo thread.

The pump on my project car was leaking like a sieve - possibly worse. Photos of that coming later. I had a good spare pump on the shelf (thanks, John!) and decided to clean and re-seal the spare pump, which allegedly had low miles (under 70k, IIRC) and should have been in better shape than the leaky pump with over 190k on it. Interestingly, the pump appeared to have been re-sealed once before, despite the low mileage. I don't know if it would have leaked or not, but given the difficulty of R&R'ing the pump, I didn't want to install it without a fresh front seal.

The factory procedure is at the link below. FSM job number 46-0730, section C. Start at PDF page 26 of 42. Note that the procedure is written for both ZF and Vickers/LUK pumps, which are NOT the same, and you'll need to interpret the instructions along the way to make sure you are following the proper directions. Photos attached below are for the ZF pump only! The Vickers/LUK pump is quite different. Oh yeah, the link:

http://www.w124-zone.com/downloads/MB CD/W124/w124CD2/Program/Chassis/46-0730.pdf


  • Photo 1: Main 4 bolts removed, rear half of pump separated from front half
  • Photo 2: Flat "barbell" shaped pressure plate removed
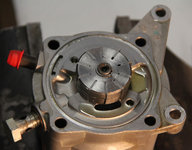
  • Photo 3: Cam insert removed, rotor & vanes exposed
  • Photo 4: Snap ring removed, rotor & vanes removed
  • Photo 5: Drive shaft removed
  • Photo 6: Main front seal exposed. This is the seal that leaks SLS fluid (NOT power steering fluid)
  • Photo 7: Front cover removed
  • Photo 8: Back side of front cover
  • Photo 9: SLS section of pump exposed with front cover removed (Note: Internals NOT removed)
  • Photo 10: Front cover temporarily re-mounted, front seal removed
  • Photo 11: Front cover with seal removed
  • Photo 12: New seal in position
  • Photo 13: New seal pressed into place with super-special tool (27mm Sears socket)
  • Photo 14: Top of rear pump section removed (power steering fluid inlet)
  • Photo 15: Snap ring info
  • Photo 16: Seal kit contents

Photos are also on my website here for non-forum members who don't want to sign up just to see the pretty pictures.

I've done this a few times and 99.99% of the time, the only leak is SLS fluid from the front shaft seal. (If you are leaking PS fluid, it's probably coming from the hose above the pump, or the reservoir, or other hoses... not the pump itself.) Unfortunately you need to mostly dismantle the pump in order to replace the one offending radial seal. I chose not to take apart the SLS pump internals to replace the couple of O-rings inside, as this adds quite a bit of time and complexity, and IMO is not needed 99% of the time.

I also did not attempt to remove the center shaft seal which separates the SLS fluid section from the PS fluid section. This center seal is almost impossible to remove and it almost never needs replacement. If your car is not mixing PS and SLS fluids, you don't need to replace the small shaft seal buried inside, just leave it alone. I replaced the O-rings for the front cover, between the halves of the pump, on the back of the 'barbell' separator plate, and the top PS fluid inlet, just because those are not difficult to replace.

Side note: The torque specs for all the bolts are very low. If you don't have a torque wrench that goes low enough, just make them snug. A previous MuppetMechanic™ managed to strip the threads on one of the eight bolts which hold on the front cover of this pump. Only a real gorilla, or idiot, would use that much force on small aluminum threads.

:banana1:
 

Attachments

  • ZF_pump10.jpg
    ZF_pump10.jpg
    149.7 KB · Views: 20
  • ZF_pump09.jpg
    ZF_pump09.jpg
    193.4 KB · Views: 20
  • ZF_pump08.jpg
    ZF_pump08.jpg
    164.1 KB · Views: 20
  • ZF_pump07.jpg
    ZF_pump07.jpg
    150.6 KB · Views: 21
  • ZF_pump06.jpg
    ZF_pump06.jpg
    164.3 KB · Views: 22
  • ZF_pump05.jpg
    ZF_pump05.jpg
    117.2 KB · Views: 21
  • ZF_pump04.jpg
    ZF_pump04.jpg
    139.5 KB · Views: 20
  • ZF_pump03.jpg
    ZF_pump03.jpg
    135.4 KB · Views: 20
  • ZF_pump02.jpg
    ZF_pump02.jpg
    178.8 KB · Views: 20
  • ZF_pump01.jpg
    ZF_pump01.jpg
    175 KB · Views: 21
  • ZF_pump_seal_kit.jpg
    ZF_pump_seal_kit.jpg
    133.3 KB · Views: 31
  • ZF_pump_lock_ring.jpg
    ZF_pump_lock_ring.jpg
    105.8 KB · Views: 23
  • ZF_pump14.jpg
    ZF_pump14.jpg
    128 KB · Views: 20
  • ZF_pump13.jpg
    ZF_pump13.jpg
    119.5 KB · Views: 17
  • ZF_pump11.jpg
    ZF_pump11.jpg
    184.9 KB · Views: 17
Re: HOW TO: Re-sealing ZF tandem pump (SLS and power steering)

What a beautiful little piece of machinery the tandem pump is when it's all cleaned up. Thanks for posting Dave. I skipped the pump reseal when I had mine off last year and you were right, my leak was from the upper short hose. That 99% stat definitely applied to me.
 
Re: HOW TO: Re-sealing ZF tandem pump (SLS and power steering)

Nice write up!
Have to do that on my Vickers pump once my ordered sealing kit arrives..
 
Re: HOW TO: Re-sealing ZF tandem pump (SLS and power steering)

Another good use for that 27mm socket. Isn't that the same size as the crank bolt?
 
Re: HOW TO: Re-sealing ZF tandem pump (SLS and power steering)

Another good use for that 27mm socket. Isn't that the same size as the crank bolt?

Eeeyup. And the M104 chain tensioner outsid housing.


Sent from my iPad using Tapatalk HD
 
Re: HOW TO: Re-sealing ZF tandem pump (SLS and power steering)

You should append this onto the HOW-TO article on the topic that I did previously.

http://www.500eboard.com/forums/sho...ak-Investigation&p=40846&viewfull=1#post40846
Done. How did I forget about that epic thread? I wouldn't have bothered taking photos otherwise! D'OH!! :jelmerian:

I'm not good at moving individual posts around, but given the relatively low S/N ratio, maybe GVZ or Glen could copy (not move) the "How to" posts with photos into a new thread? I mean, most of the first thirty (30!) posts were about Tejas vs PRK and other bunny trails.

:pc1:
 
Re: HOW TO: Removing and re-sealing ZF tandem pump (SLS and power steering)

:jelmerian:, indeed!

You need to learn how to embed uploaded photos into the middle of posts, so things are easier to follow along than having to constantly scroll up and refer to a list of photo captions. I used to not know how to do this, either, but then I learned and it's how I do all of my HOW-TO articles these days. I think my pump rebuild was a bit more complete/comprehensive than yours, in terms of what was replaced.

The sealing kit for the tandem pump (particularly the ZF model) isn't that expensive, and it's not that much more difficult to just disassemble the entire pump and re-seal it "while you're in there."

Also, you didn't detail your secrets for getting the pump removed and then re-installed :D
 
Re: HOW TO: Removing and re-sealing ZF tandem pump (SLS and power steering)

Nice write up! Have to do that on my Vickers pump once my ordered sealing kit arrives..
Thanks! The Vickers is VERY different. It needs a completely separate how-to thread with photos. Be extremely careful with the snap-rings on the Vickers shaft, it is very fragile, and easily damaged.


You need to learn how to embed uploaded photos into the middle of posts, so things are easier to follow along than having to constantly scroll up and refer to a list of photo captions. I used to not know how to do this, either, but then I learned and it's how I do all of my HOW-TO articles these days.
I'm suspecting this is an OS/browser issue. Let me know if you can do it with Windows and Chrome. I haven't yet seen any options for this. Seems all the Mac guys can do it though.


I think my pump rebuild was a bit more complete/comprehensive than yours, in terms of what was replaced.
Yes, you replaced more than I did. I explained why in my post. I didn't feel it was worth the effort. I did it once (years ago on a different pump) and that was enough for me.


The sealing kit for the tandem pump (particularly the ZF model) isn't that expensive, and it's not that much more difficult to just disassemble the entire pump and re-seal it "while you're in there."
If the pump is coming off the engine, sure, it makes sense. I think many times pumps are re-sealed when they didn't need it in the first place though. The pump usually only needs a re-seal if the SLS fluid level is continually going down (or, if PS and SLS fluids are mixing, which isn't common).


Also, you didn't detail your secrets for getting the pump removed and then re-installed :D
No. I forgot to mention in my originally piddly post that I was not going to re-invent that wheel. I remember there were already posts showing how to R&R the pump. I just didn't remember the thread showing pump disassembly.


:banana1:
 
Re: HOW TO: Removing and re-sealing ZF tandem pump (SLS and power steering)

Yes, I definitely went overboard on sealing my pump when it was pretty much the short hose that was leaking. But, proactive maintenance ... and it led to other good things like the pitman arm shaft reseal, etc.


I'm suspecting this is an OS/browser issue. Let me know if you can do it with Windows and Chrome. I haven't yet seen any options for this. Seems all the Mac guys can do it though.
Because Mac people generally know their s&*t when it comes to computers!!

Embedding photos is NOT a browser/OS issue. The functionality is built into vBulletin.
:jelmerian::jelmerian::jelmerian:

1) upload photo(s) as normal

2) use the "paperclip" button in the "Go Advanced" menu (not quick reply). Click on the RIGHT side of the paperclip button (small black down-arrow).
Screenshot 2013-12-12 11.58.12.jpg

3) make sure your cursor is where, in your text, you want to embed the photo

4) select the photo you want to embed (only one shown here, is a list with multiple photos uploaded)
Screenshot 2013-12-12 12.01.41.jpg

5) repeat as needed

:mushroom::mushroom::mushroom:
 
Re: HOW TO: Removing and re-sealing ZF tandem pump (SLS and power steering)

Thanks for the input on the snap rings,Dave!

Maybe I should take some pics when I rebuild mine....
 
Re: HOW TO: Removing and re-sealing ZF tandem pump (SLS and power steering)

Thanks for the input on the snap rings,Dave!

Maybe I should take some pics when I rebuild mine....
Yes, please take photos of the Vickers/LUK pump internals!

The issue with the snap rings is that the edge/flange is very thin, and you can damage the part which keeps the snap ring in place, while you are attempting to R&R the snap ring. Also, IIRC, the Vickers/LUK pump has two snap rings, one for the PS section, and another for the SLS section. I forget if both flanges are delicate, or if it's just one. When I worked on it, I could tell a previous mechanic had damaged the edge during a previous re-seal, and I made it worse when I was in there. I don't think it would have survived a third time, and would have required replacing the main shaft ($$$).

:duck:
 
Re: HOW TO: Removing and re-sealing ZF tandem pump (SLS and power steering)

I'm in the midst of this project, working slowly and steadily. Two questions; 1) seeing as how the flexible plastic hose/wire insulating cover literally crumbles when you touch it, did you do anything to re-wrap or re-insulate the now exposed hoses/wire? 2) In some of the earlier posts, there was a brief discussion regarding the fact that on the E420, the front of the p/s pump can be removed without having to remove the entire pump from the engine, can anyone describe that process or refer me to other threads/posts/pictures that detail this specific .034 variation? TIA
 
Re: HOW TO: Removing and re-sealing ZF tandem pump (SLS and power steering)

You can get the flexible corrugated plastic stuff from any auto parts store -- it's common stuff.
 
Re: HOW TO: Removing and re-sealing ZF tandem pump (SLS and power steering)

I'm in the midst of this project, working slowly and steadily.

2) In some of the earlier posts, there was a brief discussion regarding the fact that on the E420, the front of the p/s pump can be removed without having to remove the entire pump from the engine, can anyone describe that process or refer me to other threads/posts/pictures that detail this specific .034 variation? TIA
It's been years since I did this. I think it was discussed on PeachParts, or another forum. I believe I did the front seal on the .034 pump by only removing the front of the pump, while leaving the body attached to the bracket. This saves a LOT of time and hassle. Should be pretty straightforward, remove the front bolts, pull it out, re-seal on the workbench, re-install. Make sure you replace the short hose above the pump, to the reservoir... this is the primary source of many PS leaks.

:banana1:
 
Re: Power Steering Pump Leak Investigation

I can't remove the vertical rod in the center of the reservoir. Without this I cannot proceed with the 12mm hex bolt. (btw my tie rods got postponed, too much work and not enough tools/space). I tried with pliers, but only kept scratching the rod. I accidentally dented the flat base as well :(. On top of everything, the previous "mechanic" left a gasket seal along with the gasket. The entire bottom of the reservoir and the flat base is full with white leftovers that take forever to peel.

Is there some tool to remove the vertical rod? I noticed the top has ~1/3 cutoff, sort of D shape. Perhaps I can unscrew from there with some tool? (Also, at the rate I'm running at for tools, even at Harbor Freight, I should have just went to a shop).
 
Last edited:
Re: HOW TO: Removing and re-sealing ZF tandem pump (SLS and power steering)

The center rod isn't that difficult to remove. You can use a pair of Vise-Grips as long as you TAKE CARE not to put it on any threads or other sensitive areas on the rod. It should turn left (as you face the car) to remove, right to tighten.

+1 I had to use vise-grips on the rod as a previous mechanic apparently had not been careful in replacing the rod on an earlier repair and ended up stripping some of the threads. As a result, the rod was super tight and difficult to remove. Of course, I wasn't able to remove the rod as elegantly as Gerry (sans tooth marks), but I was able to eventually get it off by clamping as close to the base of the rod as I could without endangering the base/sides of the reservoir.
 
Re: HOW TO: Removing and re-sealing ZF tandem pump (SLS and power steering)

My center rod is completely toast. I managed to get it out but it's scratched everywhere. I also damaged the flat plate below. After this the hose took a while to get out. It was completely deformed and probably 99% the cause of my leak. The seals in the pump look OK. I am replacing the couple seals anyway as well as the hose and the seal on the return pipe. I will continue in daylight though (even though we are not supposed to work on cars, I try to use the weekends therefore, but I work Saturdays so I only get 1 weekend daylight).

Also, I don't know if it's worth the trouble to reseal the bottom of the gearbox since it wasn't wet with PS fluid, but I will only take out the tie rods once so I'll see and might as well do it. Now.. a couple of photos on the 400E. The front panel was held by 6 bolts: 4 long with thread on the end only and 2 short with all the way thread.

IMG_20140119_200343.jpg IMG_20140119_200251.jpg
 
Re: HOW TO: Removing and re-sealing ZF tandem pump (SLS and power steering)

Sounds like you had a tough time on this one. As long as the threads on the center rod are not damaged, I think it will still work. It just might not look too great when you take the cap off. As for the damage to the base, if you are concerned about it leaking, you can use a very thin coat of gasket sealant on the side of the gasket that sets on the base (face down).

The seal that usually goes on the p/s pump is the radial seal around the shaft. Was that in good shape too?

Regarding sealing the steering gearbox, you can do that as a separate job. The tie rod ends are not involved in that operation.
 
Re: HOW TO: Removing and re-sealing ZF tandem pump (SLS and power steering)

Make sure you take some brake cleaner and a razor blade and clean off that base for the reservoir, before you reinstall it, so that the seal there is optimal. You can get the aftermarket paper gasket for the base of the reservoir from AHAZ. The MB gasket is something like $30 and it is pretty much identical to the aftermarket version, except the MB gasket has a thin line of sealant around the outside. Worth $28 more than the aftermarket version? Heck no.
 
Re: HOW TO: Removing and re-sealing ZF tandem pump (SLS and power steering)

Definitely not worth going with the factory gasket on this one. I often wonder if the sealant on the factory gasket is made out of silver or platinum.

Also, while on the subject of replacing p/s hoses, tonight I had to add another hose clamp to the replacement I did six months ago. I was getting a slow leak and decided to investigate. It looks like I didn't get the original hose clamp up high enough on the nipple, so I repositioned it higher and added a second clamp just in case. I should have done this to begin with.
 

Attachments

  • Tucson-20140119-00682.jpg
    Tucson-20140119-00682.jpg
    332.4 KB · Views: 21
Re: HOW TO: Removing and re-sealing ZF tandem pump (SLS and power steering)

My rod is fine for use, just ugly :D. I have the $4 seal as well as entire pump kit. I will replace the hose, but didn't think of a third clamp. I am also taking the opportunity to reseal the cam. I will clean off all the remaining white parts from the base and the pump. Thx a lot to gerryvz :gerry: for the pictures, otherwise I wouldn't have attempted the job.

I'll push the lower stuff for the weekend when the apt. manager isn't arround.
 
Re: HOW TO: Removing and re-sealing ZF tandem pump (SLS and power steering)

I used 4 clamps. Check my how-to.


Sent from my iPhone using Tapatalk
 
Re: HOW TO: Removing and re-sealing ZF tandem pump (SLS and power steering)

I used fuel injector clamps- AKA hydraulic line clamps. If you need new ones- ask for fuel injector line clamps at any autoparts store ~$1 each.

That's what the factory used...

Michael
 
Re: HOW TO: Removing and re-sealing ZF tandem pump (SLS and power steering)

I just used plain old OE factory clamps (005-997-45-90) and new hose.

The hose is the primary failure point, it's rubber and just doesn't last 10+ years. Additional clamps may delay replacement a bit, but eventually you'll have to change the hose again.

:pc1: :pc1:
 
Re: HOW TO: Removing and re-sealing ZF tandem pump (SLS and power steering)

I used the new factory hose clamps when I replaced the short hose, but I guess I didn't get the upper clamp high enough on the nipple to keep it from sliding down the hose as I tightened it.

I probably could have just repositioned the factory clamp a bit higher and left it alone, but I figured since Gerry had four clamps, it wouldn't hurt to have three.
 
Re: HOW TO: Removing and re-sealing ZF tandem pump (SLS and power steering)

some before and after for my case

mercedes-400e-power-steering-pump-reseal-3.jpg mercedes-400e-power-steering-pump-reseal-5.jpg mercedes-400e-power-steering-pump-reseal-4.jpg

And what I am working on tomorrow (my sealant has been "out for delivery" since Saturday...)

mercedes-400e-cam1.jpg
 
Re: HOW TO: Removing and re-sealing ZF tandem pump (SLS and power steering)

Another good idea is to cut a slightly longer than stock length of hose for the reservoir to pump length. Measure the length of the stock piece, and cut the new piece perhaps 1-2 cm longer. That will give you a bit more length to "bite" into with the clamps. Don't make it too much longer though.

Cheers,
Gerry
 
Re: HOW TO: Removing and re-sealing ZF tandem pump (SLS and power steering)

Be careful with extra-length hoses, there is precious little room for extra hose length. The EPC specifies the correct lengths needed, which are different for ZF and Vickers/LuK pumps.

:mushroom:
 
Re: HOW TO: Removing and re-sealing ZF tandem pump (SLS and power steering)

That's good advice, Dave. When I originally installed the new hose, I cut it too long and had to pull the plug from the bottom of the reservoir and shorten the hose. I think I went with whatever size Gerry recommended in his how-to, which was just right.
 
Back
Top