Re: Power Steering Pump Leak Investigation
More work tonight, but only about 45 minutes spent out in the garage because I have some other things to get done.
Tonight's work:
- Removing the "nipple" and the short hose that connects the pump and reservoir
- Removing, inspecting and replacing the driver's side rotor
- Removing the power steering pump pulley and inspecting the front of the pump for obvious leaks
- Scoping out the next phase of the job -- pump removal in preparation for the re-seal job in the coming days
Here's how things went, photographically....
First off, I removed the vertical rod that the level gauge, spring, and PS fluid filter go around. I did this to provide more room/access to get at the nipple, as my 12mm hex socket is 1/2" drive and quite large. The rod came out with only a moderate turn of a pair of channel-lock pliers at the base. The channel-locks didn't even score the rod.
View attachment 14155
Next, inserting the 12mm hex key into the top of the nipple, backing the nipple out of the threaded portion of the reservoir base, and carefully removing it. You can see I also removed the aluminum crush washer with my hooked tool. It's highly advisable NOT to re-use this aluminum crush washer unless it is an emergency.
View attachment 14156 View attachment 14158 View attachment 14159 View attachment 14160
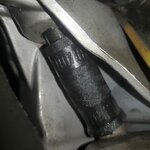
Next. I gripped the top of the short hose with a pair of curved needle-nose pliers, and carefully pulled it off of the pump's flange. Note the close-up photos of the short hose. It was still pretty flexible and pliable, but it was very wet and obviously the cause of the leak. The clamps had pressed into the hose quite a way, but it had not cracked. Still, it was in need of replacement after serving a very long life.
View attachment 14162 View attachment 14163 View attachment 14164 View attachment 14165
Then, it was time to remove the rotor to check it for wear. Three easy bolts and it was off. I closely inspected the rotor's contact surface. It was just about exactly as I expected -- some carbon scoring but not eaten or way or in any way out of line. I replaced it after the inspection. Notice the yellowish stains at the distributor protective cap. It appears as if there had been a quantity of moisture or water in there at some point. Intriguing.
View attachment 14166 View attachment 14167 View attachment 14168 View attachment 14169
Next up, it was time to remove the pulley from the front of the power steering pump. I'd previously broken the three 13mm bolts loose when the belt was still on the pulley. It's important to do this as one of the first steps in the whole job, so that you don't have to put the belt back on the pulley to hold it so that you can loosen the pulley bolts. The bolts aren't torqued down very tight to the pump's flange, so they were very easy to break loose.
View attachment 14170 View attachment 14171
And here are a few views of the front of the power steering pump underneath the pulley. I could NOT see any obvious moisture or fresh fluid being leaked. It appeared that the moisture was residual from the short hose's leak which was above it. That said, I am still going to remove the pump and re-seal it. The last couple of photos show the "easy to get at" bolts on the passenger side front of the pump; the other two hex socket-head bolts are located on the back of the pump, and hold it to the bracket. I am going to have to jack up the car and get underneath it so that I can get these two bolts out and release the pump from the bracket for rebuilding on my work table.
View attachment 14172 View attachment 14173 View attachment 14174 View attachment 14175
More to come....


 .....
.....


") It come out pretty nice:
It come out pretty nice:


")


![[500Eboard] IMG_2079.JPG](/forums/data/attachments/202/202196-79f931fb9bfe21b0cd131663c430d133.jpg?hash=efkx-5v-Ib)
![[500Eboard] IMG_2049.JPG](/forums/data/attachments/202/202197-337432092d39e099b11997168b207292.jpg?hash=M3QyCS054J)


 Paint (particularly, clearcoat) was the weak point of 80's/90's MB's. My '95 E420 (250kmi) has lost most of the clearcoat and looks pretty awful.