Well, tonight in the shop it was just 15 minutes or so to do some inspections of the underside of the car, since the transmission is out. I took some observations and photographs that you all should be interested to see. Glad I did this as I am getting ready to make my AutohauZ and parts.com parts orders tonight, and there are a few new parts I need to tack onto my p.com order....
First off is a good look at the flex disc. I'm going to remove it entirely from the car to inspect it closely, but here's a good close-up shot. From what I can see, there is no abnormal wear that would require its immediate replacement. However, I have one on my parts order and I'm going to replace it out of hand, because it's a consumable ("wear") part that will require replacement sooner or later. And it's MUCH easier to do it now, since I have extremely easy access to it....
View attachment 24894
Next is a view of the evaporator condensation drain tubes, located on either side of the transmission tunnel above the bell housing. These are the foam hoses with coiled wire inside. The 126 uses one of these hoses, too. The first one, on the driver's side, looked pretty good (first photo below), but it crumbled to dust when I touched the end of the hose portion. You can see from the second one that the only thing left of the end of it, is coiled wire, LOL!! So, automatic replacement. This is done from INSIDE the car, but you poke the ends of the hoses through the floor and into the transmission tunnel. Inexpensive but a good thing to do.
View attachment 24896 View attachment 24899
I'll bet your hoses on most of your .036s are close to or just as bad as these. Probably a couple hundred dollars of labor out of that $5K deferred labor bill that I'm always harping that EVERY .036 has. Even Dave's cars.

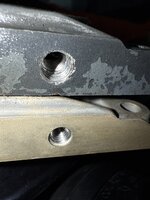
Next, it was time to look at the two-way water drain that channels water from the blower motor area under the windshield, down underneath the car into the bell housing area. This is sort of a "Y" shaped water collector.
View attachment 24900
You can see that the end of the collector on the right-hand (passenger) side is cracked off, and another chunk is in danger of cracking. So, automatic replacement time. Both of the ends were mildly clogged up with leaves and other dust/dirt, so I cleaned them out with a screwdriver. Then I just decided to pull the whole assembly off and order a new one.
View attachment 24907 View attachment 24904 View attachment 24902
Then, I checked out the oil pressure sender, which I just recently replaced around the time I did the top-end rebuild. You can see it clearly in the photo below, along with its electrical connector. Just below it in the photo, you can also see the crankshaft position sensor's black connector. I decided to replace the crank position sensor (it's a ~$55 part) as it is difficult to get to when the transmission is in the car, and an extremely simple one-bolt replacement now.
View attachment 24915
Then I looked backward to check the oxygen sensor. It looks quite original to the car, and since the car has 203,200 miles on the odometer, and I have a brand-new factory MB replacement O2 sensor, I'm going to replace it as well. It will NEVER be as accessible as it currently is, staring me right in the face...
View attachment 24916
From there, I inspected the steering box. Again, in plain view and extremely accessible from this vantage point. I have never seen a drier steering box in my life, so this is one sleeping dog that I'm going to let "lie."
View attachment 24910
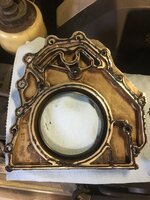
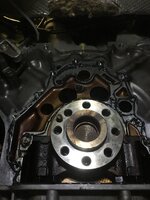
Lastly, I looked straight upward to check out the flywheel and rear crankshaft seal, for any leakage or weeping. The area under the seal (actually a good portion of the entire rear of the engine block around and above the seal) was slightly damp and oil/dirt coated, but I did not see any active leakage from the large seal. Nevertheless, I'm going to pull the flywheel off (you can see that it is held on by eight XZN bolts) and replace this rather large seal. Just because if it ever DOES leak, the transmission has to come off to replace it, and it's an 8-10 hour job that I don't want to do again, any time soon. So 30 minutes of extra labor now, before I install the new transmission, is probably well spent doing this job.
Here are a couple of views of the flywheel and crank seal area.
View attachment 24912 View attachment 24908
I sincerely hope you enjoyed this little visual inspection tour of the underside of the car and transmission tunnel.
Cheers,
Gerry