• Hi Guest !

    Welcome to the 500Eboard forum.

    Since its founding in late 2008, 500Eboard has become the leading resource on the Internet for all things related to the Mercedes-Benz 500E and E500. In recent years, we have also expanded to include the 400E and E420 models, which are directly related to the 500E/E500.

    We invite you to browse and take advantage of the information and resources here on the site. If you find helpful information, please register for full membership, and you'll find even more resources available. Feel free to ask questions, and make liberal use of the "Search" function to find answers.

    We hope you will become an active contributor to the community!

    Sincerely,
    500Eboard Management

HOW-TO: Transmission Overload Protection Switch Removal

emerydc8

E500E **Meister**
Member
MODERATOR'S NOTE: There is a supplemental HOW-TO guide for this job, located here. It is advised to read both the original and supplemental HOW-TO guides to best understand and achieve this job.


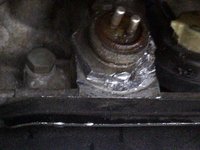
Today, I attempted to replace the transmission overload protection switch, located on the left side of the transmission. The last time I did this, I had no wrench or socket that would fit over the 35mm nut, which is an integral part of the switch.

I was told by a tech years ago that he used an air chisel to spin the nut off. It worked for me the last time, but this time when I tried it, the nut was so fused to the transmission that it just wouldn't budge. In fact, as you can see from the picture, I actually removed a piece of the nut.

In metric size sockets, all I had was a 34mm and 36mm (the 36 being a little too loose). I found that a 1 3/8" socket was a very snug fit. The problem (as anyone who has done this knows) is that there is limited space between the transmission tunnel and the nut, even when the four transmission crossmember bolts are removed and the transmission is lowered on a jack as far as it will go on its own weight.

My socket and a 3/4" drive breaker bar were way too large for the space, so I used a Dremmel tool to cut about 3/8" off the bottom of the socket (it took about 20 minutes of grinding). I also cut the end of a 3/4" drive extension so there would be just enough room to get it into the socket and get a long, 22mm box end wrench on it to turn the socket. (NB: I learned that Craftsman Dremmel blades last about 1/5 the time as Dremmel brand blades for this type of cutting.).

Still, the nut, which is only 3/16" thick, is so fused onto the transmission that the socket is slipping off as I try to turn it. The fit between the socket and nut is so tight that I actually have to hammer the socket onto the nut--and it's still slipping.

What I think contributes to the difficulty is that I'm on my back and I don't have much maneuvering room to work with. I put this away for another day where I can jack the car up higher and try to figure out how to wedge something between the transmission tunnel and socket to keep it from slipping off. I'll probably soak it a few times in penetrating spray to see if that helps. With all the rubber up there, there's no way to get a torch on it.

In the mean time, has anyone else dealt with a fused switch like this without the benefit of a lift?
 

Attachments

  • Tucson-20140521-00039.jpg
    Tucson-20140521-00039.jpg
    436.6 KB · Views: 91
  • Tucson-20140521-00040.jpg
    Tucson-20140521-00040.jpg
    379 KB · Views: 82
  • Tucson-20140521-00042.jpg
    Tucson-20140521-00042.jpg
    317.5 KB · Views: 85
  • Tucson-20140521-00041.jpg
    Tucson-20140521-00041.jpg
    336.5 KB · Views: 82
  • Tucson-20140521-00037.jpg
    Tucson-20140521-00037.jpg
    427.4 KB · Views: 88
Last edited by a moderator:
I did not have much problems with both of my cars. You can use a hex adapter to a standard fit the socket, then use a 19 mm on the hex- but I think I used my flex handle snap-on rachet.
There are parts behind that valve and it is a good time to replace the boot too. Read my thread on replacement(s). All the data is on the forum.
 
Thanks, Michael. I actually did replace the boot when you were going through that. I think I ordered it from an aircraft supply store in the southeast.

The socket just keeps slipping off; and it's not like it's not on there tightly to begin with. I might have to look at going through the transmission tunnel from the inside of the car with an air wrench. That would be the best straight-on angle, but I haven't yet looked where that would be with respect to the inside of the car. It would require a 3/4" hole. If it's somewhere that can be plugged under the carpet afterwards, I may do it.
 
Re: HOW-TO?: Transmission Overload Protection Switch Removal

Maybe for the time being this title should be changed to, “HOW TO? Transmission Overload Protection Switch Removal”.

If the transmission housing & mating components are oxidized, the first step is a thorough overnight saturation of the area with the penetrating lubricant of your choice. Lube does make things better. Come back the next day. The odds of removal will be better in your favor.

Next, the proper tools make all the difference. Before introducing air-chisels & such tactics, spend the money to get the tools meant to do the job. There will be much less deformation & gnashing of teeth involved when all is said & done. Your switch’s current state of being now provides more of a removal challenge. The correct-sized long box end wrench may still be able to fit what’s left of the hex & be leveraged to break the switch loose. If possible, getting the car up higher to get the tranny lower will help.

A pinpoint torch (such as this) Solder Kit 01.jpgcan also help to break its defiance. Remove the pan with gasket prior to doing so. I’ve successfully used this tool numerous times in the field to persuade pesky fasteners in tight spots

The most important step in the future is to apply some anti-seize to the threads & mating surface of the switch upon installation so a seizing/fused issue never arises.

Looks like a real PITA situation. Good luck with it.

PS. The 500E transmission tunnel insulation blanket has a cutout hole directly across from this switch. (although no access hole exists in the tunnel), so the potential exists to create an access hole which could be plugged afterwards. I do not recall if this location aligns with open sheet metal or is impeded by chassis structure. You’d have to verify. Hopefully you’ll be able to remove the part by conventional means & not have to take such an alternative path
 
Re: HOW-TO?: Transmission Overload Protection Switch Removal

Hopefully, this will eventually ripen into a HOW-TO without the ?

I can't seem to find anything in the manuals on removing this switch with the transmission installed on the vehicle. I presume it would require a special tool of some sort but I don't know if MB makes one with a part number. Klink mentioned to me that most guys at the dealer make their own tool. The 722.3 transmission manual specifies the tightening torque is 70 nm.

In my case, I'm not sure it's the threads that are the problem--I think it's the nut itself that has corroded and fused onto the side of the transmission case. Based on the brass color of the replacement switch (versus the aluminum color of the original), maybe there was a problem with this?

It is interesting that there's a cutout in the transmission blanket in the area of the switch. Good catch.

I have to remove my exhaust system this weekend and deal with these clogged cats, but I may try to move further along with this switch too.
 
Lowering the rear of the tranny as far as possible (by removing the mount/support) may help... don't forget to also remove the upper half of the fan shroud so the fan doesn't bind at full tilt. This may allow space to get a socket on there.

Otherwise, I would try an open-end wrench:
http://www.amazon.com/gp/product/B002YK7JIK/

:banana1:
 
Thanks, Dave. I lowered the transmission as far as it would go and still didn't have enough room. I'm pretty sure a 35mm open-end wrench would slip off at this point with the nut already shaved a bit on one side. The socket I used had to be pounded onto the nut and it slipped off.
 
Just to finish this post off, I was finally able to remove the switch today. I soaked it for about an hour in penetrating oil and, with the car much higher off the ground, I was able to get a long wrench on my custom 1 3/8" socket, which I hammered onto the nut. It took both feet with me hanging onto the bottom of the car while laying on my back, but the nut finally broke loose. Just a note--the 1 3/8" socket is too small to fit over a good switch and the only reason I was able to use it was that I had chiseled away a portion of the nut while attempting to remove it with an air chisel. The correct socket for this switch would be a 35mm.


I did notice that when I pulled the switch out, the small black plastic retainer that supports the pin at its base (140 277 01 51) had chipped in two places. I anticipated this and had this part on hand. As recommended by Klink, on the re-installation, I used the petroleum Viagra (a dab of thick Bosch grease) to keep the pin horizontal. The new assembly with the white collar is in the last pic
 

Attachments

  • IMG-20140525-00091.jpg
    IMG-20140525-00091.jpg
    326.8 KB · Views: 95
  • IMG-20140525-00092.jpg
    IMG-20140525-00092.jpg
    468.3 KB · Views: 82
  • IMG-20140525-00093.jpg
    IMG-20140525-00093.jpg
    384.7 KB · Views: 85
  • IMG-20140525-00095.jpg
    IMG-20140525-00095.jpg
    375.3 KB · Views: 79
  • IMG-20140525-00096.jpg
    IMG-20140525-00096.jpg
    363.4 KB · Views: 85
  • IMG-20140525-00094.jpg
    IMG-20140525-00094.jpg
    444.1 KB · Views: 118
  • TransOLoadSwitch.jpg
    TransOLoadSwitch.jpg
    35.6 KB · Views: 111
Jon,
You must have a good/even temperament to keep at it. I tend to throw in the towel too easily and have it towed to the shop.
Thanks for your inspiration!
 
“Never give in–never, never, never, never, in nothing great or small, large or petty, never give in except to convictions of honour and good sense. Never yield to force; never yield to the apparently overwhelming might of the enemy.”

I thought this fitting on Memorial Day. Churchill didn't know it at the time, but he was thinking about Jon with his 400E!
 
I'm learning the ropes. Just finished intake manifold rubber connections and am working on throttle cables.
I have to attack the small stuff first to get enough courage for the NSS and other hard to reach items.
 
Trae, the NSS isn't that hard to get to if you remove the transmission crossmember and let it lower with a jack under it. Really, it's a 15 minute job, unless you decide to install the plastic shift linkage bushings while you're in there.
 
Last edited:
I knew that would be right up your alley, Jon!

And that's some great news from Old Blighty, too!


Sent from my iPhone using Tapatalk
 
Really, it's a 15 minute job, unless you decide to install the plastic shift linkage bushings while you're in there.
It's worth it to get the bushing replacement pliers tool (you can get them for about $30 via eBay). This reduces bushing replacement to a 5-minute job (each) instead of a 30-45 minute (each) job using curses, sweat, pliers and a screwdriver. Particularly if you have multiple Benzes, this tool will pay for itself in just one use.

Cheers,
Gerry
 
instead of a 30-45 minute (each) job using curses, sweat, pliers and a screwdriver

How'd you know I did that every time I changed these things? Really, I have to get the tool.
 
It's worth it to get the bushing replacement pliers tool (you can get them for about $30 via eBay). This reduces bushing replacement to a 5-minute job (each) instead of a 30-45 minute (each) job using curses, sweat, pliers and a screwdriver. Particularly if you have multiple Benzes, this tool will pay for itself in just one use.

Cheers,
Gerry


I bought mine about 15 years ago, after hundreds of bushings without it.

I got quite good at it though, on a lift. Not much fun on the ground.
 
I bought mine about 15 years ago, after hundreds of bushings without it.

I got quite good at it though, on a lift. Not much fun on the ground.
Aye, it's pretty much the MB DIY mechanic's equivalent of the Clarkz Vader light-saber.
 
The dealer doesn't provide that [plastic shift linkage bushing] tool for you guys? WTF?
It's not a factory tool. It's a Hazard Fraught needle-nose modified at the ends and sold with a steep markup. The guy who invented it was a genius. AFAIK there is no factory tool for this.

:gor-gor:
 
It's not a factory tool. It's a Hazard Fraught needle-nose modified at the ends and sold with a steep markup. The guy who invented it was a genius. AFAIK there is no factory tool for this.

:gor-gor:

Yep, no factory source on that tool. And I'll also say yes, if you run old MBs you will love having that thing. Feels like a flimsy POS, but works great.
 
It's not a factory tool. It's a Hazard Fraught needle-nose modified at the ends and sold with a steep markup. The guy who invented it was a genius. AFAIK there is no factory tool for this.

:gor-gor:

Yep, no factory tool.

The tool truck started selling them as soon as that guy invented them.

I'll bet he's got some coin now............
 
$35 new and free shipping.


http://www.ebay.com/itm/Mercedes-Tr...1139856848&pt=Motors_Automotive_Tools&vxp=mtr


proxy.php
 
Oh how many times I have wanted one of those. The answer is 3. But each time I figure I have a better method for putting the bushing in without it. And each time I spend 45 minutes swearing, etc. Last round I tied a fine thread to the bushing to keep it from zooming off across the garage floor each time it sprang out of the grip of whatever I was using to try to pry it into place. I gotta suck it up and get that tool. I need to replace another bushing.
 
I finally broke down and got one about 3 years ago. I've used it 3-4 times and could just kill myself for not getting it many years ago. So many hours spent under cars sweating and swearing with pliers and screwdrivers trying to remove and replace those bushings. It's literally a 10-minute job with this tool.
 
Thanks, I was I search of the tool and settled on a 36mm low profile socket
 
Last edited:
Maybe the two can be added as how to, with the first one posted getting listed first in the merger...
 
HOW TO:

  • Don’t worry wife, I just want to change this part on my car to see if it solves my intermittent limp. Our long drive tonight will be a good way to test it. Only take 5 mins.
  • Lift car up.
  • Access is nice and easy.
  • Remove bronze ring which seems to have no point to its own existence?
  • Grab 36MM socket. Bugger, wont fit in the space between trans tunnel.
  • Grab 36mm spanner.
  • Wont crack off, Keeps slipping off, cant seem to bite it.
  • Starting to round off the corners now.
  • Spray loads of wurth “WD40”
  • Grab hammer and chisel to give it some persuasion…
  • Try again, still no good.
  • Wife looking angry.
  • Search tool boxes for a shallow 36mm socket.
  • Luckily find one. Fits perfectly, but bugger it breaks the electrical contacts off the switch. No turning back now.
  • Find long ratchet
  • Still keeps slipping off. This switch doesn’t want to move.
  • Air chisel time.
  • Totally ruin the switch but still not moving.
  • Getting a bit worried now. Pressure is on.
  • Swear loud enough to vent but not loud enough for mrs to hear.
  • Get the little mini blow torch for some gentle heat.
  • Slip off the bar steward thing again a few times, trip over yourself and now you are all dirty.
  • Decide that there is no F’ing way a little switch is ruining your evening.
  • Find massive grips (the Bahco type I normally use on tie rod ends to grip them) and bite the switch on the fine threaded part. The switch is now ruined.
  • Untwist with ease.
  • Find the new switch from Mercedes does not come with rubber seal.
  • Realise this is not over yet.
  • Carefully pick the old seal off, completely aware that if this seal tears, evening is F’d.
  • Luckily comes off.
  • Fit new switch.
  • Screw on brass thing and plug back on.
  • Drive off.
  • Hopefully wont keep bringing up a fault now…
Awesome! Loved it.
 
:plusone:

So did it fix the problem? And has the missus calmed down?

:duck:

Im hoping the cause of the limp issue is the E-Gas module as the error I get is "fault with control module EFP N4/1." I have one coming.

The overload switch keeps bringing a fault up but I cant see it causing limp?
The L5 Crank sensor also seems to keep coming back as fault so ill change that too, although im sure these two things are red herrings....

Havent driven far enough yet to determine if it is fixed with the overload switch. Sometimes the issue happens immediately. sometimes takes 2-300 miles.
 
The trans OL switch fault (on DI/EZL) generally triggers after a full-throttle upshift. And the upshift can feel slightly off (hard to describe). Hopefully it will be cured now. I've had to replace several OL switches, although with far less drama than you encountered!

The L5 crank sensor fault MAY be remedied by adding a 0.5mm shim, as described in the TSB linked below. If the engine always starts normally, it's highly unlikely the sensor is defective:

Also - make sure you are seeing the crank sensor as a "stored" fault, if using SDS/HHT-Win. If you are only seeing as a "current" fault, ignore it, that is normal.

:matrix:
 
Dave, thats very helpful!

I fitted the E Gas module today but again it did drop into limp again.

I also swapped ASR and Base modules from another car "just incase".

Problem is I forgot to wipe codes so when I plugged in after the limp, it showed lots of erronous codes.
Everything is now clear so next time I will have real codes .

Im sure the code will be the N4/1 Module fault again as this seems to always come back.

The L5 code is indeed just in current faults, so you have saved me messing about with that. Never an issue starting. Only a random limp mode which does appear to be getting more frequent.
 
My transmission overload protection switch has been leaking for several years, not severely, but it's not getting any better. So, I need to bite the bullet on replacing it.

Last year I obtained all of the parts and tools that will be required to do this job. I will post my own HOW-TO on this thread to provide further insight and information to augment the great HOW-TO that @emerydc8 did back in 2014.

I also ordered four rubber boots from an aircraft supply house in Pennsylvania -- the rubber boot that covers the wiring that connects to the transmission overload protection switch. This rubber boot often degrades and disintegrates/rips, and our own @samiam44 came up with a proper substitute some years back. I got three boots for my 722.3s, and one extra unit that I will be happy to sell in the near future to anyone needing it. It is only a $1.50 part, so I'd basically make it available to anyone needing it. I should have the boots in hand in the next couple of days.

Cheers,
Gerry
 
The following is my HOW-TO for the refurbishment and replacement of the transmission overload protection switch.

Approximate time required: 1 hour
Job difficulty: 2 on a 1-10 scale

Tools required:
  • Floor jack and 1 sturdy jackstand (or lift, or drive-on ramps)
  • Jeweler's flat-blade screwdriver
  • Small flat-blade screwdriver
  • 36mm combination wrench
  • Small amount of ATF + Q-tip
Parts required:
  • Transmission overload protection switch: 002 545 45 14
  • Large rubber o-ring: 016 997 34 48
  • Medium rubber o-ring: 005 997 80 48 64
  • Tiny rubber o-ring: 016 997 35 48
  • Plastic pin retainer ring: 140 277 01 51
Background:
Often, with age and mileage, the transmission overload protection switch begins to seep or leak ATF. This can come from the electrical connector of the switch itself, or it can come from the hardening and shrinking of the three rubber o-rings that are found on the switch assembly. Although not under a lot of direct stress, the plastic pin retainer ring also gets very brittle with age and repeated heating/cooling cycles.

Replacement of the overload protection switch is not a difficult job, but it is made much easier with a proper 36mm combination wrench. This wrench allows the loosening and tightening of the switch into the transmission housing. It is NOT advisable to use an adjustable wrench, or Vise-Grip, or even a 36mm socket (even a shallow socket). It is MUCH easier to use a wrench due to the limited, but more than adequate, space between the overload protection switch and the transmission tunnel.

The 36mm combination wrench can be easily obtained for under $20 via Amazon, using this link: https://www.amazon.com/gp/product/B002YK7JIK/ref=ppx_od_dt_b_asin_title_s00?ie=UTF8&psc=1
IMG_1361.JPG IMG_1363.JPG IMG_1362.JPG


Procedure:

First, identify the transmission overload protection switch on the driver's side of the transmission, near the front and directly above the oil pan, just forward of the neutral safety switch. In the photos below, you can see some modest seepage of ATF from the area where the switch screws into the transmission housing.
IMG_1364.JPG IMG_1365.JPG


Here is a close-up of the switch, and its electrical connector.
IMG_1366.JPG


Using your fingers, unscrew the knurled round electrical connector retaining ring, by rotating it counter-clockwise.
IMG_1367.JPG


Carefully pull the loosened retaining ring back over the rubber boot, and then pull the electrical connector straight off of the switch. Carefully bend the connector wire back and out of the way, so that you have adequate room to work.
IMG_1368.JPG


Using your 36mm wrench, grip the switch, and rotate counter-clockwise to loosen it. It may require some significant effort to loosen it. You may also find it helpful to use the "box" end of the 36mm wrench, instead of the open end. The open end has a propensity to slide off the edges of the switch, and can gouge them or round them off if you are not careful. The box end can help prevent this problem of slippage.
IMG_1369.JPG IMG_1370.JPG IMG_1371.JPG


Once loose, remove the switch from the transmission by unscrewing it by hand. It may drip a FEW DROPS of ATF from the switch's threaded mounting hole, but will not drip much.
IMG_1372.JPG IMG_1373.JPG


Place the removed switch assembly on clean towels on your work surface. I used lint-free disposable towels, which I do when working on ANY transmission component, for cleanliness.
IMG_1374.JPG


Separate the two parts of the switch assembly by pulling them apart with your fingers, as shown in the two images below.
IMG_1375.JPG IMG_1376.JPG


Here is the switch assembly that you will be replacing. Note the small o-ring on the end of it. This o-ring will be very hard and brittle, but this entire switch can be discarded. Note the Sept-1993 manufacture date on the removed switch, indicating that indeed this was the original switch on my car. The third photo below shows the Feb-2019 manufacture date of the replacement switch.
IMG_1377.JPG IMG_1379.JPG IMG_1380.JPG


This is the other part of the switch, the reaction valve. Note that it has a large and a medium rubber o-ring on the barrel, and a black plastic retaining ring on the end.
IMG_1378.JPG


Here is the replacement o-ring that will be pressed onto the end of the new overload protection switch.
IMG_1381.JPG IMG_1382.JPG IMG_1383.JPG


Carefully roll the new tiny o-ring onto the nipple on the end of the new switch. There is a groove that it will easily fit into.
IMG_1384.JPG IMG_1385.JPG


Since you will be replacing the retaining ring on the reaction valve barrel assembly, you can just pull the small shaft straight out of the end of the barrel, as shown in the second photo below. Wipe the barrel off on your clean towel, to clean it of any schmutz and/or ATF it may have on it.
IMG_1386.JPG IMG_1387.JPG


These are close-ups of the retaining ring. Use a small flat-blade screwdriver to prise the plastic retaining ring off of the end of the reaction valve barrel, as shown in the third photo below. The fourth photo shows the retaining ring removed, and in pieces.
IMG_1388.JPG IMG_1389.JPG IMG_1390.JPG IMG_1391.JPG


Next, get your replacement o-rings and retaining ring out and ready, for replacing them on the reaction valve barrel.
IMG_1392.JPG IMG_1393.JPG


Using your jeweler's screwdriver, prise the old o-rings off of the reaction valve barrel. You may need to use the blade to "cut" them so that you can removed them, because they will be too hard and inflexible to remove.
IMG_1394.JPG IMG_1395.JPG IMG_1396.JPG IMG_1397.JPG


Using a small amount of ATF and a Q-tip, coat each o-ring with a light coating of ATF, and roll it into its proper position on the reaction valve barrel. The larger diameter o-ring goes on the bottom part of the reaction valve, and the medium o-ring fits in the middle groove of the reaction valve.
IMG_1398.JPG IMG_1399.JPG IMG_1400.JPG IMG_1401.JPG IMG_1402.JPG


Once the o-rings are in position, stand the reaction valve on its larger flat end. Insert the ball joint of the shaft into the end of the reaction valve barrel.
IMG_1403.JPG


Gently place the plastic retaining ring over the end of the shaft, and lower it down onto the end of the reaction valve. Snap the retaining ring into place in its groove.
IMG_1404.JPG IMG_1405.JPG


Now, it's time to re-mate the reaction valve and the switch back together. Coat the tiny o-ring on the switch's nipple with a light coating of ATF with your Q-tip. Then press the two parts together. They will fit together easily.
IMG_1406.JPG IMG_1407.JPG


Here is what the two pieces look like once pressed together.
IMG_1408.JPG


A close-up of the switch's electrical connector prongs.
IMG_1409.JPG


Clean the outside of the switch area with your lint-free rag, to make a clean mating surface for the replacement switch. Then carefully insert the switch, thread it, and screw it into place as far as you can with your fingers.
IMG_1410.JPG IMG_1411.JPG IMG_1412.JPG


Use your combination wrench to finishing rotating the switch into place, and to tighten it. You want to make it around as tight as it was when you removed it, which is fairly tight. The factory specified torque is 70 Nm, which is quite tight.
IMG_1413.JPG


The completely installed switch.
IMG_1414.JPG


The last step is to insert the electrical connector back onto the switch, thread the knurled retaining ring onto the switch's external threads, and tighten the connector retaining ring into place. Strong finger tightness is the desired level.
IMG_1415.JPG


And with that, you are done with the job.

Thank you for your interest !!
 
Well done.

They can also fail, which will cause a CEL. I had one die in one of my W140s.

Dan
 
You're lucky yours was not fused on like mine, Gerry. Maybe if I had tried the box end wrench it would have come off without the problems I had; but in Jaymanek's case above, even the spanner slipped off. He didn't specify if he had an open-end or box-end.
 
I am having some troubles related to this switch.

Car: w126 560 SEC (euro, with a cat)
Parts ordered: all 3 o-rings, the switch itself and plastic retainer, new oil pan and gasket

I went to a mechanic because it's easier with a lifter, but explained the whole process.

Process:
- drained oil pan & removed it
- removed full switch, changed all orings and switch
- put the new oil pan and gasket
- filled with oil

Started the car, let it warm up (it was a warm already), moved the shifter through everything, BUT... reverse would not engage. Everything worked flawlessly, except reverse. We checked the oil multiple times, but nothing, no reverse.

We raise the car again and changed the orientation of the connector of the switch (thought maybe + and - was wrongly put). Tried again, still no reverse.

We then decided to put the old switch back (with the new oring) and the reverse started working. The switch leaks a bit, but at least I have reverse.

Now.. maybe the new switch is broken (bough new from dealer), but... why does this relate to reverse? From all my research, this switch has nothing to do with reverse, why would it make it not work?
 
I have noticed something about this switch under EZL but need someone else to confirm. If anyone can connect their car to star and read live data do PM me so I can explain the procedure.
 
Are you sure you ordered the correct part numbers? The HOW-TO that I did was for a 500E/E500. Although the 722.3 used in the C126 is a close cousin of the E500E, you should make sure that the parts that you ordered are correct.
 
@gerryvz - thank you for the reply. I know this thread is about the 500E, I actually ordered my parts a few months back and used EPC to find the code. It seems to be the same as yours, so I am guessing that the switch itself is compatible with a lot of models. But even if it would be different, from all the info that I have regarding this switch, it shouldn't affect reverse at all, shouldn't it?
 
Huge thanks to everyone who's documented findings here 🙂 I had been trying to find a part number for that rubber boot (that goes to the 2 pin overflow protector) with no luck. I just got a 1994 SL320 and the boot has a crack in it (see below picture)

@gerryvz if you still have that extra one still, I'd be happy to buy from you. Or if someone was able to help me find a different source. Based on what has been mentioned so far, I was able to find this (not sure if this part would work)

I'm not sure if this cracked boot is causing the problem I'm seeing- but I'm fighting the following trouble code:
> P1700 (Transmission upshift delay switchover valve (Y3/3) without function (Logic chain))

Besides showing a check engine, it's causing the shifts to not happen until the last minute. I'm working with a 722.5 (versus 722.3) but I checked the green vacuum line going from the upshift delay switchover valve (under hood on passenger side firewall) to the passenger side of transmission, it seems fine (would need to smoke test to confirm). I'm curious if this cracked boot can be causing a problem (not sure where the vacuum line goes to? there is also a black vacuum line going to upshift delay switchover valve). I'm going to run outside and wrap the boot up in electrical tape to see if that helps

1630877650508.png
 
Last edited:
Huge thanks to everyone who's documented findings here 🙂 I had been trying to find a part number for that rubber boot (that goes to the 2 pin overflow protector) with no luck. I just got a 1994 SL320 and the boot has a crack in it (see below picture)

@gerryvz if you still have that extra one still, I'd be happy to buy from you. Or if someone was able to help me find a different source. Based on what has been mentioned so far, I was able to find this (not sure if this part would work)

I'm not sure if this cracked boot is causing the problem I'm seeing- but I'm fighting the following trouble code:
> P1700 (Transmission upshift delay switchover valve (Y3/3) without function (Logic chain))

Besides showing a check engine, it's causing the shifts to not happen until the last minute. I'm working with a 722.5 (versus 722.3) but I checked the green vacuum line going from the upshift delay switchover valve (under hood on passenger side firewall) to the passenger side of transmission, it seems fine (would need to smoke test to confirm). I'm curious if this cracked boot can be causing a problem (not sure where the vacuum line goes to? there is also a black vacuum line going to upshift delay switchover valve). I'm going to run outside and wrap the boot up in electrical tape to see if that helps

View attachment 137709
The solution I got is not the best one -- only a WORKABLE one.

However, a company in Germany, happens to make this EXACT part as a reproduction. I can't remember the name of the company, but I was just looking at their web site about a week ago. I know someone here will know this company, and post the URL.

:update:

Found it !!!


connector-for-overload-switch.jpg
 
Last edited:
That repop Kurth connector looks beautiful. But €45 plus shipping, estimated €100 / $120 USD, ouch. We only need the rubber boot, not the knurled lockring! Shame they don't sell the rubber piece alone at a lower price.

:yayo:
 

Who has viewed this thread (Total: 4) View details

Back
Top