• Hi Guest !

    Welcome to the 500Eboard forum.

    Since its founding in late 2008, 500Eboard has become the leading resource on the Internet for all things related to the Mercedes-Benz 500E and E500. In recent years, we have also expanded to include the 400E and E420 models, which are directly related to the 500E/E500.

    We invite you to browse and take advantage of the information and resources here on the site. If you find helpful information, please register for full membership, and you'll find even more resources available. Feel free to ask questions, and make liberal use of the "Search" function to find answers.

    We hope you will become an active contributor to the community!

    Sincerely,
    500Eboard Management

jftu105 300E Sportline Project

This distributor business is having new twists, never boring. Today, I wanted to put the new replacement distributor on the car and took down the old distributor. After I pulled the car out of garage, suddenly, I saw a little mouse jumped off from the front bumper. First time, I noticed a mouse in my garage (may be I have been so oblivious) and I absolutely hate it. What does this disgusting thing need or want from a car?

Because I was so disgusted, I wanted to drive the car to heat up the engine area to ensure this thing is not inside anymore. I drove to a local Walmart, about 1.5 miles away, to get some baits to get rid of them, risking my life due to potential Chinese virus exposure.

When I came out, in less than 10 minute, the car won't start. I tried a few times. It cranked but won't start. I figured that the distributor was having issues again. So, I walked home to drive my old green E320, with full set of tools and the new distributor. It was a nice walk, in the sun, to have my daily walk done in an unusual fashion.

Got back to the 1992 300E after about 25 minutes. Before working on the car, I decided to try again. It started right away. I guess that the car cooled down a bit. Drove it back and decided to take out the distributor to find out what could have happened.

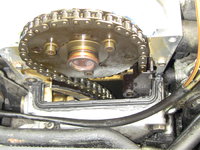
Nothing in particular. The distributor looks fine. However, the new rotor, BERU, looked quite bad, in particular the three bolts. They had this corroded look with a white layer. I looked the old Bosch I replaced, it looks fine. I then realized that the BERU used aluminum bolts. However, the rotor bracket, which is bolted to the camshaft, is made of brass. As a result, there is galvanic effect. I really don't like what I saw and decided to take off the BERU rotor. The bolts became very tight due to the galvanic corrosion. I was able to remove two of them but the third one was rounded (these damn allen bolts). My bolt extractors do not have the right size to remove it. So, I used a plier to remove it. Bad idea. I broke the rotor and one leg of the rotor bracket.

So, the problem just got worse. To remove the rotor bracket (Mercedes Distributor Rotor Bracket (M103) - Genuine Mercedes 1031580840), I used a T30 tool to loosen the center bolt. The bolt was removed without issues. However, the rotor bracket is tapered fit to the camshaft and it won't come out. Checked out a few youtube videos and they all had the same struggles and some broke the piece when removing it. Finally, one suggestion was to tap the center hole with M8x1.25 and pull it out with a bolt. I was able to do this by my oil filter socket and a M8 bolt as a pulling tool. It worked beautifully.

Went to FCP EURO and order a new rotor bracket and a new rotor (under the lifetime replacement).

Then I started to think why the first BERU failed. The center graphite pin contact broke and the center support tube melted. It was overheated, apparently. Why the car failed to start today? And then it started after sitting for about 30 minutes.

After removing the rotor bracket, the back cover of the distributor was removed too. There is no leak through the camshaft seal. Therefore, I don't change the seal even though I ordered one along with a time chain cover seal.

So, the question: Why it overheated at the center pin contact and the rotor? Could it because of lack of contact? I tried to fit the back cover and the distributor together. Then, I realized the potential issue.

I also replaced the distributor O-ring, ordered from FCP. This O-ring is slightly oversized and it is quite thick. As a result, the back cover and the distributor do not fit together as close as necessary. The center connector pin of the distributor probably barely touched the rotor center. This poor contact might be the reason for the overheating problem.

Once the new parts arrive, I will measure the fit condition between the center pin and the rotor. If the fit is poor, I will use silicon for seal instead of the oversized O-ring.

jftu105
 
Glued the rotor bracket back with Gorilla glue and a metal washer as reinforcement. Of course, this is only a temp fix for testing. Want to measure the contact between the center pin of the distributor to the rotor. Put everything back and applied a thin layer of silver silicon over the center graphite pin. Put the O-ring in place and fit the distributor back. The distributor flushes with the metal cover. Really nothing to adjust. Removed the distributor and noticed that the thin layer of the silver silicon was smudged, indicating a firm contact with the rotor. Repeated a few times and the same results. I really don't see any problems in the way I installed the distributor back.

Put everything back and fired it up. It started with no issues. I used my Lisle spark tool to check the sparks. The sparks from the coil and to each cylinder are bright and frequent, with no sign of misfiring. Drove the car back to the garage.

Will wait for the replacement parts and redo the job. Perhaps, I will do the seals (camshaft and timing cover) together.

The warm start problem would be investigated when I put everything back.

jftu105
 
Want to give a shout-out to FCP Euro. The lifetime warranty is real and easy. See the email below:

Total Returned: $59.41
Credit Type: USAePay (Credit/Debit Card) (Refunds post within 1-3 business days)
If refunds don’t seem accurate, please note that discounts factor into New/Unused returns – discounts decrease each item’s original price. Warranty returns always refund the item’s new price, not the original price.
Shipping costs from neither the original order nor the new order are not refunded in normal returns.
Returns forms that don’t reflect a warranty replacement order will automatically process as customer credit – we use the new order number on the form to process refunds.
Further information about our returns process can be found at our returns page here: Returns and Exchanges | FCP Euro
Sincerely,
FCP Euro Returns Team
 
Last edited:
Drove the 1992 sportline several times to see if the warm non-start problem would repeat. It has not. I am suspecting the BERU rotor. Once I receive the replacement, I will confirm if there is a contact problem due to the BERU rotor.

jftu105
 
Received the rotor bracket, seals, and gasket. Decided to get rid of oil leaking from the timing chain cover. It turned out that this engine was never touched. The timing chain cover was original, with the MB star, same as the camshaft seal. The valve body cover gasket was completely baked in and it was original too. All of them were vitrified after 28 years and 135,000 miles.

Took me some effort to remove the valve cover. The cover and the gasket were bonded to valve body. Had to use a thin spreader and hammer it underneath the gasket around the cover. Then, with the spreader in and hammer a flat screwdriver to pry it. In this way, I don't mark the aluminum body. Finally, got it off and the gasket was hardened completely.

The timing chain cover came off without issues but the camshaft seal was bonded so tightly and it took a long while to finally get it off. The old seal feels like a piece of wood. After that, it was all about cleaning, in particular inside the valve cover.

Finally, put everything back and everything seems to be fine. The only trouble was installing the camshaft seal. Got a Corteco. I could push it in by hand but it was not flushed. Used a large socket to hammer it in softly but it got in too deep. Had to take the cover off and reinstall the seal. This time, I used a flat metal piece to tap it in and it flushes with the timing chain cover.

This timing chain cover seal replacement job is so much easier on M103 than on M104. No coolant is involved. I start to like the M103 engine more and more after learning how to handle the distributor.

jftu105
 

Attachments

  • IMG_4603.JPG
    IMG_4603.JPG
    1,008.2 KB · Views: 6
  • IMG_4604.JPG
    IMG_4604.JPG
    1 MB · Views: 6
  • IMG_4605.JPG
    IMG_4605.JPG
    528.9 KB · Views: 6
Last edited:
I start to like the M103 engine more and more after learning how to handle the distributor.
...except the M103 typically needs valve guide replacements every ~150kmi or so, otherwise they drink large amounts of engine oil. Head off, machine shop work, etc. The M104 almost never needs guides, but does need head gaskets now & then. Dunno if the latest M104 gasket design will last longer or not. I'm still not a fan of the M103 personally; I really like being able to get live data from the HFM scanner with electronic injection!

:seesaw:
 
I am nervously waiting for this inevitable doom of valve guides.

I like M104, in particular with Hfmscan. I can pretty much figure out most of the problems. However, M104 is much harder to work on due to the tight space. The front timing chain cover seal is at least three times harder to replace.

I won't be getting rid of my four 1994-5 E320's any time soon, but I like the 1992 sportline more and more.

jftu105
 
I have had five M104 and one M103 since 2001. Sold the first M104 after putting on about 110000 miles (from 110,000 to 220,000). The buyer loved the car but it was junked after one year due to accident. During this nearly 20 years of owing M104, these are the major issues I had to fix (only those related to the engine):

1. One out of five had the head gasket failure and needed replacement. The other four had some oil leak but not to the coolant; therefore, I don't touch them.

2. All of them had front timing chain seal leak. They are PIA to replace.

3. All of them had AC leaks and needed superseal to fix.

4. All of them have to replace the upper and lower engine harness.

5. All of them have multiple MAF failures (due to the baking by the exhaust)

6. All of them have EGR issues and the ERG tube needs reopening.

7. All of them have the delay to upshift shift vacuum leak to trigger check engine light.

8. All of them with the old style belt tensioners need replacement (M103 too)

9. All of them have water pump and radiator failures (not uncommon).

10. Some of them need coil replacement.

11. All of them need throttle actuator replacement or rewiring.

12. All of them need heater hose replacement (in the back of the engine, M103 same)

13. One of them needed crankshaft harmonic balancer replaced, a major break-down, due to the loosened center bolt.

14. All of them needed some sort of electric system maintenance, such as alternator regulator, fuses, OVP (more often due to bad connection, not the actual failure of the relays), electric cooling fans, relays, etc..

15. All of them needed fan clutch and pulley replacement (all engines need these).

16. All of them needed O2 sensors (all engines need these).

17. All of them need neutral safety switch replacement.

18. Various vacuum leaks or switch-over valves failures.

Other than these, M104 pretty lasts forever. After acquiring Hfmscan, the ownership of M104 becomes much easier. If one does not do the work by oneself, some of the issues on the list basically will junk the car or cost $$$ at the shop, not to mention the dealership.

jftu105
 
Comparison with my 5 year experience with a ‘92 24V 300CE (CIS-E, ASR), bought with 120K miles, now with 210K:

1. One out of five had the head gasket failure and needed replacement. The other four had some oil leak but not to the coolant; therefore, I don't touch them. <<Had HG done at ~100K; slight external leak now, not to coolant>>

2. All of them had front timing chain seal leak. <<Nope>>

3. All of them had AC leaks and needed superseal to fix. <<Nope>>

4. All of them have to replace the upper and lower engine harness. <<Nope>>

5. All of them have multiple MAF failures (due to the baking by the exhaust) <<No MAF, nothing for exhaust to bake except my sandwich on the way to work>>

6. All of them have EGR issues and the ERG tube needs reopening. <<Nope>>

7. All of them have the delay to upshift shift vacuum leak to trigger check engine light. <<Nope>>

8. All of them with the old style belt tensioners need replacement (M103 too) <<Yup, x1>>

9. All of them have water pump and radiator failures (not uncommon). <<Neither>>

10. Some of them need coil replacement. <<Nope>

11. All of them need throttle actuator replacement or rewiring. <<Nope>>

12. All of them need heater hose replacement (in the back of the engine, M103 same) <<Nope>>

13. One of them needed crankshaft harmonic balancer replaced, a major break-down, due to the loosened center bolt. <<Nope>>

14. All of them needed some sort of electric system maintenance, such as alternator regulator, fuses, OVP (more often due to bad connection, not the actual failure of the relays), electric cooling fans, relays, etc.. <<OVP x1, couple fuses, fried MAS relay due to H2O-induced short>>

15. All of them needed fan clutch and pulley replacement (all engines need these). <<x1>>

16. All of them needed O2 sensors (all engines need these). <<Nope>>

17. All of them need neutral safety switch replacement. <<x2>>

18. Various vacuum leaks or switch-over valves failures. <<Nope>>

<<No significant ASR issues, untouched AT still shifts beautifully, no significant oil consumption, 24mpg and runs as well now as when I bought it.>>
 
Last edited:
To be fair to M104, it is basically bullet-proof inside the engine other than the head gasket. However, the peripherals around the engine are pretty weak with all sorts of problems.

After owning the 1992 sportline, I can see the cost cutting started in 1993-5, and got a lot worse after 1996. M104 is a more advanced modern engine but so far, I have to say M103 is probably the peak of an old technology. I just hope the doomed valve stem seals of M103 won't hit me any time soon.

I used to look at the big circular air filter of M103 (and other older MB engines) with a disdain. Not anymore!

jftu105
 
I have had five M104 and one M103 since 2001. Sold the first M104 after putting on about 110000 miles (from 110,000 to 220,000). The buyer loved the car but it was junked after one year due to accident. During this nearly 20 years of owing M104, these are the major issues I had to fix (only those related to the engine):

1. One out of five had the head gasket failure and needed replacement. The other four had some oil leak but not to the coolant; therefore, I don't touch them. <<M103 head gasket failure to coolant w/chocolate milkshake; M104 only slight external oil leak>>

2. All of them had front timing chain seal leak. They are PIA to replace. <<M103 done when head gasket replaced; M104 done when head gasket replaced>>

3. All of them had AC leaks and needed superseal to fix. <<M103 - never problem; M104 - never problem>>

4. All of them have to replace the upper and lower engine harness. <<M103 - N/A; M104 - upper done before I bought car; I replaced lower>>

5. All of them have multiple MAF failures (due to the baking by the exhaust) <<M103 - N/A; M104 - never problem>>

6. All of them have EGR issues and the ERG tube needs reopening. <<M103 - N/A; M104 - done when head gasket replaced, not 100% blocked>>

7. All of them have the delay to upshift shift vacuum leak to trigger check engine light. <<M104 - happened one time>>

8. All of them with the old style belt tensioners need replacement (M103 too) <<M104 - happened one time>>

9. All of them have water pump and radiator failures (not uncommon). <<M103, M104 - never had a problem>>

10. Some of them need coil replacement. <<M104 - had several times>>

11. All of them need throttle actuator replacement or rewiring. <<M103 - N/A; M104 - not a problem, but done when head gasket replaced>>

12. All of them need heater hose replacement (in the back of the engine, M103 same) <<M103, M104 - not a problem that I recall>>

13. One of them needed crankshaft harmonic balancer replaced, a major break-down, due to the loosened center bolt. <<M103, M104 - not a problem that I recall>>

14. All of them needed some sort of electric system maintenance, such as alternator regulator, fuses, OVP (more often due to bad connection, not the actual failure of the relays), electric cooling fans, relays, etc.. <<M103 - don't recall issues; M104 - OVP one time; alternator one time; voltage regulator one time>>

15. All of them needed fan clutch and pulley replacement (all engines need these). <<M103 - don't recall issues; M104 - fan clutch one time; idler pulley 1 or 2 times>>

16. All of them needed O2 sensors (all engines need these). <<M103 - don't recall; M104 - done once proactively>>

17. All of them need neutral safety switch replacement. <<M103 - don't recall issues; M104 - three times due to failures>>

18. Various vacuum leaks or switch-over valves failures. <<M103, M104 - don't recall problems>>

Other than these, M104 pretty lasts forever. After acquiring Hfmscan, the ownership of M104 becomes much easier. If one does not do the work by oneself, some of the issues on the list basically will junk the car or cost $$$ at the shop, not to mention the dealership.

jftu105
My experiences in red, above.

[Click "Click to expand" to view the list.]
 
Finally, the horrendous butcher job of door panels are gone! I restored the door panel to its former glory as much as possible. The butchered job was so damaging and complete in a negative way. They took out the amplifiers, replaced the original radio deck with a new unit (not so bad), and then hijacked the wirings. At the end, the two speakers at the dash under the windshield were disabled. I struggled to find the wiring to reconnect them back. The sound becomes muddy because all high frequencies are gone. I settled by reusing the tweeters from the butcher job.
 

Attachments

  • DSC_1803.JPG
    DSC_1803.JPG
    2.5 MB · Views: 5
  • DSC_1811.JPG
    DSC_1811.JPG
    2.2 MB · Views: 5
  • [500Eboard] IMG_3843.JPG
    [500Eboard] IMG_3843.JPG
    1 MB · Views: 3
To my surprise, as I traced the wiring, the tweeters were hooked up without any crossovers. They installed JL Audio crossovers, woofers and tweeters, but at the end, they disconnected the crossover and simply tied the tweeters and woofers to the same wire. I am surprised that the tweeters were not burned. I guess that the volume was not high enough to kill them.

I put a simple inductor-capacitor cross-over in a box and attached the tweeter to it. Then I try to hide it in front. All changes are reversible. You won't notice it unless pointing out.
 

Attachments

  • DSC_1809.JPG
    DSC_1809.JPG
    2.1 MB · Views: 4
  • DSC_1813.JPG
    DSC_1813.JPG
    2.5 MB · Views: 4
Last edited:
I have been watching LKQ, patiently waiting for black interior of W124 to show up. Nada for a long time. Not even W124. Suddenly last month, I saw one in LKQ. The car was abandoned for a long time and there were molds inside. The door panels were not pretty but the lower part, which I need for restoration, is in OK shape. So I took that. LKQ charged me the same price as the entire door panel. Two weeks later, another W124 with black interior showed up in another LKQ. Wow! It was fresh. I was the 2nd one got to it. Somebody already cut out the catalytic converter and destroyed the radio and neighboring covering. People could be rough on junk cars! What a surprise.

This time, I don't wait. I pull all four door panels.

I had to repair some hooks and tried to mount the panel in with all hooks biting tight. It went well.

The top edge of the pocket unglued, but it can wait.

With the tweeters in place, the sound is more full and fills the entire cabin.

Throughout the process, I kept asking who in the right mind will murder a car in such a horrendous way. Glad that I am able to restore it.

jftu105
 

Attachments

  • DSC_1805.JPG
    DSC_1805.JPG
    1.8 MB · Views: 7
  • DSC_1815.JPG
    DSC_1815.JPG
    2 MB · Views: 7
Last edited:

Who has viewed this thread (Total: 2) View details

Who has watched this thread (Total: 2) View details

Back
Top