• Hi Guest !

    Welcome to the 500Eboard forum.

    Since its founding in late 2008, 500Eboard has become the leading resource on the Internet for all things related to the Mercedes-Benz 500E and E500. In recent years, we have also expanded to include the 400E and E420 models, which are directly related to the 500E/E500.

    We invite you to browse and take advantage of the information and resources here on the site. If you find helpful information, please register for full membership, and you'll find even more resources available. Feel free to ask questions, and make liberal use of the "Search" function to find answers.

    We hope you will become an active contributor to the community!

    Sincerely,
    500Eboard Management

Project: W220 S430 Revival

Restore or let go?

  • Scrap it and buy a good one - money pit!

  • Bring it back bit by bit and try not to get too carried away - nice driver but not show winner

  • Full resto to original spec


Results are only viewable after voting.
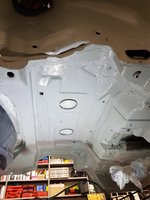
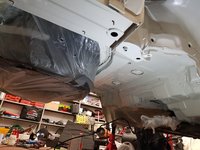
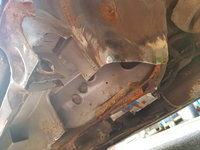
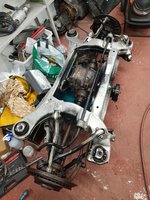
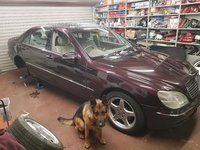
Welding ongoing and will take weeks still.:bananadeath:

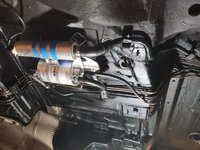
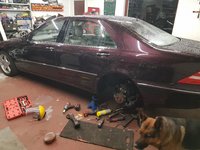
Did a full service on its transmission including a fluid flush at the weekend. And ordered valve cover gaskets + a thermostat as a smaĺl "break" from the weldathon

Screenshot_20200908-125517.jpg

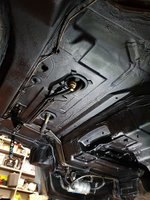
Whilst awaiting that stuff to come from Germany I will order up new oil breather hoses from the dealer too.

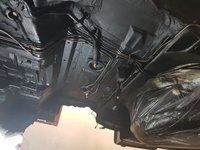
I spotted an oil drip from the rear crank seal, that will have to wait until I get my 2 post lift put up.
 
Started into both rear boot areas on the S430 which are in a bad way. I cut repair sections from a donor car some months back so it's a matter of carefully marking and cutting them to match onto the car perfectly.

20200910_184344.jpg
20200910_185137.jpg
20200910_193507.jpg

Fuel tank and pumps are removed for safely reasons. Will likely drop the rear subframe at this stage too and make all new lines for above it.

Coupled with making new custom panels with galv steel where the good replacements fall short of the original car. Aka the repair sections came with rust too!

I have my own metal break / folder now so that should make easier work of folding new flanged sections etc.

I am determined that this S430 will NEVER rust again so a part of that is correct prep and new coatings under the car. I have one of these kits coming with is a specialist 2k epoxy rust encapsulator/ primer which will be used to repaint the underbody of the S430. Primarily the rear of it at this stage with the subframe to be removed prior to same

Screenshot_20200911-135402_Samsung Internet.jpg
 
As usual! you the man Joe!

Good thing you live in NI, what would you do with all your free time otherwise?! :applause:

Now you mention it, there are alot of better things I could be doing with my time.... but here was today's happenings

20200912_170008.jpg
20200912_170054.jpg
20200912_172632.jpg

Needs welds tidying up, primed and seam sealed etc but its solid again at least and mm perfect to where it should be.

That was a long day and I have approx 40 - 60 hours more welding repairs to look forward to
 
Last edited:
You do good work Joe :goodjob: BUT when do you sleep? Don't you have an Architectural business to deal with also?
How do you find the time?

Don't stop because of my dumb questions. Just curious.
 
You do good work Joe :goodjob: BUT when do you sleep? Don't you have an Architectural business to deal with also?
How do you find the time?

Don't stop because of my dumb questions. Just curious.

Yes indeed Terry I have a small side Architecture business at home so I draw from 6am - 8am then head to work full time Architecture until 5.30pm. Then I either draw again or work in Garage until 9.30 pm, an hour of Netflix then bed. Repeat each day!

I have been getting most weekends free for the S430 so that definitely helps
 
A friend of mine is parting out a 76k miles facelift S320 w220. He was kind enough to put it up on a forklift and allow me to cut any and all remaining pieces I needed to complete my S430 project for free.

I went last night after work and stayed until near 10pm cutting lumps out of it! Got on well. I split the spot welds on the donor car which is more time consuming to remove but will really speed up my repair process with not having to remake the flanges each time.

Going to be a VERY busy couple of weeks now welding every spare minute but my the end of that I should have a perfectly solid totally rust free S430
:drool5:
 
Got the last of the sections cut from the S320

20200919_134037.jpg

The rear arches inner and outer on the donor car were in great condition. So I cut them out complete and since my S430 has bad inner and outer arches I might be able to carefully cut and weld these in complete. (With some trimming to suit) As is usual the repair sections require work too. Which is why my S430 when done will be the most rust free example around!!

Currently finishing up the other side of the boot which required 2 donor cars and custom repair sections to get a nice repair done.

Crazy amount of work but ill just keep going and not think about that!
 
A few more speed bumps and the battery was going AWOL
:lolhit:

20200816_214658.jpg

20200913_162901.jpg

All fixed now and mm perfect. (2 donor cars and some new custom sections were required to make this area good. It appears alot of w220s could have rot in there a bit like the 500E battery sheetmetal)

20200919_202910.jpg

Still needs welds ground clean, sanding down, etch primer, seam sealer and re-paint both boot tubs. I have new sound deadening too so I will replace that back to factory spec. I want to complete welding to the arches first as more hot steel spatter will fly in there
 
Rear arches were not just as terrible as I anticipated underneath the bubbling paint but they were holed. Whilst 95% of the population would fibreglass fill these and call it good (for 6x months) I opted to cut out and replace with new

20200920_105639.jpg
20200920_142703.jpg
20200920_142718.jpg

Moving onto the opposite side now and hope to have it done by dinner
 
And the other outer arch is fitted too :wootrock:

20200920_181059.jpg

I will phone the bodyshop tomorrow and see if they can take it in about 10 days. Still lots to weld but getting there. Feels like I'm over the halfway mark now on this grueling work
 
For anyone embarking on rust repairs a good thing to keep is breakfast cerial boxes :rugby: 
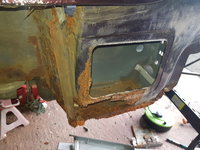
The cardboard is perfect for making templates for new steel. Trace the edges (what's left of them) with your thumb and it stays on the cardboard. Then cut to size and sharpie around it onto the new steel. I want this area replaced as one galvanised sheetmetal strip

20200920_114402.jpg 20200920_114426.jpg

I write on and keep these templates. If I was doing similar repairs again it is handy to have the templates to hand. (I have lots of C124 Templates for example)
 
Yesterday I went and got more spares for my w220s. First was a pair of mint front wings from a facelift w220. Car must have been very low miles and in a county (Cavan Ireland) with no road salt.


20200926_153257-jpg.jpg


20200926_153123-jpg.jpg


20200926_153113-jpg.jpg


20200926_153103-jpg.jpg


Those will go on my S600. (Most of the marks on them are tar spots and preservation wax) I already have 2 other sets of spare rust free facelift w220 wings. (By facelift I mean from later facelift donor cars that apparently have zinc plating prior to paint which does seem more durable)

This was from a new recent donor car and IDEAL for me to pillage for S430 metal if I need to 😎 :D

I got the nice leather owners pack just as a spare I keep with many others for older benzes. A pair of nice genuine good used facelift taillights for the S430, a alarm siren and bracket that were rust free and in great nick + a recent genuine Air Pump. The owners manual pack had a 2015 docket for the replacement air pump - result! £150 for the lot which I think was great. I'll keep the pump as a spare unless the S430 one looks like a sea crustarion and if it does I'll go ahead and swap out.

20200926_154249-jpg.jpg

20200926_154255-jpg.jpg


I did order some new body brackets and exhaust brackets etc for the S430 from the dealer so should get them this week.

Work continues I should have another installment tonight. Parts hunting off the new cadaver helf me back some yesterday
 
I was watching a show last night on Northern Ireland. They specifically mentioned County Antrim and the Causeway Coastal Route.

After I visit the @JC220 someday (and after a parts-hoard trading session), I'm going to drive that route.
 
I was watching a show last night on Northern Ireland. They specifically mentioned County Antrim and the Causeway Coastal Route.

After I visit the @JC220 someday (and after a parts-hoard trading session), I'm going to drive that route.

Sounds good Gerry! Your most welcome to call anytime - I can also make lots of recommendations for great places to visit all over Ireland
 
OK so initially I thought the jacking point on the other rear side was solid enough. But eventually it crunched inwards and that was that. Remove all plastic cladding and the same or worse than the other side.

20200926_193525.jpg

Much the same technique. Repair the donor Jack point (you can't buy just the jack point from MB)

20200927_151703.jpg20200927_154308.jpg

Repair the donor sill section and re drill the holes to suit long wheel base

20200926_184255.jpg20200927_143856.jpg20200927_162434.jpg

Cut out and re-make the inner cill
20200927_180841.jpg20200927_175016.jpg

Next is to start seam welding this section back up again

20200927_180828.jpg

There is a third section for the floor behind that needs made too. But I'll get the cill solid first then go behind and make that good.
 
Last edited:
So between the last couple of nights I got the inner cill area repaired, Franken jack point installed and the other cill seam welded back in place. This was a pretty big repair so I'm glad its mostly wrapped up. Behind the cill to floor still requires re-doing though.

20200929_191753.jpg
20200929_191808.jpg
20200929_210407.jpg
 
I have since removed both rear air struts to completely clean and Waxoyl seal the entire wheel well areas.

Then that got me thinking. When I have this much apart it doesn't really make sense to send it for paint next week. Instead I have put the bodyshop off until 12th Oct which should give me just enough time to remove the subframe now and clean + paint all areas above same. And remake the brake and fuel lines which are inaccessible above the subframe.

This way the next time I drop it off the stands it is pretty much MOT ready at the back end and once it returns from paint I finish the MOT prep up front whilst swapping out the wings.
 
A typical repair on this car

1: Clean down and identify any badly pitted or comprised steel.

20201002_111059.jpg

2: Cut out

20201002_112322.jpg

3: Cut new section from galvanised heavy gauge steel. (Not the thin cheap shit body tin you can get in auto parts stores)

20201002_112613.jpg

4: Test fit and trim until ready to proceed to fully seam welding it - controlling the heat in short bursts so as not to blow through or warp the panel.

20201002_113605.jpg20201002_115017.jpg

5: Grind back excess welds. Use a torch to check for any pin holes In the weld. If there are any tack them again and grind back. (Moisture will attack the weld of there are any pinholes)

20201002_121117.jpg

6: For new sections they are getting 2x spray coats of Wurth Zinc Perfect heavy zinc rich primer.

20201002_141445.jpg

7: If the other side is accessible it gets a wire brush, degrease and Wurth Zinc paint. If hard to reach then use Waxoyl and a lance to reach it and apply hot at high pressure to coat all areas.

A repair like this will outlive the car ;) Using fibreglass etc is a total waste of time. The rust will fester and get worse so next time you have a bigger mess on your hands.
 
Some other repairs done today
20201002_121511.jpg20201002_141001.jpg
20201002_151704.jpg
20201002_162605.jpg
20201002_222014.jpg
20201002_182452.jpg
20201002_222038.jpg

I am definitely well over the half way mark now. Its starting to look like a real nice solid w220!! Kind of fun to just sit and look at how much of this car has been restored and repaired in the last few weeks. But no time for that I have to keep pressing on!!
 
Looks like you were never even in there. Great job and skill set!
Wow, you are doing awesome work to a car that probably 90% would have parted out and scraped.
Huge respect for your effort and your welding skills! (y)

Thank you for the nice comments! Yes most would have scrapped it, maybe I should have too but I'm so far in now I can't abort :rugby:

It'll be worth it in the end I think
 
I have been busy on the S430 since but I did not work at it on Saturday due to having a scrape on my eye :rolleyes: All the welding and grinding is sore on your eyes for sure. I thought I had steel in it but went to A&E on Sat morning and it was a scrape in one eye. Basically no biggy just feels irritated and sore for a day or two.

Cut out and remade the inner rear cills at the jacking points. Before getting larger more stable 6 tonne jack stands and supporting the rear end on that to remove the rear subframe. I am pleased that I only found light surface rust up there and no welding needed. All 4x subframe mounts are solid and no severe pitting or holes so all good :)

20201004_140619.jpg 20201007_075103.jpg 20201007_075125.jpg 20201007_075352.jpg 20201007_073515.jpg
 
Man, your attention to detail and craftsmanship never seize to amaze me, very inspirational!

Thanks for the reply! Glad you like it

As it happens its past 11pm here on Sunday and I'm still working under the S430
 

Attachments

  • 20201018_225611.jpg
    20201018_225611.jpg
    1.4 MB · Views: 10
  • 20201018_225553.jpg
    20201018_225553.jpg
    1.5 MB · Views: 10
  • 20201018_225505.jpg
    20201018_225505.jpg
    1.2 MB · Views: 10
  • 20201018_225452.jpg
    20201018_225452.jpg
    3.3 MB · Views: 10
Looking back at the photos where I started a few weeks ago reminds me of the NUTs amount of work that has went into this car
 

Attachments

  • 20200911_183619.jpg
    20200911_183619.jpg
    4 MB · Views: 6
  • 20200913_162914.jpg
    20200913_162914.jpg
    2 MB · Views: 6
  • 20200815_174305.jpg
    20200815_174305.jpg
    3.3 MB · Views: 6
I remember when you first purchased it, certainly didn't look like it would need this much work... But underneath of all that... Bravo!

Joe,

You are going to put that beauty in the Mercedes Showroom as a NOS car when your done, arn't you?

lol

LOL you might as well!!!

Thanks for the kind comments! I need to stop nick picking though and get this car together. It NEEDS to get to paint. I have MOT booked for 9th November so I really, really have a lot of work to do before then. Lets hope I make it

So what was done since is:
  • Completion of inner arch fab work
  • Thorough grinder wire brushing of underbody and heat gun to remove loose / failing original underseal areas.
  • Salt removal solution sprayed on
  • Strong detergent and detail brush to very thoroughly clean the underbody.
  • Dry car with compressed air, diesel heater for one hour until steel warm to touch
  • Treat any surface rust areas further with rust Converter
  • 2k anti rust epoxy brush applied to all areas and garage heated for 24 hrs. Now epoxy is hard and every pore on the body is sealed tight
Next is seam seal and black Waxoyl underbody seal, epoxy the NLA brake pipe clips back up and get the new brake lines into place, whack the subframe back in, hook it up and start it up with no exhaust. I'll pull a few late nighters this week and have the transporter coming for it Thursday morning so again - the hours are endless but I really need the S430 together for the most part and away to paint ASAP
 
Update:

I got the S430 away to paint. Some nights I had 3.5 hours sleep to make that happen but now FINALLY I can relax momentarily and watch Netflix in the evenings instead of lying under a benz

I made all new Kunifer lines, pressure washed the subframe and applied the Waxoyl to name a few jobs. From white primer to on its wheels ready for paint shop transport was about +18 hours labour
 

Attachments

  • 20201020_183659.jpg
    20201020_183659.jpg
    1.8 MB · Views: 7
  • 20201020_222551.jpg
    20201020_222551.jpg
    4 MB · Views: 7
  • 20201020_222557.jpg
    20201020_222557.jpg
    4.2 MB · Views: 7
  • 20201020_222621.jpg
    20201020_222621.jpg
    2.3 MB · Views: 7
And back together enough to go to paint. That is - replacement front wings, rear arches / quarters and rear bumper.

Then when it comes back I'll remove the old rusted front fenders, more welding to front cill jack points, waxoyl the be jesus out of the front underbody also, refurbish wheels and 1st MOT test in over a decade on 9th May
 

Attachments

  • 20201023_134706.jpg
    20201023_134706.jpg
    6.2 MB · Views: 11
The trusty MIG is set aside and the S430 is only hours away from MOT prep finished. (Rear parking brake plates and shoes coming from Germany)

There was a tonne of work in this and some fantastic parts find (Like OEM silencer delete system for free) which I'll update on this thread in a few days when I have time. I have probably done 200 hours labour on this car in the last couple of months. But it sure is worth it now
 

Attachments

  • 20201115_185619.jpg
    20201115_185619.jpg
    4.2 MB · Views: 11
  • 20201115_185800.jpg
    20201115_185800.jpg
    4.1 MB · Views: 11
The trusty MIG is set aside and the S430 is only hours away from MOT prep finished. (Rear parking brake plates and shoes coming from Germany)

There was a tonne of work in this and some fantastic parts find (Like OEM silencer delete system for free) which I'll update on this thread in a few days when I have time. I have probably done 200 hours labour on this car in the last couple of months. But it sure is worth it now
Your dog's eyes say it all! "C'mon now, are we done yet?!?!?!" 🐶
 
Your dog's eyes say it all! "C'mon now, are we done yet?!?!?!" 🐶

Haha funny thing is my pooch LOVES the garage. No idea why. Its certainly not my company- must be the diesel heater! He doesn't miss a thing, keeps an eye on proceedings. Indeed he could rebuild a w220 now I'm sure of it.
 
Great job on this restoration, as always! And what gorgeous color you just don't see every day!

Thankyou! The colour is pretty rad but it took 4 trips back and forward to paint supplier. The paint can has air miles at this stage! Nightmare to match Almandine Black.

If some of you don't mind visiting the dark side there were much more up to date posts below on this project:

 
Joe,

What a great job! The finished project is going
to really look great. Now, “Get your motor running and get out on the highway “

I see you have a junk yard guard dog also. He looks just like one where I used to work about 30 years ago for a plastering subcontractor.

Your’s looks like a handsome dog and maybe a little tamer.

The first time I met the one I’m talking about he was in a cage. He was pretty scruffy and unkept. He wanted to take off my head. He was only let out when the yard was closed at night and on weekends. He couldn’t see very well either. The guy I worked for introduced him to me and everything seemed OK. I could actually pet him.

Anyway, long story short. On weekend I had to go into the yard for some equipment. So I had to unlock the gate and enter the yard. Guess what I forgot about the guard dog. So here he comes ears laid down growling and barking. I thought I was done.

Remember I said he couldn’t see very well. He got within a couple feet of me and licked my hand. I still had to go change my pants.
 

Who has viewed this thread (Total: 1) View details

Who has watched this thread (Total: 2) View details

Back
Top