• Hi Guest !

    Welcome to the 500Eboard forum.

    Since its founding in late 2008, 500Eboard has become the leading resource on the Internet for all things related to the Mercedes-Benz 500E and E500. In recent years, we have also expanded to include the 400E and E420 models, which are directly related to the 500E/E500.

    We invite you to browse and take advantage of the information and resources here on the site. If you find helpful information, please register for full membership, and you'll find even more resources available. Feel free to ask questions, and make liberal use of the "Search" function to find answers.

    We hope you will become an active contributor to the community!

    Sincerely,
    500Eboard Management

W124 500TE Project - Lets do this!

Hello All!

Two weeks have gone by and this is my first real update of 2018.

As the work is now out of my hands, I’m guessing updates will be slower!

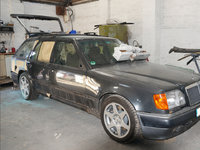
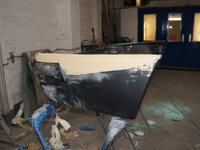
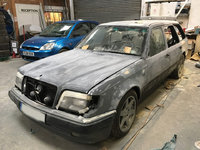
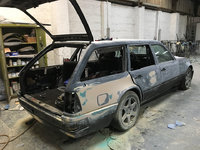
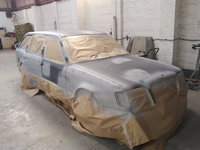
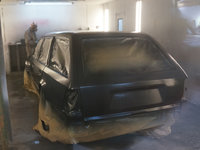
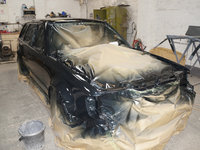
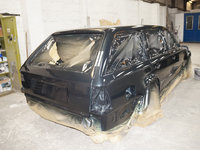
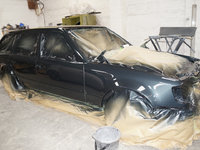
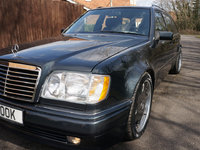
The beast was taken to the body shop last week.

After mucho sucking through teeth, a price was agreed for the work. It’s the most expensive respray they have done for me.. Almost double the cost of the SEC Widebody back in 2008.

I think they learnt from the SEC job. Think of a number, triple it. May just about cover the inevitable surprises involved in jobs for me!

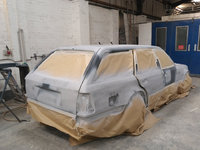
Hopefully the results will be worth it.

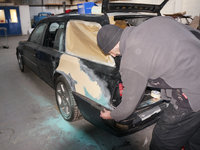
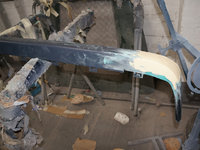
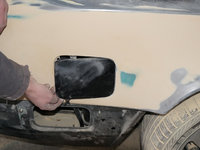
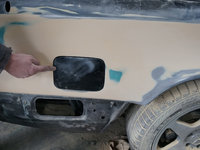
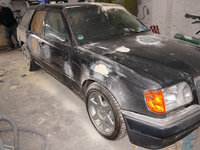
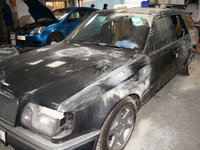
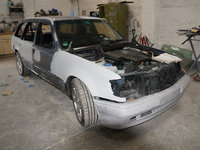
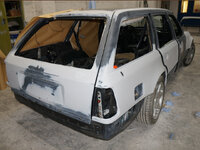
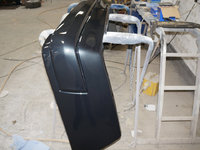
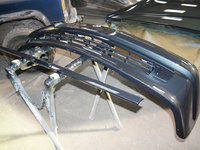
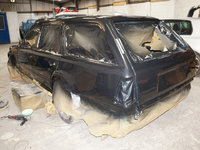
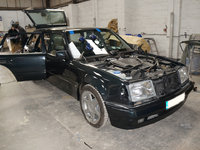
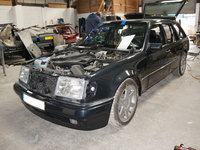
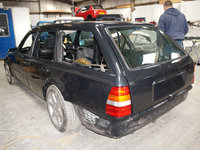
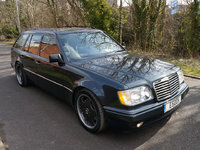
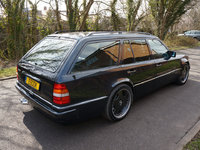
The major headache of the bodywork, is how to get the 500E bumpers to fit an estate. The mountings are different and the estate bumpers have “ears” below the tail lamps..

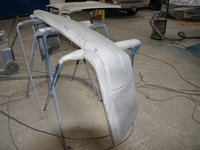
As you can see they are experimenting. We are using as much of the 500E bumper as possible and then grafting on the estate pieces. Once it’s all lined up, it will all need to be stitched and plastic welded together where possible. This type of plastic doesn’t “weld” very well, so we will see what tricks they pull out of the hat!

The bumper will have to be extended on the upper edge where it meets the quarter panel.

The centre rubbing panel will be a combination of the saloon part which has longer sides and the centre section will be the estate part.

The chrome trims are another challenge. The hockey stick shaped chrome tops don’t quite reach around far enough.

So much to think about when it comes to the bumper.

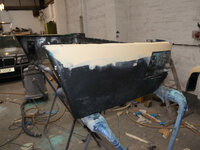
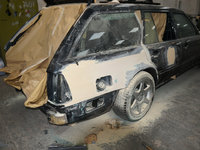
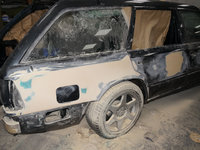
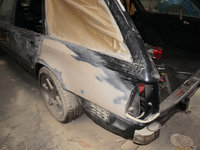
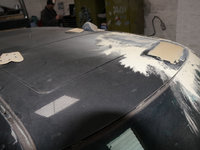
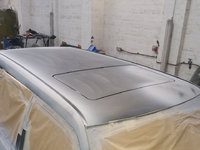
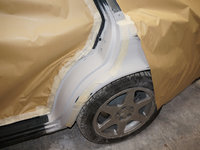
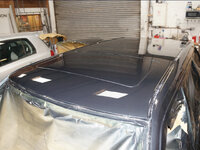
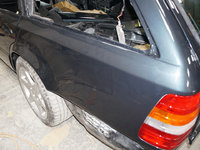
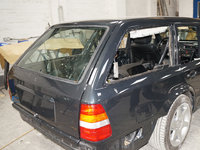
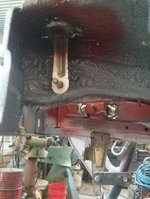
The rear quarter panels have been strengthened from inside. They have been pulled out to remove as much of the distortion as possible. Finally they have been filled to achieve a flat finish. The body shop will wait a few days for this to go totally hard, before they sand it back.


Thanks!
 

Attachments

  • 500te136.jpg
    500te136.jpg
    562.7 KB · Views: 91
  • 500te137.jpg
    500te137.jpg
    451.5 KB · Views: 96
  • 500te138.jpg
    500te138.jpg
    592.3 KB · Views: 96
proxy.php

this steering wheel looks similar to the one i ordered..and was having issues when trying to fit the airbag..as the fasteners holding the airbag..have a different measure between them than the threaded holes in the airbag..
have you mounted the airbag on this steering wheel yet?or at least tried to ?
 
Just a mini update:

The bumper shape is now almost there.

The height has been made up using fibre glass sheeting.

The centre insert has been made using a new centre estate section and the original 500E side parts.

The bumper has taken a few days and is not finished yet!

Another update in a few days!
 

Attachments

  • 500te139.jpg
    500te139.jpg
    441.5 KB · Views: 19
  • 500te140.jpg
    500te140.jpg
    429.7 KB · Views: 19
  • 500te141.jpg
    500te141.jpg
    511.9 KB · Views: 18
  • 500te142.jpg
    500te142.jpg
    446.9 KB · Views: 18
  • 500te143.jpg
    500te143.jpg
    588.3 KB · Views: 20
Latest update:
 

Attachments

  • 500te145.jpg
    500te145.jpg
    389.3 KB · Views: 13
  • 500te144.jpg
    500te144.jpg
    498.3 KB · Views: 16
  • 500te146.jpg
    500te146.jpg
    407.9 KB · Views: 15
  • 500te148.jpg
    500te148.jpg
    508.1 KB · Views: 15
  • 500te149.jpg
    500te149.jpg
    535.7 KB · Views: 15
  • 500te150.jpg
    500te150.jpg
    497.7 KB · Views: 12
  • 500te151.jpg
    500te151.jpg
    401.6 KB · Views: 16
  • 500te147.jpg
    500te147.jpg
    422.3 KB · Views: 14
Hello!

Last week was a slow one, the bodyshop had some other work to get through.

This week the shell has been primed. This now sits for a few days before anything else is done.

In the meantime, the bumpers are being further prepared.

Then all the smaller parts will be primed; under headlight panels, side skirts, bumpers, mirror caps etc etc.
 

Attachments

  • 500te162.jpg
    500te162.jpg
    224.4 KB · Views: 14
  • 500te159.jpg
    500te159.jpg
    178.3 KB · Views: 13
  • 500te160.jpg
    500te160.jpg
    239.4 KB · Views: 13
  • 500te165.jpg
    500te165.jpg
    171 KB · Views: 14
  • 500te164.jpg
    500te164.jpg
    215.2 KB · Views: 15
  • 500te161.jpg
    500te161.jpg
    228.2 KB · Views: 13
  • 500te163.jpg
    500te163.jpg
    197.3 KB · Views: 15
I'd be soooo tempted to switch to 009 Sapphire Black (color on the E500 Limited)...

:seesaw:

Totally agree on a color change (its not like you're trying to preserve its originality for collectibility reasons). Its a one-off (well . . . a two-off if I recall correctly) car and a distinctive car deserves a distinctive color IMO! If it were me, bornit, nautical blue, or almandine (if sticking to W124 colors) would be in the running. I also like violane (R129), tanzanite blue (W211), or onyx grey (R129).
 
Totally agree on a color change (its not like you're trying to preserve its originality for collectibility reasons). Its a one-off (well . . . a two-off if I recall correctly) car and a distinctive car deserves a distinctive color IMO! If it were me, bornit, nautical blue, or almandine (if sticking to W124 colors) would be in the running. I also like violane (R129), tanzanite blue (W211), or onyx grey (R129).
+eleventybillion. :D :D

If it were my ride, and I planned to keep in a loooong time, I'd paint it one of my personal favorite colors. Bornite and Nautical Blue would be in short list for sure. The catch is, for a proper color change, it's a ton of extra work (powertrain out, probably interior out, yadda x3). And it has to match the interior color, which may limit choices a bit.

However, a relatively minor change... i.e., from 199 to 009... might not require all the extra work. For example, if painted 009, if the engine compartment was left 199 most people wouldn't notice when the bonnet was up. Still need to shoot the door jambs and whatnot, but based on the photos it looks like that's already on the menu. I've seen 009 in person and it looks REALLY sharp. Dark black with blue metallic flake. Really neat color. I've heard 189 is also a neat color (Black Opal - not sure if any late 124's had this offered, or if 189 wasn't used until the 210 chassis.)

I assume everyone has already seen this, but in case not, here's a link to SG-Motorports widebody E36 wagon conversion painted in 189:
https://www.500eboard.com/forums/showthread.php?t=7623


:stirthepot:
 
I've heard 189 is also a neat color (Black Opal - not sure if any late 124's had this offered, or if 189 wasn't used until the 210 chassis.)

I can personally confirm that 189 (Black Opal) looks great on a W163 chassis (especially with slightly tinted windows).


Robert
 
Hello All!

Soon be spring, hopefully this project will complete in time to enjoy it during the nicer weather.

The bodyshop have everything ready for paint.

As for colour choice, I thought long and hard and have decided that I want to keep it 199 Blue Black.

It was very tempting to go for a 500E Ltd colour, but to do a colour change properly, it involves stripping down to bare shell. A lot more work and £££.
Both cars being 199 Blue Black, it’s the right thing to do. Besides I think it’s a lovely colour.

Hopefully some “colour” shots soon.
 

Attachments

  • 500te166.jpg
    500te166.jpg
    248 KB · Views: 26
  • 500te167.jpg
    500te167.jpg
    224.7 KB · Views: 25
  • 500te168.jpg
    500te168.jpg
    223.7 KB · Views: 25
  • 500te169.jpg
    500te169.jpg
    196.9 KB · Views: 26
  • 500te170.jpg
    500te170.jpg
    225.1 KB · Views: 28
  • 500te171.jpg
    500te171.jpg
    184.9 KB · Views: 25
And she is all painted.

Remarkably very few imperfections I can see.

Polishing is well underway, the roof was being done.
 

Attachments

  • 500te179.jpg
    500te179.jpg
    254.8 KB · Views: 26
  • 500te182.jpg
    500te182.jpg
    240.1 KB · Views: 24
  • 500te178.jpg
    500te178.jpg
    236.2 KB · Views: 28
  • 500te180.jpg
    500te180.jpg
    248.9 KB · Views: 21
  • 500te181.jpg
    500te181.jpg
    245.9 KB · Views: 25
Glass being fitted today. New genuine front & rear screens. New Rubbers all around.
 

Attachments

  • 500te188.jpg
    500te188.jpg
    248.8 KB · Views: 43
  • 500te187.jpg
    500te187.jpg
    276.9 KB · Views: 45
  • 500te186.jpg
    500te186.jpg
    299.7 KB · Views: 54
  • 500te185.jpg
    500te185.jpg
    268.9 KB · Views: 38
  • 500te184.jpg
    500te184.jpg
    262.7 KB · Views: 37
  • 500te183.jpg
    500te183.jpg
    274.3 KB · Views: 38
No oil cooler on this one as USA spec.
I can't remember, did you swap over the 500E lower radiator support? This is totally different, and unique to the 036 chassis... and, I think it has some of the mounting bits for the oil cooler, if desired. Requires some cutting & welding. The photo in post #10 makes it look like the wagon did receive the 500E support, but I couldn't find any other pics of the front end minus the bumper.

You can add the oil cooler later if desired, all the major parts are available, except a couple of small mounting brackets which are NLA (that I am still hunting for, if anyone has them for sale!).

:apl:
 
The lower radiator support are different, but I think the main reason are to make space for the cooling tube for the engine mount. I did last week mount the brackets for the oilcooler and some brackets on the lover radiator support. I think I will fit the tube as it is.


Sent fra min D5803 via Tapatalk
 

Attachments

  • 16.jpg
    16.jpg
    854.8 KB · Views: 26
Remember the 500E oil cooler setup is totally different than on any other 124, it's located in the center of the bumper, not on the side. I can't find a good photo showing the oil cooler installed on the E500E, but here's a pic of the parts courtesy of Omegabenz:
 

Attachments

  • 500E_oil_cooler1.jpg
    500E_oil_cooler1.jpg
    104.7 KB · Views: 51
Hi,

Yes the 500E radiator support has been swapped.

This USA car did not have a cooler so decided to leave it.

My UK car has an oil cooler and have replaced it some years ago.

I dont think its something ill be adding. This car wont be tracked or any hard driving.

I live in the UK, we wear our shorts if the temperature reaches 10 degrees Celsius.
 
Hi All,

Sorry for the lack of updates! Those of you on facebook may have seen that the car is indeed all painted and back from the bodyshop.

We did have some dramas at the bodyshop.

Both rear quarter glass windows were a pain to fit with new seals. We are convinced that the new Mercedes seals simply do not fit properly. We broke one of the glass panes trying to fit the glass. To add insult to injury, Mercedes no longer supply the glass in the correct green tint. Luckily the W124 facebook group helped me out and I got a good used pair of glass from a local member.

On the day of collection, the rear bumper fell to the floor on one side whilst it was being bolted up. This cause some crack damage along the seam where estate and saloon bumper were joined. Of course, this really upset Adi at the bodyshop. The bumper has been the most difficult part of the bodywork.

To me it seemed like the tiniest of cracks in the paint, but it was a setback for the bodyshop, as the bumper now had to be redone.

After Adi cooled down, he was able to repair the damage. A couple of days later, the bumper was repainted and the car ready for collection.


Since the car came back, I have been busy getting loose ends tied up. I have re fit most of the interior. The recaros have bolted in nicely. The rear heated seats work. The kiddie’s seats are almost in.

Refitting some interior panels resulted in a trip to Accident & Emergency on Saturday evening. Eye protection is recommended when using a sharp flat head screwdriver to prise a rubber trim. The screwdriver flung out and I stabbed myself in the eye. I was
very lucky that it caught the edge of my eyeball and there is no serious damage. My colleagues were more than a little frightened by the mix of blood and tears pouring out of my skull.

Nothing that sitting in a hospital for 4 hours followed by a teenager sending me home with a tube of cream, couldn’t fix.

In other news, I scored a lovely Brabus exhaust back box from the bay a few weeks ago. Think it suits the car really well.

Earlier this week, I had our local stainless exhaust place, Custom Chrome, manufacture me the missing parts of the exhaust.
I have used the original 500E down pipes.
Custom Chrome have made me a centre box to accept the twin pipes. From this box there is one large pipe to join up to the brabus box.
The sound is lovely. Although I need to try and raise it a little as it seems to kiss the tarmac over the speed bumps.


I am now waiting for the final “outsourced” piece of this jigsaw. The wood.
The wood guy says he is almost done. It will be a couple of weeks longer though. Without the wood, I cannot fit the dash, door cards or speakers.

For now I will be concentrating on little bits and pieces.

  • Information Stickers
  • Rest of the audio System & antenna
  • Replace Front Door Seals
  • Wax Underside and fit new arch liners. Fit remainder of exhaust shields etc
  • Sort out intermittent ASR issue, something up with brake lamp switch
  • Replace all interior courtesy lamps (all gone a bit yellow)
  • Replace Indicator & Cruise Stalks for Freshness
  • Replace all Sill kick plates
  • Fit & Wire in Auto Dim Mirror with Homelink.
  • So many other minor things. I still have 6 trays full of parts to fit!
 

Attachments

  • 500te196.jpg
    500te196.jpg
    272.5 KB · Views: 48
  • 500te195.jpg
    500te195.jpg
    263.1 KB · Views: 50
  • 500te194.jpg
    500te194.jpg
    287.9 KB · Views: 57
  • 500te193.jpg
    500te193.jpg
    327.7 KB · Views: 62
  • 500te192.jpg
    500te192.jpg
    420 KB · Views: 75
  • 500te191.jpg
    500te191.jpg
    425 KB · Views: 68
  • 500te190.jpg
    500te190.jpg
    438.5 KB · Views: 76
  • 500te189.jpg
    500te189.jpg
    424.5 KB · Views: 67
Hi Everyone!

Hope everyone is having a lovely Easter.

I have been slowly re assembling the interior and electrics.

One of the items I really wanted to swap was the factory front door speakers from the 500E. A cool option that was standard for the US spec cars.

Luckily the mounting holes are present in the standard doors.

The original, factory sound deadening pad came off altogether from the donor 500E. I don’t think the door panels had ever been removed on the donor car, everything was still totally perfect.

The wood arrived back with me yesterday. Im amazed by the quality. Pictures to follow as it is raining here and I need the car to be outside to get some good pictures.

The dash is back on with its refinished wood, the door cards are all back together and in.

I will spend the next few days just carefully refitting all the wood panels and generally getting the inside all finished.

The little fiddly things zap up so much time!
 

Attachments

  • 500te199.jpg
    500te199.jpg
    262.3 KB · Views: 22
  • 500te198.jpg
    500te198.jpg
    261.1 KB · Views: 22
  • 500te197.jpg
    500te197.jpg
    274 KB · Views: 21
Hello All!

Its almost there!

The interior is all in and finished. What do you think?
 

Attachments

  • 500te205.jpg
    500te205.jpg
    243.3 KB · Views: 55
  • 500te204.jpg
    500te204.jpg
    230.5 KB · Views: 56
  • 500te203.jpg
    500te203.jpg
    210.8 KB · Views: 51
  • 500te202.jpg
    500te202.jpg
    234.2 KB · Views: 58
  • 500te201.jpg
    500te201.jpg
    234.1 KB · Views: 61
  • 500te200.jpg
    500te200.jpg
    199.5 KB · Views: 64
Today the transmission has been fettled by the company that rebuilt it back in September.

It needed some minor adjustments to make the shifts nice and sharp. Really does pull well now.

On the way to the transmission place, I had a nervous situation. Occasionally, when I went around bends, there was an almighty banging from the transmission tunnel which would last a few seconds. Strange? Well I had to wait until I brought the car back tonight to inspect.

It was a bolt for the seat runner that must be slightly too long, or maybe I missed a washer, as the bolt was just touching the prop shaft universal joint, but only when going around corners! Decided to cut the bolt down a bit and all sorted.

So now all that is left now, is to wax protect the underside and box sections with Dinitrol and then next week it is off to have specialist wheel alignment. I only set the wheel alignment up roughly. It will be going to a place where they spend a full day
getting it all perfect with weights etc etc.

And then hopefully it will be ready for the show season!

It feels like it’s been a long journey, but the light can be seen now.
 

Attachments

  • 500te206.jpg
    500te206.jpg
    316.5 KB · Views: 53
  • 500te207.jpg
    500te207.jpg
    212.5 KB · Views: 55
  • 500te208.jpg
    500te208.jpg
    211.9 KB · Views: 64
  • 500te209.jpg
    500te209.jpg
    224.9 KB · Views: 59
Beautiful! Nice work. I too would like to know what you did with the woodwork. I have some spares in bad shape that I've thought of changing to black. It was a huge project. You should be proud.

drew
 
What is that center console you have in there? Is that a TE spec item? I haven't seen it before.

Hi,
This is a W124 specific storage compartment. In my other cars I have them with fridges inside made by Waeco I believe. this one isnt a cooler, just a storage compartment.
Something is needed as an armrest with the recaro seats, this fits the bill nicely.
 
Beautiful! Nice work. I too would like to know what you did with the woodwork. I have some spares in bad shape that I've thought of changing to black.

drew

Dear Drew,

I use a fantastic woodworking guy here in the UK. He has restored lots of wood for me in the past. Very slow but very very good.
I asked for all the wood to be finished in a black tinted lacquer. Therefore the wood still shows its grain and the finish is a very dark brown. A little like the birds eye maple used in more modern Mercedes but without the green.

Im sure there will be someone local to you offering this. I think Madeira concepts are the go to guys on your side of the pond?
 
Hi Jay,

I think you’ve done a fantastic job. This was certainly a well thought out and meticulously assembled project. What a beautiful wagon. I love the interior w/ the Porsche seats. I agree w/ Drew on the wood finish. I know exactly what your finisher did. I used to refinish antique furniture and used a lot of tints to match panels together.

I think you have a real ‘SHOW STOPPER’

The Best of Luck with it!!!

Take Care
 
Outstanding and awesome project, thanks for making that video and sharing. With all the detail work you did, I'm surprised you didn't shoot for RHD as well.. :o

Very impressive... kudos... :beerchug:
 
This board should have a dedicated section for all of the w124 v8 E500E/C36 wagon conversions. They really are special projects and the threads are strewn around here all over the place...but are some of the most interesting builds and reads!
 

Who has viewed this thread (Total: 1) View details

Who has watched this thread (Total: 5) View details

Back
Top