• Hi Guest !

    Welcome to the 500Eboard forum.

    Since its founding in late 2008, 500Eboard has become the leading resource on the Internet for all things related to the Mercedes-Benz 500E and E500. In recent years, we have also expanded to include the 400E and E420 models, which are directly related to the 500E/E500.

    We invite you to browse and take advantage of the information and resources here on the site. If you find helpful information, please register for full membership, and you'll find even more resources available. Feel free to ask questions, and make liberal use of the "Search" function to find answers.

    We hope you will become an active contributor to the community!

    Sincerely,
    500Eboard Management

RESTO PROJECT: M119 / W124 / E500 Engine Top-End Refresh

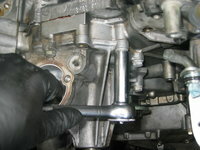
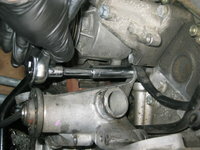
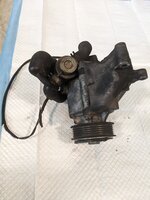
@JC220, @gsxr, and maybe others with experience, what would be an adequate alternative to this tool (to hold, rotate camshaft)?

[500Eboard] IMG_9662.jpeg
 
That is just a thin wrench for rotating the cams. Anything that will rotate them without damaging the lobes should be fine.

View attachment 148131
Exactly this - use the hex slots on down the samshafts to hold them not that front one.

Also, I would not be taking the intake adjusters apart not sure why it is sometimes suggested but it requires special tooling etc and no need. Pull the camshaft(s) complete or unbolt the exhaust camshaft sprocket.
Well, I'm following Gerry's detailed write up with pictures. He removes intake sprocket to replace the located in the upper V chain guide, and it seems easy-enough - with a proper tool to help with reassembly. And a dilettante like me needs pictures and details :D .
 
Got it. To replace that rail, you either disassemble the cam adjuster and leave the cam in place, OR remove the cam+adjuster together. When I did the job, I went with the first option as Gerry did, leaving the cam in place and disassembling the adjuster. Not sure if the second option is quicker or easier. (??)

:seesaw:
 
Got it. To replace that rail, you either disassemble the cam adjuster and leave the cam in place, OR remove the cam+adjuster together. When I did the job, I went with the first option as Gerry did, leaving the cam in place and disassembling the adjuster. Not sure if the second option is quicker or easier. (??)
That's my plan, following Gerry's write up. Maybe Joe's approach is easier, but for an unversed tenderfoot such as myself, lots of details + pictures is confidence-propping :).

As my car is down due to a broken spring and I'm currently driving a rental (1 vehicle household currently), I thought it'd be a good idea, while I wait on the springs (will replace in pair), to disassemble things for tackle camshaft magnets replacement and - why not - also replace said timing chain guides in the upper V. Especially given Gerry's extensive illustrations for the purpose. The sucky thing is a long delay in receiving the tool that helps with adjuster reassembly, which might take 2+ weeks to reach me. Might have to bottom everything up and postpone the job until next (sigh...) good opportunity
 
That large cam-holder wrench that I used in the photos is INCORRECT for the M119, and is NOT a great fit on the M119 cams. Mine is an M104 tool that is specific to those cams, but works sort of / just barely. However for loosening the adjuster nuts, it works great.

You need the M119 tool with the 119 part number that the @gsxr shows above in the instructions.
 
I got my pintle caps from Master Injector in UK Gerry, I believe they make them directly and the fitment was exact same as OEM IIRC but will check in future as I have a M104 set to do this weekend actually!
The M104 injectors are totally different than the M119 LH units.
 
The M104 injectors are totally different than the M119 LH units.
Yes I order the sets each time to suit the application. So for my m104 for example I emailed them asking for a kit of 6no sets and provided the Injector part numbers from the injectors in the car
 
Replacement of the two uppermost chain rails (one on each side) can easily be done after the valve covers and front cylinder head covers are removed; the exhaust cam sprockets removed; the timing chain tensioner and top timing chain guides removed; and the intake cam adjuster mechanisms removed.
Is there a typo here? Exhaust cam sprockets and a chain tensioner MUST be removed to replace the uppermost chain guides?
 
You need to remove the intake cam sprocket (adjuster mechanism) to access the upper/inner guide rails.

To remove those, you need to remove the chain tensioner and remove the passenger exhaust cam sprocket, which allows enough slack in the chain to then remove the intake bits. And, I believe you need to remove the driver side exhaust sprocket to replace the 1 rail which resides below it.

It's not as hard as it sounds, just very time consuming, particularly if you are cleaning everything while it's apart.

chain_rails2.jpg chain_rails3.jpg chain_rails4.jpg
 
You need to remove the intake cam sprocket (adjuster mechanism) to access the upper/inner guide rails.

To remove those, you need to remove the chain tensioner and remove the passenger exhaust cam sprocket, which allows enough slack in the chain to then remove the intake bits. And, I believe you need to remove the driver side exhaust sprocket to replace the 1 rail which resides below it.

It's not as hard as it sounds, just very time consuming, particularly if you are cleaning everything while it's apart.

View attachment 148134 View attachment 148135 View attachment 148136
Dave thanks! I was under the light confusion that only intake sprocket and the between-the-sprockets guide needs to come out to access the uppermost V guide. Do you recall what needs to be cleared out of the way to extract chain tensioner (my car is a 93 400E)? Specifically radiator, fan clutch? Thanks
 
Dave thanks! I was under the light confusion that only intake sprocket and the between-the-sprockets guide needs to come out to access the uppermost V guide. Do you recall what needs to be cleared out of the way to extract chain tensioner (my car is a 93 400E)? Specifically radiator, fan clutch? Thanks
Yeah, only the intakes need to come out to access those guide rails, but you have to pull the exhaust sprocket first in order to get the intakes out. A and B must come out before you can access C, but you can't skip A.

IIRC the job would be miserable (or impossible with the fan clutch in place; remove the fan+clutch assembly. Radiator can stay in the car if you aren't doing the full Monty with front crank seal replacement. Note in the photos above, the radiator is in place.

:jono:
 
Yeah, only the intakes need to come out to access those guide rails, but you have to pull the exhaust sprocket first in order to get the intakes out. A and B must come out before you can access C, but you can't skip A.

IIRC the job would be miserable (or impossible with the fan clutch in place; remove the fan+clutch assembly. Radiator can stay in the car if you aren't doing the full Monty with front crank seal replacement. Note in the photos above, the radiator is in place.
:LOL: I'll be re-reading everything again and again. This idea has been on my mind for 2 days only, this thread is a long read (I read unhurriedly), + I have other distractions - so my project view is still scattered, but gradually getting narrower
 
I broke out my MB zip tie bag, and snagged and then installed a zip tie to hold the vacuum lines down at the base of the washer reservoir foot.
110622-0f1d5e0dcd47da3ec08fd1ed2c581f6f.jpg 110623-a7e160742a6aecfb71c2817011fa7629.jpg
Are there any distinguishing features to Mercs zip ties vs mundane ones?
 
[Black 8mm OD pipe 000-987-27-27] now an NLA part
Ugh. At least this is available aftermarket, however contact the vendor before buying to confirm you won't receive multiple 1-meter lengths instead of a continuous length.

:oldman:
 
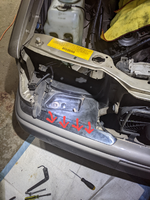
With the headlight out, the plastic air scoop is exposed. This is held in by four small bolts, which I removed.
108692-ae703a6d7c2b1a90544c32c89d1fc908.jpg 108693-123686b0aadcefd018b23ced6a9b1a94.jpg 108694-99cd3866d35b2800ef1f101515a6eeec.jpg 108695-265b7cabd971378ad2640e0e087edb71.jpg 108696-4c07703e9bab93bee325345f1166ae22.jpg

I removed the large piece of forked foam under the turn signal.
Gerry, do you remember how you jiggled the scoop out after removing the 4 bolts that hold it? Its long lip that is under the front bumper... Does it come out first or last?

PXL_20220612_020155943~2.png
 
Last edited:
I recall that stupid scoop being stupid hard to stupid remove. Grrrrr. Might require some bending around, IIRC.

:banger:
 
I recall that stupid scoop being stupid hard to stupid remove. Grrrrr. Might require some bending around, IIRC.
Yes! I gave up after 15 minutes of wrestling with it. Afraid to break it too, as I'm sure it's NLA. Hoping its removal is still fresh in Gerry's mind so he share how he managed to extract it intact.
 
No! But I did not look very hard.
Actually, I'm going to correct you here) A little after I posted my question, I saw in your "light top-end" thread, in one of the posts there containing pictures of myriad parts, cross checked against your Picasso spread sheet - that you have found the NLA part somewhere!))
 
Gerry, do you remember how you jiggled the scoop out after removing the 4 bolts that hold it? Its long lip that is under the front bumper... Does it come out first or last?

View attachment 148295
As I remember it, I wiggled out the TOP of the bucket first, then angled it forward and then eased out the bottom past the chrome strip. Just take your time and work it, and don't force anything.
 
Then it's time to remove the water pump itself. There are six 13mm bolts that hold the water pump to the front timing cover. Pay attention to where each bolt goes, because there are several lengths of water pump bolts. I also removed the four bolts that held the alternator support carrier to the front timing cover. Loosening the lower alternator bolt allowed the removal of this alternator support carrier.
101888-ee76c9ea1c61686391256af1ad252a15.jpg 101889-16fc7c3f1d9c53c97804f40a1aa5fd70.jpg 101890-2a1addb710ef1f8130b823be3e2b6ec1.jpg 101891-bc46e28ef9fd44605748ffbc2999bd40.jpg 101892-e7353b3b1f134af54e80b22a85eae740.jpg
Removing the alternator support carrier from the engine.
101910-0daf1eecf3d4766699ba6393fb25eaa6.jpg
After removing the three bolts, the smog pump came free, as you can see.
102459-0fac8ffdb9a335fe0613ce471b876386.jpg
@gerryvz, the above is the sequence in which you removed Air Pump. Does the water pump have come off to extract the Smog Pump? What's the minimally invasive way to get the Air Pump out? Thanks
 
I....think you need to take the bracket off to take the smog pump off, but you shouldn't need to touch the alternator or water pump. If memory serves you need to apply an anaerobic sealant to the threads of the smog pump bracket bolts.

I'd be sure to snag all the hoses for the smog pump (Gerry listed the pns). There's also a plastic elbow fitting I'd advise grabbing (119-990-02-78) - it's near the exhaust so gets heat aged and brittle, breaking on disassembly (along w the rest of the hoses). It makes a 135 deg angle so while a 3/4" 90 deg fitting from autozone works, it's a pain to fit.
UPDATE: The PN I mentioned is showing NLA - maybe somewhere someone online has it?
 
The smog pump is located on the upper/middle front passenger side of the engine. The water pump is located on the middle/front center of the engine. Completely different locations, and completely different attachments, and no inter-dependency on either to be removed.

I recommend getting all new smog pump hoses as they are available. Every single hose on my car was fossilized so hard that it would have broken a window had I thrown it against such.

When the smog pump is out, it is a good idea to consider replacing the timing chain tensioner, as it will NEVER be as accessible as when the pump is out. I did not end up replacing my tensioner, but I had a new one on hand in case I did need to.

At minimum, check the timing chain tensioner for oil leaks, and replace the gasket if you see an obvious leak. The gaskets are cheap.
 
The smog pump is located on the upper/middle front passenger side of the engine. The water pump is located on the middle/front center of the engine. Completely different locations, and completely different attachments, and no inter-dependency on either to be removed.
Thank you! That's exactly what I wanted to confirm
 
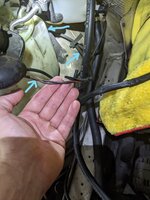
@gerryvz, I see an electrical connection to my Air Pump, but I did not see you documenting how you've got it disconnected. The cabling disappears into the wilderness under the coolant tank, and further under the box with all of the computers. Did you actually disconnect yours or did you the Air Pump near the engine bay, leaving electrical connection uninterrupted? Is it safe to unplug it on the Air Pump side (doesn't seem so to me)? Thanks

779.jpg778.jpg777.jpg
 
If I remember correctly, it is a simple two or three prong plug that exits behind or underneath the passenger side headlight/bucket. You will have to follow it. I believe it is documented in my HOW-TO if you read through. Yes, I did remove the pump entirely.
 
The wire does not come off the Air Pump, don't try to remove it.

The connector is zip-tied behind the headlight & washer reservoir, and will be a nuisance to disconnect. Once you have it disconnected, DO NOT put it back under the Zip-tie. Next time it will be much easier to disconnect.
 
If I remember correctly, it is a simple two or three prong plug that exits behind or underneath the passenger side headlight/bucket. You will have to follow it. I believe it is documented in my HOW-TO if you read through. Yes, I did remove the pump entirely.
thanks! I found it. It was between windshield fluid tank and the coolant tank. hidden underneath other cables. once i dug in there I've spotted the 2-prong connector
 
Once you have it disconnected, DO NOT put it back under the Zip-tie. Next time it will be much easier to disconnect.
noted, thanks! the hoses are rock solid indeed. where one of the hoses attaches to the engine, it broke off (easily), leaving a piece on the neck of the engine connection. I used a long screw driver and tapped it with a rubber mallet to split hose leftover for an easy removal
1655413040594.jpeg
 
As I remember it, I wiggled out the TOP of the bucket first, then angled it forward and then eased out the bottom past the chrome strip. Just take your time and work it, and don't force anything.
That worked very well! Knowing that the TOP of the bucket extracts first, it took me all of 30 seconds to extract it. It feels that the bucket will break in the process, but it appears sturdier and flexible enough. That cringey feeling though one gets inside while bending/prying 30 year old NLA Merc plastic part))
 
I had I think three pintle caps that fell into the intake when I pulled out the injectors. They got sucked up readily with the first pass of the shop vac. After a first pass at full suction (with no attachment or modification), I put a 3/8" ID tube onto the end of the shop vac last night and was able to get a lot more stuff up, and ended up (just on a few valves) with even more stuff out using Q-tips soaked in solvent.

Based on the limited work I've done to fix this, I have no doubt that I can get 98% of the dust out of the intake and off of the intake valves. Big picture, as I said, I'm not worried -- it's just going to take an hour or two of careful, methodical work to get things cleaned up.
Hello Gerry,

I couple days ago I removed the injectors and all of them, but one, were missing the pintle caps. I saw 2 pintle caps fall into the engine and the rest of them I´m assuming fell without me noticing while removing the injectors.

I would use a shop vac to remove them but I got no access to electricity where my car currently is. Since the pintle caps are made of plastic and will probably be "eaten" by the engine, I was wondering if it is safe to start the car?
 
I'd avoid starting the engine if possible. Can you use a flashlight to look down each bore and see if the other plastic caps are visible?

If the caps did get spit out the exhaust, they would melt against the catalyst honeycomb, which probably is not a good thing...

:klink3:
 
I'd avoid starting the engine if possible. Can you use a flashlight to look down each bore and see if the other plastic caps are visible?

If the caps did get spit out the exhaust, they would melt against the catalyst honeycomb, which probably is not a good thing...
I tried to look down but can’t see anything… I know for sure that two caps are there but I don’t know about the other ones…

Right now I have my 500E cat less so them melting would not be a concern. But wouldn’t them damage the pistons or valves?
 
Last edited:
Right now I have my 500E cat less so them melting would not be a concern. But wouldn’t them damage the pistons or valves?
I am really not sure. Plastic is soft and shouldn't hurt big metal things, but it's difficult to predict what might happen after they enter the combustion chamber. You can use a borescope/endoscope through the spark plug hole to view if anything is in the cylinder but that won't help extract it.

:wormhole:

I used a endoscope and 6 pintle caps were inside the valves (the other two came out with the injectors) so I decided to be safe than sorry and removed the intake manifold. I removed them, changed the injectors o-rings, and installed everything back to its place. The engine is running smooth as it should.

The injectors were rebuilt 2000 miles ago (2.5 years ago) so I only replaced the o-rings. As for the pintle caps, I decided not to install them to avoid this whole problem in the future.

Thanks as always!
 
Gerry,

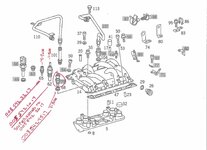
Do you recall using any sealant on these three intake manifold water temp sensors or do they just go in dry? Any problems with leaks since? Incidentally, the four-pole Hella sensor is available at FCP Euro for $17.39 (Made in Spain). I didn't read whether you replaced the OEM Chinese Beru unit you originally installed. Maybe the Hella is no different.


Attachments

  • Hella 4-Prong 008 542 3217 FCPEuro $17.39.JPG
    Hella 4-Prong 008 542 3217 FCPEuro $17.39.JPG
    516.2 KB · Views: 6
Last edited:
Thanks Dave. I ordered the three sensors based on the helpful @gerryvz parts list, supra. Any idea why the EPC shades out the 2-pole sensor and doesn't list the part number? I ordered the one-pole and two-pole sensors from the dealer but they haven't arrived yet.
 

Attachments

  • Coolant Sensors EPC.jpg
    Coolant Sensors EPC.jpg
    1 MB · Views: 6
Yes, I just installed all three of these sensors dry. I would have noted it in the text voice-over if I'd used sealant of any kind. The factory manual doesn't specify it, and I generally try to follow the manual unless it's demonstrated that it is in error, or there is a more modern/better way to do something. In the cases of these sensors, the aluminum crush washers, and the many threads, help seal things adequately and thus do not require sealant.

When something is grayed out in the EPC (after you enter a VIN number), that means that it is likely NOT APPLICABLE to your vehicle or specific model.

One example of this is on the 560SEC/SEL: there is an early (two-pole) version of one of the coolant temp sensors, and a four-pole version (which is shared, IIRC, with the M119 -- your Hella 008 part number). The two-pole versions were used on M117s through model year 1989, and starting in 1990, the four-pole versions were used.

In the EPC entry for my SEC, the four-pole version is grayed out, because it is not applicable to my 1989 model engine.
 
Thanks Dave. I ordered the three sensors based on the helpful @gerryvz parts list, supra. Any idea why the EPC shades out the 2-pole sensor and doesnt list the part number? I ordered the one-pole and two-pole sensors from the dealer but they havent arrived yet.
Jon, this is yet another EPC error I need to add to my list. 😟

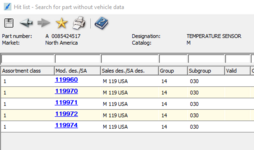
2-pin sensor A0085424517 shows on all M119's, except the M119.975 variant used in all 124.034 chassis; in all regions worldwide. It should not be grayed out as it is valid for all .034/.975 applications. It would be interesting to see if Xentry Parts / ISPPI / XPISS has corrected this error.

:scratchchin:

1674491800666.png 1674491761317.png
 
Back
Top