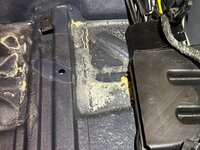
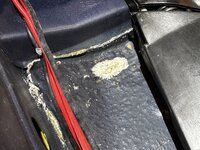
An update on my latest project, I've been terribly busy at work and personally, so there's been too little time for little else, but now I'm onto the following, ever since my father bought the car back in 2008, it's been stored in his garage. It also was out of commission for many years, never used. This in combination with a very humid condition in the garage set the stage for a few problems, one being that there was mold inside the car.
I thought I would be able to clean and air it out, but have also always known that the interior will need a proper cleaning at some point, so I reasoned that I'll combat the mold (I've done it many times before successfully) and deal with the cleaning later. More than a year's passed since I've had the car, and it still stinks of mold. I have a colony growing somewhere. I also found traces of mice living in the car - that smell when you dissolve their excrements is sickening. Smells like death mixed with piss.
I could pretty much conclude that the growth will be under the carpet, since that is the most likely and the one surface I haven't been able to inspect. So I had a little think about it, and decided, ok, let's do it properly. I also looked at my sagging headliner and thought about the sunroof refurbishment and all of the associated benefits of doing all of this at once.
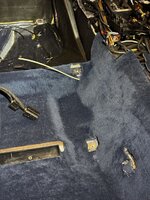
So I pulled out all of the interior bar the instrument panel and the parcel shelf. And yikes it was way worse than I ever imagined. The horrible mold was full on aggressive, it even looks alien, and it smelled horrible. Even though I worked with a mask, I had a headache and felt sick the entire next day.


So all of the textiles have been washed, treated with biocides and subjected to ozone treatment. Every single surface inside the car is washed, treated with biocides and right now the ozone machine is doing it's work inside the car.

A note on ozone - I use a professional machine, and they are very potent. So when it comes to textiles and more importantly anything rubber och plastic, you have to be carful not to overdo it. The ozone can easily turn foam backing into powder, or make rubber just fall to pieces.
The headliner and sunroof liner were pulled out and left at the upholstery shop here in town, I opted for a material that is very high quality and resembles the original material colour very well.
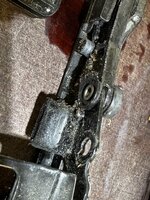
The sound deadening below the driver's seat had failed, so I removed all of it and reinstalled new deadening.
Sunroof is being refurbished following the excellent How-to made by
@JC220 a huge thank you for the guide.


")


 With Mercedes original centre caps with all tabs in place too!


")
.JPG")
.JPG")