• Hi Guest !

    Welcome to the 500Eboard forum.

    Since its founding in late 2008, 500Eboard has become the leading resource on the Internet for all things related to the Mercedes-Benz 500E and E500. In recent years, we have also expanded to include the 400E and E420 models, which are directly related to the 500E/E500.

    We invite you to browse and take advantage of the information and resources here on the site. If you find helpful information, please register for full membership, and you'll find even more resources available. Feel free to ask questions, and make liberal use of the "Search" function to find answers.

    We hope you will become an active contributor to the community!

    Sincerely,
    500Eboard Management

HOW- TO: Complete windshield wiper mechanism lubrication + upgrade

From the photo, you appear to have the hybrid setup which was used during the transition... you have the late-style 1-piece seal, but the early-style non-easily-removable cover.
That's right. One-piece seal and an aluminum cover held by 3 screws at the back. Thank you, Gents

20210324_142509.jpg
 
Last edited:
6; This is where you can see the condition of the plastic gears and most likely the original 25+ year old grease. ALL old grease must be removed first – because it will be old & hardened. I used Hot water, dishwashing soap & a paint brush to clean all parts of the wiper then blow dry with a compressed air gun. (Be careful what you use to clean the old grease so you do not damage or soften the Nylon gears)
Is it a bad idea to use brake cleaner (perhaps non-California type) to clean up wiper mechanism and gears?
 
Is it a bad idea to use brake cleaner (perhaps non-California type) to clean up wiper mechanism and gears?
I would stick with a water based degreaser if you can for the plastic components. Like oil eater or similar and a brush and hot water to scrub it clean.

Just for fear of brake cleaner compromising the plastic gears thats all. I'm not sure it would but given the choice I'd avoid.

Eg I have a parts cleaner and brushes with a heater in it too. So I can clean any part no matter how grubby with water based degreaser with relative ease
 
Another dumb question. I don't see it mentioned in the write up, any pre-cautions about disconnecting lever the connects wiper to the motor? Should I undo golden nut, or separate ball joint? Thanks

20210324_163300.jpg
 
Another dumb question. I don't see it mentioned in the write up, any pre-cautions about disconnecting lever the connects wiper to the motor? Should I undo golden nut, or separate ball joint? Thanks

View attachment 128848
In your case you could just leave the arm connected to the motor and not risk losing the clocking of same. FYI markers work but I also now use a dremel and make a fine cut on the stub and brackets to enable alignment after parts washing whereby sometimes the sharpie marks have rubbed off.

The ball joints split easily enough just by prying on them with a lever. Then when all is clean do add a dollop of multi purpose grease to the socket before popping the joint back together.

Not so much on a w124 but any wiper work to separate joints like the motor arm nut / stub are much easier with a tool like this:

Screenshot_20210324-204339_eBay.jpg

Its invaluable on w140s etc.
 
I was ready to drive out to buy the puller, but, as I'm starting to get accustomed too, in many cases, such as with separating bracket from the spindle was easy. 3-4 light pries with screw driver and it popped off.
 
I was ready to drive out to buy the puller, but, as I'm starting to get accustomed too, in many cases, such as with separating bracket from the spindle was easy. 3-4 light pries with screw driver and it popped off.
Yes on a w124 not really needed. But invaluable to have in your toolbox for when you come across a windshield wiper which has a nut securing it to a stub. Those are usually stuck pretty good! I use that tool quite often on more modern MBs and also w140s etc. Ebay should have them for 15 bucks or so
 
Seems we're having some fun with the wiper.

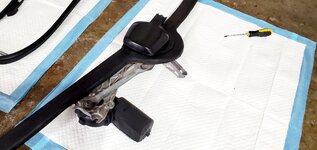
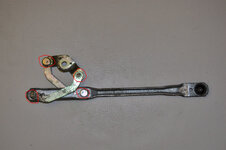
My turn. Here is my arm, after detaching. Does anyone know whether it is possible to relatively easily disconnect (and of course then connect back) the joints circled in red?

IMG_1005.jpg

Mine got lots of oxidation and I thought about giving it to zinc plating, at least the golden parts. But it seems that the joints are of pin-type, which were struck with a hammer, what seems like a one-time only connection. And I'm not sure what I would got if I gave the whole arm for zinc-plating - there are some rubber/plastic separators, which might not like it or survive.
 
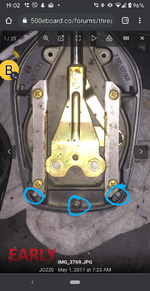
@gsxr, are these the instructions to remove that black aluminum cover? Is "gear head" the name for the cover? Joe's instructions say there are 3 screws holding it, but on mine there are only 2... My understanding the cover must slide forward to clear your arm shaft..

Screenshot_20210324-192206.png


Joe's picture of "old style" cover shows 3 holes for screws. Mine only has 2...

Screenshot_20210324-190201~2.png
 
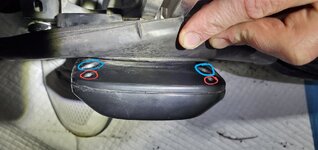
@JC220, so this what bottom back of my cover looks like. Only 2 screws (circled in blue), there are two holes (circled red) but they just stare inside. I don't understand their purpose:
IMG-6077da29f67cf9f7796116e1011b4b88-V~2.jpg

This the wiper arm shaft that extends/contracts. The cover extends all around it, so the only way, I take it, it can come off is to slide flat forward(?)
IMG-5156ad504f07eb5051b870cf622727fd-V.jpg

Is this thing irrelevant or not to cover's removal? MB's document I print-screened in post #59 says it needs to be pressed off... But I don't see how it obstructs the cover..
IMG-9d018d6446a5e9e154a79cf03d79f6a5-V~2.jpg

I can't find a way to get the damn-cover off...
 
Last edited:
@gsxr, Dave, could you please advise on the correct way to "press off" this "locking ring"

View attachment 128872
That ring does not come off. It is part of the shaft.

To remove that assembly there is a small circlip around the shaft against the housing. Looks like you already removed that? In which case the wiper will now withdraw from the front of the housing if it is positioned such that it goes out of the slot on the plastic gear tray as described in the How-To
 
Ok, I got it off. It was a problem of visualization, lack of experience, imbecility and variability of the damn mechanism that's out there. Not necessarily in that order :D


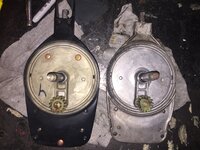
For example my device does not exactly match Joe's "early" or "late" picture

#1.jpgJC220 early vs late 2.JPG


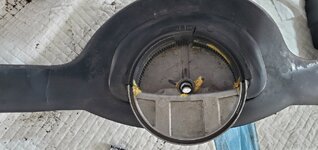
Another look inside my device. I can see how with new lube this thing will be whisper quiet
#2.jpg
 

Attachments

  • #1.jpg
    #1.jpg
    152.9 KB · Views: 18
Ok, I got it off. It was a problem of visualization, lack of experience, imbecility and variability of the damn mechanism that's out there. Not necessarily in that order :D


For example my device does not exactly match Joe's "early" or "late" picture

View attachment 128913View attachment 128914


Another look inside my device. I can see how with new lube this thing will be whisper quiet
View attachment 128912
@kiev I don't want to get your hopes up but you could have an early - late prototype wiper arm there!!!

Like @Stevester 500E now infamous early prototype oiler tubes (which were offered individually for glass cabinet display then later discovered to be incorrect r129 tubes!)

:bowdown:
 
I've been following your progress having recently done one early and one late style. You may want to consider painting both the cover and the arm and smaller cover with satin or semi gloss black paint.
Also, you may want to try the following to index the arm properly.
Reassemble the rotating arms to the spline you noted earlier according to your position marks. Gently snug the nut. Position the entire assembly now onto the three studs on the firewall. Reconnect the electrical plug and run the wipers once and note where the arm parks. It's possible to be one spline off which will park the wiper too far down into the cowl which will pose problems. Once you see where things are lined up it's easy to move the mechanics underneath one spline and tighten things up.
The insides of both the units I did looked similar as far as lack of/hardened grease. Most of the units out there are likely due for this work.

drew
 
@sheward, Drew, I've never painted anything in my life. At your convenience, may I ask you to write a concise paragraph on what I'd need (with specifics) and the process? I'll Google the rest. Thanks
 
Sure. The first step in painting any of the mentioned parts is to use the finest grade of sandpaper necessary to remove any scratches. General sandpaper grits go from 60grit (most coarse/ aggressive) to 600 grit (very soft). Anything below 220 grit should be avoided for a job such as this .Only use the 220 grit to remove any scratches or imperfections where necessary. Once that is done change to 400 grit to bring back the smooth finish. Most sandpaper can be used "wet", or with water. This will help keep material from building up on the paper and scratching your work. I sometimes do this under a running faucet.

Once you are happy with the finish, clean the parts using alcohol or similar to remove any residue of any kind including oils from your fingers. You are now ready to spray paint according to instructions on the can. You should spray in warmer temps and low humidity. Several light coats with 400 grit sanding in between (and after drying - usually about one hour) will produce the best results. Finish with one or two coats of clear if you have the patience with the same light wet sanding in between. Remember to clean in between as well.

Some folks prefer to use automotive brand paints which may or may not be superior. I have always had good results with plain old Rustoleum or Krylon brands which have been around for eons. Both the semi gloss black and the satin black are a very good match for these items. I like satin black. I have found some variations between different manufacturers of semi gloss.

Note that the later wiper covers are plastic and care should be used when selecting sandpaper as the plastic scratches a bit easier than the metal. Overall, the best tip I will offer is be careful not to introduce more scratches by using too aggressive sand paper. If your parts are in good shape but just faded you may only need to wet sand a bit with 400 grit to enhance paint adhesion. I also recommend hanging your pieces by a bit of wire to paint. This will allow slightly better coverage than spraying a part on a flat surface.

Materials
A sheet of 220grit and 400 grit sandpaper. One sheet of each is all you will need.
Alcohol or cleaning agent
Paint

drew
 
Note that the later wiper covers are plastic and care should be used when selecting sandpaper as the plastic scratches a bit easier than the metal.
If you have a plastic cover on a late wiper, if it's SWF mechanism, those may be available new - no need to paint. Unfortunately the Bosch platic covers are NLA. And, the small plastic U-shaped cover over the shaft is also NLA.

If painting plastic, you may need to apply an adhesion promoter first, if the paint is not designed specifically for use on plastic.

:runexe:
 
For plastic parts I got really good results with good quality plastic restorers. Initially I had Polytrol (made by Owatrol), but in my opinion even after drying it was kind of oily or a bit sticky. I then tried Gyeon Q2 Tire and the results are fantastic. The trick is to give it a good warm up with a hairdryer. Even that this is a tire dressing, it works pretty well with plastic. Gyeon has a specialized restorer for plastic elements, but I still have a nearly full bottle of Q2 Tire and after a few experiments found out that it works for me. The plastic cover for my mono wiper already had some grayish areas, so I had to apply 3 separate layers (treating each with hairdryer, and giving one-day break between each application), but now it looks nearly like new. Nearly, because some micro scratches are still there, but they are hardly visible.

The advantage is that you can't do it wrong and no experience is needed.

I wonder whether it would be possible to first polish it with sand paper and then apply the dressing, but I'm afraid that I would have to go with grits of 1000 or even more.
 
A hand application of meguires ultimate compound or similar always brings my wiper covers up like new. Plastic or aluminium types. Try it - it works! And maybe a ceramic coating would further protect and enhance the finish.

Try cutting compound before doing a repaint. I think the original finishes are going to be better than a rattle can paint job.
 
In my two cases, there was pitting on the cover as well as complete loss of paint on the arms. I should add that in the case of significant pitting it's easier to fill the pits with a body filler than to sand them out.

drew
 
@kiev I don't want to get your hopes up but you could have an early - late prototype wiper arm there!!!

Like @Stevester 500E now infamous early prototype oiler tubes (which were offered individually for glass cabinet display then later discovered to be incorrect r129 tubes!)

:bowdown:
...oiler tubes...and later proved to be Gen I early style 500E oiler tubes. See pics at post #62:


..wiper...I've done this refurb too, and could swear I had a prototype version....:jono:
 
Last edited:
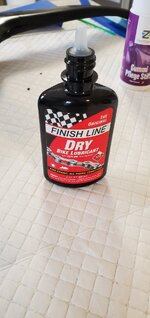
@JC220, what bicycle chain lube did you use? Apparently there's "wet" and "dry" types. I happen to have "dry"...

IMG-1ef747668dfb3f54b73ed3e88b4187e9-V.jpg
 
Ok, thanks for the confirmation. I just put it back together. Using Gleitpaste to lubricate gears and other innards is almost a mystical satisfaction. With it everywhere, the gear box, which took quite a hamering (I used rubber 🔨) to become unseated from the shaft, went back on almost effortlessly.

IMG-ea94c9c644f3e8469b1f97dd0e331cbd-V.jpg
 
Ok, thanks for the confirmation. I just put it back together. Using Gleitpaste to lubricate gears and other innards is almost a mystical satisfaction. With it everywhere, the gear box, which took quite a hamering (I used rubber 🔨) to become unseated from the shaft, went back on almost effortlessly.

View attachment 128952
Looking good! That wiper would polish up with Meguires ultimate compound or similar.
 
Last edited:
The removal of the wiper itself is not included as this information is widely available – I prefer to concentrate on the wiper mechanism itself for purposes of this DIY
Is there a good reference link for this? (yes, I tried search)
 
Is there a good reference link for this? (yes, I tried search)
Ricardo, everything is "self-explanatory" for a guy like you. "trouble" might be taking place if you have an "earlier" or a transition variant between "earlier" and "later mechanism". Since your car is 1994, I believe yours should be a walk in the park - relatively speaking. In addition to Dave's links, there is this "housewife" variant:

 
Thanks Dave, I feel WIS shamed!

Kiev, thanks for the vote of confidence. I hope to get to it this weekend. I bought windshield wiper mechanism lube, can't remember the molykote number, and its has been in my lube drawer for a long time (don't you guys have a lube drawer?)
 
I've test-installed and electrically reconnected wiper mechanism into my car. It works and operates beautifully :banana1:. Joe, thank you for the write-up and for your guidance.

I have a question, I looked at your pictures for an amount of grease to use and tried to replicate it. I can hear Gleitpaste "sloshing" in there, standing outside. Likely from gears meshing. I assume that means I used too much (about 10-12 grams in total though the whole mechanism) Hoping it will disperse once the mechanism will get a proper work out. @JC220 did you hear new lubricant "sloshing" after re-assembly, by any chance?
 
I've test-installed and electrically reconnected wiper mechanism into my car. It works and operates beautifully :banana1:. Joe, thank you for the write-up and for your guidance.

I have a question, I looked at your pictures for an amount of grease to use and tried to replicate it. I can hear Gleitpaste "sloshing" in there, standing outside. Likely from gears meshing. I assume that means I used too much (about 10-12 grams in total though the whole mechanism) Hoping it will disperse once the mechanism will get a proper work out. @JC220 did you hear new lubricant "sloshing" after re-assembly, by any chance?
Yes you can hear the fresh grease for a few months after sevice it doesn't really bother me much! Especially when the wiper motion is visibly faster / healthier
 
Well, I did not set wiper position correctly. It was too extended in rest position and protruding beyond A pillar. Dumb mistake - I know. 2nd time around it took me a total of just 1.5 hours to remove seal and panels, remove the mechanism, disassemble it to fix the issue and install back into the car along with all of the seals. An exponential progress vs 1st time :banana1:. But now it's a tad too low in "park" position - LMAO . Since I'll be removing it again to fix it, I've ordered a Dorman gear so that there's a tad more justification.

Early version wipers with the Aluminium cover have a Bosch Arm. Later units with the plastic cover have a SWF Arm
My wiper has an aluminum cover and and SWF Arm
 
Well, I did not set wiper position correctly. It was too extended in rest position and protruding beyond A pillar. Dumb mistake - I know. 2nd time around it took me a total of just 1.5 hours to remove seal and panels, remove the mechanism, disassemble it to fix the issue and install back into the car along with all of the seals. An exponential progress vs 1st time :banana1:. But now it's a tad too low in "park" position - LMAO . Since I'll be removing it again to fix it, I've ordered a Dorman gear so that there's a tad more justification.


My wiper has an aluminum cover and and SWF Arm
Yes the parking position can be tricky! Especially if interchanging parts then your markings are therefore gone in some areas. Plus the little teeth are so fine a marker line doesn't mean you will land right exactly in the same fine grooves. I do this now when working at wipers on all benzes:

  1. Take photos with your phone of the wiper blade park position before taking any parts off.
  2. Take more park reference photos (+ a dimension if you like) with trims off.
  3. Once wiper is out mark all connection points as accurately as you can with a fine tip sharpie. I also use a Dremel and cut a fine line where possible. This means that through washing you won't inadvertently remove the reference lines.
  4. Test fit the assembly in the car - no trims or anything yet.
  5. Power up wiper and allow to park itself. Compare actual park position with your photos. In the case of my S280 this took about 5 goes to get back perfect the way I wanted it. Partly because I fitted a replacement motor whilst in there and therefore had no reference points. So remove, adjust and re-park until it's sitting correctly the way it was before.
  6. When satisfied with the park position then proceed to re-fit all trims and gutters etc.
I will add this text as a foot note to the How To posts now incase overlooked :)
 
A few advises from my fun with the wiper. I should have posted this a few weeks earlier, but my health problems forced me to reduce time spent before PC screen. Anyway, below is for those, who like me, disassembled the whole thing (either in hurry or out of curiosity) and did not make any marks allowing to put things together without loosing the clocking.
The whole mechanism is not so scary and complicated as you may find in the Internet stories and at least some of the alignments may be logically concluded.

Your aim is to have all the following 4 parts in the park position. There are 4 parts which need to be aligned together:
1. The motor (marked red)
2. The wiper mechanism (marked yellow)
3. The lever which connects the motor with the wiper arm (marked blue)
4. The lever which connects the wiper mechanism with the wiper arm (marked green)

IMG_1050-marked.jpg IMG_1018-marked.jpg IMG_1051-marked.jpg

The motor is the simplest part. Take it to your car, connect, turn the wiper on and shortly after that off. The motor will stop in park position. You may repeat it one more time, just to be sure. The motor is done.

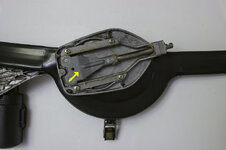
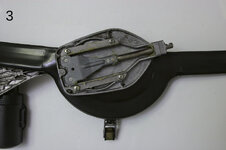
The wiper mechanism is the most interesting one. It has two boundary positions: completely retracted (pictures marked 1 and 3 below) and completely extended (picture marked 2 below). It is completely retracted when facing top (picture 1) and when in park position (picture 3).

IMG_1021-pos_1.jpg IMG_1020-pos_2.jpg IMG_1018-pos_3.jpg

When inserting the mechanism into its base it needs to be completely retracted and facing top (picture 1). There are two things here when doing this step:
- it is only possible to insert the mechanism when it faces top (so this can't go wrong);
- it needs to be retracted (this can go wrong). So just make sure that the mechanism is retracted. You do not need to be perfectly perfect, just find your way. Mine was to have the rotating arm exactly between the two rail wheels as on the picture below:

IMG_1023-marked.jpg

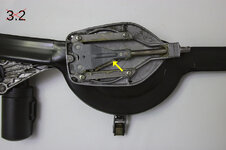
You may now play bit rotating the mechanism to see how it works (or just have some fun with it ;)). You now need to find the park position as on picture 3. Note that:
- 3.1 is a bit before the park position; note the rotating arm (yellow arrow), it still did not complete its cycle;
- 3 is exactly the park position;
- 3.2 is a bit after the park position; note the rotating arm - it started its new cycle.
The reason that 3.2 is possible is that there are a few teeth left (those black on the inside part), most probably as a buffer. You do not want to reach position 3.2. You need to finish in completely retracted position (picture 3) - see the photo above on how I found mine.

IMG_1019-pos_3.1.jpg IMG_1018-pos_3.jpg IMG_1017-pos_3.2.jpg

The wiper mechanism is done.

The next part is the lever which connects the motor with the wiper arm.
Here, I could not conclude anything. I used another wiper as a reference (I've bought one as a spare). So here is the key photo (worth 25 bucks being the cost of a spare, used wiper) which shows how the lever (blue arrow) is aligned to the base holder:

IMG_1028-marked.jpg

Press the lever into the motor's axle and secure with the nut. Just screw the nut with your fingers, but not too tight, do not use a wrench yet. Trying to do so could rotate the motor a bit and you will move it out of the park position (and we need to have all the 4 parts in the park position). The lever is done.

The lever which connects the wiper mechanism with the wiper arm (marked with green arrow on the first set of photos). That's the last part. There shouldn't be anything special to do: because we aligned lever with the motor (part 3), then this part should have its tooth combination also aligned. Just put it on the axle and it should get on it. At least it was in my case. Push it on the axle and secure with its nut.

Now secure the nuts which hold the lever on the motor's axle (part 3) and wiper's mechanism (part 4) with wrenches. Even if you now move the motor out of park position, all the four parts will be moved together, so you will not loose the clocking. It will finish in the park position when started and stopped.
 
Last edited:
Hello all.

Some interesting reading here.

Now my story and a question about the mono wiper on my 124.

In 2008 we went to a party in Germany. Snow after 20 mins. Rare around here (SW France). Damn.

On the way back we had sleet on the way over the Central Plateau and the wiper got slower and slower. And there was a distinct smell of hot electrics. But we got home and I had a spare wiper motor that I fitted immediately and all was well for 12 years.

In 2020, I visited a friend who has 20+ 124s in various states of disassembly. We completely overhauled my mechanism using the best parts we could find from his stock. He then repainted the wiper arm and we re-installed and everything works as it should.

With ONE EXCEPTION.

When the arm parks, it does so having reached the extreme left but only when it has twitched upwards a bit (2 cm at the end of the blade?). This is not a disaster, just annoying that we didn't get it 100% right.

Am I right in say that, if I disengage the motor and re-position the blade to the required park position, all will be well?

Or will it then attempt to plough further downwards before twitching upwards again?

Finally, we tried to fit my New Old Stock wiper arm. No way. The fitting to the gear mechanism was like a mirror image of the original. Why? Because my original is Bosch and my shiny NOS one is SWF. You live and learn.

Best to all.

RayH
 
Hello all.

Some interesting reading here.

Now my story and a question about the mono wiper on my 124.

In 2008 we went to a party in Germany. Snow after 20 mins. Rare around here (SW France). Damn.

On the way back we had sleet on the way over the Central Plateau and the wiper got slower and slower. And there was a distinct smell of hot electrics. But we got home and I had a spare wiper motor that I fitted immediately and all was well for 12 years.

In 2020, I visited a friend who has 20+ 124s in various states of disassembly. We completely overhauled my mechanism using the best parts we could find from his stock. He then repainted the wiper arm and we re-installed and everything works as it should.

With ONE EXCEPTION.

When the arm parks, it does so having reached the extreme left but only when it has twitched upwards a bit (2 cm at the end of the blade?). This is not a disaster, just annoying that we didn't get it 100% right.

Am I right in say that, if I disengage the motor and re-position the blade to the required park position, all will be well?

Or will it then attempt to plough further downwards before twitching upwards again?

Finally, we tried to fit my New Old Stock wiper arm. No way. The fitting to the gear mechanism was like a mirror image of the original. Why? Because my original is Bosch and my shiny NOS one is SWF. You live and learn.

Best to all.

RayH
Hi Ray,

Good to see you here!

Yes the parking setting sounds like it is slightly off but it is not a problem. You can strip the housing down to the wiper is easy to remove and re-install for testing. And MAKE MARKS on the pinions before loosening and adjusting the settings a little at a time and keep re-testing it.

Done this myself many times to fine tune the wiper park position on my 124s and 140s. Doesnt take too long to do it and you can find the sweet spot where it parks nicely by trial and error. Always run the motor of course to test it is parking where you want it to before final tightening on the bolts.

I do always use threadlock and tighten the bolts quite hard otherwise they can come undone several weeks later.
 
I do not want to step into JC's helpful answers, but - two helps is more than one :)

My understanding is that you run into situation which is shown on photo numbered 3.2 in post #88 (the one indicated as "you do not want to reach position 3.2"). If so the yes - it should be sufficient to loosen just the motor (and only the motor), move everything else into the park position. Before disconnecting the motor it may be helpful to make marks on the motor's axle and the short lever which attaches to the motor's axle, as JC indicated. Or check the last photo from post #88, which shows how motor and the lever aligns.

Note - when releasing the nut from the motor's axle, it is quite possible, that the motor will rotate a bit (I could not find a way to securely hold it). If that happens just take the motor to the car, connect it and turn the wiper for one cycle, so the motor ends in the park position.

Attach the motor and you should be fine then.
 
Now, this is getting interesting.

This is a left hand drive car. And I am looking at the car from the front. The wipers are working.

The blade goes further down on the (to me) right - the drivers side. I can clearly see that it sweeps only to a higher level on the left (passenger) side.

So, if the motor is definitely in its rest position and the blade has stopped high after reaching the bottom of its driver's sweep, and twitched upwards. My feeling is that I should detach the motor and move the blade slightly UPWARDS. Then it should sweep further to the passenger side. Then the motor will "think" that it should rest BEFORE it twitches upwards.

Does this sound right? Or is dementia creeping up on me?

R
 
Hi Ray,
In order to be completely sure what is going on there - could you confirm, that the trace left by the tip of the wiper's blade is symmetrical about the center of the windscreen? That is: the trace is similar to the butterfly's wings and the wiper is completely retracted when it is in 12:00 o'clock position (is in the center of the windscreen). Of course, with the exception which you already mentioned - that on the driver's side the blade goes further down than on the passenger's side.
 
could you confirm, that the trace left by the tip of the wiper's blade is symmetrical about the center of the windscreen?
I believe so. Looking from the front, all looks symmetrical aside from the offset I described.

However, awake in the middle of the night, I began to doubt my logic about removing the motor and shifting the blade. My feeling is that the motor is driving the system beyond its full cycle, if that makes sense.

If I detach the motor and shift the blade upwards from its rest position, surely that will just move the entire sweep to another area, with the same twitch upwards at the end. Yes?

Now more baffled than ever.

But not unduly concerned.

Best.

RayH
 
I believe so. Looking from the front, all looks symmetrical aside from the offset I described.
That's good - less to correct :)

However, awake in the middle of the night, I began to doubt my logic about removing the motor and shifting the blade. My feeling is that the motor is driving the system beyond its full cycle, if that makes sense.
I would say that the whole system has been assembled with park position beyond its full cycle. The motor is doing its job - makes one complete cycle.

I suppose that the following picture illustrate your case:

IMG_1021-pos_1.jpg IMG_1020-pos_2.jpg IMG_1018-pos_3.jpg IMG_1017-pos_3.2.jpg

1, 2 and 3 show correct state of the wiper mechanism. 3.2 is a little bit too far. You are now in case 3.2, but you want to set it into case 3.
Your reasoning is correct - try to unbolt the motor, move the mechanism into position 3 (from 3.2) and put the motor back.

After putting the motor back, try to manually perform the complete cycle to. Once I wrote the above I started to be concerned that the following part may need to be unbolted and realigned as well:

IMG_1051-marked.jpg

But first let's try with the motor only. I suppose that there just one position which will allow you to put the lever on the motor's axle.
 
Last edited:
If anyone needs encouragement to do this job then I have some photos for you of my broken wiper mechanism. If I would have done this in March of 2021 when I last asked about it I wouldn't be here with this mess on my hands. The failure mode is the wiper would extend on the passenger side, jam on the A pillar and get stuck. Don't let this happen to you. You need to service your rack gear with new grease as a PM step.

My "rack" gear is shredded. The little follower gear on the wiper arm itself is fine.

IMG_6626.jpeg


You then remove the clip holding the rubber trim (my car is a 1994 E500).
IMG_6637.jpeg

Then there is some tape you peel back revealing the screws holding in the rack gear
IMG_6639.jpeg


Remove those screws and the rack gear will come out.
IMG_6640.jpeg


Then you remove these little cast metal "holders" as you will re-use that to put in the new rack gear.
IMG_6641.jpeg
IMG_6642.jpeg
 
I am now in the process of cleaning everything up and waiting for my new rack gear which I found at Pelican Parts. When that arrives I will post the repair photos. eBay also has Rack gears available.

Just like JC220 says I will start with high viscosity chain lube for the linkages and then follow up with grease.

So is the recommended grease Gleitpaste? I also have the Napa Syl-glyde stuff.
 
Last edited:

Who has watched this thread (Total: 6) View details

Back
Top