• Hi Guest !

    Welcome to the 500Eboard forum.

    Since its founding in late 2008, 500Eboard has become the leading resource on the Internet for all things related to the Mercedes-Benz 500E and E500. In recent years, we have also expanded to include the 400E and E420 models, which are directly related to the 500E/E500.

    We invite you to browse and take advantage of the information and resources here on the site. If you find helpful information, please register for full membership, and you'll find even more resources available. Feel free to ask questions, and make liberal use of the "Search" function to find answers.

    We hope you will become an active contributor to the community!

    Sincerely,
    500Eboard Management

HOW-TO: Replacing M119 camshaft oiler tubes

Gerry, I have a question. Will this process and these part numbers work with my 1994 SL500?

Thanks, Torry
Yes. Everything would be the same for the M119 as found in the 1994 SL500. It's a close variant of the engine as found in the E500. Did you confirm that your car has plastic oiler tubes by looking through the oil filler cap with a flashlight? It's more than likely that a 1994 model M119 DOES have the plastic tubes, but it's good to make sure before you embark on the project.

Cheers,
Gerry
 
We have had a long winter on the East coast and my 93 500E does not go out when there is salt on the roads. It has been sitting in the garage and when I started it last weekend I could hear ticking from the passenger side. I changed out the cam oilers on the driver side almost two years ago and have been putting off doing the passenger side because I was concerned about accessing the rear cam cover bolt. The ticking noise got me motivated and the job is just about done. Metal cam oilers and new upper chain guides installed, cam cover back on, just have to torque the cam cover bolts and put back the wiring harness, etc. I found the passenger side to be no more difficult than the driver side though that rear cam cover bolt is tough. Interestingly that bolt is slightly shorter and is the old style shallow head bolt, while all the others have a deeper head. I did not change the small oil hose/separator that sit in the head below the oil tube on the cam cover (parts 1190100062 and 1190160181) -- should I have replaced them?

Thanks again to Gerry for a great HOW-TO. I would not do this myself without such good instructions! Before and after pics attached, as well as one showing the tight access to the rear cam cover bolt.
 

Attachments

  • Cam oiler tubes - before replacement.jpg
    Cam oiler tubes - before replacement.jpg
    620.9 KB · Views: 40
  • Cam oiler tubes - replaced.jpg
    Cam oiler tubes - replaced.jpg
    615.1 KB · Views: 40
  • Rear bolt.jpg
    Rear bolt.jpg
    997.7 KB · Views: 33
What was harder, the rear bolt or getting the picture! Great job....


Sent from my iPhone using Tapatalk
 
I am really happy that so many folks are finding this HOW-TO to be useful. Thank you for the feedback !!
 
To complete the story from my post yesterday: started the car and could still hear the ticking but it slowly went away, completely gone within 3-4 minutes. I did check the old plastic cam oiler tubes and none were obviously broken. Anyway I am happy to have the metal oilers installed and no more ticking. Looks like my next project is the headliner. There is always something to do!
 
Cover Gasket Kits

FYI. MB OE cover gasket kits (p/n 119 010 13 30 & p/n 119 010 14 30) from MB Gainesville are $24.00 each (which is half price from a couple years ago & even less than some current aftermarket item prices).

Cover_Gaskets.jpg

Anybody considering doing this job might want to take advantage of the current price.
 
Re: Cover Gasket Kits

FYI. MB OE cover gasket kits (p/n 119 010 13 30 & p/n 119 010 14 30) from MB Gainesville are $24.00 each (which is half price from a couple years ago & even less than some current aftermarket item prices).

View attachment 48963

Anybody considering doing this job might want to take advantage of the current price.

Wow, that's a great price. The last time I bought them, I paid about $30 each from Lionel before he left.
 
I've got a parts order going in tomorrow for a G-wagen tie rod. I think I'll throw a couple of M119 valve cover gaskets on it, to have in my parts stock as spares.

I have two sets of spare valve cover gaskets (MB factory and Elring aftermarket) for my M117, though I'm going to use one of the sets soon when I roll in a new timing chain and replace the spark plugs, cap and rotor.
 
Re: Disconnecting Fuel Line task

This is the second half of the M119 cam oiler tube DIY -- this time for the left (driver's side) bank of cylinders.

... you have to remove the fuel line that goes from the fuel cooler to the fuel rail, joining at the base of the fuel pressure regulator. Again, your 17mm open-end wrench makes quick work of loosening that joint. You will want to have a rag underneath it to catch any fuel that dribbles out (there will be a little). You can minimize fuel spill if you just quickly tilt the hose upward after loosening the connector.
View attachment 17513 View attachment 17514

To remove my cover, I had to additionally disconnect the fuel line directly behind the one mentioned. This line's connection is located just past the adjacent FPR.

It likewise is disconnected using a 17mm open-end counterheld by a 14mm open-end wrench.
 
Replacing UpperTiming Chain Guide Rails

The next step is super-important and delicate ... the removal and replacement of the plastic sliding rail for the top of the timing chain, located between the cam sprockets. This plastic rail consists of two plastic pieces...that press together and are locked by six small tangs, which snap into slots...you WILL break some of the tangs off in the process,

I was recently checking for this assembly's installation torque spec of 9Nm / 6.6 fl lb. FSM 05-3350 confirms that there is a special tool used to release this assembly.
 
Re: Replacing UpperTiming Chain Guide Rails

I was recently checking for this assembly's installation torque spec of 9Nm / 6.6 fl lb. FSM 05-3350 confirms that there is a special tool used to release this assembly.
I've got the tool. I only use the top "fingered" piece, then push the lower 2 tabs manually. The top piece is really handy, but for old/brittle rails it's useless... you just snap off all the bits and try to make sure not to drop anything.

:duck:
 

Attachments

  • M119_chain_rail_tool1.jpg
    M119_chain_rail_tool1.jpg
    127 KB · Views: 21
  • M119_chain_rail_tool2.jpg
    M119_chain_rail_tool2.jpg
    77.9 KB · Views: 17
Re: Replacing UpperTiming Chain Guide Rails

I've got the tool. I only use the top "fingered" piece, then push the lower 2 tabs manually.

I received the replacement parts today. Now I can see & understand how the lower tabs connect, and how the tool releases them.

:doh: I should have looked up this job in the FSM earlier. I was correct with the top tabs, but was backwards in attempting to release the lower tabs from the frontside (it looked like the only direction they could be reached manually) The tool releases all the tabs from the backside.

I was gonna toss the old parts anyway, but it would've been nice to have removed them intact.
 
Re: Reinstalling Left Cam Cover

...when you put the cam covers back on the car after doing the job, be VERY careful to ensure that the cam cover gasket remains in place on the cover itself. It's such a tight squeeze between the back of the cylinder head and the firewall, that when you are putting the cover back on it is very easy to accidentally shift it out of place or off the end of the cover and not even know it!!

The bottom right corner is quite the squeeze (coming off & going on). I used the Vader (I do believe) method of a couple strategically placed drops of superglue to keep the gasket intact with the cover during installation.

Worked great. Got it in on the first attempt. Was able to verify the "half moons" with a mirror & the hidden corner with fingertips.
 
Aah, you guys are weenies. I went glue-less and had to fit that cover 7-8 times before I got 'er done right.

The swearing you do after every failed attempt grows hair on your chest. :jono:
 
Re: Right Side Cam Cover

These two parts should be added to the recommended parts list:


  • Oil Separator 119.010.00.62
  • Breather Hose 119.016.01.81

Cam_Cover 012.jpg

A high probability they are petrified & will break upon removal when removing the right cam cover.
 
Hi,

I was about to check under the valve cover when replacing spark plugs but the cover is like one piece with the head. I assume it should be detached easily after removal of all nine (x2) bolts, right? Has anybody seen glued valve cover before, even there exists rubber sealing between?
 
Hi,

I was about to check under the valve cover when replacing spark plugs but the cover is like one piece with the head. I assume it should be detached easily after removal of all nine (x2) bolts, right? Has anybody seen glued valve cover before, even there exists rubber sealing between?
If the cover has been on for many years, the gasket becomes "glued" to the head and cover. Usually you can get it loose by GENTLY prying at the front/upper corners, once it starts to come off you should be able to remove the cover. Depending how old the gasket is, you may have a lot of scraping to do, to remove bits of old gasket. OE MB gaskets (made by Bruss) are highly recommended; there have been reports of the aftermarket (Victor-Reinz) gaskets not fitting properly. Cost is almost the same for OE vs aftermarket in USA, not sure about Finland / Europe.

:seesaw:
 
It's good to know that it might be stucked just due to age, the cover has been there over ten years.
I have new MB original sealing availabel so no problem if old one will broke.

Thanks for hints. This forum is great... ups ... awesome. ;)
 
5mm flex-head allen socket

Please don't laugh at my disability. I can't find this tool even via Google or Amazon search. At two Home Depos they looked at me with plate-sized eyes. At harbor freight store, a what seemed like a conscious human being, told me it doesn't exist and that I need to buy a pivoting universal joint + a socket with hex head, which won't work to reach valve cover bolt by the fire wall (passenger side).

What is the searchable name for this tool that Amazon or Google will recognize and lead me to a definitively correct part? A link would be also appreciated. Thanks
 
Koken and Snap-On make these... but they are NOT cheap. Like, $40-$60 each MSRP. Photos attached of the Koken. Link to Snap-On TUAM5E:


There's an off-brand but it's kinda porky, and I'm not certain if it will fit in the tight space. Link to the off-brand set at Amazon:
 

Attachments

  • koken_5mm1.jpg
    koken_5mm1.jpg
    162.7 KB · Views: 16
  • koken_5mm2.jpg
    koken_5mm2.jpg
    133.6 KB · Views: 13
  • koken_5mm3.jpg
    koken_5mm3.jpg
    139.6 KB · Views: 13
  • koken_5mm4.jpg
    koken_5mm4.jpg
    154.9 KB · Views: 12
@kiev instead of waiting on those hex sockets to come in the mail why not just pluck the motor for full uninterrupted access?
:banana2:
 
In the very first post of this thread, @gerryvz says that flex-head 5 mm hex is "almost imperative" for this job and that with out it, it'd be extremely difficult. How can the bolt by the firewall be removed with out it? What's the alternative? Just curious
 
Last edited:
There are plenty of threads and references to this tool here on the forum. Just search for Koken and you should find plenty of them.

On the W124, the rear-most hex bolts CANNOT realistically be removed without this flexible Allen socket.

On the W140, the rear-most hex bolts CAN be removed with an ordinary hex socket or Allen key.

The Durston flexible Allen driver set that @gsxr lists above WILL work -- I have one and have used it in the past for this job. More recently I obtained two of the Snap-On units -- one myself directly from Snap-on, and another one as part of a Snap-On tool set that was sold to me by our member @clarkz71 (aka "Clark Vader")
 
There are plenty of threads and references to this tool here on the forum. Just search for Koken and you should find plenty of them.

Meant to say: how can the bolt be removed WITH OUT flex-head hex socket. You mentioned that it's "almost imperative" for the job in post #1 and that with out it the job is extremely difficult. That means still doable, and I'm curious how?

I've already ordered Koken from the link Dave provided
 
There are plenty of threads and references to this tool here on the forum. Just search for Koken and you should find plenty of them.

On the W124, the rear-most hex bolts CANNOT realistically be removed without this flexible Allen socket.

On the W140, the rear-most hex bolts CAN be removed with an ordinary hex socket or Allen key.

The Durston flexible Allen driver set that @gsxr lists above WILL work -- I have one and have used it in the past for this job. More recently I obtained two of the Snap-On units -- one myself directly from Snap-on, and another one as part of a Snap-On tool set that was sold to me by our member @clarkz71 (aka "Clark Vader")

As another option, there is this set 1/4" flex hex drivers from VIM that I have successfully used to remove said valve cover rear bolts on a number of separate occasions.

 
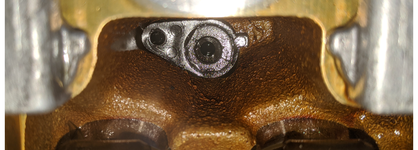
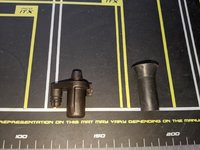
Could someone explain how to remove old oil separator on the passenger side, under spark plug hole #4? A neck broke off it so I cant attach a new breather hose. I've got a new one. Thanks
 

Attachments

  • 1111.png
    1111.png
    5.4 MB · Views: 21
  • IMG_20200115_165021.jpg
    IMG_20200115_165021.jpg
    3.5 MB · Views: 21
Could someone explain how to remove old oil separator on the passenger side, under spark plug hole #4? A neck broke off it so I cant attach a new breather hose. I've got a new one. Thanks

The left side on the pic is a locating dowel / clip that engages in the head casting. Basically get a pair of long needle nose pliers and carefully wiggle whilst pulling up at the same time and it will come loose. Dont try to pull to hard or the brittle plastic might break. It's easy enough to remove
 
@JC220. Thanks! Indeed it was. So the separator is supposed to be lose like that? I put the new one in and can easily pull it out with fingers with zero effort, is that how it's suppose to be?
 
@JC220. Thanks! Indeed it was. So the separator is supposed to be lose like that? I put the new one in and can easily pull it out with fingers with zero effort, is that how it's suppose to be?

Yes they are a little loose dont worry about that. When the cam cover goes back on a small metal pipe drops down into the funnel effectively clamping it in position

Dont forget the new copper crush washers for the cam cover bolts :pc1:
 
@gerryvz, your write up helped/guided - thanks. I did passenger side only thus far.

My engine was ultra smooth when cold, but as the engine was warming up, ticking/clattering would emerge. The closer oil got to an operating temperature, the louder. Couldn't hear anything while driving, only at idling

1. All 8 plastic tubes on the passenger side were lose, but intact. Metal tubes resolved 2/3 of the noise, so driver side is next.

2. Chain guide was intact, but disintegrated upon removal. I caught all pieces.

3. It was "fun" removing, apparently original, 27 year old (122k mi) valve cover gasket that wasn't leaking (!), in 1 inch pieces with a screwdriver, wife's hair drier, and 10 story high cursing :banana1:

4. Might be worth adding oil separator and breather hose that attaches to it to the required parts list in post #1
 

Attachments

  • IMG-16b6f55c03b86f05501988225d1c35be-V.jpg
    IMG-16b6f55c03b86f05501988225d1c35be-V.jpg
    2.4 MB · Views: 27
  • IMG-b4a33f25528814728419830d48503eed-V.jpg
    IMG-b4a33f25528814728419830d48503eed-V.jpg
    1.6 MB · Views: 27
@gerryvz, your write up helped/guided - thanks. I did passenger side only thus far.

My engine was ultra smooth when cold, but as the engine was warming up, ticking/clattering would emerge. The closer oil got to an operating temperature, the louder. Couldn't hear anything while driving, only at idling

1. All 8 plastic tubes on the passenger side were lose, but intact. Metal tubes resolved 2/3 of the noise, so driver side is next.

2. Chain guide was intact, but disintegrated upon removal. I caught all pieces.

3. It was "fun" removing, apparently original, 27 year old (122k mi) valve cover gasket that wasn't leaking (!), in 1 inch pieces with a screwdriver, wife's hair drier, and 10 story high cursing :banana1:

4. Might be worth adding oil separator and breather hose that attaches to it to the required parts list in post #1

Interesting how the tubes were intact but were causing the ticking, were they seated properly or were slightly out of place?
 
This seems to be one of the more popular write-ups that people are using.

What are the part numbers for the oil separator and breather hose? Does anyone have them off-hand?
 
Item Oil SeparatorPart #1190100062
Breather hose 1190160181

Just looked at my mboemparts.com invoice to get part numbers. The tiny, about an inch in length breather hose that attaches to the oil separator was $16 🤯

@195910, I agree. Based on the noise I heard, I thought there a few popped tubes. Mine was more of a tap-tap-tap, cluck-cluck-cluck cacophony that I could hear up to 20, maybe even 30 feet away. Though definitely it was not a knocking sound. No sound at all when car was cold.

All 8 tubes were lose. I pressed on each one, and each one went in with a pronounced click.
 
All 8 tubes were lose. I pressed on each one, and each one went in with a pronounced click.

A few members here mentioned that the tubes slighly pop out of place (not the end cap but the tube itself).
AFAIK the Camshaft bridges don't hold the tubes firmly, there is ~2 mm gap between the oil tube tabs and the bottom of the bridge
 
A few members here mentioned that the tubes slighly pop out of place (not the end cap but the tube itself).
AFAIK the Camshaft bridges don't hold the tubes firmly, there is ~2 mm gap between the oil tube tabs and the bottom of the bridge
The tubes do not need to be rigidly in place.
 
A few members here mentioned that the tubes slighly pop out of place (not the end cap but the tube itself).
AFAIK the Camshaft bridges don't hold the tubes firmly, there is ~2 mm gap between the oil tube tabs and the bottom of the bridge

That was my understanding too. So what did metal tubes changed? It's been about 300 miles since change and the clutter is down by 2/3... You can see from the picture of my valvetrain that aside from conventional oil staining, it's clean - no gunk anywhere. When removing plastic tubes, each drained oil, so I don't think any were plugged up.

@gsxr, @JC220, any educated guesses?

@gerryvz, I sources metal tubes from @J-Sauce back in 2015. He had me o-rings put on them
 
While the tubes don't have to be held TIGHTLY in place, the contact surface of the o-rings does get fossilized from age and heat cycles, and does flatten. This facilitates less sealing. Putting new o-rings gives a rounder/larger sealing surface. While the new o-rings don't necessarily hold the tubes firmly in the cylinder head, they are going to be better than old fossilized rings in any case.

My opinion. It's been said here before that reusing old o-rings is just fine and makes no difference. My philosophy is like with any "soft" part, it's incremental labor, a no-brainer and very cheap to replace all of the o-rings, so why not do it? It's only going to be up-side, with no down-side.

Cheers,
Gerry
 

Who has viewed this thread (Total: 3) View details

Who has watched this thread (Total: 3) View details

Back
Top