• Hi Guest !

    Welcome to the 500Eboard forum.

    Since its founding in late 2008, 500Eboard has become the leading resource on the Internet for all things related to the Mercedes-Benz 500E and E500. In recent years, we have also expanded to include the 400E and E420 models, which are directly related to the 500E/E500.

    We invite you to browse and take advantage of the information and resources here on the site. If you find helpful information, please register for full membership, and you'll find even more resources available. Feel free to ask questions, and make liberal use of the "Search" function to find answers.

    We hope you will become an active contributor to the community!

    Sincerely,
    500Eboard Management

jftu105 300E Sportline Project

Dave,

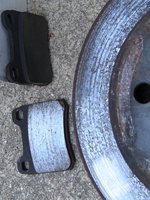
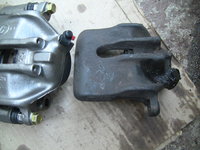
Thanks a lot. I ordered a caliber from rockauto as you suggested.

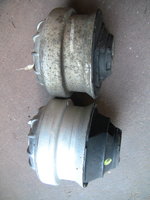
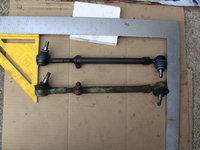
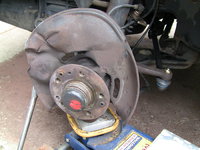
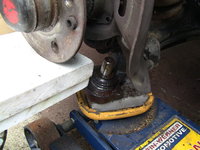
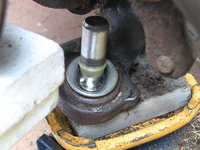
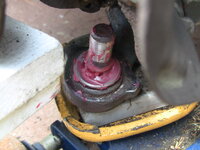
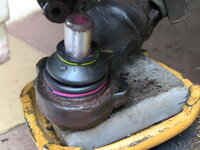
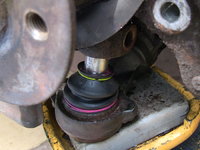
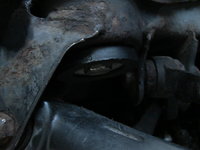
I am looking at the subframe bushing thingy, but I have a hard time to figure it out. It seems to me that you release the bolt from the bottom.

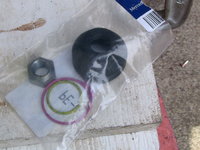
OK, it starts to make sense to me. So, it would be these three parts,

http://www.w124performance.com/images/W124_subframe/bushings/forward-small/bushing_kit_custom.jpg

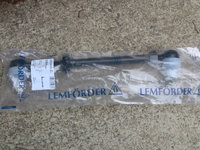
Can it be replaced with this one?

https://www.fcpeuro.com/products/mercedes-subframe-bushing-kit-rear-1243508608


Thanks.

jftu105
 
Last edited:
Download this 6MB PDF file for more info on R&R of the forward / small bushings... it may help clarify things:
http://www.w124performance.com/docs/mb/W124/subframe_bushing_install.pdf

For the rear bushings, don't get Febi... either Lemforder or OE. The links you have are for Lemforder individual bushings, and you can buy the bolts/plates separately. The Febi link was for a kit with everything.

Standard rear bushing p/n is 1243510242 (need 1), hardware kit is 1243506708 (need 1). $30 / $37 each respectivel, free shipping from Naperville:

https://www.mboemparts.com/oem-parts/mercedes-benz-rear-mount-1243510242

https://www.mboemparts.com/oem-parts/mercedes-benz-sub-frame-mount-kit-1243506708

Use an impact wrench to remove the old bolts, and chase the threads in the frame floor with a tap before re-installing. Warning - it's a big job, and if you don't have the special tools, you'll need to fabricate stuff.

:duck:
 
Dave,

Thanks for all the information. I went through all the pictures via the link you provided and the part search at MBoemparts.com.

I also understand much better what are needed. Basically, the rear subframe is supported by four bushings, two on each side of the car (driver and passenger sides). On each side, one bushing in front and one bushing at the back. The front bushing is smaller and MBoemparts shows a kit, with a part number: 1243500441 for $73.26.

https://www.mboemparts.com/oem-parts/mercedes-benz-repair-kit-1243500441?c=Zz1yZWFyLXN1c3BlbnNpb24mcz1yZWFyLXN1c3BlbnNpb24mbD0yMSZuPUFzc2VtYmxpZXMgUGFnZSZhPW1lcmNlZGVzLWJlbnombz0zMDBlJnk9MTk5MiZ0PWJhc2UmZT0zLTBsLWw2LWdhcw==

The larger bushing is for the back of the subframe. MBoemparts shows a part of 124-351-0242 as a mount, not a kit and I don't how many mounts are there, probably one. The price is $30.34.

https://www.mboemparts.com/oem-parts/mercedes-benz-rear-mount-1243510242?c=Zz1yZWFyLXN1c3BlbnNpb24mcz1yZWFyLXN1c3BlbnNpb24mbD0yMyZuPUFzc2VtYmxpZXMgUGFnZSZhPW1lcmNlZGVzLWJlbnombz0zMDBlJnk9MTk5MiZ0PWJhc2UmZT0zLTBsLWw2LWdhcw==

According to your pictures, I will need stop plates and bolts, and the part number at MBoemparts.com is 124-350-6708 for $37.00 (I could not find any pictures, but the part search did locate it). It should have two stop plates and two bolts.

If I get all the parts, I should order:

1 x 124-350-0441 (front subframe bushing kit, containing two bushings, two plates and two bolts) $73.26
2 x 124-351-0242 (two bushings total): 2x$30.34 = $60.38
1 x 124-350-6708 (kit, containing two plates and two bolts): $37.00

The total will be $170.94.

However, MBoemparts is not giving me freeshipping. Do I need a promo code?

I will get our local MB specialty shop, Better Wrench at Chapel Hill, NC, to install it as the job is probably out of my league and I don't have all the pulling and pushing tools. At the shop, it would be easier that they remove the whole subframe and then take out and put in the new bushings. Then put the subframe in place and bolt on.

Thanks a lot. This sportline should be called spoilline, a money pit. My buyer's remorse is big.

Please slap me to my senses next time I want to buy a good looking car. Beauty is really skin deep. On the other hand, I should know that after 27 years, some parts are due to be replaced. I just wish the previous owners did a better job in repairs, not wasting money on new speakers and fancy AMG wheels.

jftu105
Don't lament things too much! You just methodically take care of things (and do it the right way) and it will be a "one and done" thing during your ownership and likely the rest of the life of the car. You will have a very nice car to drive out of all of this -- and that's the goal, to have a car that works great and as intended, and looks great. Just keep at it. Folks here can and will help you, and you can get the appropriate new and used parts as needed through sources and references here. And for many of the common maintenance and repair jobs, you'll find the requisite HOW-TO articles here.

Unfortunately, many if not MOST people tend to pursue "wasting money on new speakers and fancy AMG wheels" instead of making sure the car is operating as it was supposed to mechanically. It's just how life is -- people want the bling to impress others, rather than having a car that operates properly. I'm glad to see you are committed to restoring the car to a good mechanical state. It's a labor of love, and as Steve Jobs once said, "The Journey is the Reward," but you will have a nice car when you are done !!
 
The promo code works. I went ahead and ordered the subframe bushings.

Ranting and swearing are part of the frustration and relaxation during the car repair. That's why it is therapedic.

Today's plan is to replace the tierods. MBoemparts return the same part number for tierods for 1992 300E and 1994 E320. They must be the same. I had two new Lemfoeder I purchased from FCP before. Will just put them in, hopefully they fit. I will match the length down to 1 mm and they should not upset the alignment.

I will then proceed with engine oil, transmission fluid, and fuel filter changes (including the S-shape fuel hose out of the filter or the pump). I will test drive only after I put in a new caliber. Not taking any chances. I still need to the do the rebooting for the driver side lower control arm. The passenger side was replaced in 2013, according to the receipts.

Thanks for all the help.

jftu105
 
Last edited:
I will get our local MB specialty shop, Better Wrench at Chapel Hill, NC, to install it as the job is probably out of my league and I don't have all the pulling and pushing tools. At the shop, it would be easier that they remove the whole subframe and then take out and put in the new bushings. Then put the subframe in place and bolt on.
Call them for a quote first. You may want to be sitting down. Wouldn't surprise me if it's pushing into 4 figures for labor. The job is DIY'able, either by fabricating stuff to make it work, or by purchasing the tools (which will work on all 124's). And, it's possible to replace all 4 bushings without removing the subframe from the car. Depends which you have more of - time or money?


This sportline should be called spoilline, a money pit. My buyer's remorse is big. Please slap me to my senses next time I want to buy a good looking car. Beauty is really skin deep. On the other hand, I should know that after 27 years, some parts are due to be replaced. I just wish the previous owners did a better job in repairs, not wasting money on new speakers and fancy AMG wheels.
The majority of owners tend to do the latter, especially if the car is still running & driving "okay". Nobody sees $1k in new suspension parts, but everyone sees those blingin' AMG wheels! Again, you have a very rare car here, and IMO it's worth the investment to restore & keep it.


MBoemparts return the same part number for tierods for 1992 300E and 1994 E320. They must be the same. I had two new Lemfoeder I purchased from FCP before. Will just put them in, hopefully they fit. I will match the length down to 1 mm and they should not upset the alignment.
Never, ever trust an online part catalog for fitment information - not even from a dealership! They are notoriously inaccurate. However in this case the info is correct, the .030 and .032 tie rod assemblies are the same. Use the EPC for part lookups. Either shell out for the official online subscription from MB, or buy one of the standalone EPC's from eBay if you use a computer (not tablet). More info at this link:
https://www.500eboard.co/forums/ind...wa-net-information-on-buying-installing.3724/

About the alignment - adjusting the tie rods within 1mm will get you close enough to make the car driveable, but after all the suspension work is complete, I'd still recommend a dealer alignment. Make sure to check *every* steering/suspension component that can affect alignment beforehand. BTW, how are the strut mounts & idler arm bushings? Those common items that wear out after a couple of decades. Ditto for the rear wheel carrier/support joint at the outer end of the LCA (~$20/ea, easy to replace with the proper tool). At a minimum, I wouldn't swap on new tires until you are confident the alignment is close enough to not cause rapid wear.

:wormhole:
 
Dave,

Very true and thanks for all the advices. The repair of our classical cars is like painting the golden gate bridge. Once you started, it takes years to go to the end. Once you reached the end, it is time to paint the beginning point again. There are so many rubber parts and they all beginning to have some signs of failures or major wear. Once I get the obvious problems fixed, I will then do the golden gate bridge painting thing, sorting them through gradually.

As for today, I decided to do a lighter work. First, find out what is wrong with the rear passenger side window regulator. The cables fell off and gotten chewed up badly. Need to get a new one. I will just get a cheap one from eBay for now.

Did the oil change and put in a bottle of MOS2. Will do the transmission later.

Also, did another round of interior cleaning to remove any hint of cigerette smell with H2O2 and amonia. H2O2 releases O2, similar to ozone and kills germs. Apply my good-for-everything coconut oil to the leather seats and all interior surface.

Had to tighten the brake line once again. I had every size of the flare wrench except a 10 mm. I believe I had one but could not find it. Had to go to the store and got one so that the brake hard tubes are tightened properly. An open wrench is too dangerous to use. Now, truely, it has no leaks. I noticed leaks this morning.

Thanks again for everything.

jftu105
 
Working on this car, loosening every bolt or screw is an adventure. Finished the engine oil change without incident, using my topsider extraction tool. The filter was actually loose. It was a carquest filter with a smooth end. I removed by turning it with my bare hand. Put in a Mann filter with a proper end for the filter tool. Looking down, there is no oil leak on the ground. Good news.

The transmission fluid replacement was fine with the topsider and then drain from the torque converter. When I tried to remove the drain plug, it was so tight that the allen slot was rounded. Tried a removal tool but it won't budge. Learning from the lesson of caliber bleeder yesterday, I quickly abandon removing the drain plug. I don't know which idiot would tighten an allen drain plug that tight. I don't need to open it. Removed all six bolts to the pan. Let it tilt one side and then extract fluid using the topsider. After that, only a very thin layer of fluid in the pan. The filter was MB original.

The pan was actually clean. The fluid was dark red, quite thick. Put in Maxlife, red and a new filter. Shifted it through gears. The shifting is smoother. However, the engine mounts and transmission mount all shot, giving out more sudder. Will replace them.

Finally, while under the car, the center link (drag link) is shot. The steering damper is shot too. Need to replace two tierods, one center link and damper.

I start to see the end of the tunnel for this project.

Below are the to do list:

7. Transmission mount (give up)
9. Some interior parts of the door panel (the seller removed the panel and threw away all the parts on the panel, yak!)


34. Windshield replacement


Things completed so far:

1. Fender
2. Headlights
3. Turning signals
4. Center brake light
5. Arm rest
6. Interior cleaning
7. Brake hoses and hard tubes, brake fluid flushing
8. Engine oil/filter
9. Transmission fluid/filter
10. Hood open puller
11. Washing and waxing
12. Four 16 inch tires
13. Engine mounts
14. Hood pad
15. Air filter.
16. Instrument cluster fixed, fuse #5 was burned
17. Blower fan (AC fan) fixed, 30A fuse blown. The fan needed lubrication. Add some MOS2 to the bearings.
18. AC works.
19. Blower area and evaporator cleaned.
20. Added the two missing rubber straps in the engine compartment
21. Cleaned the draining holes. Add a DIY draing tube on the driver side under the windshield.
22. Two rear rotors and pads
23. Rear passenger side window regulator
24. Steering fluid and filter
25. Windshield damaged during repair. Tempararily repaired to stop crack from advancing.
26. Windshield fluid reservoir leaking. Resealed and works now.
27. Vacuum tube repair and hoses replacements
28. Deodoring, cigerette smell
29. Front calibers, bleeding.
30. Rotors and pads.
31. Driver side LCA rebooting.
32. Two tierods.
33. Drive side window control switch defect. Replaced with a spare.
34. Add some silicon to the hard tube to hold it to the chasis to avoid vibration during driving.
35. Transmission shift link rubber bushings
36. Center link and damper.
37. Coolant flush.
38. Transmission shift harshness tuning, a disconnected vacuum tube reconnected.
39. Fuel filter
40. Fuel hose, from the fuel pump (so rusty)
41. Fixed one holding bolt for the fuel pumps/filter cover.
42. Add the missing bottom cover under the engine
43. Battery
44. Transimission shift knob (the sportline tag lost). Did a DIY patching. At least it does not look so ugly.
45. Open all the drain holes in the engine compartment and the trunk.
46. O2 sensor checked out fine.
47. Engine fine tuning, duty cycle adjustment, closed-loop control fine
48. DIY Alignment after tierods and center link replacement
49. Subframe bushings (got the parts from MBoemparts.com)
50. Belt tensioner and belt
51. Spark plugs
52. Door lock vacuum (locking one door will not lock all the doors)
53. The connection between the middle muffler and the rear muffler (needs welding, will use a local muffler shop)


jftu105
 
Last edited:
Going through the old receipts of the third owner. In Dec. 12, 2014, a import repair shop charged $554 for

1. 6 spark plugs ($48)
2. OVP ($108)

and labor and diagnosis $392, plus tax for $554.26.

In the diagnosis note, it stated, direct quote:

"Check out car running issue when cold - car barely starts and run extremely poorly - often takes several starts - once warmed up, car will start and run very well, drives ust fine - scope test ignition system - coil output test OK but very uneven firing seen - inspect and replace spark plugs (3 new and 3 old) - distributor cap and rotor inspection showing some breakdown but OK for now - fuel injection not responding to adjustment - isolate fault to failed overvoltage protection unit - install new unit and set lambda control frequency - extended road test and tweak settings - after leaving overnight performance very good on both cold start and road test."

I am not familiar with M103 and KE-Jetronics. I can agree with the spark plugs being an issue to cold start. After warming up, the spark plugs can fire better. $8 per plug seems to be reasonable.

I am not convinced by the OVP claim though. For M104, I know OVP is not related to the lambda control and you cannot adjust it. But for M103, it could be totally different. But you don't adjust the lambda control "FREQUENCY", do you? I though you adjust the bias of the lambda control, so that it is not too rich or too lean, not frequency. I assume that a faulty OVP for M103 could cut off the supply voltage to the control unit, which then could not respond to lambda control adjustment. $104 for an OVP? I guess that it is how much it costs at the shop. $392 for changing plugs and an OVP, plus scope tests, lambda control adjustment and road tests.

BZworld clowns would be jumping for joy for what this shop did and stated regarding OVP.

jftu105
 
Last edited:
I have never figured out why the likes of Q*baert and the Real1Shepster have never established accounts here -- though it's likely they have under different monikers. Probably because their "eco-junk wiring is the cause of all problems" shtick would wear thin quickly.
 
I think that they know the moderators would not tolerate their nonsense and their insults as much on the 500E board.

jftu105
 
Last edited:
Made little progress today as it rained until 3. Put in a new hood pad and it looks a lot nicer. Also, replaced the air filter and both engine mounts. Also some degreasing and cleaning, making the engine look more respectable.

On the passenger side, the room is so big, it was easy. On the driver side, the room is a lot tighter than E320. I tried many ways, on top, under, and finally found a wrench just the right length so that I can release the top bolt from the top. The engine mounts were completely collapsed. They were MB original, probably from 1992. Also added an air pump cover so that dust won't fall straight in.

Then I tried to do the transmission mount. On E320, I have done it many times. The first time was tough, but now I have a Snapon offset tool, 19mm, the job became easy. However, this sportline has a bigger flexible disk, making the gap between the top nut and the flexiable disk so much smaller. I tried all my wrenches, nothing works. Gave up.

Help!!!!!

With the new engine mounts, the idling is definitely smoother. While doing the engine mounts, I notice more issues. The belt tensioner is bad too. One more job I don't like. The bottom cover is not there. The two rubber straps to seal the engine compartment from the fresh air input to the cabin are gone.

Really, do people really need to neglect and abuse a good looking car that much. The to-do list just got longer.

jftu105
 

Attachments

  • IMG_3902.JPG
    IMG_3902.JPG
    513.2 KB · Views: 18
  • IMG_3903.JPG
    IMG_3903.JPG
    1.1 MB · Views: 19
  • IMG_3907.JPG
    IMG_3907.JPG
    832 KB · Views: 19
  • IMG_3909.JPG
    IMG_3909.JPG
    641.9 KB · Views: 17
Last edited:
OK, make some more progress today but progress cannot be made without damages.

Decided that I don't want to get too dirty today to go under the car; therefore, I addressed the AC fan not working issue. So, you go in the car, turn the key, but no wind is coming out. Nothing, from low to high, or any AC settings, even defrost. The seller told me that the circulation fan needed replacement. I really don't think the fan will be dead but I need to open it up and do some cleaning, in particular hosing down the evaporator to remove any molds or faul smell.

It turned out that the 1992 design is quite different from the 1994 design. The weather straps and the windshield wiper are not one unit. There are two metal/rubber strap, one on each side. They fit very tightly, unlike the 1994, which comes undone when the plastic holding edge at the bottom of the windshield cracks. In the process of taking the strap off, I used a flat screw drive to pry it off as it is very tight.

Bad idea. The driver side came off without issues, but when I continued to the other side, I heard some scratching sound and next thing I know, the windshield cracked. What a bummer!

I collected myself and went ahead to take everything off to expose the AC fan. The 1992 design is actually better, more secured and water proof. Cost cutting already started in 1994. The fan is also bigger than that of 1994. Took it out and tested it with 12V, it ran.

Thinking that it could be the climate control unit, I took that out too, but really did not have a way to test it. Put it back and then I noticed that there are three wires into a fan regulator, which then supplies the voltage to the fan. Traced it and I located a three pin connector. Removed it and measured the voltage. There was one ground wire, one red wire (12V), and one yellow wire (control voltage). At different fan speed setting, I get any where from 2 to 9 V. So I know the climate control unit is fine. However, the red wire which should be 12 V, I am not getting it.

I went into the fuse box but could not find anything wrong and any connection to ths red wire. So I did the smart thing. I checked my E320 and measure how the voltage should be. It turned out that it is ignition key controlled. When the key on, I get 12V. Key off, I get zero. The climate control could be on or off, but the 12 V is only controlled by the ignition key. Instead of tracing wires, I just tap a fused 12V from one of the fuses which is also controlled by the ignition key.

It works. Put everything back, with a growing scar on the windshield. I hope the crack will make a turn and go down but it growing upward slowly. When the sun comes out tomorrow, it will grow fast.

Run the engine and, surprisely, the AC works!!!

Also noticed that there are a small fuse box, next to the main fuse box (see the fourthimage). Open it, it is missing a fuse. I just put one in. I don't know what it is for.

That's all for today.

jftu105
 

Attachments

  • IMG_3910.JPG
    IMG_3910.JPG
    617.9 KB · Views: 10
  • IMG_3911.JPG
    IMG_3911.JPG
    452.7 KB · Views: 10
  • IMG_3912.JPG
    IMG_3912.JPG
    715.9 KB · Views: 11
  • IMG_3913.JPG
    IMG_3913.JPG
    676.5 KB · Views: 12
  • IMG_3914.JPG
    IMG_3914.JPG
    805.2 KB · Views: 14
  • IMG_3915.JPG
    IMG_3915.JPG
    700.5 KB · Views: 14
Ha, it turned out that there is a Climate Control Auxilliary Fan fuse, right next to the main fuse box.

http://www.peachparts.com/shopforum/tech-help/363024-blower-fan-not-work-mercedes-300te.html

Open the cover and indeed it was burned. Wasted all that time to add a connection. Will put back everything tomorrow.

Should have googled first!

I also have instrument cluster issues. The oil pressure, fuel, coolant temperature, etc., the left side of gaugs all out. Also get a buzz sound which I think is related to the seat belt. The sound comes from a relay box inside the main fuse box.

jftu105
 
Good work getting the fan going! The change in 94-95 was not cost cutting, MB added a dust filter to keep crud out of the evaporator. This is a REALLY nice improvement over the pre-facelift setup. The filters work great, and can be replaced without taking the wiper mechanism off. 94-up evaporators always look pristine. Pre-facelift are almost always dirty.

The blower motor, regulator, and plastic enclosure all all different... nothing interchanges.

:wormhole:
 
I agree that the dust filter is a great improvement. The funny thing is that most people do not know the existence of the dust filter. As a result, the filter could be there forever without being replaced. I had to replace several filters in total black and molds. In fact, of five E320 I have owned plus one of a friend, none of them had the filters replaced. When I replaced them, it was the first time ever. We are talking about a 15 years old or longer filter. This sportline's fan area was surprisingly clean. Some trash accumulated at the bottom of the evaporator, but not too bad. I prefer the dust filter. However, I still think that MB cut the cost of simplifying how the straps are held down.

Finally, got the buzz sound and instrument cluster thing fixed too. Fuse #5, which supplies 12V to those gages. Sometimes, when the fuse is burned, it burns so finely and it is hard to tell visually. The best way is to measure the voltages on top and the bottom of the fuse. If the bottom is 12V, while the top is 0V, it is burned.

jftu105
 
I prefer the dust filter. However, I still think that MB cut the cost of simplifying how the straps are held down.
Ah yes... the trim pieces at the base of the windshield changed in very late pre-facelift production (late 1993 USA model year), just before the facelift + dust filter. I don't like the late style trim because the plastic channel at the base of the glass is not sold separately, and is almost always broken, so it doesn't retain the flat rubber trim.

And, if a late windshield is replaced by a shop that doesn't know a new channel must be included with the aftermarket glass, you can end up with no channel at all (in th is case, they usually glue the rubber trims to the glass). On one of my E420's, this happened to the PO... got a new windshield, without the channel, and they glued the rubber trims to the glass. Which was fine, until I had to access the blower motor for repairs. I ended up using 3M 08693 Auto Glass Urethane, which worked fabulously, except I only needed about 2 ounces out of the 10oz tube.

The proper kit for late windshields, either OE/dealer or aftermarket, includes a new lower channel for the black rubber weatherstrip to plug into.

:tumble:
 
Received the caliber and rear brake rotors and pads from Rockauto. However, the stupid Rockauto people put padding over the box, not inside the box of the caliber. The bleeder screw gets snapped during shipping. When I opened it, I saw a broken bleeder screw and it was snapped deep inside. I could not remove it and put in my own bleeder to move on. Had to return it back to Rockauto and wait for their replacement. At least, I will get the rear brakes done.

The windshield crack advances when I tried to fix it with windshield repair kits from 3M. Now, it cracks straight up. So, it does not affect my vision. Really annoying that things keep broken up along the way.

jftu105
 
OK, new rear rotors and pads are in. I was surprised that there is a drum brake inside. I don't recall 1994 E320 has a drum brake.

The rotors are quite rusty and it took me some good hammering and penetration oil to finally knock the old rotor off. The pads are thin and the rotors are badly scarred.

Took a small drive around the block at speeds below 30 mpg (no liscence plate and with potential bad front caliber). The shifting is smoother due to new engine mounts but still a bit too jumpy. Probably need to adjust the vacuum. Will deal with it later. The windshield wiper reservoir is leaking through the sensors. Again, the to do list is getting longer.

I feel that the engine is just as powerful and the ride is definitely different from my E320. It is definitely firmer to the ground. People in our subdivision actually turned their heads when I drove by slowly.

jftu105
 

Attachments

  • IMG_3918.JPG
    IMG_3918.JPG
    719.6 KB · Views: 7
  • IMG_3917.JPG
    IMG_3917.JPG
    824 KB · Views: 7
The drum brake on the rears is the parking brake.

Correct and most all MB saloons have them. Even much newer 2014 etc models still have drum brake parking shoes.

Note that the parking shoes require periodic adjustment which is done inside the drum per WIS. In particular if you have fitted new discs then the shoes require setting
 
All 124s, 126s, 107s, etc. very definitely have the "drum" inside the rear disc for the parking brake. Don't know about newer MBs, but this was pretty standard with MB for a long time.
 
I've been reading this thread and see you purchased brake parts including calipers from Rock Auto. Having very recently shopped for rear calipers for my 94 E320 I know Rock Auto only sells after market calipers. No factory or ATE calipers.
Do you think you'll be happy with after market calipers? I have no personal experience perhaps another member will chime in.

Regards,

Peter Weissman
 
The Rock Auto calipers are original OEM (Ate or Girling), which are rebuilt by various aftermarket companies (NASTRA, NuGeon, A1 Cardone, and others). They don't tend to use OE seals or hardware, but I've not heard of anyone having problems with the rebuilds.

:strawberry:
 
Geraniumtr........

I've probably put a half a dozen sets of aftermarket rebuilt calipers that I've bought from O'Reillys on my various Benzes. They have worked great and at $50, $60, usually not more than $70 per caliper it's a huge savings.......there's a core charge too.

As Gsxr noted, they are OEM calipers. You can see the various manufacturers names stamped on the caliper. And as Gsxr also noted, they probably aren't rebuilt with factory seals or hardware, but again I haven't had any problems.

PM me....or I guess in the new parlance.... start a conversation with me if you'd like more info.
 
I have heard mixed stories (some good, some bad) about NuGeon and A1 Cardone rebuilt calipers. Worth a try, but don't be surprised if there is a failure rate out of the box that will require a warranty replacement.

When I recently replaced the rear calipers on my 560SEC, I was able to get "factory" rebuilt calipers from ATE -- presumably using their own rebuild parts. If these had not been available, I would have purchased NuGeon or A1 Cardone rebuilds, though with a modest expectation of a failure. The ATE-built calipers were essentially the identical price as the NuGeon and A1 Cardone units.
 
Tks guys, I think I get it. Regardless of who the rebuilder is they all use a factory core -- ATE or girling. The new parts can be genuine MB if its a factory rebuilt caliper or OEM or after market if rebuilt by someone else.

Peter Weissman
 
Well, as I said, I ordered this rebuilt caliber from Rockauto, rebuilt by Centric. Most of Centric stuff are made in China now, just found that out. Won't be buying Centric stuff ever. The part arrived and it looks nice and clean, with a slip, stating how high quality the rebuilding is. However, the stupid Rockauto guy put the caliber in a box without any protection, and then placed the box inside a bigger shipping box. They put some bubbles around the box. The bleeder screw is made of high carbon steel, rather brittle. They also put the shipping label on the side, not on the top. During shipping, the box got turned 90 degrees to scan the label (I think). As a result, the bleeder screw hit the ground and snapped. You can see a small hole on the box, where the bleeder screw puncturing through. It snapped due to impact, which is a bending load. And it snapped flushed, 90 degrees to the screw direction, where the normal stress due to bending is the highest. The bleeder screw I broke while trying to unscrew also broke flushed. However, because I was twisting it, causing the shear stress, which is the highest along the 90 degree direction. This indicates that the material is ductile, i.e., low carbon steel. So they broke the same way but due to different stresses and different materials. The one I broke, MB original, must be made of low carbon steel, otherwise, it would broke at 45 degree if it is brittle.

You can do a little experiment and see what I stated. For example, if you take a piece of chalk and break it by bending, it would break at 90 degree, but if you try to twist it to break it, it would be at 45 degree. Chalk is brittle and it fails at the maximum normal stress. For a ductile material, such as low carbon steel, it fails at the maximum shear stress. You will see just the opposite of the breakage as those of a chalk.

In short, it might be a good idea to use a high carbon steel bleeder screw because it would see tightening torque, not impact, unless it is packed by some stupid people at Rockauto.

Finally, judging how rubber fails due to high temperature and years of service, I am very amazed by the rubber on the caliber to last that long, at least for the MB original, at such a harsh environment.

jftu105
 
I once had a brake failure. I was very lucky. Never again do I want to go thru that experience. When it comes to brakes buy the best parts available.

In most instances you get what you pay for. What’s your life worth?
 
Finally got back to this project. Got a repair kit for the rear window regulator. It costs $15 off eBay. Had to figure out a few things before this kit can work. Also did some enforcement to the window regulator so that it won't fail too easily. The ends of the wires meet in a casing. But the design is bad. Over time, the casing no longer hod the wires firmly and they popped out. At the junk yard, I went through 4 -5 of them and they all have the same failure. Anway, the window regulator at the rear, passenger side is in and works fine. Put the panel back. The seller took the panel off and lost several parts. Now I am missing a pocket on the panel and the light fixture. But they can wait.

Also did the fluid change of the power steering. The window washer reservior is leaking. Took it out and do some repairs. The seal to the sensors are bad. Reseal them and will see tomorrow if it works when sealer cures.

Will tackle the caliber, bleeding, tierods, center links, LCA boots, this week. It is getting closer.

jftu105
 

Attachments

  • IMG_3925.JPG
    IMG_3925.JPG
    865.7 KB · Views: 6
  • IMG_3928.JPG
    IMG_3928.JPG
    745.5 KB · Views: 6
Last edited:
By the way, where does this vaccum line (the little green tube) from the engine breather hose go? I need to reconnect it. For now, I block it.

Lifted up the air filter housing and found where it is connected to.

jftu105
 

Attachments

  • IMG_3927.JPG
    IMG_3927.JPG
    688.1 KB · Views: 8
Last edited:
The stupid Rockauto people did it again. The replacement caliber arrived today without damages but it is for the front left (driver side). The tag and box are all correct but the part is wrong. This is getting ridiculous. I had the old caliber taken off and the brake line opened. Put the new caliber in and then realized that the hose mounting hole and the bleeder screw both are pointing down, not up. Wrong Side. The old caliber seized. The piston is not moving. Therefore, even if I did not destroy the bleeder screw, I should replace it.

I don't know what to do with this stupid Rockauto thing. Two shipments, Two Mistakes!!!

I am going to take off the driver side too. If the right side seized, the left side is not going to be too good.

jftu105
 

Attachments

  • IMG_3967.JPG
    IMG_3967.JPG
    860.7 KB · Views: 5
  • IMG_3969.JPG
    IMG_3969.JPG
    785.7 KB · Views: 5
No longer have confidence in Rockauto to ship the right caliber to me. I returned the part and request a full refund. Also sent a complaint to their customer service. You can't even talk to anybody over their. I guess this is how they keep the cost low.

Removed the left side caliber too. Also seized.

I think I will replace both rotors and pads. Give them brand new lives.

Went to local O'reilly and order both sides of calibers and they would be here after 1:50 tomorrow. It would cost a lot more and I will see the quality before I pay for them.

Also removed the nuts of the tierods, both sides. The tierods are seized too. Center link is loose.

The previsous owners should be ashamed to let the car condition to go this bad, while spending money on the speakers and AMG wheels.

jftu105
 
Jftu105 I feel your pain, I had the same thing happen several times with Partsgeek. I stopped ordering from them. I don't know whether it's the order entry system at these big online auto parts companies, the people at the warehouse or what?

My suggestion. Look up your car on O'Reillys website and find the caliper you need. Right down the part number of the caliper or take your iPad like I do to your local store. Most of the time O'Reillys will have the caliper at a local warehouse/store and you'll have it later that day or the next. I didn't mention the 3 other national stores, Autozone, Advance, or NAPA only b/c I've had good luck with O'Reillys. You could certainly try the other stores. Good luck. Start a conversation with me for more info.
 
HaHa jiftu105 you must have hit send while I was typing I'll been interested in what you think of the OReillys calipers. As I mentioned before, I've have O'Reillys calipers on 1/2 dozen Benzes.
 
Got a lot done today. Calibers from O'Reilly arrived as promised. Cleaned up the old brackets and they fit nicely. Before the calibers arrived, I did the tierods replacements for both sides and did the rebooting for the driver side lower control arm. Will do the center link tomorrow or later. Calibers got in without incidents and did the bleeding. Just used up all the brake fluid. Will get another liter and do another round of bleeding later. The brakes feel good, firm and stop with authority.

The entire brake system almost renewed with four new brake rotors, two new calibers, new hard tubes in the back, and all new pads.

Lots pictures to share.

This is the first time I serviced a floating brake caliber. I kind of like it as it is simple. The fixed caliber has two pistons and probably have better performance.

jftu105
 

Attachments

  • IMG_3970.JPG
    IMG_3970.JPG
    781.7 KB · Views: 13
  • IMG_3971.JPG
    IMG_3971.JPG
    906.3 KB · Views: 13
  • IMG_3972.JPG
    IMG_3972.JPG
    911.4 KB · Views: 13
  • IMG_3973.JPG
    IMG_3973.JPG
    906.9 KB · Views: 13
  • IMG_3974.JPG
    IMG_3974.JPG
    788.3 KB · Views: 12
  • IMG_3975.JPG
    IMG_3975.JPG
    780.3 KB · Views: 11
  • IMG_3976.JPG
    IMG_3976.JPG
    786.3 KB · Views: 12
  • IMG_3977.JPG
    IMG_3977.JPG
    797.5 KB · Views: 12
  • IMG_3979.JPG
    IMG_3979.JPG
    778.7 KB · Views: 13
  • IMG_3980.JPG
    IMG_3980.JPG
    716.6 KB · Views: 10
  • IMG_3981.JPG
    IMG_3981.JPG
    1.1 MB · Views: 10
  • IMG_3982.JPG
    IMG_3982.JPG
    686.2 KB · Views: 11
  • IMG_3983.JPG
    IMG_3983.JPG
    1.1 MB · Views: 10
  • IMG_3985.JPG
    IMG_3985.JPG
    796.2 KB · Views: 11
  • IMG_3984.JPG
    IMG_3984.JPG
    1.2 MB · Views: 13
Last edited:
Whew!

I think I am done with the first stage of work, mainly all underbody work has been completed except the subframe bushings, which can wait.

Did the center link and damper today. Not too bad, just hard work, with cramped space and large torque needed. The Snapon offset tool proves its worth again.

Then, did the transmission shift link bushings. Those little nylon pieces are long gone. The specialty tool proves it worth. The hardest part is to put the end locking spring in. The new design is good and you can just push it in, but the original one is a killer to put on. While under the car, noticed that the vacuum tube to the transmission fell off. Reconnected it and now the shifting is smooth.

Also did the coolant flush. Dirty green, but not brown.

Finally, attached the fuel hose from the filter to the sending tube to front. The hose failed on me once, so I have spares and replaced it for all my cars. This hose is so rusty and the filter looks acient but was replaced perhaps 7, 8 years ago. One of the holding bolts for the cover was twisted off when I tried to unscrew it. Had to use the liquid steel and attach one bolt in place.

During coolant flush, the fuel ran out completely during idling. Therefore, it is a good timing to do the fuel hose and filter.

From here, a few things are still needed. I will get the muffler welded and then do the subframe bushing (probably paid to get it down if the cost is not too high). I can feel clinks when going from forward to reverse or vise versa.

Will get a liscence plate and insurance. From there, I can drive to have a few things done at the shop.

Too much work really. See my earlier to do list. I have updated what I have done and what are still to be done.

jftu105
 

Attachments

  • IMG_3986.JPG
    IMG_3986.JPG
    667.2 KB · Views: 4
Last edited:
Did not do much today. Did a DIY alignment for the toe-in. It turned out quite nice. The steering wheel is centered and the car stays straight. Also did another round of coolant flushing and put in a bottle of pentofreeze. Finally, did a duty cycle adjustment based on the description by H.D., THE guru of KE-JETRONIC. Adjusted the bias of the duty cycle to be slightly less than 50% (47% per H.D.)+-4%. It was a bit confusing because my DMM measures the ON cycle, not the Off cycle at the VAC setting. I had to do some conversions. The KE-JETRONIC does engage in closed-loop control and the idling is smooth and steady. The lambda control is correct. This is similar to seeing the O2 control of M104 via Hfmscan in about 0% +-4%. In fact, in the past, when I said the engine is running lean at 6%, I was mistaken. The engine is running fine, just the bias shifted by 6%. When the bias shifted over 20%, then the engine is no longer running correctly.

The oxygen sensor was checked fine, switching promply. At idling, it is a bit lean biased, but in acceleration, the voltages goes over 0.75 V. I will keep it. It is a three wire sensor and I will splice a four wire in. The ground will be shared for the signal and the heater ground.

Finally, I have a question and I hope I can get some answers. In my E320's, 1994-5, the shifting from P to R or R to D is smooth with not much RPM change. However, with this 300E, it is idling about 800 RPM at P. When I shift from P to R, the RPM goes down to about 600 RPM and engages, with some nice push or a little thud. If I shift from R to D, passing through N, the RPM will go up to 800 RPM and then comes down to 600 RPM and the thud to engage, after about one second, even if I shift the lever quickly to position. It is kind of annoying. I don't know if this is typical of M103 or this is a sign of transmission troubles. At D, shiftings from 1st to 2nd, and to 3rd are all smooth. At R, it reverses properly. Transmission fluid and filter are replaced.

Thanks in advance.

jftu105
 
Last edited:
I think I am done with this project. The rest of work would be mundane, not worth reporting.

I got the subframe bushing done today. This has to be the hardest 2-bolt job I have ever done. Just two bolts with ample space to worth with, but they are so locktighted and the broken bushing was even worse. I had to break it "loose" with over 3 feet extension with my snapon offset tool 19 mm. After that, it is still over 80, 90 ftlb torque to get it loose, for at least 10 more turns. I could only turn 30 degrees each time. You do the math. It is like going to the gym for weight lifting under the sun.

If removing the bolt was tough, the removal of the subbushing was brutal. I had to improvised so many things and finally pressed the center rubber out, with my bicycle hitch ball joint and a stainless steel cup. Actually, before that I had to get the center metal out with my tie-rod tool. Finally, I just destroyed the left over metal shell to get it out.

Putting back the bushing actually went smoothly. But I had to bolt it twice because the rear bushing won't go in properly. It turned out a piece of broken rubber got into the middle. Anyway, finally got them all together and did a test drive. It does make a big difference, as I don't hear the clunk in the back anymore. Finally, wihtin our subdivision (not going out without a liscence plate and insurance), I managed to go up to 40 mpg. Nice and tight. Or you may say

SPORTY!!!

Thank you all for the advices and "likes". It makes the restoration more sufferable. But please smack me at the head if I want to do something like this again. Almost 50 things, big and small, to this point. The muffler is the last big job but it is a shop job.

jftu105
 

Attachments

  • IMG_3987.JPG
    IMG_3987.JPG
    678.5 KB · Views: 13
  • IMG_3988.JPG
    IMG_3988.JPG
    585.4 KB · Views: 14
  • IMG_3989.JPG
    IMG_3989.JPG
    283.5 KB · Views: 14
  • IMG_3990.JPG
    IMG_3990.JPG
    1.2 MB · Views: 16
  • IMG_3991.JPG
    IMG_3991.JPG
    1.1 MB · Views: 16
  • IMG_3992.JPG
    IMG_3992.JPG
    1.2 MB · Views: 15
  • IMG_3993.JPG
    IMG_3993.JPG
    1 MB · Views: 15
Last edited:
Here are the things I have done so far,

1. Fender
2. Headlights
3. Turning signals
4. Center brake light
5. Arm rest
6. Interior cleaning
7. Brake hoses and hard tubes, brake fluid flushing
8. Engine oil/filter
9. Transmission fluid/filter
10. Hood open puller
11. Washing and waxing
12. Four 16 inch tires
13. Engine mounts
14. Hood pad
15. Air filter.
16. Instrument cluster fixed, fuse #5 was burned
17. Blower fan (AC fan) fixed, 30A fuse blown. The fan needed lubrication. Add some MOS2 to the bearings.
18. AC works.
19. Blower area and evaporator cleaned.
20. Added the two missing rubber straps in the engine compartment
21. Cleaned the draining holes. Add a DIY draing tube on the driver side under the windshield.
22. Two rear rotors and pads
23. Rear passenger side window regulator
24. Steering fluid and filter
25. Windshield damaged during repair. Tempararily repaired to stop crack from advancing.
26. Windshield fluid reservoir leaking. Resealed and works now.
27. Vacuum tube repair and hoses replacements
28. Deodoring, cigerette smell
29. Front calibers, bleeding.
30. Rotors and pads.
31. Driver side LCA rebooting.
32. Two tierods.
33. Drive side window control switch defect. Replaced with a spare.
34. Add some silicon to the hard tube to hold it to the chasis to avoid vibration during driving.
35. Transmission shift link rubber bushings
36. Center link and damper.
37. Coolant flush.
38. Transmission shift harshness tuning, a disconnected vacuum tube reconnected.
39. Fuel filter
40. Fuel hose, from the fuel pump (so rusty)
41. Fixed one holding bolt for the fuel pumps/filter cover.
42. Add the missing bottom cover under the engine
43. Battery
44. Transimission shift knob (the sportline tag lost). Did a DIY patching. At least it does not look so ugly.
45. Open all the drain holes in the engine compartment and the trunk.
46. O2 sensor checked out fine.
47. Engine fine tuning, duty cycle adjustment, closed-loop control fine
48. DIY Alignment after tierods and center link replacement
49. Subframe bushings (got the parts from MBoemparts.com)
50. Spark plugs H9DC0 new and chased the threaded hole. Much better engine performance.
51. Exterior light control module. Tailights not working properly.
52. Windshield wiper replacement and nozzle adjustment.
53. Belt tensioner and belt replacement.
54. Viscous fan clutch
55. Air filter housing fixture repair.
56. AC control unit light bulbs, both burned
57. Fuel injector cleaner
58. Muffler welding, done by a nice welding shop for just $66, beautifully done.
59. Replace all weak muffler hangers.
60. Central locking system repaired
61. Drive side front door panel repair and refit.
62. Air pump cap
63. Rear passenger side ashtray cover and light
64. Differential fluid change
65. AC top up.
66. Distributor new
67. Coil new
68. O2 sensor new
69. Air/fuel ratio tune-up
 
Last edited:
The typical issue with floating calipers is the loss of lubrication on the sliding mechanism which then leads to asymmetrical wear of pads and rotors as well as slightly diminished braking force.
You have done a yeomans job of bringing back a rare car in a rare/nice color. Enjoy it!

drew
 
I got the subframe bushing done today. This has to be the hardest 2-bolt job I have ever done. Just two bolts with ample space to worth with, but they are so locktighted and the broken bushing was even worse. I had to break it "loose" with over 3 feet extension with my snapon offset tool 19 mm. After that, it is still over 80, 90 ftlb torque to get it loose, for at least 10 more turns. I could only turn 30 degrees each time. You do the math. It is like going to the gym for weight lifting under the sun.
BT, DT. Miserable by hand, and I have done it many times. Using an impact wrench makes it a breeze... impacts almost all the way out (i.e., it doesn't just impact to break loose and then spin out quickly; it's tight ALL the way out).


If removing the bolt was tough, the removal of the subbushing was brutal. I had to improvised so many things and finally pressed the center rubber out, with my bicycle hitch ball joint and a stainless steel cup. Actually, before that I had to get the center metal out with my tie-rod tool. Finally, I just destroyed the left over metal shell to get it out.
Yep, more often than not, I've had the same experience... worst part of the job is chiseling out the metal shell. I think maybe ONCE out of six or eight cars, the bushing came out intact. Thankfully this is a once-per-ownership job. Nice work!

:sawzall:
 
I contemplate over acquiring an impact wrench but never do it. I do have impact drivers for small screws.

At junk yards, I have seen people with impact wrenchs (1000 ft-lb) and they remove wheels like they are nothing. I actually did an analysis on impact wrench and the whole principle is about conservation of momentum (angular or linear). In fact, it is the same principle of hitting a tennis ball, base ball, or a golf ball.

One funny question for entertainment. Why you can tear a piece of toilet paper off and the whole roll stays in place when you tear it quickly? But if you pull the toilet paper slowly, then you just unroll the whole roll without tearing it.


jftu105
 
Last edited:
I contemplate over acquiring an impact wrench but never do it.
Get one. You'll kick yourself for not doing it sooner. I used air impact for over 2 decades before finally picking up a Milwaukee M18 FUEL "mid-torque" cordless impact in May 2019 during a killer sale. I wish I had gone electric sooner; it does 90% of what the air can do, with 3x the convenience. I rarely need the air impact any more. The impact also makes short work of flex disc bolts, axle shaft bolts, and pretty much anything suspension related.

More discussion on the Milwaukee impact is in this thread, start at post #4 and read down:
https://www.500eboard.co/forums/ind...r-best-buy-diy-garage-tools.11758/post-167005

:banana2:
 

Who has viewed this thread (Total: 1) View details

Who has watched this thread (Total: 2) View details

Back
Top