Navigation
Install the app
How to install the app on iOS
Follow along with the video below to see how to install our site as a web app on your home screen.
Note: This feature may not be available in some browsers.
More options
Style variation
-
Hi Guest !
Welcome to the 500Eboard forum.
Since its founding in late 2008, 500Eboard has become the leading resource on the Internet for all things related to the Mercedes-Benz 500E and E500. In recent years, we have also expanded to include the 400E and E420 models, which are directly related to the 500E/E500.
We invite you to browse and take advantage of the information and resources here on the site. If you find helpful information, please register for full membership, and you'll find even more resources available. Feel free to ask questions, and make liberal use of the "Search" function to find answers.
We hope you will become an active contributor to the community!
Sincerely,
500Eboard Management
You are using an out of date browser. It may not display this or other websites correctly.
You should upgrade or use an alternative browser.
You should upgrade or use an alternative browser.
Yes I notice that the overflow tank is full.That is one 'full' overflow tank!
Will you be stripping the interior out completely?
But I don't know it's shud be full or empty
The overflow house is bad
It's will be replaced

Coolant overflow tank should be empty. Drain the tank, rinse it out, and replace the rubber hose.Yes I notice that the overflow tank is full.
But I don't know it's shud be full or empty
That is the pressure accumulator for the ASR system.I found this on left wing
It's something to do with abs??
Generally speaking, it should be empty. I would remove and empty it. It is an OVERFLOW tank from the coolant EXPANSION tank. Basically a last-ditch tank so that coolant does not leak onto the ground.Yes I notice that the overflow tank is full.
But I don't know it's shud be full or empty
The overflow house is bad
It's will be replaced
If the overflow tank has liquid in it, the cap may have been bad, or the main tank was overfilled, or the car got REALLY hot at some point.For the overflow tank to be that full there has to be something wrong. Maybe the radiator coolant cap is bad and not holding the pressure?
OR, any combination of the above.

I agree with youIf the overflow tank has liquid in it, the cap may have been bad, or the main tank was overfilled, or the car got REALLY hot at some point. Or, any combination of the above.
The water tank has been replaced in the past and the car comes from hot climate Japan
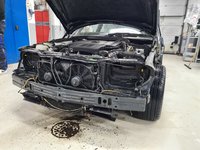
Went to the workshop to work with the E500
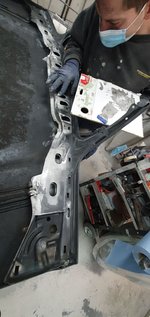
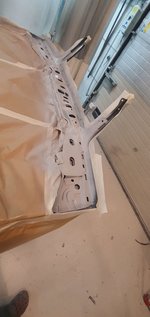
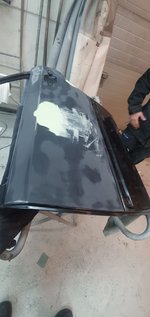
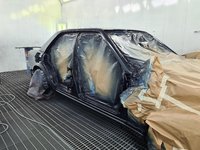
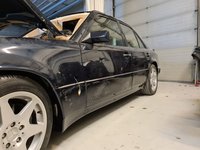
I have cleaned all surfaces of sand and dirt, before starting paint job.
Pictures before and after
I have cleaned all surfaces of sand and dirt, before starting paint job.
Pictures before and after
Attachments
-
 20201226_155506.jpg2.7 MB · Views: 30
 -
 20201226_155510.jpg2.4 MB · Views: 27
 -
 20201226_155515.jpg2.3 MB · Views: 25
 -
 20201226_155517.jpg2.3 MB · Views: 25
 -
 20201226_155521.jpg2.6 MB · Views: 25
 -
 20201226_155526.jpg2.2 MB · Views: 23
 -
 20201226_155530.jpg2.1 MB · Views: 24
 -
 20201226_155534.jpg2.2 MB · Views: 25
 -
 20201226_155539.jpg2.1 MB · Views: 25
 -
 20201226_155951.jpg3.4 MB · Views: 25
 -
 20201226_155957.jpg3.1 MB · Views: 24
 -
 20201226_173012.jpg2.6 MB · Views: 24
 -
 20201226_173017.jpg2.6 MB · Views: 26
 -
 20201226_173023.jpg2.5 MB · Views: 29
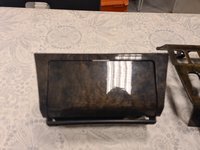
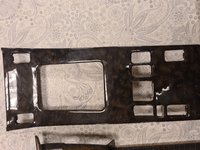
Has contacted a Polish company that refurbished the wood.
Dismantled all wood panels these will be sent to Poland tomorrow, takes about 2 months too refurbished , and the company gives a 10 year warranty.
See link

 renowacja.wixsite.com
Photos before restoration
Dismantled all wood panels these will be sent to Poland tomorrow, takes about 2 months too refurbished , and the company gives a 10 year warranty.
See link
Mercedes Renowacja
Renowacja elementów drewnianych do samochodów klasycznych: Mercedes-Benz, Ferrari, Rolls Royce etc.
Photos before restoration
Attachments
-
 20210103_145049.jpg1.1 MB · Views: 8
 -
 20210103_145053.jpg1.8 MB · Views: 9
 -
 20210103_145101.jpg2.2 MB · Views: 10
 -
 20210103_145109.jpg2.5 MB · Views: 8
 -
 20210103_145130.jpg3.3 MB · Views: 9
 -
 20210103_145133.jpg2.4 MB · Views: 8
 -
 20210103_145136.jpg2.1 MB · Views: 7
 -
 20210103_145140.jpg1.8 MB · Views: 7
 -
 20210103_145143.jpg3.6 MB · Views: 7
 -
 20210103_145146.jpg2.2 MB · Views: 7
 -
 20210103_145150.jpg3.6 MB · Views: 7
 -
 20210103_145157.jpg2.1 MB · Views: 9
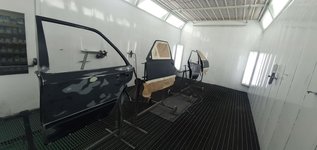
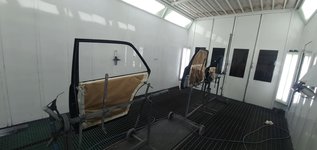
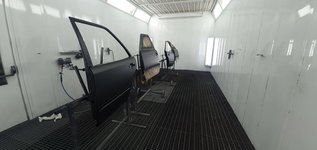
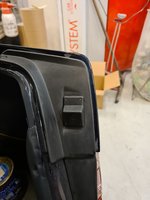
Work progress on engine hood and the doors
Attachments
-
 IMG-20210104-WA0012.jpg138.5 KB · Views: 18
 -
 IMG-20210104-WA0013.jpg126.3 KB · Views: 19
 -
 IMG-20210104-WA0014.jpg133.1 KB · Views: 18
 -
 IMG-20210106-WA0002.jpg132.8 KB · Views: 17
 -
 IMG-20210106-WA0003.jpg141.3 KB · Views: 17
 -
 IMG-20210106-WA0004.jpg131.5 KB · Views: 17
 -
 IMG-20210106-WA0005.jpg130.3 KB · Views: 18
 -
 IMG-20210106-WA0007.jpg93.2 KB · Views: 18
 -
 IMG-20210106-WA0008.jpg106.3 KB · Views: 19
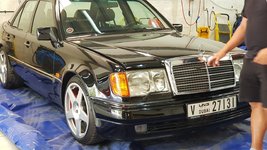
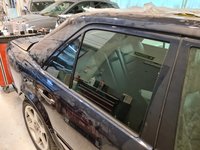
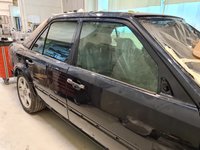
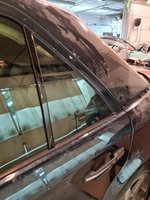
Kudos to you Skikar, this looks like a proper repaint with doors and fenders deinstalled and not just a quick respray! 
Are they also removing the glass? If they do then consider replacing the anodized trim pieces. I did that on my car and it looks so much nicer when the trim is dark and not shimmering in a silver/gold tone.
Excited to see how your car will turn out!
Are they also removing the glass? If they do then consider replacing the anodized trim pieces. I did that on my car and it looks so much nicer when the trim is dark and not shimmering in a silver/gold tone.
Excited to see how your car will turn out!
ThanksKudos to you Skikar, this looks like a proper repaint with doors and fenders deinstalled and not just a quick respray!
Are they also removing the glass? If they do then consider replacing the anodized trim pieces. I did that on my car and it looks so much nicer when the trim is dark and not shimmering in a silver/gold tone.
Excited to see how your car will turn out!
Yes I'm going to take out the front screen and the rear screen
I have have not considered to bye new trim but I will check out the parts are available at Mercedes
Is the trim standard for the w124?
Or maybe repainting them in glossy black or black I'm not sure
Do you have pictures of the new trim
Unfortunately some trim pieces are NLA, but they are identical to all other W124. I believe some members have painted them and were happy with it. I just got lucky and bought an almost full set two years ago (the rear window stay bars I had wrapped, as these haven't been available for quiet a while). Attached a before and after photo.Thanks
Yes I'm going to take out the front screen and the rear screen
I have have not considered to bye new trim but I will check out the parts are available at Mercedes
Is the trim standard for the w124?
Or maybe repainting them in glossy black or black I'm not sure
Do you have pictures of the new trim
Attachments
![[500Eboard] 2AA199EF-EE57-4977-841C-FC4BA7676732 (1).jpeg](/forums/data/attachments/121/121918-4b317712407c74eae1cdef78acede3ea.jpg?hash=SzF3EkB8dO)
![[500Eboard] C55D2095-A676-4998-9CDE-AB7811676014.jpeg](/forums/data/attachments/121/121920-ee0466180a987c4747709d4b39cfd2f9.jpg?hash=7gRmGAqYfE)
Last edited:
Wow, your car will turn out great!
Very nice work!!
I have seen these trims re-annodized (like from factory) instead of repainted on a W201. The owner had it done somewhere in Germany, but could not remember the companies name. Since it works on a W201, I don´t see a reason why it should not work on a W124...
Very nice work!!
I have seen these trims re-annodized (like from factory) instead of repainted on a W201. The owner had it done somewhere in Germany, but could not remember the companies name. Since it works on a W201, I don´t see a reason why it should not work on a W124...
You should be able to still buy the rear window surround, but everything else is NLA, I believe. Hopefully I'm wrongThat's looking very good
I will check with local Mercedes dealer tomorrow
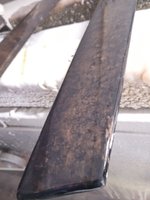
Hi. I would remove them all and paint them gloss black, I did this on my last 500E and it looked perfect. I'll also do the same on my E500 LTD when I replace the rear glass and the trims have to be removed. I will probably remove all the rear trim, the roof trim and the front windscreen trim. The only risk is the trim can get damaged when removed but if you are careful and patient it should be OK. Last time I checked with MB, indeed some pieces are NLA and if you are replacing them all, it would make sense to paint them all (or the alternative to source all new NOS parts from ebay/similar etc.) for consistency purposes. Makes a big difference to the car when this job is done IMO.
Hi BilalHi. I would remove them all and paint them gloss black, I did this on my last 500E and it looked perfect. I'll also do the same on my E500 LTD when I replace the rear glass and the trims have to be removed. I will probably remove all the rear trim, the roof trim and the front windscreen trim. The only risk is the trim can get damaged when removed but if you are careful and patient it should be OK. Last time I checked with MB, indeed some pieces are NLA and if you are replacing them all, it would make sense to paint them all (or the alternative to source all new NOS parts from ebay/similar etc.) for consistency purposes. Makes a big difference to the car when this job is done IMO.
Do you have pictures how its looks in gloss black ?
I have contacted the local Mercedes dealer today
The upper trim for the front screen its out of stock
I dont now the parts nr is correct
1-A1246782237 In stock (Rear glass weatherstrip, bottom)
2-A1246781930 In stock (Rear glass trim, left side)
3-A1246782030 In stock (Rear glass trim, right side)
4-A1246784237 In stock (Rear glass trim, top/center connector) - MBCC shows NLA
5-A1246700708 In stock (Rear glass weatherstrip, left side)
6-A1246700808 In stock (Rear glass weatherstrip, right side)
7-A1246702722 NLA (Front windshield top trim)
8-A1246906762 NLA (Roof rail / front windshield trim, left side)
9-A1246906862 NLA (Roof rail / front windshield trim, right side)


Yes, those PN are correct and their availability also sounds right, with only the pieces around the rear window available...I have contacted the local Mercedes dealer today
The upper trim for the front screen its out of stock
I dont now the parts nr is correct
1-A1246782237 In stock (Rear glass weatherstrip, bottom)
2-A1246781930 In stock (Rear glass trim, left side)
3-A1246782030 In stock (Rear glass trim, right side)
4-A1246784237 In stock (Rear glass trim, top/center connector) - MBCC shows NLA
5-A1246700708 In stock (Rear glass weatherstrip, left side)
6-A1246700808 In stock (Rear glass weatherstrip, right side)
7-A1246702722 NLA (Front windshield top trim)
8-A1246906762 NLA (Roof rail / front windshield trim, left side)
9-A1246906862 NLA (Roof rail / front windshield trim, right side)
There are two more items (right and left) on the rear door 124-730-10-19 and 124-730-09-19.
I don't have any close ups unfortunatelyHi Bilal
Do you have pictures how its looks in gloss black ?

This is the best I can do.
Attachments
-
 Screenshot_20210109-175500_Gallery.jpg1.1 MB · Views: 12
 -
 Screenshot_20210109-175422_Gallery.jpg720.5 KB · Views: 13
 -
 20190629_095443.jpg3.2 MB · Views: 16
 -
 20190727_111141.jpg3.4 MB · Views: 14
 -
 20190629_105242.jpg4.2 MB · Views: 12
 -
 20190622_102319.jpg4.3 MB · Views: 11
 -
 20190727_111156.jpg3.3 MB · Views: 10
 -
 20190629_105256.jpg1.4 MB · Views: 11


Small update
All doors er prepare before painting
All doors er prepare before painting
Attachments
-
 IMG-20210111-WA0003.jpg117.8 KB · Views: 12
 -
 IMG-20210112-WA0000.jpg102.2 KB · Views: 10
 -
 IMG-20210112-WA0001.jpg92.1 KB · Views: 10
 -
 IMG-20210112-WA0002.jpg116.4 KB · Views: 10
 -
 IMG-20210112-WA0004.jpg63.1 KB · Views: 10
 -
 IMG-20210112-WA0005.jpg95.6 KB · Views: 10
 -
 IMG-20210112-WA0006.jpg94.5 KB · Views: 9
 -
 IMG-20210112-WA0007.jpg99.6 KB · Views: 9
 -
 IMG-20210112-WA0008.jpg92.8 KB · Views: 9
 -
 IMG-20210114-WA0002.jpg126.3 KB · Views: 10
 -
 IMG-20210114-WA0003.jpg112.1 KB · Views: 9
 -
 IMG-20210114-WA0004.jpg124.3 KB · Views: 8
 -
 IMG-20210114-WA0005.jpg154.6 KB · Views: 10
 -
 IMG-20210118-WA0009.jpg84 KB · Views: 9
 -
 IMG-20210118-WA0010.jpg95.7 KB · Views: 9
 -
 IMG-20210119-WA0000.jpg121.8 KB · Views: 11
 -
 IMG-20210119-WA0001.jpg126.2 KB · Views: 11
 -
 IMG-20210119-WA0002.jpg103.3 KB · Views: 9
 -
 IMG-20210119-WA0003.jpg114.8 KB · Views: 9
 -
 IMG-20210119-WA0004.jpg155.5 KB · Views: 9
 -
 IMG-20210119-WA0005.jpg107.1 KB · Views: 9
 -
 IMG-20210119-WA0006.jpg102.6 KB · Views: 9
 -
 IMG-20210119-WA0007.jpg157.5 KB · Views: 11
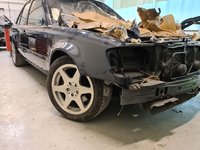
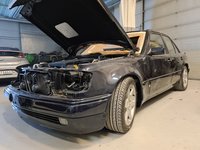
Have worked a lot with the car lately.
I am very pleased that the car is almost rust free and very little dents in the body.
Found some mall dents.
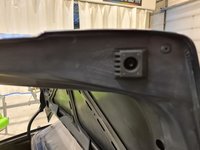
Will weld hole in the roof after the roof antenna.
Doors and hood are laid with Primer filler.
Are there other things I should think about before the car is to be painted
I am very pleased that the car is almost rust free and very little dents in the body.
Found some mall dents.
Will weld hole in the roof after the roof antenna.
Doors and hood are laid with Primer filler.
Are there other things I should think about before the car is to be painted
Last edited:
Update on the car
Car is ready for next stage
The body have black primer.
Car is ready for next stage
The body have black primer.
Attachments
-
 IMG-20210129-WA0005.jpg176.5 KB · Views: 12
 -
 IMG-20210129-WA0004.jpg188.3 KB · Views: 10
 -
 IMG-20210129-WA0003.jpg179.1 KB · Views: 9
 -
 IMG-20210129-WA0007.jpg111.1 KB · Views: 9
 -
 IMG-20210129-WA0006.jpg144.6 KB · Views: 9
 -
 IMG-20210129-WA0008.jpg138.8 KB · Views: 9
 -
 IMG-20210129-WA0009.jpg124.9 KB · Views: 9
 -
 IMG-20210129-WA0010.jpg106.7 KB · Views: 9
 -
 IMG-20210129-WA0011.jpg162.6 KB · Views: 10
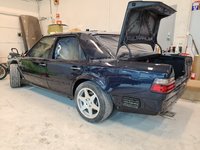
The car painted today
Fresh paint is always good
More pictures to come
Fresh paint is always good
More pictures to come
Attachments


Last edited:
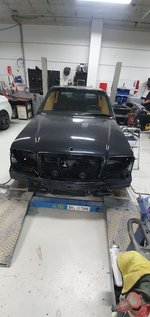
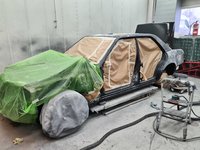
Then the car is painted, but the doors and hood are left, and small part's
We have tried to paint the panels the same as it came out of the factory
We have tried to paint the panels the same as it came out of the factory
Attachments


We have painted inside the hood and trunk lid with Code 7021 Graphite Blue like from the factory
Attachments


Inside the front fenders we apply with raptor paint to protect the car
Attachments


Getting there slowly
I have removed the tinted film from rear windows
The car looks much nicer and the green shade of the glass enhances the blue color of the car
I have removed the tinted film from rear windows
The car looks much nicer and the green shade of the glass enhances the blue color of the car
Attachments


Yes we have painted glossy blackDid they paint all your anodized trim? Looks like it judging from you window stay bars- nice!
Thanks
More assembly today
rear bumper completed
All of chrome pieces are cleaned and polished with Autosol polish.
New hood isolation
Rear lights are polished with glass polish from Autoglym the result is very good
rear bumper completed
All of chrome pieces are cleaned and polished with Autosol polish.
New hood isolation
Rear lights are polished with glass polish from Autoglym the result is very good
Attachments


Found a solution for the headlamp lenses
I bought chrome 3m wrap for cars
3m wrap is heat resistant
First steep was as to sand the plastic frame down.
This is the result
Not 100 % but much better than before
I bought chrome 3m wrap for cars
3m wrap is heat resistant
First steep was as to sand the plastic frame down.
This is the result
Not 100 % but much better than before
Attachments


Last edited:
I get some update from the company ho restore the wood
The wood is not finished yet
The wood is not finished yet
Attachments


Kashif - you have done a great job with your Limited!Is this factory-fitted equipment
E500 limited sticker where can i find or order this
parts nr ??
View attachment 96114

That picture of the E500 Limited badge looks familiar to me, probably from my ex. Limited? I have seen the badge in several Limiteds and to my understanding it is an original item. I scored a brand new one several years ago, but it doesn't carry any part number and the packing was gone. The badge is not for sale, sorry, or at least not yet.
That shifter console panel shown in your post #164 has a strange wood pattern, are you sure it is original birdseye maple wood? In your post #196 showing the resto work, it appears more correct though. I'm just wondering.
Thanks alot! ArntKashif - you have done a great job with your Limited!
That picture of the E500 Limited badge looks familiar to me, probably from my ex. Limited? I have seen the badge in several Limiteds and to my understanding it is an original item. I scored a brand new one several years ago, but it doesn't carry any part number and the packing was gone. The badge is not for sale, sorry, or at least not yet.
That shifter console panel shown in your post #164 has a strange wood pattern, are you sure it is original birdseye maple wood? In your post #196 showing the resto work, it appears more correct though. I'm just wondering.
Yes the shifter console has been fixed or restored in wrong pattern when the car was in Japan
Is it possible to take a good picture of the badge Arnt
Similar threads
- Replies
- 4
- Views
- 619
- Replies
- 316
- Views
- 21,380