I'm going to install the rear H&R springs on my wagon this weekend and want to make sure I understand how to adjust the SLS. If those in the know could look at this and tell me if I am correct or totally out of the ballpark.
500AMM I hope you don't mind me borrowing your photo.
No problem at all, I'm glad they can be of any help.
So, it sound like I have to rotate the bottom nut, extend the rod, cinch the lower nut and leave the two middle bolts alone. Not looking to slam it just give it a little lower stance and match the springs.
Ken,
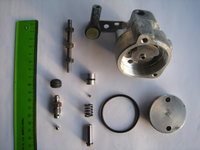
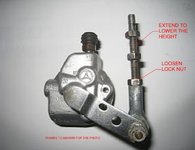
If you look closer at the lower ball socket it is marked with R, which means
rechts (right) and normal threads. If you look closer at the upper lock nut you see a vertical slotted mark on it, which indicates that it is the
links (left) threaded end of the adjustment rod. Post #53, image #1
The car has to rest on the wheels in normal position when you do the adjustment. So if the car has been on a lift or jacked up partly to get access for work, it has to be lowered and
rolled back and forth to normalise the wheel position so the car is resting normally. I prefer to use a bridge lift for this.
- hold the 10mm key on the welded nut in center of the adj.rod
- losen the locking nuts on both ball sockets, and turn them towards center so they clear
- start the car and let it idle
- to lower the car you turn the adj.rod clockwise, which means you extend the free length
- turn until you notice a movement on the car, it is no danger with this and you can turn as fast or slow as you like
- but you need a ruler or something to measure the movement against a reference point on the car, while you adjust
- if you don't notice any lowering, turn the adj.rod the other way to see if the car elevates
- then adjust it down again
- at the point where the lowering stops, is the car resting on the springs
You may risk to extend the adj.rod too far so it comes free from the ball sockets, but nothing happens of that reason. But it will be some fiddling to get it to engage in both ball sockets at the same time again. So calm down, take a coffee, concentrate, and no kids, pets or woman around.
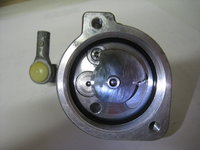
If you end up with a wanted height that leave the car resting on the springs, which I think you may do with new H&R springs, you have to adjust the rod so the lever on the valve is in neutral position, shown in post #53, image #8, last photo. The lever is aligning with a hole in the valve, and you can see I have used a screw on the photo to keep it there during assembly.
Then it is out for just a short test drive so it settles a bit, followed by checking the ride height.
If you are lowering the car 15-20mm, I would recommend to loosen the inner bolts on the LCA to release the twist in the bushings.
Happy wrenching!
")
Cheers
-a-