Navigation
Install the app
How to install the app on iOS
Follow along with the video below to see how to install our site as a web app on your home screen.
Note: This feature may not be available in some browsers.
More options
Style variation
-
Hi Guest !
Welcome to the 500Eboard forum.
Since its founding in late 2008, 500Eboard has become the leading resource on the Internet for all things related to the Mercedes-Benz 500E and E500. In recent years, we have also expanded to include the 400E and E420 models, which are directly related to the 500E/E500.
We invite you to browse and take advantage of the information and resources here on the site. If you find helpful information, please register for full membership, and you'll find even more resources available. Feel free to ask questions, and make liberal use of the "Search" function to find answers.
We hope you will become an active contributor to the community!
Sincerely,
500Eboard Management
You are using an out of date browser. It may not display this or other websites correctly.
You should upgrade or use an alternative browser.
You should upgrade or use an alternative browser.
W124 500TE Project - Lets do this!
- Thread starter jaymanek
- Start date

The rear inner fenders were carefully cut and spliced into the section we removed from the 500E. This is what took the most time... Carefully cutting back until the panel fit perfectly.
Cool project by the way!
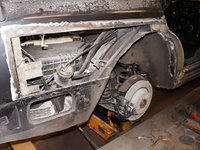
You seem to have a large gap at the sides of the firewall panels... where the wiring and pipes come through? Or it it angle of the picture?
I take it you have a donor 400/500E?
Cool project by the way!
You seem to have a large gap at the sides of the firewall panels... where the wiring and pipes come through? Or it it angle of the picture?
I take it you have a donor 400/500E?

Hello everyone!
Well its getting cold here in the UK now. Finding motivation to go out and tinker in these temperatures is challenging!
This week I don’t feel like I have accomplished that much. Mainly because I haven’t.
Just waiting patiently for the block to be ready. There are only little jobs I can do until I can carry on with the engine.
I did spend some time wiring for the stereo amp.
I will be fitting rainbow speakers all around and a 4 channel amp. I would like to fit a small sub, but there is very little room anywhere, so will see about that later. Maybe a couple of those little ones that fit under the seats.
Seems daft to be wiring in the stereo when we don’t even have an engine, but its good to do this work now, as I have all the seats out. I can route the, quite chunky, wiring in the proper ducts. You cannot get into these ducts without removing the seats.
I also fitted all the hardware and seat belts for the folding rear kiddy seats. This car was only a 5 seater. Now the kids can beat each other up out of sight.
Chris has been busy preparing the right side rear quarter panel at his workplace.
The last real part of metalwork for Chris.
As with the widebody SEC project, the fuel filler area is the tricky thing to get right.
The saloon fuel filler is high up, above the flared arches.
On the estate the fuel filler door is low down and so we must find residence for it on the 500E panel.
So many get rush these little details and get it wrong. Chris has taken his time to get this in the right place.
Chris has unpicked the inner bowl part of the fuel filler and married it to the 500E wing.

This is the quarter panel being prepared to accept the prepared 500E panel.

Test fit and adjustments being carried out

Some tack welds to hold the panel in position.

We can see some filler in that rear panel. Not great, but thankfully looks like there was only a small dent there which has been lazily repaired in the past.
This will be addressed when it gets to the body shop.
Well its getting cold here in the UK now. Finding motivation to go out and tinker in these temperatures is challenging!
This week I don’t feel like I have accomplished that much. Mainly because I haven’t.
Just waiting patiently for the block to be ready. There are only little jobs I can do until I can carry on with the engine.
I did spend some time wiring for the stereo amp.
I will be fitting rainbow speakers all around and a 4 channel amp. I would like to fit a small sub, but there is very little room anywhere, so will see about that later. Maybe a couple of those little ones that fit under the seats.
Seems daft to be wiring in the stereo when we don’t even have an engine, but its good to do this work now, as I have all the seats out. I can route the, quite chunky, wiring in the proper ducts. You cannot get into these ducts without removing the seats.
I also fitted all the hardware and seat belts for the folding rear kiddy seats. This car was only a 5 seater. Now the kids can beat each other up out of sight.
Chris has been busy preparing the right side rear quarter panel at his workplace.
The last real part of metalwork for Chris.
As with the widebody SEC project, the fuel filler area is the tricky thing to get right.
The saloon fuel filler is high up, above the flared arches.
On the estate the fuel filler door is low down and so we must find residence for it on the 500E panel.
So many get rush these little details and get it wrong. Chris has taken his time to get this in the right place.
Chris has unpicked the inner bowl part of the fuel filler and married it to the 500E wing.
This is the quarter panel being prepared to accept the prepared 500E panel.
Test fit and adjustments being carried out
Some tack welds to hold the panel in position.
We can see some filler in that rear panel. Not great, but thankfully looks like there was only a small dent there which has been lazily repaired in the past.
This will be addressed when it gets to the body shop.
Attachments


Chris spent all weekend welding and grinding, welding and grinding.. It gave me a headache and I was in the office.
Around 4pm on Sunday, Chris had to give up as all the grinding was causing pain in his hands. He has to have steroid injections for the pain.
Anyway, the panels are both on but both need a little more work to get the joins perfect. He will finish off in the coming days.
Threw some primer on just for protection from the elements.
Attachments

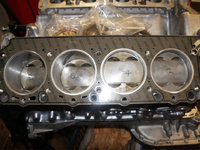
Well Serdi UK, the chaps who are treating the block with colgate extra silicony, had quoted two weeks turnaround.
I decided to take on the role of the annoying customer and rang them just over a week.
Well to my surprise they said, “yep, its just coming off the line now and its ready.”
So our TJ was despatched to Middlesex expediently in the company jet.
The block is now back here and I hope this is the correct finish we are looking for???!
Our A170 CDI did not fare so well. It seems a pulley or possibly the timing chain is rattling away very loudly and TJ barely made it back. 43K miles the car has done.. Whats that cheesy quote? They don’t make em….. Ah well, a job for tomorrow.
The charge for this work was very reasonable at £30 + VAT per cylinder.
I now have something to get my teeth into again…
Attachments


Hi All,
I dont think this engine wants to go back in the car. I have another slight set back.
I installed the new chain, guides etc. Turned the engine by hand a few times and everything spot on. My 6mm "factory tools" nicely drop into place when crank is at 45 before.
Then tonight I installed the timing case cover with new O rings and using the usual Mercedes sealant that I keep. This is the stuff recommended for timing covers, its sticky, tacky and never really goes hard.
Then I installed the oil pump, upper pan and lower pan. I have a question about sealant so will start a thread on that.
All good.
I rotate the engine back around on the stand to its normal position and start packing tools away for the night.
I notice a rubber O ring perched on the camshaft pulley.
Took me a moment but I realised what happened.... I may have cursed a couple of times.
So now I need to undo all that work. This is not the problem. The problem is I have to wait for new sump gaskets from Mercedes which im sure will be a 2-3 day order.
GRRRRR.
Yes, yes, im glad I noticed it now rather than once installed, but I think this engine is really trying to get me back for messing with it.
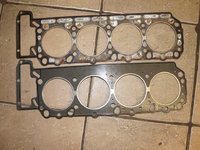

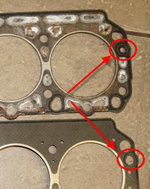
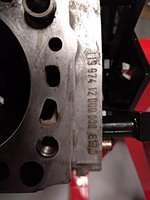
there are more... ill give you a clue. i only noticed when trying to bolt in the timing case cover.
Yes that's a biggie! The bolt holes don't match up. Are there different gasket PN's available? Could it be you have one from a earlier or later m119?
 Gen-U-Whine gaskets yes?
Its my fault.
There are two gasket versions for the left. Early or Late.
I ordered early gaskets for both sides as everything for this car is the early version.
On the right head gasket there are three choices and I didnt notice that mine is the "middle" version.
5 day order from Germany.
There are two gasket versions for the left. Early or Late.
I ordered early gaskets for both sides as everything for this car is the early version.
On the right head gasket there are three choices and I didnt notice that mine is the "middle" version.
5 day order from Germany.
I know.. Had these gaskets here for months now too.
It happens to the best of us! I have shelves filled with parts that didn’t fit and too late to return....
 The engine cylinders look great now BTW – it’s coming together nicely! Great work. Do you intend to fully respray the car? Or blend the paint if the rest of it is still decent?
The whole car is being painted including the door shuts.
The loose plan was to get the engine in and running in the next week or two.
The bodyshop say they can work on the paint over the Christmas period which is normally quiet for them.
However it seems like I am having to do everything twice at the moment so we will see how that plan goes!
I certainly do not want to paint the car until the engine is in and running.
I completely missed the timing cover bolt pattern.
This also solves the mystery as to why the right cylinder head, gasket, AND timing cover are all different for .974 engines up to #1893.
Affected engines would have been very early builds, 1990-1991 and very, very early 1992 USA model year. The change would have been approximately in September 1991.
Small world. One of my engines is 5031, only six away from yours! And yep, it's the "middle" range.Mine is engine no 5037.
The late gaskets were for the switch to open-deck blocks (early/mid 1994 production dates).

This was the engine when I was timing it up. I then had to pull the right head gasket back off so now its all off again.
Question:
The freewheel pulley that wedges between the timing cover and block. Any special grease recommended here? I find it odd that there is no special surface here for the pulley to spin on.
Question:
The freewheel pulley that wedges between the timing cover and block. Any special grease recommended here? I find it odd that there is no special surface here for the pulley to spin on.
Attachments

You mean the center chain drive sprocket? It is lubricated by oil pressure, supplied by a bore in the block directly to the main oil galley (direct below the sprocket in your photo) flowing through the hollow shaft and then reaching the outer flange to lubricate.
Last edited:
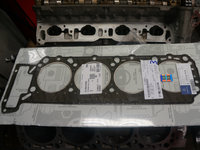
Yay the head gasket has arrived! So today spent some time and put the head back on.
Then I resealed the timing case cover with the correct orange sealant, part number A0019898920/10.
Once this was on I reinstalled the oil pump, oil level sensor and finally the bottom sump.
There is debate on whether to use sealant with the paper gasket here or not. I decided to go with the Mercedes instructions and went with a thin layer at the back end of the block.
Mercedes specify their own clear RTV sealant here A0029894520. Expensive stuff it its just regular RTV.
P.s. I over ordered loads of both of the above sealants. If anyone wants any at trade price, I’ll be happy to sell.
Once both the timing case and bottom pans were on, I could go about setting the timing.
I had to remove the right camshaft adjuster mechanism in order to be able to fit one of the head bolts that goes into timing chain. I wish I hadn’t have done this. It was a pig to get back together again due the tension in the spring.
In hindsight I should have just removed the camshaft altogether, put the bolt in and refit the camshaft complete.
Anyway, all done and set up the timing. Pushed around 8 turns of the engine and the factory 6mm pins have dropped into their holes each time.
Note the old water pump was just fitted temporarily for the timing marker fitted to it.
New water pump and ancillaries to be fitted next.
Attachments


Hi All,
Today was about getting the engine built up.

This is the factory tool to get the crank seal in exactly the right place. (Thanks 500E forum).
I used the “deeper” setting of the two.

These are all the parts I was hoping to get fitted today. Didn’t get all done but not much left.


That’s it for today folks. Im tired!

Question:
The orange goo doesnt seem to be going off at all.. Im just testing the little bits that have squeezed out and still seems very fluid. Its been over a day. ?? Normal?
If anyone spots anything I am doing wrong, please say!
Today was about getting the engine built up.
This is the factory tool to get the crank seal in exactly the right place. (Thanks 500E forum).
I used the “deeper” setting of the two.
These are all the parts I was hoping to get fitted today. Didn’t get all done but not much left.
That’s it for today folks. Im tired!
Question:
The orange goo doesnt seem to be going off at all.. Im just testing the little bits that have squeezed out and still seems very fluid. Its been over a day. ?? Normal?
If anyone spots anything I am doing wrong, please say!
Looks GREAT! I can't tell if your serpentine belt tensioner is new or used, but if it's used and appears rather old, I'd consider replacing it. Make sure the washer behind it is in the proper position (I always forget which way is correct, in front of or behind the tensioner lever).
Also - for the air/smog pump bracket, if you didn't coat the bolt threads with the orange anaerobic sealant, pull those out and coat them as shown in the attached photo. Otherwise you end up with a small oil leak that's nearly impossible to track down.
Oh, and yes, it's normal for the orange goo to remain gooey. It only dries / seals in the absence of air, so any exposed squeezeout will not dry up. This has a side-effect of ensuring no blobs of dried sealant fall off inside the engine to clog oil passages. I suspect it's one of the reasons MB used this stuff.
Attachments

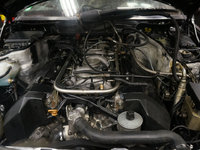
Hello!
Well today has been another afternoon of assembling. I think everything that I can get onto the engine is on. Wiring loom, breather hoses, all ancillaries etc etc.
Hopefully it is exactly how I removed it from the 500E now… well in a better state of health with some luck.
I replaced hoses, clips, pipes etc as I was going along.
The spark plugs and leads are in. I use my favourite Magnecor leads. Although cylinder No5 was a bit short, only just made it, so may ask them to make me another lead for that cylinder.
I never noticed that the channels where the spark plug wires sit are all marked as to which wire should go where. That’s a cool but typical Mercedes detail. I have changed so many sets of those leads over the years and not once have I noticed that detail.
Then I spent a few hours repairing the lower wiring harness which goes to the starter and alternator. Quite how everything was working beforehand, is beyond me.
All of the wires were bare, rusty and generally only fit for the bin. I replaced all of the smaller wires but reused the main positive cable as this looks ok. I insulated several times and used some heat proof tubing to wrap it all.
I have been trying to get hold of a new loom from Mercedes, but at the moment they are awaiting more production. I was hoping that they may have come into stock by now, hence I didn’t waste my time rebuilding this loom until now.
I am not totally happy with my efforts, it doesn’t look OEM enough, although I think I have made it safe at least. So I will change this loom as soon as it is available again from Mercedes.
The manifolds look cool on the engine, shame you can’t really see them in the engine bay!
So I hope that we are now ready to mount into the car!
Over and out.
Attachments


I *think* Laso is ok, if you can find one... otherwise it's only OE MB. Lots of junk on the market these days, avoid those like the plague. If you don't plan to take it on long trips, you can skip the tensioner for now, it may last a long time. I'd be nervous going on a long trip with an old one though, as it could leave you stranded. There's actually a test procedure in the FSM which basically consists of clamping it in a vise and twisting it by 30° in each direction. If the rubber bearing doesn't rotate in the shell, it's good (for now).The tensioner is original. However the mercedes part was very expensive. I couldnt find any good aftermarket tensioners so decided to leave it. Any brands aftermarket that can be trusted?
http://www.w124-zone.com/downloads/MB CD/W124/w124CD1/Program/Engine/119/13-3452.pdf
You're right, it's a spendy bugger, MB is proud of it... $334 USD list price, or €209 excluding VAT. Ouch!
http://partssearch.mercedes-benz-classic.com/parts/A1192000270?tt=automatic

I *think* Laso is ok, if you can find one... otherwise it's only OE MB. Lots of junk on the market these days, avoid those like the plague. If you don't plan to take it on long trips, you can skip the tensioner for now, it may last a long time. I'd be nervous going on a long trip with an old one though, as it could leave you stranded. There's actually a test procedure in the FSM which basically consists of clamping it in a vise and twisting it by 30° in each direction. If the rubber bearing doesn't rotate in the shell, it's good (for now).
http://www.w124-zone.com/downloads/MB CD/W124/w124CD1/Program/Engine/119/13-3452.pdf
You're right, it's a spendy bugger, MB is proud of it... $334 USD list price, or €209 excluding VAT. Ouch!
http://partssearch.mercedes-benz-classic.com/parts/A1192000270?tt=automatic
Thanks. I have a febi one coming tomorrow. I’m not sure I want to mount it. Will see what it feels like when it comes.
I *think* Laso is ok, if you can find one... otherwise it's only OE MB. Lots of junk on the market these days, avoid those like the plague. If you don't plan to take it on long trips, you can skip the tensioner for now, it may last a long time. I'd be nervous going on a long trip with an old one though, as it could leave you stranded. There's actually a test procedure in the FSM which basically consists of clamping it in a vise and twisting it by 30° in each direction. If the rubber bearing doesn't rotate in the shell, it's good (for now).
http://www.w124-zone.com/downloads/MB CD/W124/w124CD1/Program/Engine/119/13-3452.pdf
You're right, it's a spendy bugger, MB is proud of it... $334 USD list price, or €209 excluding VAT. Ouch!
http://partssearch.mercedes-benz-classic.com/parts/A1192000270?tt=automatic
Ive got INA branded M119 tensioners which were very good - maybe even OE... that’s what I would recommend I got mine on Amazon UK at the time
INA is a good brand, and I'd be willing to give them a try. But I've never seen INA M119 tensioners for sale in USA.Ive got INA branded M119 tensioners which were very good - maybe even OE... that’s what I would recommend I got mine on Amazon UK at the time

Dave, +1 on INA parts. Recently had the timing belt, tensioner and idler pulley replace on our 02 Volvo V40. Volvo Indy used INA tensioner and pulley. German made and OEM supplier to Volvo according to shop. They only use INA parts for this job.
Regards,
Peter Weissman
Regards,
Peter Weissman
Hi All,
Another long day.
Started off by getting everyone together to help get the lump into the car.
This went well, just dropped into position without a fight.
Then we spent a good couple of hours trying to wrestle the gearbox and all of its connections into place. All went well.
A couple more hours connecting all the wires, hoses etc.
I tried to connect up the propeller shaft, but guess what. The prop donuts that I had since September are wrong, they are for an SLK. Not sure how they got mixed up but I couldn’t find the originals. So cannot drive the car until they come.
Topped up all fluids.
Then came the moment.
Oh yes, that first turn of the key. We took a few turns without the crank sensor connected to get the oil up. This was all good until the braided fuel pipe burst!
Fuel absolutely everywhere.
We tried to repair the pipe but no good.
So I went out back and raided my scrap W126 SEC420. Pulled both pipes from that and used those as a temp measure.
Try again… And guess what, the return also bursts! What is happening?? Well I dissect the pipe and find that its just really old, hard and crumbled underneath that stainless braiding.
So we used the other pipe from the SEC for the return.
Now we have turned the engine a few times, time to plug the crank sensor back in.
Within a few seconds the engine coughs into life.
Settles nicely and no further leaks. Frantically clamber all around the car to check for any dripping fluids.
Only problem is the oil pressure gauge doesn’t move. I guess I have a bad connection somewhere that I will need to figure out. Oil is certainly pumping around the engine nicely.
I am happy. Some issues to iron out but for now, its all good.
A short clip of it idling with no exhausts!
https://youtu.be/RVSSG4QtVLU
[video=youtube_share;RVSSG4QtVLU]https://youtu.be/RVSSG4QtVLU[/video]
Attachments


looking at the 1st still pic, (empty engine bay), I see a shield on the passenger side now, did you find that lost original one, or make a custom one..
awesome project...
Yes my colleague found it hiding! Was a bit bent but got it back to shape, cleaned it up and wax protected all those shields with mercedes engine bay wax..
p.s. the issue with my oil pressure guage - well after changing the sender, testing all wiring, using another cluster, I found that the reason the oil pressure wouldnt show was because when I painted the needles, the slightly wet paint had caused the needle to stick to its stop. I released the needle and its working!
I guess mine is one of these early engines.I completely missed the timing cover bolt pattern.
This also solves the mystery as to why the right cylinder head, gasket, AND timing cover are all different for .974 engines up to #1893.
Affected engines would have been very early builds, 1990-1991 and very, very early 1992 USA model year. The change would have been approximately in September 1991.
I'm starting the rebuild process and I think the machine shop has done the same mistake jaymanek did.
Enviado desde mi Aquaris X Pro mediante Tapatalk
Attachments
Happy New Year to all fellow Mercedes nuts!
Sorry for the lack of updates, turns out my plan of using the free time over the festive season to tinker, was not in accord with a certain non petrol heads vision of Christmas.
Just before Santa came, I bolted up as much of the 500E exhaust system as I could. Which basically meant front and most of the middle section.
Once bodywork is complete, we will of course have a stainless system made up from downpipes back.
I finished up some other loose ends, tidied up under the engine bay, replaced those braided fuel lines, checked all levels etc
This was a quick drive up the road.
https://youtu.be/l2y1KrJmKNQ
That seemed to be a good place to pause for Christmas.
I have ironed out most issues. I have carried out a session on Star Diagnostics. Deleted all fault codes and then checked for anything new.
Found that my new brake lamp switch wasn’t working properly for the ASR system to read it. Replaced it and all is well again.
Oil pressure gauge was fixed. After much head scratching, new parts etc, turned out my needle on the gauge that I had painted, had stuck itself to the stop pin. Gave it a poke and oil pressure reading perfectly. Phew wasn’t my wiring!
I just have two more issues to deal with. The A/C compressor isn’t kicking in. I think I know why and it’s a matter of me tracing the wiring back into the car. Will do that at some point.
Also kick down switch under accelerator pedal isn’t working. Again I’m sure it must be a minor wiring issue.
There is now very little I can do until the car is painted. I met with body shop today and they are excited to get on. They have some other work to finish before they can get mine in, but shouldn’t be long.
I fitted the old headlamps, indicators etc so I could drive the car.
I have now covered around 30 cautious miles in the car. How does it drive?
Well it drives just like a 500E. It is exactly the same to drive as any 500E. Why did I expect anything different!? Well I thought something might fall off, but so far nothing has!
Apart from the ridiculous exhaust note, it drives smooth. Gear changes are nice, everything seems to work as it should. I am happy with it at this stage.
No major issues have revealed themselves as of yet.
Next I have to order all of the new seals, clips etc that will be needed at bodyshop.
Their biggest challenge is how to make the 500E rear bumper work. Saloon/Estate bumpers are different altogether.
Their biggest challenge is how to make the 500E rear bumper work. Saloon/Estate bumpers are different altogether.
On my widebody wagon I used a wagon bumper and stretched it out on the sides and made custom spacer brackets to mount it with on the sides and space it out. It works very well and look great in my opinion.
I know of one car where they heated the fender and bend it. It looks ok on the one side, but they wasn't that lucky on the other side. I'm Sweden there is a guy that made bumpers for 500te in glasfibre. I think I will use one like that on mine 500te.
Sent fra min D5803 via Tapatalk
Sent fra min D5803 via Tapatalk
Similar threads
- Replies
- 13
- Views
- 3,141
- Replies
- 192
- Views
- 16,718
- Replies
- 124
- Views
- 8,934
- Replies
- 40
- Views
- 4,145
Similar threads
- Replies
- 13
- Views
- 3,141
- Replies
- 124
- Views
- 8,934
- Replies
- 613
- Views
- 78,119