Navigation
Install the app
How to install the app on iOS
Follow along with the video below to see how to install our site as a web app on your home screen.
Note: This feature may not be available in some browsers.
More options
Style variation
-
Hi Guest !
Welcome to the 500Eboard forum.
Since its founding in late 2008, 500Eboard has become the leading resource on the Internet for all things related to the Mercedes-Benz 500E and E500. In recent years, we have also expanded to include the 400E and E420 models, which are directly related to the 500E/E500.
We invite you to browse and take advantage of the information and resources here on the site. If you find helpful information, please register for full membership, and you'll find even more resources available. Feel free to ask questions, and make liberal use of the "Search" function to find answers.
We hope you will become an active contributor to the community!
Sincerely,
500Eboard Management
You are using an out of date browser. It may not display this or other websites correctly.
You should upgrade or use an alternative browser.
You should upgrade or use an alternative browser.
HOW-TO: M104 / W124 Top-End Rebuild [Cylinder Head / Gasket]
- Thread starter gerryvz
- Start date
Re: M104 / W124 Top-End Rebuild
It appears that Wurth also makes an orange anaerobic sealant, #0893574050, which they claim can be used for sealing flanges and other metal to metal surfaces. My BMW mechanic told me about it, I'm unsure whether or not it is equivalent to the MB orange sealant discussed above.
It appears that Wurth also makes an orange anaerobic sealant, #0893574050, which they claim can be used for sealing flanges and other metal to metal surfaces. My BMW mechanic told me about it, I'm unsure whether or not it is equivalent to the MB orange sealant discussed above.
Re: M104 / W124 Top-End Rebuild
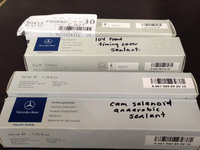
The notation I made on the outside of the box "104 front timing cover sealant" is the clear RTV that is used as the "dots" or "globs" at the ends of the green timing cover seal.
The front-most box "cam solenoid anaerobic sealant" is the orange stuff that I joke is made from satsumas and pulverized koala-bear claws, and is used on the metal-to-metal sealing surfaces at the timing cover to the end of the cylinder head.
Three of these boxes were acquired from MBUSA either in the past two months, or in the past 9 months in the case of one of the boxes.
Cheers,
Gerry
Thanks Sir.Pic attached.

The notation I made on the outside of the box "104 front timing cover sealant" is the clear RTV that is used as the "dots" or "globs" at the ends of the green timing cover seal.
The front-most box "cam solenoid anaerobic sealant" is the orange stuff that I joke is made from satsumas and pulverized koala-bear claws, and is used on the metal-to-metal sealing surfaces at the timing cover to the end of the cylinder head.
Three of these boxes were acquired from MBUSA either in the past two months, or in the past 9 months in the case of one of the boxes.
Cheers,
Gerry
Re: M104 / W124 Top-End Rebuild
Tonight I changed the "break-in" 10W-30 oil I'd used, and the oil filter, and while I was at it I changed the oil level sensor. I refilled the engine with 7 quarts of Chevron DELO 400 15W-40 oil. With the Southern climates, engines can get away with using a bit heavier oil than you guys up north.
I also changed the oil pressure sensor. The oil pressure sensor was a bit of a PITA to get at, but I was able to snake my hand up on top of the transmission (where it connects to the block) from underneath the car with my hand to get it. I had to use a "stubby" 17mm open-end wrench as there is not a lot of room in that area. It screws into the bottom of the oil filter housing, and is the same part as is used on the M119 and also the late M117s.
The wire that connects to the oil pressure sensor is not in good shape. Insulation is visibly flaking off of the wire. I think I'm going to order and replace the entire lower wiring harness for the car, as it is in pretty poor condition. Hopefully it won't be too much of a bugaboo to replace.
Interestingly, the oil level sensor was a Hella model, that came in a Hella box. I could tell that it was identical to the MB model because it had the MB part number and star ground off the cast aluminum housing. The oil pressure sensor was a VDO model, also I believe the OEM for MB for this part.
Seeing as I had about 70 miles on the car after the rebuild, I did a careful inspection on the underside of the engine with my torch. Other than the oil level sensor, there were no leaks and everything seemed to be in good condition. So, I replaced the lower plastic belly pan. The car needs to be thoroughly detailed on the inside and the outside, and the front brake pads and rotors replaced (I have them in hand, ready to go) and it will be ready to rock and roll.
Cheers,
Gerry
Re: M104 / W124 Top-End Rebuild
Tonight I spent the better part of an hour and a half cleaning up all the tools that I used for this job, and putting everything away in its correct place.
I then went through the box that contained everything I replaced as part of this job. From the photos below, you can see that it a lot of parts.
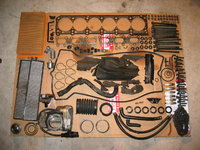

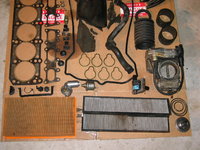
Then it's the box that is completely full of plastic bags and MB parts bags.

Lastly, it's nice to finally have the boys together back in the garage. My SEC has been hanging out in the driveway for more than two months

Cheers,
Gerry
Tonight I spent the better part of an hour and a half cleaning up all the tools that I used for this job, and putting everything away in its correct place.
I then went through the box that contained everything I replaced as part of this job. From the photos below, you can see that it a lot of parts.


Then it's the box that is completely full of plastic bags and MB parts bags.

Lastly, it's nice to finally have the boys together back in the garage. My SEC has been hanging out in the driveway for more than two months

Cheers,
Gerry
Re: M104 / W124 Top-End Rebuild
And, as the garage door slowly closes on our friends, we say "Good Night". The End. What's in store next time? Maybe a trans?
And, as the garage door slowly closes on our friends, we say "Good Night". The End. What's in store next time? Maybe a trans?
Re: M104 / W124 Top-End Rebuild
Thanks Patrick. What a great learning experience. The biggest ingredients that are required are persistence, and plenty of research done ahead of time. The encouragement from folks here on the board along the way was also a big help.
Sent from my iPad using Tapatalk HD
Nice going Gerry. I am sure that your wife is ready to get her wagon back.
I hope to do this one day....
Thanks Patrick. What a great learning experience. The biggest ingredients that are required are persistence, and plenty of research done ahead of time. The encouragement from folks here on the board along the way was also a big help.
Sent from my iPad using Tapatalk HD
Re: M104 / W124 Top-End Rebuild
What a fantastic write-up, Gerry. I read every post and clicked on every picture. I enjoy my 2001 E430, but I wish I would've held onto my former 1993 300E (3.2). It was a fantastic car.
I still remember fondly the ride you took me in in your 300E 6.3 when you lived in Portland. That was a nice car.
Re: M104 / W124 Top-End Rebuild
Don't be a stranger here.
Cheers,
Gerry
Good to hear from you here. You know, there are still some decent, low-miles HFM E320s out there, often blue-hair cars. I remember when you got your 210, and I have often wondered about your opinions about your experience with the newer car as compared to the older one. I would not say I have MISSED the 6.3 I owned, but it would certainly have probably doubled or tripled in value since I sold it in 2004 or so. Hard to believe when we met it was 11-12 years ago !! Time flies.What a fantastic write-up, Gerry. I read every post and clicked on every picture. I enjoy my 2001 E430, but I wish I would've held onto my former 1993 300E (3.2). It was a fantastic car.
I still remember fondly the ride you took me in in your 300E 6.3 when you lived in Portland. That was a nice car.
Don't be a stranger here.
Cheers,
Gerry
Re: M104 / W124 Top-End Rebuild
Has it been that long since we met up in Portland? I can't believe it's been 11-12 years ago.
I like the W210 chassis, but it's just doesn't have the same quality as a W124.
You can certainly feel the influence of Lexus on the minds of the engineers that desgned the W210 cars. Everything has been softened, damped, and quieted. The braking is more power-assisted. It takes a much lighter touch to stop the car. The accelerator pedal has a lighter spring. The pedal in my W124 car felt much more stiff and positive. The steering is vastly different due to the new rack and pinion in place of the recirculating ball. It feels more like your typical Japanes car. It is also more power-assisted. Again, too much so in my opinion. The interior of the car is quieter. Engine noise and road noise is considerably muffled.
The suspension leaves much to be desired. It wallows like a whale. It is just under-damped. Going over bumps is like being on a ship in a bad storm. It rocks back and forth so much that it gives me a feeling of seasickness. My W124 with Bilstein HD's was perfect in every respect: firm but not harsh, controlled by not skittish, and rode like a magic carpet on the freeway. Even my wife, who doesn't even know when she is driving on a flat tire, notices the difference.
Interior-wise, I love the new instrument cluster and center stack housing the radio and HVAC controls. The instrument cluster is modern and very well-lit, and the digital HVAC controls and read-out are very welcome. The push buttons and rotary dial were a relic of the past IMHO, and should've done away with in the mid-eighties. Also, even though the exterior dimensions are with a couple of inches of each other, the back seat space in the W210 is dramatically larger than the W124. I can't describe the difference it is so great. It is like being in an S class car.
Body design is a subjective issue. But if I have to choose one over the other, I'd choose the W124. I prefer the classic lines of the W124. It is holding up well with time like all Mercedes should. Time will tell how the W210 looks 10 + years from now.
I believe Mercedes has taken a lot of the Mercedes out of the car. It has lost some of its "DNA". The 124's, like 126's, feel unique. There is nothing else that handles and feels quite the same. W210's, on the other hand, feel much like any other luxury car. In fact, one could say the Mercedes has "Lexified" the car.
Good to hear from you here. You know, there are still some decent, low-miles HFM E320s out there, often blue-hair cars. I remember when you got your 210, and I have often wondered about your opinions about your experience with the newer car as compared to the older one. I would not say I have MISSED the 6.3 I owned, but it would certainly have probably doubled or tripled in value since I sold it in 2004 or so. Hard to believe when we met it was 11-12 years ago !! Time flies.
Don't be a stranger here.
Cheers,
Gerry
Has it been that long since we met up in Portland? I can't believe it's been 11-12 years ago.
I like the W210 chassis, but it's just doesn't have the same quality as a W124.
You can certainly feel the influence of Lexus on the minds of the engineers that desgned the W210 cars. Everything has been softened, damped, and quieted. The braking is more power-assisted. It takes a much lighter touch to stop the car. The accelerator pedal has a lighter spring. The pedal in my W124 car felt much more stiff and positive. The steering is vastly different due to the new rack and pinion in place of the recirculating ball. It feels more like your typical Japanes car. It is also more power-assisted. Again, too much so in my opinion. The interior of the car is quieter. Engine noise and road noise is considerably muffled.
The suspension leaves much to be desired. It wallows like a whale. It is just under-damped. Going over bumps is like being on a ship in a bad storm. It rocks back and forth so much that it gives me a feeling of seasickness. My W124 with Bilstein HD's was perfect in every respect: firm but not harsh, controlled by not skittish, and rode like a magic carpet on the freeway. Even my wife, who doesn't even know when she is driving on a flat tire, notices the difference.
Interior-wise, I love the new instrument cluster and center stack housing the radio and HVAC controls. The instrument cluster is modern and very well-lit, and the digital HVAC controls and read-out are very welcome. The push buttons and rotary dial were a relic of the past IMHO, and should've done away with in the mid-eighties. Also, even though the exterior dimensions are with a couple of inches of each other, the back seat space in the W210 is dramatically larger than the W124. I can't describe the difference it is so great. It is like being in an S class car.
Body design is a subjective issue. But if I have to choose one over the other, I'd choose the W124. I prefer the classic lines of the W124. It is holding up well with time like all Mercedes should. Time will tell how the W210 looks 10 + years from now.
I believe Mercedes has taken a lot of the Mercedes out of the car. It has lost some of its "DNA". The 124's, like 126's, feel unique. There is nothing else that handles and feels quite the same. W210's, on the other hand, feel much like any other luxury car. In fact, one could say the Mercedes has "Lexified" the car.
Re: M104 / W124 Top-End Rebuild
Nice job Gerry.
The only mistake I saw in your pictures was the ground wire by the switch over valves in front of the upper timing cover.
As you can see in your picture you placed the wire behind the bracket, it should be in front under the bolt head.
Here's a picture of an original M104 before doing the cover reseal below your picture.
I've also done several of these upper cover reseals and the ground
wire is always under the bolt, not behind the bracket.
Honest mistake I'm sure. Great job, love the red cylinder head cover.


Last edited:
Re: M104 / W124 Top-End Rebuild
I also got the lower wiring harness (positive battery cable) in today's parts order, as my original lower harness is shot (top one was replaced in 2007). So I have a bit of work to do this weekend, and will get to this ground wire at that time. Thanks again for pointing out the inaccuracy on the ground placement !
Here's the ground connector as I removed it. The ring connector was indeed directly under the bolt head, as you indicate.

Cheers,
Gerry
My goodness, indeed!! Thanks for the heads up. I'll change that to the correct orientation. I just received a parts order today from MB, that includes the pin that the lower edge of the front plastic covers slides onto. As far as I know it wasn't there when I took the engine apart (and I don't see it in your photo either) but I see the bung in the timing cover for it, and the groove at the bottom of the plastic cover, and the EPC said I could order it, so I did.Nice job Gerry.
The only mistake I saw in your pictures was the ground wire by the switch over valves in front of the upper timing cover.
As you can see in your picture you placed the wire behind the bracket, it should be in front under the bolt head.
Here's a picture of an original M104 before doing the cover reseal below your picture.
I've also done several of these upper cover reseals and the ground
wire is always under the bolt, not behind the bracket.
Honest mistake I'm sure. Great job, love the red cylinder head cover.
I also got the lower wiring harness (positive battery cable) in today's parts order, as my original lower harness is shot (top one was replaced in 2007). So I have a bit of work to do this weekend, and will get to this ground wire at that time. Thanks again for pointing out the inaccuracy on the ground placement !
Here's the ground connector as I removed it. The ring connector was indeed directly under the bolt head, as you indicate.

Cheers,
Gerry
Re: M104 / W124 Top-End Rebuild
No problem, ordinarily I would not point out a minor detail like that.
But I noticed you mentioned several times that you wanted everything
to be just as Mercedes had built it and "correct" shall we say.
So I felt compelled to let you know.
Wasn't "nit picking" and the wire was "grounded" so no running issue
My goodness, indeed!! Thanks for the heads up. Thanks again for pointing out the inaccuracy on the ground placement !
Here's the ground connector as I removed it. The ring connector was indeed directly under the bolt head, as you indicate.
Cheers,
Gerry
No problem, ordinarily I would not point out a minor detail like that.
But I noticed you mentioned several times that you wanted everything
to be just as Mercedes had built it and "correct" shall we say.
So I felt compelled to let you know.
Wasn't "nit picking" and the wire was "grounded" so no running issue
Re: M104 / W124 Top-End Rebuild
Today I did a follow-on job to the top-end rebuild -- adding the bottom connector for the front plastic cover of the cylinder head. This piece was missing on my engine when I took it apart, and I only noticed that it was there via the EPC diagram. So I threw this rather cheap part on my next parts order, and installed it today.
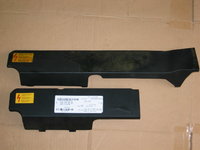
I also compared the cover for the upper wiring harness to the original one, which has a broken tab. Again not anything that is a problem, but one tab of the cover doesn't grip the harness cover, so I thought I'd replace this $16 part. Unfortunately, the EPC is WRONG and the part I ordered is for a later M104.992 engine, yet when I cross-referenced it with my engine number (and just did so again tonight) it said that this later cover was the correct one for my car. Since it's only $16 I'm not going to bother returning it, so I'll probably put it on eBay or sell it to someone who has a mid to late 1995 E320 wagon or perhaps a 1996 car, if applicable.
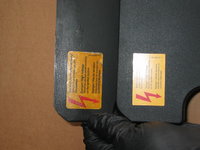
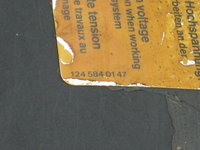
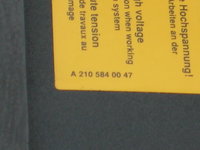
I did a compare of the yellow sticker that came on the new harness cover (a 210 part number) with the older 124 (original E320) and 123 stickers, both of which are considerably/noticeably larger.
First off, here are a couple of views of the small grommet, along with the hole in the end of the timing cover where it presses into:
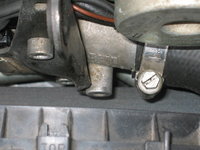

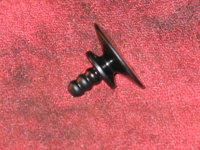
You can see how it slip-fits into the bottom of the front engine cover, keeping the bottom of the cover secure and away from the serpentine belt, which is very close by.
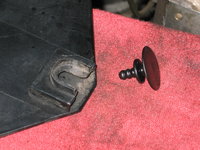

Here you see me using my small hooked tool to explore the inside of the hole in the end of the timing cover, to ensure that it isn't blocked by crud and that the entire length of the grommet can be pressed inside of it.
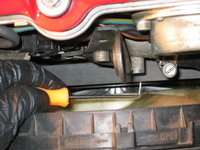


Then you see me holding the grommet into position, while I use a long screwdriver against the end of the fan to lever against, to press it into the end of the timing cover. The third photo shows the grommet all in place.
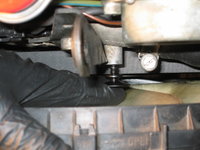


And here's the final result. Identical to how the cover fit BEFORE the grommet was installed, but now it is 100% factory correct

Here are some comparisons of the old and new wiring harness covers, along with a photo comparing the old 123 yellow sticker to the current 210 sticker. Quite a difference. I decided not to bother fitting the wiring harness cover - my cover is just fine, though I'm angry about the error in the EPC.






Today I did a follow-on job to the top-end rebuild -- adding the bottom connector for the front plastic cover of the cylinder head. This piece was missing on my engine when I took it apart, and I only noticed that it was there via the EPC diagram. So I threw this rather cheap part on my next parts order, and installed it today.
I also compared the cover for the upper wiring harness to the original one, which has a broken tab. Again not anything that is a problem, but one tab of the cover doesn't grip the harness cover, so I thought I'd replace this $16 part. Unfortunately, the EPC is WRONG and the part I ordered is for a later M104.992 engine, yet when I cross-referenced it with my engine number (and just did so again tonight) it said that this later cover was the correct one for my car. Since it's only $16 I'm not going to bother returning it, so I'll probably put it on eBay or sell it to someone who has a mid to late 1995 E320 wagon or perhaps a 1996 car, if applicable.
I did a compare of the yellow sticker that came on the new harness cover (a 210 part number) with the older 124 (original E320) and 123 stickers, both of which are considerably/noticeably larger.
First off, here are a couple of views of the small grommet, along with the hole in the end of the timing cover where it presses into:


You can see how it slip-fits into the bottom of the front engine cover, keeping the bottom of the cover secure and away from the serpentine belt, which is very close by.


Here you see me using my small hooked tool to explore the inside of the hole in the end of the timing cover, to ensure that it isn't blocked by crud and that the entire length of the grommet can be pressed inside of it.


Then you see me holding the grommet into position, while I use a long screwdriver against the end of the fan to lever against, to press it into the end of the timing cover. The third photo shows the grommet all in place.


And here's the final result. Identical to how the cover fit BEFORE the grommet was installed, but now it is 100% factory correct

Here are some comparisons of the old and new wiring harness covers, along with a photo comparing the old 123 yellow sticker to the current 210 sticker. Quite a difference. I decided not to bother fitting the wiring harness cover - my cover is just fine, though I'm angry about the error in the EPC.


Re: M104 / W124 Top-End Rebuild
I have three w124 cars a 1994 e320 sedan and two 1995 wagons. One of the wagons is serial no.341788 and a build date (door jamb) of 11/95. It has the longer cover as do the other two cars. I have had this car since 2000 when it had 54k miles and i believe the cover is original. This car is the one with the severe oil leak it has the newer green front cover seal from a headgasket replacement done before we got the car. The seal/triangle is leaking but so is the cam actuator. My adventure is only beginning in bringing this wagon back up to snuff but thanks again for the most excellent and helpful thread. I am looking forward to your post on the lower wiring harness.
Thanks again
Jeff
Re: M104 / W124 Top-End Rebuild
Gerry, do you have the number for the grommet above, I am missing that piece. I had it in my mind it threaded in the cover. In my case there is a broken piece in the hole. I have 4 of the upper covers that engages the grommet, three that came with the cars and a spare that was given to me, all of them are broken in the same place where they snap on the drivers side.
Gerry, do you have the number for the grommet above, I am missing that piece. I had it in my mind it threaded in the cover. In my case there is a broken piece in the hole. I have 4 of the upper covers that engages the grommet, three that came with the cars and a spare that was given to me, all of them are broken in the same place where they snap on the drivers side.
Re: M104 / W124 Top-End Rebuild

WOW... talk about a late 1995 build. That would have been a 1996 model year if Mercedes had kept the 124's coming as 96 models into North America!I have three w124 cars a 1994 e320 sedan and two 1995 wagons. One of the wagons is serial no.341788 and a build date (door jamb) of 11/95.
Jeff

Re: M104 / W124 Top-End Rebuild


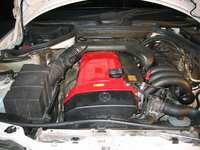
All is now well with the world, and my M104 now feels full and complete again.
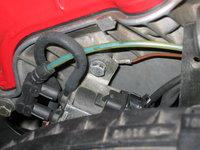
Given that our friend Clark Vader (aka Bob_036.....aka "Clarkzturbator"...etc.) had identified the very critical problem with my re-installation of the ground wire BEHIND the switchover valve instead of IN FRONT of this valve, I removed and repositioned the ground wire to its proper position.Nice job Gerry.
The only mistake I saw in your pictures was the ground wire by the switch over valves in front of the upper timing cover.
As you can see in your picture you placed the wire behind the bracket, it should be in front under the bolt head.
Here's a picture of an original M104 before doing the cover reseal below your picture.
I've also done several of these upper cover reseals and the ground
wire is always under the bolt, not behind the bracket.
Honest mistake I'm sure. Great job, love the red cylinder head cover.


All is now well with the world, and my M104 now feels full and complete again.

Re: M104 / W124 Top-End Rebuild
I still have a small oil leak at the front of the engine -- it's the front crankshaft seal, so unrelated to any of the top-end work I've recently completed. So that will be a job I tackle in the next few weeks -- probably in March. The top end (head gasket, timing cover, etc.) is all dry. This will be a moderate DIY job, with the radiator needing to be removed. I have to re-fence my house, which now that the Houston weather is getting warmer, I have the opportunity to get this work done fairly quickly, which I'll do before it gets too hot and humid outside (mid- to late-April).
Working on it now. One to two panels per night. Takes time to do it right.You cleaned that wagon up yet?
I still have a small oil leak at the front of the engine -- it's the front crankshaft seal, so unrelated to any of the top-end work I've recently completed. So that will be a job I tackle in the next few weeks -- probably in March. The top end (head gasket, timing cover, etc.) is all dry. This will be a moderate DIY job, with the radiator needing to be removed. I have to re-fence my house, which now that the Houston weather is getting warmer, I have the opportunity to get this work done fairly quickly, which I'll do before it gets too hot and humid outside (mid- to late-April).
Re: M104 / W124 Top-End Rebuild
Thank you so much for your helpful pics and posts, Gerry!
I am also doing same job for my W124 2.8L, and now waiting for parts coming.
T40 TORX at camshaft cap was hard task because my T40 socket is loose for the bolt! Fortunately, I could loosen all these bolts without stripping though, I decided to purchase another socket.
New Hazet's socket fits nicely!


I also tested Snap-On T40 at local tool store, but it was same as Ko-ken (left one).
Ko-ken is my favorite (try one if you find your local store!), but I highly recommend Hazet for this job!
Thank you so much for your helpful pics and posts, Gerry!
I am also doing same job for my W124 2.8L, and now waiting for parts coming.
T40 TORX at camshaft cap was hard task because my T40 socket is loose for the bolt! Fortunately, I could loosen all these bolts without stripping though, I decided to purchase another socket.
New Hazet's socket fits nicely!


I also tested Snap-On T40 at local tool store, but it was same as Ko-ken (left one).
Ko-ken is my favorite (try one if you find your local store!), but I highly recommend Hazet for this job!
Re: M104 / W124 Top-End Rebuild
Wow, yes that is a big difference. And good to see/know. Yeah, I had a MAJOR problem with these bolts and even my machine shop said they had some difficulty with them. The next time if I ever have to do this job again I will get the Hazet socket for it. I can clearly see from your photos that it has a better "bite" into the bolt. Thankfully new bolts were cheap (I think they were about USD $1.75 each?), and I put all new MB bolts on the car.
So far I have about 1,000+ miles on the rebuild and it has been running perfectly.
I have one slight issue, and that is the car takes a bit longer to start when the engine is warm. You have to crank on the starter for about twice as long (3 seconds) to start it. When the car is cold (not started for 3-4 hours) or hot (just go into a store for 5-10 minutes) it starts perfectly. But when you leave it for 15 minutes to a couple of hours, it takes longer cranking to start up. So I am slowly working on diagnosing this, but the fuel pressure is fine (leakdown is according to spec). I have also removed and checked the plug/coil connections and all is perfect.
The car is running absolutely smoothly and perfectly and I would say is developing probably 15% more power (especially at low RPMs/off the line) than it did before. I can really feel the difference and the power curve is really amazing when it comes up on the cam at maximum acceleration.
Cheers,
Gerry
Re: M104 / W124 Top-End Rebuild
IMHO, it could be temp sensor failure? Intake air, water temps.. OR wiring harness problem?
That's a good news! I thought I wouldn't feel any significant change because my engine doesn't have any problems except minor oil leaks.
I have one slight issue, and that is the car takes a bit longer to start when the engine is warm. You have to crank on the starter for about twice as long (3 seconds) to start it. When the car is cold (not started for 3-4 hours) or hot (just go into a store for 5-10 minutes) it starts perfectly. But when you leave it for 15 minutes to a couple of hours, it takes longer cranking to start up. So I am slowly working on diagnosing this, but the fuel pressure is fine (leakdown is according to spec). I have also removed and checked the plug/coil connections and all is perfect.
IMHO, it could be temp sensor failure? Intake air, water temps.. OR wiring harness problem?
The car is running absolutely smoothly and perfectly and I would say is developing probably 15% more power (especially at low RPMs/off the line) than it did before. I can really feel the difference and the power curve is really amazing when it comes up on the cam at maximum acceleration.
That's a good news! I thought I wouldn't feel any significant change because my engine doesn't have any problems except minor oil leaks.
Re: M104 / W124 Top-End Rebuild
What you're feeling is a combination of the variable intake cam timing and manifold resonance flap.
More the flap, which increases intake volume flow like the old domestic V8 performance intake manifolds.
Like going from a dual plain street manifold to a race single plane manifold (Edlebrock)
In fact, Yamaha had the same thing on the 1984 V-Max. They called it V-Boost
It's quite impressive, good low end torque, then great peak HP
Mercedes claims around 20hp increase, though I'd have to check WIS
That number is off the top of my head from memory.
The car is running absolutely smoothly and perfectly and I would say is developing probably 15% more power (especially at low RPMs/off the line) than it did before. I can really feel the difference and the power curve is really amazing when it comes up on the cam at maximum acceleration.
Cheers,
Gerry
What you're feeling is a combination of the variable intake cam timing and manifold resonance flap.
More the flap, which increases intake volume flow like the old domestic V8 performance intake manifolds.
Like going from a dual plain street manifold to a race single plane manifold (Edlebrock)
In fact, Yamaha had the same thing on the 1984 V-Max. They called it V-Boost
It's quite impressive, good low end torque, then great peak HP
Mercedes claims around 20hp increase, though I'd have to check WIS
That number is off the top of my head from memory.
Re: M104 / W124 Top-End Rebuild
The temp sensors could be potentially something, yes. I have a spare of one of the water temp senders at the water pump, and need to get a spare of the other one. I also have a brand new intake air temp sender (that I didn't install as the old one seemed fine) and I also have a couple of wrecking-yard spares of the intake air temp sender too. Probably not a bad item to try replacing to see if there is a change.
Thanks for the thoughts/suggestions.
I don't think it's a wiring harness issue because the upper harness has been replaced in 2006 with a new, MB known-good-wiring harness. The lower harness is brand new and didn't change the situation (I didn't expect it would; it was original and just needed changing).IMHO, it could be temp sensor failure? Intake air, water temps.. OR wiring harness problem?
That's a good news! I thought I wouldn't feel any significant change because my engine doesn't have any problems except minor oil leaks.
The temp sensors could be potentially something, yes. I have a spare of one of the water temp senders at the water pump, and need to get a spare of the other one. I also have a brand new intake air temp sender (that I didn't install as the old one seemed fine) and I also have a couple of wrecking-yard spares of the intake air temp sender too. Probably not a bad item to try replacing to see if there is a change.
Thanks for the thoughts/suggestions.
Re: M104 / W124 Top-End Rebuild

By the way, did you see that I "fixed" my ground wire at the switchover valve so that it's in the correct position?


Indeed, that intake air flap was a great innovation they did on the M104. Those buggers are spendy -- I cannibalized the one on the extra intake manifold I got at the wrecking yard as a spare, because IIRC they are pushing $500 dollars new from MB!What you're feeling is a combination of the variable intake cam timing and manifold resonance flap.
More the flap, which increases intake volume flow like the old domestic V8 performance intake manifolds.
Like going from a dual plain street manifold to a race single plane manifold (Edlebrock)
In fact, Yamaha had the same thing on the 1984 V-Max. They called it V-Boost
It's quite impressive, good low end torque, then great peak HP
Mercedes claims around 20hp increase, though I'd have to check WIS
That number is off the top of my head from memory.
By the way, did you see that I "fixed" my ground wire at the switchover valve so that it's in the correct position?

Re: M104 / W124 Top-End Rebuild
Did I say in front of the bracket? I meant............... oh never mind. lol
Yes, that's the way it left Sindelfingen. well done.
By the way, did you see that I "fixed" my ground wire at the switchover valve so that it's in the correct position?


Did I say in front of the bracket? I meant............... oh never mind. lol
Yes, that's the way it left Sindelfingen. well done.
Re: M104 / W124 Top-End Rebuild
Well, when it rains, it pours.
Yesterday, I spent a full eight hours basically rebuilding & refurbishing the driver's seat on my wife's E320 wagon, so that it looks and operates like new. In the process, I learned A LOT about how the later W124 seats work ... particularly those with seat heating and orthopedic mechanisms work. That is one extremely complex piece of seating, that's for sure.
For approximately the past 2 years, the driver's seat height adjustment did not work correctly, because one rear corner of the seat would not extend up and down, while the other one would, which caused a "twisting" in the seat base that was certainly not good for the seat. This was generally not an issue because the "back and forth" adjustment worked, as did the seat-back reclining function. But I always vowed to fix this, and finally it hit my "to do" list to fix it this weekend.
I didn't document the process (I know, I know... I should have) but basically I had to check all of the cables and ensure they were still square and not rounded off at the ends. I found the bad cable that controlled the height adjustment in question by essentially plugging the seat base (with the actual seat removed) into the car and observing what happened. Then I had to remove the cable and shortened the external housing by about a half-inch, so that the end of the cable stayed inserted into the motor so that the motor would turn the cable properly, to raise and lower the rear of the seat. Then I used brake cleaner to remove all the old grease and dust/dirt from the seat tracks and gears, and re-lubricated everything with Lubriplate grease and MB "gleitpaste" (sunroof paste). It was not a fun job as there are four motors and (IIRC) four or five cables that control various functions of the seat adjustment. I also disassembled the vacuum controller for the orthopedic function and ensured it was working as intended. Then it was time to reassemble the seat, and replace all of the plastic trim bits around the base of the seat (there are four or five plastic trim pieces, as well as a small carpet piece that covers the front of the seat-base on its leading edge.
The final battle (which probably took a good 30-45 minutes) was to actually reconnect the electrical plugs, and then re-install and bolt down the seat to the floor of the car. The rear bolts are quite nasty to bolt down because not only must they be aligned correctly to the holes on the floor, but they are recessed inside of the rear seat base (which raises and lowers the seat) so they have to be accessed through a convoluted arrangement of socket extensions and wobblies to get the correct angle on the head of the bolts that hold each side down. The only way to get things aligned is to install each of the two front bolts about 1/3 of the way, which gives you enough room to wiggle the seat to get the two rear bolts threaded. For the final, fourth bolt (next to the transmission tunnel/console) I used a wooden hammer handle in between the outer side of the seat and the carpeted door sill to wedge the seat over enough to get it aligned (just slightly) to get the bolt threaded. Then everything tightened up just fine. A quick check for functionality and seat-heating & orthopedics ensured that my work was sound. Whew.
The biggest pain is that the driver's seat is not only HEAVY, but it is also fairly unwieldy because it has the center armrest/glovebox attached to it, which adds weight and also width, so you have to be careful in getting the seat in and out of the car.
It felt very good to clean out underneath the seat plenty of spare change and other garbage that had accumulated from 7 years of hauling kids around. Next up at some point will be the passenger side seat.
But the real crux of things happened today. We took the E320 wagon to church, and then early this afternoon after getting home, my wife left to run some errands around the area. About 20 minutes after leaving, sitting at my desk here in my home office perusing this very site (and getting ready to leave to run some errands of my own), I get a phone call from her. She was about 1.5 miles away, stranded on the side of the road. She had just rounded a corner at an intersection when she lost all forward motion on the car. She coasted to the side of the road and pulled over.
What she told me on the phone was that the engine ran fine, and she had reverse gear, but she had no forward gears. All gears (except reverse) were the same as park or neutral. No forward motion. She called AAA for a tow and I went over there in my E500, and we switched cars so that she could continue her errands. After about 20 minutes the tow truck driver arrived and we towed the car the 1.5 miles to my house, where he quite expertly backed it right into the middle bay of my garage shop.
So now my new project commences: I will need to remove the transmission over the coming days, and determine whether I want to install a used transmission, or have the one that is in the car rebuilt. I am leaning toward just having our current one rebuilt, just because it is difficult to know how long a used one will last, although it is probable that the cost will be several times greater than a used unit. Since I will remove and install the transmission on my own, I will save the labor costs of a full R&R, but it is going to take time.
I will check tomorrow on the costs for a rebuild in and of itself, done locally. If I do go that route, I will use the same transmission rebuilding shop that G-Man recently used when he had his 500E transmission redone. I do intend to rebuild my 560SEC and/or E500 transmissions myself, but since my wife's car is a daily driver and I need to get it back on the road as soon as possible, I will need to go the professional rebuild route in this instance.
However, I will document the process for removing and installing the transmission in the car, which generally is the same process as with the E500E with the exception of the bellhousing on the back of the engine block (an inline-six vs. a V-8), the extra structural cross-member between the front control arms, and a few other minor differences.
So, I will start a separate thread to document this job when I get started. Taking my time and being thorough on documentation, and cleaning and replacing any needed soft-parts, I would expect that the transmission removal and install will each take about 10 hours, probably almost double the book time for such a job. The process seems to be pretty straightforward in and of itself.
So it goes.....

Cheers,
Gerry
Well, when it rains, it pours.
Yesterday, I spent a full eight hours basically rebuilding & refurbishing the driver's seat on my wife's E320 wagon, so that it looks and operates like new. In the process, I learned A LOT about how the later W124 seats work ... particularly those with seat heating and orthopedic mechanisms work. That is one extremely complex piece of seating, that's for sure.
For approximately the past 2 years, the driver's seat height adjustment did not work correctly, because one rear corner of the seat would not extend up and down, while the other one would, which caused a "twisting" in the seat base that was certainly not good for the seat. This was generally not an issue because the "back and forth" adjustment worked, as did the seat-back reclining function. But I always vowed to fix this, and finally it hit my "to do" list to fix it this weekend.
I didn't document the process (I know, I know... I should have) but basically I had to check all of the cables and ensure they were still square and not rounded off at the ends. I found the bad cable that controlled the height adjustment in question by essentially plugging the seat base (with the actual seat removed) into the car and observing what happened. Then I had to remove the cable and shortened the external housing by about a half-inch, so that the end of the cable stayed inserted into the motor so that the motor would turn the cable properly, to raise and lower the rear of the seat. Then I used brake cleaner to remove all the old grease and dust/dirt from the seat tracks and gears, and re-lubricated everything with Lubriplate grease and MB "gleitpaste" (sunroof paste). It was not a fun job as there are four motors and (IIRC) four or five cables that control various functions of the seat adjustment. I also disassembled the vacuum controller for the orthopedic function and ensured it was working as intended. Then it was time to reassemble the seat, and replace all of the plastic trim bits around the base of the seat (there are four or five plastic trim pieces, as well as a small carpet piece that covers the front of the seat-base on its leading edge.
The final battle (which probably took a good 30-45 minutes) was to actually reconnect the electrical plugs, and then re-install and bolt down the seat to the floor of the car. The rear bolts are quite nasty to bolt down because not only must they be aligned correctly to the holes on the floor, but they are recessed inside of the rear seat base (which raises and lowers the seat) so they have to be accessed through a convoluted arrangement of socket extensions and wobblies to get the correct angle on the head of the bolts that hold each side down. The only way to get things aligned is to install each of the two front bolts about 1/3 of the way, which gives you enough room to wiggle the seat to get the two rear bolts threaded. For the final, fourth bolt (next to the transmission tunnel/console) I used a wooden hammer handle in between the outer side of the seat and the carpeted door sill to wedge the seat over enough to get it aligned (just slightly) to get the bolt threaded. Then everything tightened up just fine. A quick check for functionality and seat-heating & orthopedics ensured that my work was sound. Whew.
The biggest pain is that the driver's seat is not only HEAVY, but it is also fairly unwieldy because it has the center armrest/glovebox attached to it, which adds weight and also width, so you have to be careful in getting the seat in and out of the car.
It felt very good to clean out underneath the seat plenty of spare change and other garbage that had accumulated from 7 years of hauling kids around. Next up at some point will be the passenger side seat.
But the real crux of things happened today. We took the E320 wagon to church, and then early this afternoon after getting home, my wife left to run some errands around the area. About 20 minutes after leaving, sitting at my desk here in my home office perusing this very site (and getting ready to leave to run some errands of my own), I get a phone call from her. She was about 1.5 miles away, stranded on the side of the road. She had just rounded a corner at an intersection when she lost all forward motion on the car. She coasted to the side of the road and pulled over.
What she told me on the phone was that the engine ran fine, and she had reverse gear, but she had no forward gears. All gears (except reverse) were the same as park or neutral. No forward motion. She called AAA for a tow and I went over there in my E500, and we switched cars so that she could continue her errands. After about 20 minutes the tow truck driver arrived and we towed the car the 1.5 miles to my house, where he quite expertly backed it right into the middle bay of my garage shop.
So now my new project commences: I will need to remove the transmission over the coming days, and determine whether I want to install a used transmission, or have the one that is in the car rebuilt. I am leaning toward just having our current one rebuilt, just because it is difficult to know how long a used one will last, although it is probable that the cost will be several times greater than a used unit. Since I will remove and install the transmission on my own, I will save the labor costs of a full R&R, but it is going to take time.
I will check tomorrow on the costs for a rebuild in and of itself, done locally. If I do go that route, I will use the same transmission rebuilding shop that G-Man recently used when he had his 500E transmission redone. I do intend to rebuild my 560SEC and/or E500 transmissions myself, but since my wife's car is a daily driver and I need to get it back on the road as soon as possible, I will need to go the professional rebuild route in this instance.
However, I will document the process for removing and installing the transmission in the car, which generally is the same process as with the E500E with the exception of the bellhousing on the back of the engine block (an inline-six vs. a V-8), the extra structural cross-member between the front control arms, and a few other minor differences.
So, I will start a separate thread to document this job when I get started. Taking my time and being thorough on documentation, and cleaning and replacing any needed soft-parts, I would expect that the transmission removal and install will each take about 10 hours, probably almost double the book time for such a job. The process seems to be pretty straightforward in and of itself.
So it goes.....

Cheers,
Gerry
Re: M104 / W124 Top-End Rebuild
Thanks guys. I can't complain .. the transmission is original and has 203,200 miles on it. It did exceptionally well and lasted 19 years, so no complaints. You just never know when these things are going to happen.
Basically this was caused by the failure of the B2 piston, which is a known weakness on these transmissions and something that WILL fail at some point.
I'm looking forward to the R&R as a bit of an adventure, as this will be the first time I've done a transmission before. It will be good practice for when I need to do my other cars in the future. My E500 has the dreaded "reverse clicking" syndrome, so I'm more or less living on borrowed time with that car, and babying it as much as possible to make it last.
Cheers,
Gerry
Re: M104 / W124 Top-End Rebuild
I feel your pain, as Bill Clinton said.
Mine went 2 weeks after I bought my 400E. Only 113K (August 2011)
I was still working at the dealer at the time, so I opted for a Mercedes factory remanufactured gearbox (722.366)
and rebuilt convertor. The factory in Germany basically puts ALL new parts in a reconditioned used case. As new as you can get.
And they do a full transmission dyno running in setting modulator pressure and checking working and governor pressures.
Just a $3200 part instead of a $8000 part. But, well worth it.
These pics are two years after the install (November 2013)
Two and a half years later shifting is as new.


Re: M104 / W124 Top-End Rebuild
I'm still figuring out my options on this -- there are many ways to go. I'd like to keep the car's original transmission with it rather than throw in a cheap, used unit because you don't know how that unit has been treated and what (if any) issues there are with it in terms of shifting, wear, etc.
So I'm in the research phase for the next few days before I make a final decision. I'm not so concerned about cost as I am getting the work done correctly. But I do know I won't be purchasing a dealer reman unit
This is the classic B2 piston failure. The later transmissions as used on the '94 & '95 .032s and .092s had all of the updated parts and seals, which improved reliability, but of course are still prone to failure with mileage. As I said I really can't complain about a transmission with 203+K miles on it. Sort of makes me wonder about my SEC though, which is pushing 219K miles now.....
In any case, it will be educational to drop the transmission on the .092. I am really dreading trying to get at the two top-most bolts on the bell-housing. I just don't see any clear way to get at them from above the engine, so it looks like it's going to have to be from below. There are a total of 10 bolts (including two for the starter, which I replaced a couple of years ago) and it looks like eight of them are pretty accessible -- just the top-two bolts at 11 and 1 o'clock which look to be rather difficult. The rest of the drop should be pretty easy and straightforward. I do need to buy a transmission jack.
Cheers,
Gerry
Indeed, a lot of so-called "rebuilds" don't actually replace much in the way of internal components ... they just reseal them and replace the things that have failed, and call it good.The factory in Germany basically puts ALL new parts in a reconditioned used case. As new as you can get.
I'm still figuring out my options on this -- there are many ways to go. I'd like to keep the car's original transmission with it rather than throw in a cheap, used unit because you don't know how that unit has been treated and what (if any) issues there are with it in terms of shifting, wear, etc.
So I'm in the research phase for the next few days before I make a final decision. I'm not so concerned about cost as I am getting the work done correctly. But I do know I won't be purchasing a dealer reman unit
This is the classic B2 piston failure. The later transmissions as used on the '94 & '95 .032s and .092s had all of the updated parts and seals, which improved reliability, but of course are still prone to failure with mileage. As I said I really can't complain about a transmission with 203+K miles on it. Sort of makes me wonder about my SEC though, which is pushing 219K miles now.....
In any case, it will be educational to drop the transmission on the .092. I am really dreading trying to get at the two top-most bolts on the bell-housing. I just don't see any clear way to get at them from above the engine, so it looks like it's going to have to be from below. There are a total of 10 bolts (including two for the starter, which I replaced a couple of years ago) and it looks like eight of them are pretty accessible -- just the top-two bolts at 11 and 1 o'clock which look to be rather difficult. The rest of the drop should be pretty easy and straightforward. I do need to buy a transmission jack.
Cheers,
Gerry
Re: M104 / W124 Top-End Rebuild
You want Sun Valley to reman your transmission. the best shop I've heard of in the US specializing is all years of MB gearboxes.
Even those funky W109 & W113 tranny's
http://www.benzworld.org/forums/w12...ission-sun-valley-mercedes-transmissions.html
http://www.mercedesdismantlers.com/
You want Sun Valley to reman your transmission. the best shop I've heard of in the US specializing is all years of MB gearboxes.
Even those funky W109 & W113 tranny's
http://www.benzworld.org/forums/w12...ission-sun-valley-mercedes-transmissions.html
http://www.mercedesdismantlers.com/
Re: M104 / W124 Top-End Rebuild
Gerry sorry to hear about your transmission but glad to hear you have a reliable local rebuilder and that it happened close to home. Looking forward to the thread on the replacement and removal
Gerry sorry to hear about your transmission but glad to hear you have a reliable local rebuilder and that it happened close to home. Looking forward to the thread on the replacement and removal
Re: M104 / W124 Top-End Rebuild
SunValley technically sold the dismantling business, and is now focusing exclusively on transmission rebuilds.
I got one two years ago $1500 shipped for the wife's '95 E320 wagon, and it has been shifting great since day one, and been working wonderfully!
I do run TO-4+ 30wt. fluid for a firm shift, that my wife still likes.
Also, I installed a magnetic ATF filter between the tranny feed into the radiator/tranny cooler to pick-up any break-in crap, and change the fluid & filter first at 200-miles (yuck!), and then at 1000-miles, very good.
My master tech has been using Sun Valley for the last 10+ years- no issues.
 neil
neil
You want Sun Valley to reman your transmission. the best shop I've heard of in the US specializing is all years of MB gearboxes.
<SNIP>
SunValley technically sold the dismantling business, and is now focusing exclusively on transmission rebuilds.
I got one two years ago $1500 shipped for the wife's '95 E320 wagon, and it has been shifting great since day one, and been working wonderfully!
I do run TO-4+ 30wt. fluid for a firm shift, that my wife still likes.
Also, I installed a magnetic ATF filter between the tranny feed into the radiator/tranny cooler to pick-up any break-in crap, and change the fluid & filter first at 200-miles (yuck!), and then at 1000-miles, very good.
My master tech has been using Sun Valley for the last 10+ years- no issues.
Re: M104 / W124 Top-End Rebuild
I've been in contact with Marc there. $1,700 for a rebuild + $200 freight (core sendback included).
My local shop (who did G-Man's transmission recently in his 500E) wants $2,500 - they will do a complete & conscientious job with MB parts. $2,700 + tax if they pull the transmission and reinstall it.
Re: M104 / W124 Top-End Rebuild
Oh, the top-two is, yes, difficult to access. I used long extension (about 60cm?) and swivel joint, and obviously, tightening them was also frustrating.
I've done for my 722.4 3 years ago (I had no reverse), I felt that disassembling and re-assembling are not so difficult but measuring and adjusting are important.
Ganbatte!
Re: M104 / W124 Top-End Rebuild
Yes, I am not looking forward to this, but as always will document the removal as best I can for others who need to do it in the future.Oh, the top-two is, yes, difficult to access. I used long extension (about 60cm?) and swivel joint, and obviously, tightening them was also frustrating.
I've done for my 722.4 3 years ago (I had no reverse), I felt that disassembling and re-assembling are not so difficult but measuring and adjusting are important.
Ganbatte!
Re: M104 / W124 Top-End Rebuild
You REALLY need to buy an M104/W124 so you can experience the utter superiority of the M104 over the M103. You'll never go back. And I'd bet you'd name the car "SuperBenzer1" or something like that.
Dave GSXR Mushroom Man will confirm this statement about the M104 superiority. Going from a 103 to a 104 is the powertrain equivalent of going from a W123 chassis to a W124 chassis.
This is the one car that I don't track the mileage on. However, when I drove it from Oregon to Houston, TX back in 2008, I did keep track of the mileage, and will pull it up and post it when I get a minute.Is there any way you could please post a "fuelly" on this car too?
You REALLY need to buy an M104/W124 so you can experience the utter superiority of the M104 over the M103. You'll never go back. And I'd bet you'd name the car "SuperBenzer1" or something like that.
Dave GSXR Mushroom Man will confirm this statement about the M104 superiority. Going from a 103 to a 104 is the powertrain equivalent of going from a W123 chassis to a W124 chassis.
Re: M104 / W124 Top-End Rebuild
I have no doubt of that. Perhaps you are unaware of how I obtained Benzer3. Over nine years ago, I was originally looking for a HFM M104 W124. But when I discovered that just a few more bucks would score me a M119 powered W124, I bought one of those instead. Hence Benzer3! I'm affraid the same pricing dynamic still exists today. In fact it is even more so! Yes, a M104 is way superior to a M103, but I'm affraid the M119 is way superior to a M104, especially when you factor in the fact that the price difference is amost non-existent. It would appear that Dave has reached the same conclusion, seeing as how there are a few 4.2s in his fleet now but zero M104s. I still lust after a M104 though.
The only other consideration then is fuel economy, which is the reason for my post.
Last edited:
Re: M104 / W124 Top-End Rebuild
Gerry
The trans is not hard to rebuild. Getting to the bolts on top of the bellhousing you must have a 30+" extension w/ half drive on one end and 3/8 on the other. Its made for this job. You can then put your 17mm swivel (impact) on it and bump the bolts out. With the trans cross member and drive shaft disconnected loosen the engine mounts and let the whole thing tilt, use a jack if necessary. You can reach the top bolts or atleast guide the swivel socket onto them, MUCH easier with an impact. I rebuild my trans with MB parts for <$1200. If you replace steels I would recommend going aftermarket if you have to replace more than 1. This is the second I have rebuilt and both had room for 5 clutches in K1 ( I think ). I only had to buy some snap ring pliers, everything else is picks and screw drivers and creative socket use for seal installation. Take the clutch packs all the way apart and clean them as I found tons of garbage down in the interior. Some people just throw new clutches in and replace the easy to get to seals. Also, I had to keep going back to buy different snap rings to get the preload on the clutches right. Just buy them all and take back what you don't use.
Also on those cam cap bolts. I have two sockets, one for off and one for on so they are less prone to breaking and I use a half drive bar on all of that stuff, cam gear, head bolts, cam caps etc, anything with a torx. If you just have one socket when you reverse the load it tries to unwind the twist you already put in the socket and it shatters
-Mike
Re: M104 / W124 Top-End Rebuild
I was replacing the valve-cover gaskets because I noticed oil in the spark-plug wells, and I'm glad I read this thread beforehand, because I also ordered the 12-rubber grommets for the cam-cover bolts that were petrified.
I like to give all rubber parts a wiping down of Protectant 303, as it seems to aid in the longevity.
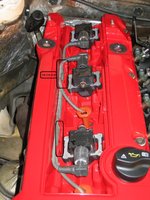
Gerry, our '95 wagon had two plastic insulators (104.159.14.40) that insulate the ignition wires from the two front coils. The rear coil does not have an insulator, since it only has ONE set of ignition wires running parallel to the coil. Mine were very fragile, and broke when breathed upon. Current retail is $7.00, parts.com: $5.25
I marked-up your picture with the location of the insulator, and have included a close-up.
 neil
neil
I was replacing the valve-cover gaskets because I noticed oil in the spark-plug wells, and I'm glad I read this thread beforehand, because I also ordered the 12-rubber grommets for the cam-cover bolts that were petrified.
I like to give all rubber parts a wiping down of Protectant 303, as it seems to aid in the longevity.
Gerry, our '95 wagon had two plastic insulators (104.159.14.40) that insulate the ignition wires from the two front coils. The rear coil does not have an insulator, since it only has ONE set of ignition wires running parallel to the coil. Mine were very fragile, and broke when breathed upon. Current retail is $7.00, parts.com: $5.25
I marked-up your picture with the location of the insulator, and have included a close-up.
Attachments
Re: M104 / W124 Top-End Rebuild
Interesting - my car nor any other I have seen has had these insulators. I even looked at a 1994 E320 in the wrecking yard today, and didn't see anything like that when I unbolted the Allen bolts holding that cover onto the top of the valve cover. When you get yours installed, can you take a photo? I'd like to put them on my car.Gerry, our '95 wagon had two plastic insulators (104.159.14.40) that insulate the ignition wires from the two front coils. The rear coil does not have an insulator, since it only has ONE set of ignition wires running parallel to the coil. Mine were very fragile, and broke when breathed upon. Current retail is $7.00, parts.com: $5.25
Similar threads
- Replies
- 12
- Views
- 1,371
- Replies
- 20
- Views
- 816
- Replies
- 3
- Views
- 119
- Replies
- 17
- Views
- 4,734
- Replies
- 7
- Views
- 3,412
Similar threads
- Replies
- 12
- Views
- 1,371
- Replies
- 3
- Views
- 119
- Sticky
- Replies
- 52
- Views
- 15,185
- Replies
- 17
- Views
- 3,638
- Replies
- 19
- Views
- 3,629

