I had a few detailing jobs I wanted to do that were all related to the trunk area. Since the jobs were somewhat interdependent, I decided that I would wait until the time was right & do them all at once.
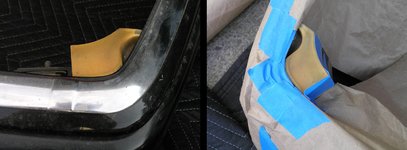
At first I only wanted to adjust the rear bumper & install a new trunk mounted sound system amplifier. The bumper’s right side was slightly out of position & bugging me. Its forward end was not lining up properly with the rear wheel fender arch. Because of this, I could also slightly see the yellowish color of the urethane impact insert in the right bumper corner. It was too much of a contrast against an 040 Black background. I decided to remove the bumper in order to camouflage the inserts with black paint.
The scope of the project escalated to the following tasks:
• Inspect both the bumper underside & the car body covered by the bumper.
• Thoroughly wash, clean and wax the car body (normally covered by the rear bumper) so it is good to go for the next 18 years.
• Paint the visible yellow inserts flat black so they disappear from my view.
• Cosmetically refurbish the rusting exhaust tips
• Install a new audio amplifier
Job#1 is to remove the rear bumper. The “HOW-TO” process can be reviewed with this link:
http://500eboard.com/forums/showthread.php?1479-HOW-TO-Remove-Install-amp-Adjust-Rear-Bumper
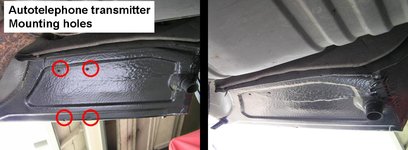
The first step of Job#1 requires removing the inner trunk fender well linings to expose the rear bumper mounting fasteners. I had a surprise discovery upon removal of the left lining which sidetracked me for a few days with additional work (which can be reviewed at this link):
http://500eboard.com/forums/showthread.php?1470-All-is-not-well-that-is-in-the-well
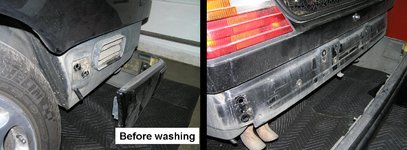
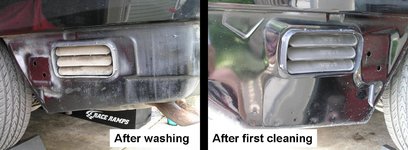
Job#2 is to inspect, wash & wax the newly exposed body area normally covered by the rear bumper. After washing the superficial dust & dirt away, the area was thoroughly wiped down with degreaser a few times.
I was real happy to discover the excellent condition of the under body & paint. The black paint was waxed twice with Zymöl. I intend to purchase & try out Turtle Wax Black Box for the next full body wax job. Black Box’s wax residue will be invisible on my car.
Job #3 is to pretty-up the exhaust tips. Cosmetically speaking, their current condition will not do. I’m going for an original-finish look. Rear Bumper removal provides adequate access to accomplish this task. Elevating the car on Brute Race Ramps provides an additional 10 inches of ergonomic workspace.
The exhaust is actually in very good shape. The tips leaving the muffler exhibit the most surface rust of the system.
• The first step was to remove the surface rust with a very rough grit autobody emory cloth strip (with special attention to the welding rings where the exhaust tips meet the muffler).
• The second step was to follow-up with finer grades of sand paper. Then wipe clean with Prep-Sol.
• After masking the work area, 3 or 4 coats of primer/sealer were applied.
• After the primer had sufficiently dried, 3 or 4 coats of temperature & chemical resistant finish color coat were applied, with a light sanding between coats. The new paint job should provide years of adequate protection
The end result is satisfactory. From a normal viewing level, one would think the exhaust was recently renewed with an OE replacement.
At first I only wanted to adjust the rear bumper & install a new trunk mounted sound system amplifier. The bumper’s right side was slightly out of position & bugging me. Its forward end was not lining up properly with the rear wheel fender arch. Because of this, I could also slightly see the yellowish color of the urethane impact insert in the right bumper corner. It was too much of a contrast against an 040 Black background. I decided to remove the bumper in order to camouflage the inserts with black paint.
The scope of the project escalated to the following tasks:
• Inspect both the bumper underside & the car body covered by the bumper.
• Thoroughly wash, clean and wax the car body (normally covered by the rear bumper) so it is good to go for the next 18 years.
• Paint the visible yellow inserts flat black so they disappear from my view.
• Cosmetically refurbish the rusting exhaust tips
• Install a new audio amplifier
Job#1 is to remove the rear bumper. The “HOW-TO” process can be reviewed with this link:
http://500eboard.com/forums/showthread.php?1479-HOW-TO-Remove-Install-amp-Adjust-Rear-Bumper
The first step of Job#1 requires removing the inner trunk fender well linings to expose the rear bumper mounting fasteners. I had a surprise discovery upon removal of the left lining which sidetracked me for a few days with additional work (which can be reviewed at this link):
http://500eboard.com/forums/showthread.php?1470-All-is-not-well-that-is-in-the-well
Job#2 is to inspect, wash & wax the newly exposed body area normally covered by the rear bumper. After washing the superficial dust & dirt away, the area was thoroughly wiped down with degreaser a few times.
I was real happy to discover the excellent condition of the under body & paint. The black paint was waxed twice with Zymöl. I intend to purchase & try out Turtle Wax Black Box for the next full body wax job. Black Box’s wax residue will be invisible on my car.
Job #3 is to pretty-up the exhaust tips. Cosmetically speaking, their current condition will not do. I’m going for an original-finish look. Rear Bumper removal provides adequate access to accomplish this task. Elevating the car on Brute Race Ramps provides an additional 10 inches of ergonomic workspace.
The exhaust is actually in very good shape. The tips leaving the muffler exhibit the most surface rust of the system.
• The first step was to remove the surface rust with a very rough grit autobody emory cloth strip (with special attention to the welding rings where the exhaust tips meet the muffler).
• The second step was to follow-up with finer grades of sand paper. Then wipe clean with Prep-Sol.
• After masking the work area, 3 or 4 coats of primer/sealer were applied.
• After the primer had sufficiently dried, 3 or 4 coats of temperature & chemical resistant finish color coat were applied, with a light sanding between coats. The new paint job should provide years of adequate protection
The end result is satisfactory. From a normal viewing level, one would think the exhaust was recently renewed with an OE replacement.
Attachments
-
 prewash.jpg162.2 KB · Views: 34
 -
 Painted%20Tips.jpg68.6 KB · Views: 33
 -
 Prep%20Tips.jpg87.4 KB · Views: 33
 -
 P7070254.JPG201.8 KB · Views: 28
 -
 Rusty%20Tips.jpg79.9 KB · Views: 32
 -
 Waxed.jpg127.6 KB · Views: 28
 -
 Underbody_2.jpg109.4 KB · Views: 30
 -
 Underbody_1.jpg93.4 KB · Views: 30
 -
 Wash_Clean.jpg114.5 KB · Views: 32
 -
 Fin%20Tips.jpg90.2 KB · Views: 31
 -
 Fin%20Tips_2.jpg96.8 KB · Views: 39
 -
 Fin%20Tips_1.jpg87.2 KB · Views: 36
Last edited: