• Hi Guest !

    Welcome to the 500Eboard forum.

    Since its founding in late 2008, 500Eboard has become the leading resource on the Internet for all things related to the Mercedes-Benz 500E and E500. In recent years, we have also expanded to include the 400E and E420 models, which are directly related to the 500E/E500.

    We invite you to browse and take advantage of the information and resources here on the site. If you find helpful information, please register for full membership, and you'll find even more resources available. Feel free to ask questions, and make liberal use of the "Search" function to find answers.

    We hope you will become an active contributor to the community!

    Sincerely,
    500Eboard Management

New owner introduction and restoration project 500E

Soooo,the guys I ordered the parts from sent me despite me providing my engine number the main bearings for the late versions...


Edit:

Just found out Mercedes changed also from 21mm wide main bearings on the early cars to the 17mm wide bearings of the late versions...

So only the 17mm wide bearings are available for all M119...

I do NOT like using the narrow bearings,though...
 
Last edited:
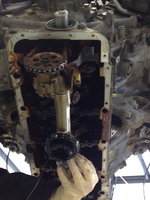
Main bearings and crank installed.
Main bearing play measured with plasti gauge and axial play measured with dial gauge.
proxy.php


proxy.php


proxy.php


Will still install a few pistons today before I go home.
Continue tomorrow.
 
Minor update,installed yesterday quite a bit more parts...

Old main and rod bearings were quite worn:

proxy.php


Verified with the plasti gauge also rod bearing play(main bearing and rod bearing journals were measured with micrometer and caps with bore dial gauge,I use plasti gauge only to double check)

proxy.php


Installed heads,lower timing cover,oil pump and oil pans as well as a/c bracket,water pump,idler pulley brackets,...

proxy.php


proxy.php


proxy.php
 
That my friend is a beatiful thing! I love your attention to detail and surgical like cleanliness. Cant wait to see it all put together.
 
Awesome. :gor-gor:

Can you post a photo of your engine stand? Also, how did you attach the engine block to the engine stand with the oil pan removed (when working on the crank/rod bearings)? The normal lower attachment points are on the oil pan, which makes it difficult when the oil pan is removed...

:detective:
 
Dave, if you look at his pix above, you can see where he mounted the bottom legs and then on the first page of this thread you can see the top side.
 
Dave, if you look at his pix above, you can see where he mounted the bottom legs and then on the first page of this thread you can see the top side.
Glen, I was hoping for a better photo of the rear side showing the exact bosses used, and when the oil pan was off, how many bolts were used (3 or 4).

:D
 
Dave, maybe these photos would help with your question ... I just took these early this morning.....
 

Attachments

  • 2014-02-08 09.48.52.jpg
    2014-02-08 09.48.52.jpg
    285.5 KB · Views: 50
  • 2014-02-08 09.49.04.jpg
    2014-02-08 09.49.04.jpg
    301.8 KB · Views: 54
  • 2014-02-08 09.49.15.jpg
    2014-02-08 09.49.15.jpg
    331 KB · Views: 51
  • 2014-02-08 09.49.31.jpg
    2014-02-08 09.49.31.jpg
    284.9 KB · Views: 45
  • 2014-02-08 09.49.38.jpg
    2014-02-08 09.49.38.jpg
    277.8 KB · Views: 45
  • 2014-02-08 09.49.46.jpg
    2014-02-08 09.49.46.jpg
    346 KB · Views: 53
  • 2014-02-08 10.01.00.jpg
    2014-02-08 10.01.00.jpg
    285.7 KB · Views: 54
  • 2014-02-08 10.01.16.jpg
    2014-02-08 10.01.16.jpg
    231.9 KB · Views: 52
I mounted the block through all 4 threads,then installed the upper oil pan removed the engine with two guys from the stand,changed the layout of the bracket and bolted the lower points through the oil pan.


I would NEVER attach a full equipped engine like in the pics above!!!!

Two bolts only and even with slight movement upwards in the front or to the side it might crack the Alusil block on the mounting points.


Alusil blocks are very sensitive to load applied to threads,they crack very easy.
I fixed over the years many engines some DIY guys cracked by attaching them wrong to the engine stand.

Royal PITA to weld them!!!!!!!!!!!!!


Usually,I mark every single bolt I tighten with a white marker.
Took quite a bit effort to source a red paint marker that is close to the color Porsche used.
 
Last edited:
Made a bit more progress over the weekend
Valve train parts ready to go in:

proxy.php


proxy.php


Cams installed:

proxy.php


proxy.php


Made my own "special tool" for assembling the intake shaft gear:

proxy.php


Riveting the chain:

proxy.php


Measuring cam timing:

proxy.php


Things left to do:

-rebuild tandem pump
-assemble intake manifold and install it
-attach ignition parts
-install engine mounting brackets
-install alternator
-install oil filter housing
-install knock sensors and lower wiring harness

Have to change rod bearings and Vanos high pressure pump on a V10 starting today,hopefully I find some time this week to take care of a few of the things mentioned above.
 
Does anybody know the correct gap for the cam position sensor?
The specs are in the WIS / FSM somewhere... if you can't find them, let me know and I'll look it up. Doesn't appear in a quick glance at the FSM...

:scratchchin:
 
The specs are in the WIS / FSM somewhere... if you can't find them, let me know and I'll look it up. Doesn't appear in a quick glance at the FSM...

:scratchchin:

Look in the cylinder head installation area of the FSM. I recall seeing it for the M104 when I did my recent top end job on that engine.


Sent from my iPhone using Tapatalk
 
Thank you,again!
I did measure the gap with a feeler gauge during assembly.Measured 0.45mm,so seems I am fine
 
Hi, IF, order new shim/shims, I had to and maybe you too for the new motorbuild later on.

BTW, what happened to the cyl. heads? Did you give them a good valve *job* ? Roger
 

Attachments

  • shim.jpg
    shim.jpg
    122.4 KB · Views: 31
Hi, IF, order new shim/shims, I had to and maybe you too for the new motorbuild later on.

BTW, what happened to the cyl. heads? Did you give them a good valve *job* ? Roger

Hi Roger,I left this one bone stock.

Decided against modifying the heads to keep the engine original.
 
I'd port-match the intake to the heads- pretty easy and well worth the invested time or $.

Dave, you can move the exhaust toward center to reduce the amount of scraping on the Remus muffler. My 94' production Renntech muffler was a real scraper, but the later production was moved toward the center maybe 6 inches and it doesn't scrape.


Michael
 
Made some minor progress last week and weekend.

-Rebuilt tandem pump,was easy.Only issue was one broken spring on the SLS side and a stuck piston.Got it eventually out and replaced all springs.

-Assembled intake manifold after getting linkages back from yellow plating.

-Re-sealed the steering box.

-Installed the oil cooler and oil lines

-Replaced all rubber hoses for p/s with new heat protection.

-Replaced all coolant hoses

-Installed the new rear brakes and braided hoses after changing dust shields to W210s and replaced wheel bearings.

-Changed all bushings and arms on the rear axle and their mounting hardware.

-Built an auto-dim mirror with parts of a W210 mirror from the junk yard.

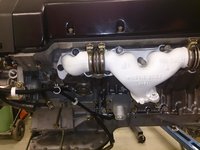
-ceramic coated exhaust manifolds white

-replaced all vacuum lines

-installed engine and transmission

-installed fresh plated transmission oil cooler lines and new hoses

-coated lots of brackets,supports and covers in the engine bay satin black
 
Took also care of my cracked sub frame carrier.

Massive thanks to my mate Siim,who helped me a lot and worked with me 14-18h for the last 4 days.

The bucket should be running next weekend hopefully...

Tried to upload pics from my laptop as attachments but seems like it does not work...
 
Last edited:
Closing in on first start up,still have to get the fuel tank back in.

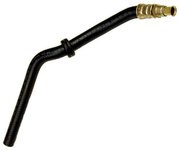
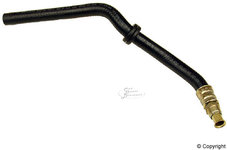
The fuel feed hose had many cracks in it from being old.

Nice that the part is .036 specific and NLA.
So had to get it custom made(for less than 10€ instead of 150€ when it was still available).

You guys should check yours from time to time,BTW...
 
Rebuilt tandem pump,was easy.Only issue was one broken spring on the SLS side and a stuck piston.Got it eventually out and replaced all springs.

I need a set of SLS pump pistons and springs to re-commission a tandem pump. May I ask where you got the springs from?

Jim
 
The fuel feed hose had many cracks in it from being old. Nice that the part is .036 specific and NLA. So had to get it custom made(for less than 10€ instead of 150€ when it was still available).

You guys should check yours from time to time,BTW...
I just found the same thing on my project car. The 034/036 feed hose (124-470-57-75) was superceded to the standard W124 (6-cyl) feed hose, which is very similar... I think there are just minor differences in the shape. Sadly, the new/superceded part number (124-470-69-75) tripled in price as of Jan-1, 2014. It had been $60 USD list price last year, now it's $175 USD list price.

Even worse, there are no quality aftermarket hoses available. The only one is Trucktec, which is junk. A number of WorldPac vendors are showing CRP (Conti) but they are not CRP, they are Trucktec hoses with the Trucktec logo blacked out with magic marker!! A vendor I ordered from wasn't happy to learn this, they checked all of their warehouses and found the same thing. They said they could have bought the Trucktec hose directly for less than they paid for the supposedly-CRP hoses. At any rate, it's either OE for stupid money, or a junk hose.

Raikku, how did you get a custom molded hose remade / rebuilt?

Any chance someone could chase down the original OEM hose (made by Cohnen) over in Europe?

::oldman:
 
Dave,I got a hydraulic shop around the corner that manufactures all kind of hoses and lines mostly for heavy duty stuff.

Dropped the old one there,they re-used the threaded fitting part and pressed a new Continental hose on it that is suitable for hydraulic fluid and fuel up to 20bar,pressure tested it and within 30 min I had a replacement..

Dealer ship said even the superseed part is NLA...

The original hose it not molded I would say judged by checking the old one,it is originally a straight piece..
 
Superceded part (124-470-69-75) is still available... not sure what your dealer was thinking. I just didn't want to pay $150+ for a stinking hose.

It is definitely a molded/formed hose originally. The Trucktec replacement is also molded/formed.

:tumble:
 

Attachments

  • 1244706975.jpg
    1244706975.jpg
    8.5 KB · Views: 28
  • fuel_tank_exit_hose_oem_124_470_69_75_1244706975.jpg
    fuel_tank_exit_hose_oem_124_470_69_75_1244706975.jpg
    43.9 KB · Views: 26
Ok....
Well,now I got a non molded hose on the car then.
Has no hard bends or anything that would harm the flow.
Replaced also on the driver side the hoses,clamps and valve.
 
Given the stupid cost of new OE, I'm awfully tempted to try and get a rebuilt straight hose myself!!!

:scratchchin:
 
ThAt's " Cohline" mind you
I don't think so... would have sworn it was "Cohnen" marked on the OE hose. Got one loose on the bench, I'll take photos.

UPDATE: Photo confirmation attached.

:mushroom1: :mushroom1: :mushroom1:
 

Attachments

  • fuel_hose_Cohnen.jpg
    fuel_hose_Cohnen.jpg
    75.6 KB · Views: 49
Works perfect,I post pics the next time I have the car up.
Have to remove the fuel hoses again anyway to install the new rubber boots that seal the trunk holes...

Has some ASR issues we sorted today and now it runs perfect and very powerful,surprisingly quick car...
All I need to do is getting the transmission adjusted for having it shifting proper.
Then take it this week for a longer drive.

Things left to do:

-replace rubber boots for fuel hoses trunk floor
-fix ignition lock
-get a few panels painted(good enough for the summer,disassemble it next winter again and take out all windows,engine,...to have it fully resprayed,replace all gaskets,..)
-replace fuel filler cap
-ASR defeat switch
-install new B-pillar cover

for the summer time:

-Quaife differential
-rebuild drive shafts
-finish wood refurbish
-replace roof line with Alcantara unit
 
Last edited:
First test drive with the previous owner today...

Went quite ok,transmission needs adjusting,proper alignment and diff is a bit noisy(does not bother me too much,the Quaife goes in soon enough)
Otherwise car drove nice.

Scored today at the junk yard a few items like B-pillar cover and some small parts.
Were right away installed.
 
Another case of sheer amazement what some folks can do in a matter of a few weeks and months - it is just incredible what "git 'er done" guys can do. Rebuild engine? No problem. Rebuild suspension? No problem. Rebuild upholstery? No problem. Compound and correct paint? No problem. Install Quaife? No problem. Seriously, much, much awesomeness.

Rgds,
 
Last edited:
Cheers,guys!

Drove now around 300km with the car.
Wiper relay and ABS pump relay are stuck closed sometimes,new relays fix these issues.

The car is way more entertaining without the ASR(thanks to the ABS fault I figured that out yesterday),but for sure needs a LSD.
I am not a fan of traction control anyway.


Am a bit surprised how good the suspension,brakes and overall handling of the car is.
Power output of the engine and shifting of the gearbox(got it adjusted myself) are amazing for a 20year old car.
 
Replaced fuel pumps and filter.
Now everything on the fuel system is done.

Ordered a throttle cable and the NSS.

Time to change the fluids after driving now 1500km.
 
ETA now also ordered,do not want to run into issues later on as it is still the original one.


Are you having your original one rebuilt, and if so who did you send it to? I cant even imagine the cost of buying a new one (if its available)....
 
Just a quick update:

Finally moved to the UK a bit over a week ago.
Drove the 036 within a day from Stockholm to Calais(over 2000km),only stopping for food and petrol.
Amazing long distance car,arrived tired but relaxed.

Will take now a while until I will have time to work on the 500 again as setting up my new company and all the personal moving stuff will keep me busy for a while,I guess...
 
Are u setting up shop in the uk ? Once you've settled let me know we can meet up !
 
Yes,I am setting up a shop in the UK for BMW M cars and Porsches.
And whoever needs help with his 036 over here :)
 

Who has viewed this thread (Total: 2) View details

Back
Top