• Hi Guest !

    Welcome to the 500Eboard forum.

    Since its founding in late 2008, 500Eboard has become the leading resource on the Internet for all things related to the Mercedes-Benz 500E and E500. In recent years, we have also expanded to include the 400E and E420 models, which are directly related to the 500E/E500.

    We invite you to browse and take advantage of the information and resources here on the site. If you find helpful information, please register for full membership, and you'll find even more resources available. Feel free to ask questions, and make liberal use of the "Search" function to find answers.

    We hope you will become an active contributor to the community!

    Sincerely,
    500Eboard Management

OWNER a777fan (E420)

Plugs, wires, caps, rotors, insulators, and coils all new.
Next upstream electrical is to swap EZLs, Egas, and LH modules to see if there's a difference.

Wondering if any of those could be responsible for intermittent misfires?


Hmmm... IMHO those other possibilities are getting slim on the hit list, simply because they control more and more things as you work your way back to the LH unit. For example, the EZL has two 'units' one for each coil, and (while there is probably WAY more to it) their main function in regards to the ignition process should be to turn the current to the coils ON, and then OFF, after a given duration as a function of engine load, environmental conditions etc. A relatively simple task in comparison to what is going on across all the High Voltage equipment that you have already replaced. But you never know, anything is possible when it comes to electronics.

Where are you located? If in the PNW, you should swing by and we can hook the scope up to see what is going on.
 
Located on the East Coast.

I have an SDS, but 38 pin mushroom melted and I have not replaced it yet.

Got a used 38 pin from the parts car though. Just need to rewire.

Indy has an oscilloscope.
 
While it may have seemed like I was solely focused on the ignition issues this weekend, I did have some time to try and patch up the flamed out ACC system. The PBU graciously supplied by @gerryvz arrived. I cleaned it up and plugged it in. When I turned the key however, I noted the blower motor was running at a low speed, even with the PBU '0' button pushed. Assuming the PBU is good (and why wouldn't it be right? I mean these things don't usually fail, right?) I consulted the wiring diagram. The only other component in line is the Blower Motor resistor.

I found my old 'How-To', refreshed my memory of how to get to that item and extricated from the bowels of the blower motor cavity. It was a classic case of frustrated 'doing-without-thinking' as once I extricated it, I sat there, looking at it on the bench thinking... well great... now what? Some BW article (i KNOW right?!) indicated the 'resistor' is actually just a big transistor. I did some googling and found this nice resource about testing a transistor with the diode setting of a multi-meter: https://vetco.net/blog/test-a-transistor-with-a-multimeter/2017-05-04-12-25-37-07

The descriptions of the BASE, COLLECTOR, and EMITTER all lined up with my perception of the the wires coming off the transistor. I made myself a little spreadsheet to keep the results of the various tests straight.

Screen Shot 2020-11-02 at 6.23.39 PM.png

The Pos and Neg columns were just to remind me what color wire I was supposed to have on each lead. I don't know if this resistor is an NPN or PNP type, but given that Test 1-3 indicate an NPN, Test 4 indicates a PNP, and Test 5 is a fail either way, I feel pretty confident this sucker got blown when the PBU melted. It's unfortunate, as a new one is not cheap.

PS - My new favorite parts site is Ed Hicks Imports in Corpus Christi, TX. Thanks again for pointing them out Dave! For example the resistor at mboemparts was ~301 USD. Ed Hicks is letting them go for ~270 USD! :)

EDIT: This test did not successfully identify a faulty resistor. While I did find the resistor to be the cause of this errant blower motor behavior, the new resistor gave identical results from this test as the old broken one. :(
 
Last edited:
Located on the East Coast.

I have an SDS, but 38 pin mushroom melted and I have not replaced it yet.

Got a used 38 pin from the parts car though. Just need to rewire.

Indy has an oscilloscope.
Probably worth a trip to the indy for the scope. You don't happen to be in 'upstate' NY or near do you? If so, you should check out Eric O. at South Main Auto in Avoca. He's not an MB guy, but he's got an amazing diagnostic noggin, and a great youtube channel if you haven't checked it out already.
 
While it may have seemed like I was solely focused on the ignition issues this weekend, I did have some time to try and patch up the flamed out ACC system. The PBU graciously supplied by @gerryvz arrived. I cleaned it up and plugged it in. When I turned the key however, I noted the blower motor was running at a low speed, even with the PBU '0' button pushed. Assuming the PBU is good (and why wouldn't it be right? I mean these things don't usually fail, right?) I consulted the wiring diagram. The only other component in line is the Blower Motor resistor.

I found my old 'How-To', refreshed my memory of how to get to that item and extricated from the bowels of the blower motor cavity. It was a classic case of frustrated 'doing-without-thinking' as once I extricated it, I sat there, looking at it on the bench thinking... well great... now what? Some BW article (i KNOW right?!) indicated the 'resistor' is actually just a big transistor. I did some googling and found this nice resource about testing a transistor with the diode setting of a multi-meter: https://vetco.net/blog/test-a-transistor-with-a-multimeter/2017-05-04-12-25-37-07

The descriptions of the BASE, COLLECTOR, and EMITTER all lined up with my perception of the the wires coming off the transistor. I made myself a little spreadsheet to keep the results of the various tests straight.

View attachment 117286

The Pos and Neg columns were just to remind me what color wire I was supposed to have on each lead. I don't know if this resistor is an NPN or PNP type, but given that Test 1-3 indicate an NPN, Test 4 indicates a PNP, and Test 5 is a fail either way, I feel pretty confident this sucker got blown when the PBU melted. It's unfortunate, as a new one is not cheap.

PS - My new favorite parts site is Ed Hicks Imports in Corpus Christi, TX. Thanks again for pointing them out Dave! For example the resistor at mboemparts was ~301 USD. Ed Hicks is letting them go for ~270 USD! :)
Not that it matters or anything but is the blower motor regulator really a BJT transistor (not a MOSFET)?
Man I haven't thought about ancient BJT NPN/PNP type transistors since my textbook days!!! 😳

VBE for an NPN is nominally 0.7 volts. VBC for PNP is nominally 0.7 volts. (The article you reference says 0.45v-0.9v but for BJTs, the voltage drop is usually around 0.7 volts).

Your measured readings of ~1.7V drop is not what I would expect for a BJT.....

I would expect Voltage drop between gate and source of an N-type MOSFET to be able to get to 1.7V (or higher) (as opposed to VBE = 0.7V for an NPN BJT) ..... I vaguely remember the VBE on a NPN BJT being 0.7v because that's the saturation voltage .... whereas on a MOSFET it behaves more like a resistor and the voltage drop is dependent on current ...... I think. All this transistor stuff brings me back to the my undergrad days ---- I "learned" all the transistor stuff the same summer I discovered, ahem, the joys of getting ********* ..... so I don't really remember anything. 🤪

All this is useless anyways and pointlessly academic - I'm glad you got a replacement porcupine transistor (MB branded at that!) for not-extortionate pricing.
Gah! I knew someone would know more about this than I after searching online for 5 minutes! ;)

Thanks for the info @Jlaa. I figure that I will perform the same test on the new one. If it gives similar results, the new unit will go into the parts hoard for whatever 124 comes next! :D

(of course the PN locks me into a car with cabin air filters, but, I am ok with that)
 
I've not yet been able to figure out how to bench-test these regulators with a meter, so if y'all can find a way, that would be sweet. I've had to connect them in the car and measure current draw at high speed, and verify the fan RPM changes as expected.

:shocking:
 
It's always fun for me to lean back in my Aeron chair, and read the posts where @Jlaa is being @Jlaa......

Good entertainment !!
Herman Miller out of Michigan makes #1 quality furniture, although I must confess I am more relaxed when I read this board and am typically in one of the loungers that Herman Miller manufactures when reading 500eboard.com. :smiley_emoticons_mt
I've not yet been able to figure out how to bench-test these regulators with a meter, so if y'all can find a way, that would be sweet. I've had to connect them in the car and measure current draw at high speed, and verify the fan RPM changes as expected.

I'm no lab-technician expert. That said, transistors are active devices (instead of passive devices like resistors). I'm sure you already know this but since they are 3-terminal devices in that they allow current from one terminal to another terminal, depending on the current applied through the base (BJT) or voltage at the gate (FET), your method for testing proper operation is probably the right way.
 
I've not yet been able to figure out how to bench-test these regulators with a meter, so if y'all can find a way, that would be sweet. I've had to connect them in the car and measure current draw at high speed, and verify the fan RPM changes as expected.

:shocking:

Herman Miller out of Michigan makes #1 quality furniture, although I must confess I am more relaxed when I read this board and am typically in one of the loungers that Herman Miller manufactures when reading 500eboard.com. :smiley_emoticons_mt


I'm no lab-technician expert. That said, transistors are active devices (instead of passive devices like resistors). I'm sure you already know this but since they are 3-terminal devices in that they allow current from one terminal to another terminal, depending on the current applied through the base (BJT) or voltage at the gate (FET), your method for testing proper operation is probably the right way.

I will certainly report back with my findings once the new resistor arrives.

I really appreciate that there are people out there interested in dialoging about this stuff. So much better to experiment/test as a group!
 
Small update!

The resistor was in fact the cause of my blower motor issues with the PBU plugged in!

Unfortunately, the new resistor gave identical results to the old one when I repeated the test from post #703.

I’ll edit my previous post as to not lead others astray. I am very glad to have a pieced together ACC system again however. Mucho thanks to the honch again for supplying the PBU!
 
Well. I think the car is finally back on the road. A few items now completely addressed:
  • Spent yesterday putting the dash back together. And everything there is running tip top.
  • Took advantage of having the wiper assembly out to replace the cabin air filters with ones I picked up from @bunty660. Thanks sir!
  • Also disassembled the wiper assembly, cleaned and re-greased it using @JC220 s rebuild thread.
  • Replaced the ETC and dash temp gauge sensors.
  • As I had prviously mentioned, I had traced my misfire to a bad rotor. My new ones arrived and I replaced both for good measure. No more misfires. I was able to take it on a long drive today with no issues. Start/stop, and highway traffic. I have not been able to do that in a LONG time. Felt great. Very happy with that.
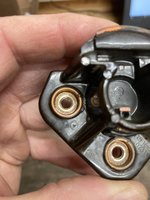
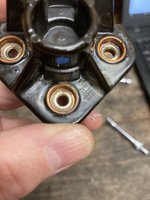
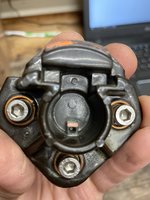
Here is the offending rotor I took out for posterity:

3E2A9A6C-0FB8-43C4-92C9-F38EF0FDDDBD.jpegDAF25689-9851-4B4C-B03F-6EF9612DC660.jpeg4FC625F0-FD6E-41AB-8786-D0F6565888EA.jpeg4FC625F0-FD6E-41AB-8786-D0F6565888EA.jpeg4F2C9F42-7181-4801-8991-EC967EF46EB7.jpegB5639AF1-C854-46DC-A800-D5F1EA283C5A.jpeg9B320A29-218D-49E6-995F-0D764BB3BB68.jpeg944DF2BA-7AA5-4E41-B550-0A93C65BC35F.jpeg1BBF5BB6-1F0F-4E5B-9DE3-6501DB961965.jpegA039FCAF-A1F2-4562-94A4-02D6540DC2B5.jpeg6F7A4FA7-DC9D-4369-A256-9E4A472C771E.jpeg67500511-541A-4E35-9532-F2C4B7A7010B.jpeg
IMHO, it looks quite horrible for how many miles are on it. ~4000 or so. No clue what the discoloration is from.

As you can see, I had replaced the low profile bolts with regular height Cap heads. I wonder if they were JUST high enough to be able to pull the voltage out of the center electrode ‘cup’ and to ground through the rotor mount?
 
can you show a comparison in the two bolt types? Or, if you already posted it, note the post number.
 
Here is a picture from a recent post by Sir Jlaa.


drew
 
Here is a picture from a recent post by Sir Jlaa.


drew

Ah! Thanks @sheward! I thought i remembered someone post those. Of course it was @Jlaa!!!

I think those are the exact aftermarket screws that I utilized. @Jlaa, do your pictures indicate you are successfully using the taller 'aftermarket' bolts with no issues!? :)
 
Ah! Thanks @sheward! I thought i remembered someone post those. Of course it was @Jlaa!!!

I think those are the exact aftermarket screws that I utilized. @Jlaa, do your pictures indicate you are successfully using the taller 'aftermarket' bolts with no issues!? :)
Actually the 4mm allen cap screws I bought are knurled, whereas yours are smooth. That said, I haven’t used these yet (waiting for my current set of Bosch rotors to die still) but @Trae has been using 4mm cap screws — here — Beru rotors now made in ITALY, no longer reboxed OE | M119 Engine
 
Actually the 4mm allen cap screws I bought are knurled, whereas yours are smooth. That said, I haven’t used these yet (waiting for my current set of Bosch rotors to die still) but @Trae has been using 4mm cap screws — here — Beru rotors now made in ITALY, no longer reboxed OE | M119 Engine
Ah! Thanks.

It is interesting to note that @Trae is also trying to figure out a 'warm' misfire at the moment... :detective:

I have suggested to him (via PM) to swap out the bolts for the low profile stock ones if he still has them around. I have not heard yet if he has had the chance to 'experiment'.
 
Very nice, Jon! Are the lamps NLA? I can't remember. I assume you Dremeled the opening into the original C-pillars?

Oh yeah - how goes the Sportline project?

:deniro:
 
Yep! Ole dremel helped me out.

Back a year and a half ago, the left light was shown as NLA. I stalked ebay for a bit, but then became distracted. Looked last week and nabbed two of em for the price of 1.

Funny though, the classic center website still indicates its available. This despite me checking a year and a half ago with multiple vendors stating it was NLA.

The sportline parts (except the rear sway) are ready to go in. I’m working on getting a rear sway, but have come to the realization that the rear subframe needs to come down. If thats happening, I’ll likely do all the bushings back there ‘while im in there’. The projects grow and grow!
 
Non-MB content warning! :nobmw:

I've been tearing into the M60B40 engine (BMWs M119 of the early 90s) in my 1995 E34, as I had noticed some slop in the timing chain when replacing the valve cover gaskets. I never found anything definitive about whether the slop I found was unacceptable, but with 187k and a TON of sludge all over the head, I figured it was time. I wanted to replace the chain, and clean up as much of the sludge as possible ( to aid with the nightmares I was having of blocked oil passages in some parts of the head.. lol).

Anyway I'm trying something a little different in documenting the journey on this project, producing little video clips here and there of my actions. The first one is about hydraulic lifter disassembly and cleaning. I thought I would share it here as well, for those into the 'blood and guts' of engines. :)

 
Quick update and a description of some curious behavior Uter has been displaying as of late. Note, I have not yet pulled codes so I really don't have even an initial direction yet, but wanted to record some of my observations for posterity (and discussion if others have had similar experiences).

The car is fine on initial start up. Once up to temperature (~80 C on the coolant gauge), the following can occur:
  • When stopped and in gear, the idle can surge. When occurring, the behavior presents itself in any 'in-gear' shift lever position. When moved to P or N the idle stabilizes. Once underway in gear (duh), everything operates normally. This behavior can occur on my first trip of the day, once warmed up. It sometimes happens, and sometimes does not. It can also appear, and then go away without shutting the engine off/restarting.
  • On a second start, (or any subsequent start when already warm), the car is not happy. When in gear, it has a rough idle. Application of the accelerator will result in a response from the engine, but power output is low, and the engine is very slow to rev. Pulling away from stop signs or stop lights is an exercise in patience, (and is also pretty adventurous when crossing uncontrolled intersections! :lolzz: ) After a certain amount of time (a given number of seconds) of accelerator application with the car accelerating its as if the engine finally catches up with itself, and operates 'normally', until it gets to the next stop sign or light. The behavior when it 'catches up with itself' is almost as if the parking brake was on, and was suddenly released. And no...the parking brake is not on when this occurs. lol!

I'm sure I have left out some important details out of the above. Anyway, I'll eventually get the blinker out to see if there are any specific hints buried in the compies.
 
Jon, I'm too lazy to look back through 14 pages... your ETA has been rebuilt, correct? Has the crank sensor been replaced? Any change if you disconnect the MAF?

:detective:
 
ETA has had the Roden 'spa' treatment. A couple years back now if I remember (2018?). Crank Sensor has NOT been replaced. I have not yet disconnected the MAF, but will add that to the trouble shooting list to see if it changes anything.
 
Hrmmm. Do you have a working SDS to view live data? That would help a lot. Check codes for grins but don't be surprised if there are none.

Try disconnecting the MAF for grins - I'm not expecting a big change, but it's easy and free. This will cause some codes, you'll need to clear them after re-connecting the MAF.

Do you have a spare E-GAS module to try? I'm thinking you either have some throttle control issues, mixture issues, or both. With all new ignition components it's pretty unlikely to be ignition (but SDS live data would help rule this out).

The idle surge, rough idle, and lack of power leaving a stop may or may not be related to a single issue... could be dealing with more than 1 root cause.

Another question - has the fuel pump ever been replaced?
 
Please open your trunk and immediately check the connections at the battery. REMOVE the connectors and clean both the battery terminals, and the ends of the positive and negative cables with a wire brush or terminal cleaner.

In addition to your crank position sensor, has your neutral safety switch been replaced, by chance?

After cleaning the battery+terminals, I recommend the following:

1) Disconnect the MAF as said, and drive the car and see if there is any change. Do this before step 2.
2) Clear all codes, and drive the car 20 or 30 miles (three or four good cold start cycles), and see what comes back. Identify and diagnose codes, and report back here. Don't bother with current codes -- delete them, ignore them, drive the car, then see what comes back.
3) If you have spares for the CAN modules, consider swapping in spares, one by one, to see if there is any change. Particularly the LH and the E-GAS (or TTL/R -- if your car is so equipped). Don't think modules would be an issue, but something to try.

Cheers,
Gerry
 
@gerryvz

You were spot on. The terminals in the trunk were quite bad. I'm not sure how they got that way, but the positive terminal (primarily the LH module takeoff was highly rusted/corroded. I'll add photos from my phone after I have made this post.

EB8E0691-A507-405E-86EB-F01D9D48FE59.jpeg
1BD68B56-3647-4C3F-A9D7-7E9F63C128E4.jpeg

Once the terminals were clean, the stumbling/hesitation I described in the second bullet of post #727 was completely gone. However, the car was still exhibiting the classic miss when warm behavior. Not totally surprising given the fact that the car has basically been sitting in front of the house since January. I popped off the caps, and used some contact cleaner to get the moisture and gak out of them. Put them back on, and the car has been fine. Took it for a longer-ish drive with a few WOT runs, and its still humming along nicely.

I hope that it now stays driveable! Will be sure to take it on regular longer drives moving forward to keep the moistures away.

If it stays running... I plan to reward it by FINALLY installing the sport line springs/dampers I purchased a long time ago. :)
 
Have you considered cutting the grooves into the distributor caps, as shown in a couple of threads here, to alleviate the moisture problem?
 
Have you considered cutting the grooves into the distributor caps, as shown in a couple of threads here, to alleviate the moisture problem?
Thought about it... for sure. I think my stubborn-ness is getting in the way. Much like Dave, I can't understand why this is 'suddenly' an issue for these cars. not sure how many more times I will 'clean' them before giving in. Remind me of the definition of insanity again...?
 
Thought about it... for sure. I think my stubborn-ness is getting in the way. Much like Dave, I can't understand why this is 'suddenly' an issue for these cars. not sure how many more times I will 'clean' them before giving in. Remind me of the definition of insanity again...?
Is your stubborn-ness a match for this legendary pdf doc (no doubt you have already seen it) ....

I mean it is August now in Seattle. Maybe slot-ma-tize the caps before the winter? It's not like Seattle is known for rain or anything? 🤣
 

Attachments

A few more little things on Uter over the last couple days.

The MB batt-trie I had purchased right after buying Uter in 2017 started to fail. I can't really blame it, as it has endured many months of idle-ness and infrequent use. I discussed with the @gsxr over email, and he recommended an H8 size EverStart AGM from wally world, which was a great suggestion but unfortunately none were available locally. I perused online and ended up finding a good price on a Super Start Platinum from O'Reilly. Oddly, getting it shipped to me via UPS was cheaper than if I had picked it up myself at the store right down the street. I installed it and its been great for the last 25 miles. LOL

Secondly, I was getting the LH CLICK OF DEATH from under the rear seat after the first start of the day. The fuel pump relay would quiet down after a couple minutes. Again, an online consult with the Dr @gsxr revealed that this is exactly how the symptoms for failing LH module capacitors start. The clicking subsides once the module has warmed to a certain degree. It will slowly get worse and worse as time progresses until the fuel pump relay never stops clicking. The LH module I had in the car was a WOT module I had pulled from a yard down in the bay area a couple of years ago (I think it was out of a 92 W140 IIRC), so I really wasn't too surprised that it MIGHT need some attention. I dinked around online and did a tiny bit of research to figure out what parts I needed to do the fix. I'll repeat them here for anyone interested:

There are a total of 6 caps, of two different varieties. 3 22uF/40V and 3 100uF/40V units. I went onto digi-key, (which is a great site btw, also awesome shipping turn around etc), and plunked in the specs. My research led me to believe that Nichicon caps would be a good choice (let me know if you have a different opinion), and they happen to have a 'High Temperature' line (UBX), which are rated up to 150 deg C. My research had also indicated that when selecting replacement caps, matching the capacitance of the original cap is most important. The voltage rating needs to be equivalent or higher than the original rating. With that in mind, the UBX line from Nichicon had a 100uF/50V, and a 22uF/100V model available. I purchased 3 of each. Despite my research the jump in voltage for the 22uF units (40 to 100) had me a little worried, so I found a 22uF/50V from Nichi's UBW line, which has a slightly lower temp rating (only ~135 deg C :LOL: ) and purchased three of them as well. I am glad I did, as the car did NOT like the 22uF/100V units. It was mostly fine, but had an odd occasional miss at idle and when revving up. Once I popped the 50V units in... it was great. Runs awesome now, lots of power nice and smooth at idle. I've got another WOT module and my original LH unit i'll re-cap here in the near future. Let me know if any of you smart electro guys (paging dr. @Jlaa ) have any insight to share on why the 100V units made the car upset. I'm still trying to figure out if it really was the 100V caps, or just my sh*tty soldering skills.

Quick shot of the OG caps. You can see one of the 22uF units was a-leakin.

E68A64FC-FC1C-4509-ADB7-20B9176B0E9E.jpeg

Thirdly - I purchased a set of rebuilt injectors and installed em. I figured 27 years for the original units was plenty enough, and the rebuilt units are pretty affordable in my opinion. This wasn't completely on a whim, the car was running rich (IE - stinky), and I was pretty much out of causal factors. Remains to be seen if the new puppies will fix that, but I'll report back on that later.

With these three things (and the cleaned batt-trie cables and de-misted caps) the ole girl is running better than ever. Took it for a spin on th highway, and I am still blown away by how comfortable this car is. AC on, cruising, stop and go traffic, just great!
 
A few more little things on Uter over the last couple days.

The MB batt-trie I had purchased right after buying Uter in 2017 started to fail. I can't really blame it, as it has endured many months of idle-ness and infrequent use. I discussed with the @gsxr over email, and he recommended an H8 size EverStart AGM from wally world, which was a great suggestion but unfortunately none were available locally. I perused online and ended up finding a good price on a Super Start Platinum from O'Reilly. Oddly, getting it shipped to me via UPS was cheaper than if I had picked it up myself at the store right down the street. I installed it and its been great for the last 25 miles. LOL

Secondly, I was getting the LH CLICK OF DEATH from under the rear seat after the first start of the day. The fuel pump relay would quiet down after a couple minutes. Again, an online consult with the Dr @gsxr revealed that this is exactly how the symptoms for failing LH module capacitors start. The clicking subsides once the module has warmed to a certain degree. It will slowly get worse and worse as time progresses until the fuel pump relay never stops clicking. The LH module I had in the car was a WOT module I had pulled from a yard down in the bay area a couple of years ago (I think it was out of a 92 W140 IIRC), so I really wasn't too surprised that it MIGHT need some attention. I dinked around online and did a tiny bit of research to figure out what parts I needed to do the fix. I'll repeat them here for anyone interested:

There are a total of 6 caps, of two different varieties. 3 22uF/40V and 3 100uF/40V units. I went onto digi-key, (which is a great site btw, also awesome shipping turn around etc), and plunked in the specs. My research led me to believe that Nichicon caps would be a good choice (let me know if you have a different opinion), and they happen to have a 'High Temperature' line (UBX), which are rated up to 150 deg C. My research had also indicated that when selecting replacement caps, matching the capacitance of the original cap is most important. The voltage rating needs to be equivalent or higher than the original rating. With that in mind, the UBX line from Nichicon had a 100uF/50V, and a 22uF/100V model available. I purchased 3 of each. Despite my research the jump in voltage for the 22uF units (40 to 100) had me a little worried, so I found a 22uF/50V from Nichi's UBW line, which has a slightly lower temp rating (only ~135 deg C :LOL: ) and purchased three of them as well. I am glad I did, as the car did NOT like the 22uF/100V units. It was mostly fine, but had an odd occasional miss at idle and when revving up. Once I popped the 50V units in... it was great. Runs awesome now, lots of power nice and smooth at idle. I've got another WOT module and my original LH unit i'll re-cap here in the near future. Let me know if any of you smart electro guys (paging dr. @Jlaa ) have any insight to share on why the 100V units made the car upset. I'm still trying to figure out if it really was the 100V caps, or just my sh*tty soldering skills.

Quick shot of the OG caps. You can see one of the 22uF units was a-leakin.

View attachment 136756

Thirdly - I purchased a set of rebuilt injectors and installed em. I figured 27 years for the original units was plenty enough, and the rebuilt units are pretty affordable in my opinion. This wasn't completely on a whim, the car was running rich (IE - stinky), and I was pretty much out of causal factors. Remains to be seen if the new puppies will fix that, but I'll report back on that later.

With these three things (and the cleaned batt-trie cables and de-misted caps) the ole girl is running better than ever. Took it for a spin on th highway, and I am still blown away by how comfortable this car is. AC on, cruising, stop and go traffic, just great!
Awesome! That’s good news! Can you post the part number of the original caps as well as the replacement Nichicon caps you got from Digikey as well? I think that would be helpful — I will attempt to recap my ECUs at some point as well. Nichicon is a great brand.

I don’t know a ton about capacitors, but my understanding is yes, replacement with a higher rated cap is generally great ….. except, electrolytic capacitors (those ones you replaced are electrolytics right?) depend on some good percentage of their voltage rating to develop the capacitance rating. I believe I read that if one uses an electrolytic capacitor with a 2-3-4x voltage rating above the actual circuit working voltage may be expected to not develop the full nameplate-rated capacitance value.

Again I am not an expert at this stuff. I just supposedly learned a lot of theory way back when in undergrad. 😂
Interesting! Yep, these were electrolytic types. So perhaps that was what was going on. Here is the screenshot from my order. Note I have already bought the extra ones for the other LH units I have on the shelf:Screen Shot 2021-08-14 at 5.14.31 PM.png
 
Interesting! Yep, these were electrolytic types. So perhaps that was what was going on. Here is the screenshot from my order. Note I have already bought the extra ones for the other LH units I have on the shelf:View attachment 136758
Hmmmm good stuff! Did you try looking at Panasonic caps as well, to replace those leaky Frako caps? I have two LH ECUs to perform surgery on, as well as a mountain of Becker stuff. Sometimes I use Mouser too.
 
Hmmmm good stuff! Did you try looking at Panasonic caps as well, to replace those leaky Frako caps? I have two LH ECUs to perform surgery on, as well as a mountain of Becker stuff. Sometimes I use Mouser too.
I did not... but I will note that there is one remaining old cap left in there. You can see it in the top right corner. Its blue and it runs lengthwise rather than sitting on its end. I only mention it as it is a Panasonic! Does the orientation indicates its a different type of capacitor?

Also... the red caps are 'Frakos'? I couldn't make out the logo or name on them. I did run across quite a few posts complaining about how crappy that brand is though...
 
Yeah the brown ones are Frakos. I think the blue one is a Philips (from the photo?) Those Frako aluminum electrolytic caps have a bad reputation.
 
Last edited:
Interesting! Yep, these were electrolytic types. So perhaps that was what was going on. Here is the screenshot from my order. Note I have already bought the extra ones for the other LH units I have on the shelf:View attachment 136758
@a777fan looks like you did good choosing caps! Those UBXs are rated for 1000 hrs at 150C and the UBWs are rated for 1000hrs at 135C, and both lines are built for automotive applications. The UBTs are rated for 2000 hrs 125C, but I think the UBX / UBW are already quite legit (and they cost more than the UBTs)

Question --- for the 22uF UBWs, instead of discrete caps, you got the ones mounted for Tape & Box / Cut Tape. This is for folks who plan to make a crap ton of products. See below --- the UBW1H220MPD vs UB1H220MPD1TD.

Screen Shot 2021-08-14 at 7.46.53 PM.png

LhSF2.png

Any reason why you chose to do this? Or was it just a stock / not in stock issue? Are you secretly making a factory to produce new-for-2021-re-imagined-LH-computers???? :lol:
Anyways for anyone reading this, these are excellent caps. 👍 I just ordered 10 of each, in non-Tape & Box format thus saving a miniscule 2 cents each for the 22uF capper. Thanks for the push @a777fan --- something I have been thinking of doing for a long time!

1628997989155.png
 
Last edited:
@a777fan looks like you did good choosing caps! Those UBXs are rated for 1000 hrs at 150C and the UBWs are rated for 1000hrs at 135C, and both lines are built for automotive applications. The UBTs are rated for 2000 hrs 125C, but I think the UBX / UBW are already quite legit (and they cost more than the UBTs)

Question --- for the 22uF UBWs, instead of discrete caps, you got the ones mounted for Tape & Box / Cut Tape. This is for folks who plan to make a crap ton of products. See below --- the UBW1H220MPD vs UB1H220MPD1TD.

View attachment 136759

View attachment 136760

Any reason why you chose to do this? Or was it just a stock / not in stock issue? Are you secretly making a factory to produce new-for-2021-re-imagined-LH-computers???? :lol:
Anyways for anyone reading this, these are excellent caps. 👍 I just ordered 10 of each, in non-Tape & Box format thus saving a miniscule 2 cents each for the 22uF capper. Thanks for the push @a777fan --- something I have been thinking of doing for a long time!

View attachment 136761
Ah! Thanks. I remember some of those numbers flying by while purchasing.

As for the choice of ‘free’ or ‘taped’, my choice was based on my complete lack of experience (read: incompetence) with any of these. I must admit, while I really like the digi-key website for all the various filters you can apply to your search results, the sheer number of similar ( to the novices eye) items can make it more than a little confusing when working through all the options. Add in the fact that all items have similarly structured 27 digit part numbers, and its game over for me. I’m just happy i got out the ‘door’ with the products I was looking for in the first place. Lol.

TWO cents cheaper!?? Bah! That’ll teach me to pay attention 💰🤑💰
 
Does anyone know if the T/LLR modules are cross compatible? I've got one from a junkyard I want to swap in, but I'm not sure if I can do that...

Thats the module currently in the car:
tempImage6N6ZfY.jpg


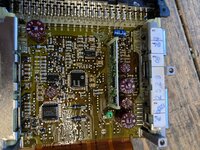
Here is the module I'd like to swap in... it will obviously be re-assembled prior to installation... lol.
IMG_5451.jpeg
 
Yes, if the donor is from a W124 (and it appears to be), they should be interchangeable. Is there anything wrong with your existing T/LLR? The donor appears to be an older version.
 
Yes, if the donor is from a W124 (and it appears to be), they should be interchangeable. Is there anything wrong with your existing T/LLR? The donor appears to be an older version.
Indeed. I sourced it out of a junkyard and split it open to replace the caps inside, which didn't look super awesome.

I'm still getting a surging idle while in gear at times, so I want to swap in the re-capped T/LLR to see if it makes any difference. Given that my ETA has already gotten the Don Roden 'spa' treatment, and my LH module is recently recapped (the idle surge was there prior to the re-capping), I'm not sure where to go next if the T/LLR doesn't have any influence.
 

Who has viewed this thread (Total: 3) View details

Who has watched this thread (Total: 5) View details

Back
Top