Hey there,
i figured it's time to share my journey of V8 W124 ownership now as well. I joined the 500Eboard a few months ago and i've really been enjoying all the content on here. The amount of valuable information on here is really mind boggling. A big thank you to everyone being kind enough to share their knowledge.
The car is a 1993 E420 with the code 953 Sportline option, which i bought in November 2023. It's got about 342.000km (212.500mi) on the clock and has very terribly been resprayed in the past (more detailed pictures of the paint job later):


50 shades of silver... I also don't have any better photos of it in assembled condition - the car is currently in the paint/body shop of my gf's family, but more on that later.
I'll throw the option list (wrong one) that lastvin gave me in here:
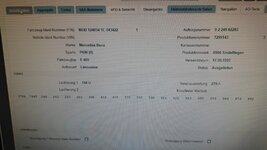
FIN WDB1240341C043422
Model 400 E
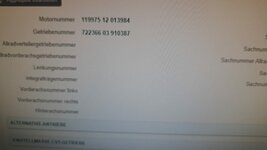
Engine 119975 12 013984
Transmission 722366 03 910387
Order Number 0 2 249 02283
Order Location AUGSBURG BRANCH
Approx. Build Date 1993-09
Code Description
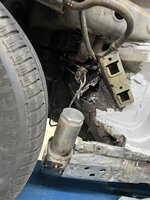
So far i have driven the car about 1500km with the only noticeable issue being a clunk in the rear when shifting load. Well, i will be adressing all the technical stuff (engine, chassis, etc.) in the future.
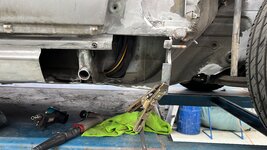
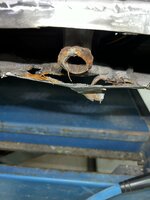
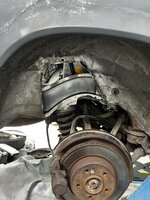
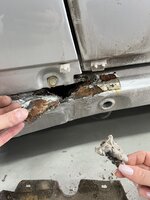
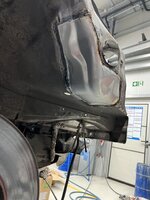
Right now the car is undergoing a looooot of welding and being prepared for a full respray. I started working on that in the beginning of March and have taken a lot of pictures of the work i've been doing. I will try to post everything i have done so far in chronological order.
i figured it's time to share my journey of V8 W124 ownership now as well. I joined the 500Eboard a few months ago and i've really been enjoying all the content on here. The amount of valuable information on here is really mind boggling. A big thank you to everyone being kind enough to share their knowledge.
The car is a 1993 E420 with the code 953 Sportline option, which i bought in November 2023. It's got about 342.000km (212.500mi) on the clock and has very terribly been resprayed in the past (more detailed pictures of the paint job later):
50 shades of silver... I also don't have any better photos of it in assembled condition - the car is currently in the paint/body shop of my gf's family, but more on that later.
I'll throw the option list (wrong one) that lastvin gave me in here:
FIN WDB1240341C043422
Model 400 E
Engine 119975 12 013984
Transmission 722366 03 910387
Order Number 0 2 249 02283
Order Location AUGSBURG BRANCH
Approx. Build Date 1993-09
Code Description
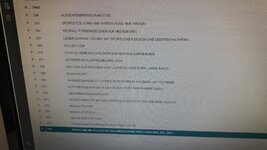
- 240 OUTSIDE TEMPERATURE INDICATOR
- 260 TYPE DESTINATION ON TRUNK LID - ELIMINATION
- 305 DUST FILTER
- 404 MULTI-CONTOUR SEAT, FRONT LEFT
- 412 ELECTRIC SLIDING ROOF WITH TILTING DEVICE
- 471 ACCELERATION SKID CONTROL (ASR)
- 480 SELF-LEVELLING SUSPENSION
- 531 AUTOMATIC ANTENNA
- 551 ANTI-THEFT/ANTI-BREAK-IN WARNING SYSTEM
- 570 FOLDING ARMREST, FRONT
- 580 AIR CONDITIONER
- 620 VEHICLES WITH CATALYST TECHNIQUE
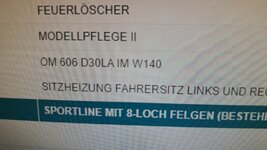
- 682 FIRE EXTINGUISHER
- 751 BECKER RADIO GRAND PRIX 2000 VK RDS
- 859 MODEL UPDATE II
- 864
- 884 TRUNK LID ADDITIONAL LOCKING MECHANISM (HZS)
- 240 outside temperature indicator
- 243 sports seat in front and rear
- 260 elimination of type sign on trunk lid
- 278A leather perforated grey
- 281 steering wheel 390mm and gearshift in leather trim
- 305 dust filter
- 412 electric tilting/sliding roof steel
- 471 acceleration skid control (ASR)
- 538 automatic antenna and front loudspeaker without radio installation
- 580 air condition
- 590 heat-insulating glass all-around with rear window pane laminated glass
- 611 courtesy lamps for front and rear doors
- 620 exhaust emission control
- 653 sport chassis with light alloy rims 8-hole
- 682 fire extinguisher 1.3 kg
- 744U Brillant silver metallic
- 859 MODELLPFLEGE II
- 864 ?
- 873 heated front seats
- 953 Sportline with 8-hole rims
So far i have driven the car about 1500km with the only noticeable issue being a clunk in the rear when shifting load. Well, i will be adressing all the technical stuff (engine, chassis, etc.) in the future.
Right now the car is undergoing a looooot of welding and being prepared for a full respray. I started working on that in the beginning of March and have taken a lot of pictures of the work i've been doing. I will try to post everything i have done so far in chronological order.
Last edited:


")


 But yeah, she is as committed to this as I am... I have to give her credit again, without her this "restoration" wouldn't be possible. I'm doing all of this in her family's paint/body shop where she works as well. I wouldn't even be driving 124s without her to be honest as they always have had 124s in her family. When I drove her mother's E280T with the 2.8l M104 engine for the first time, I got hooked.