I drove the car a fair amount this week, putting a couple hundred miles and lots of smiles on it. A real pleasure to drive with everything sorted for the most part. It ran beautifully and for it's first fill up got over 17 mpg, which I thought was pretty good considering it seemed to be using fuel faster than I expected.
This "reacquaintance" with the car got me a bit more motivated to address other issues on it, such as the headliner.
I removed the headliner this afternoon, which took me all of maybe 45 minutes, tops. The fabric was almost completely loose from the headliner backing, as I expected. I'll be taking it over to my upholstery guy on Monday to have him work his magic on it along with the piece for the sunroof as well. It really doesn't need replacement, but if there's an issue with matching the material I figure he'll have it and can replace the material on it as well, if necessary. At the same time I'll take some pictures of my driver's seat lower cushion and the damage on it and see what he recommends. I just happened to do a "car-part.com" search a little while ago and found a local dismantler that has a 1994 E320 with a gray interior, so I'll reach out to them on Monday and see what they have. I figure I can probably get a passenger seat that's got minimal wear on it to replace my driver's cushion. I hope.
Following Gerry's lead, I dug out an old point and shoot Kodak camera I had in a drawer to do my garage pictures today. They turned out OK, but could have been better. I'll continue to work with it a little more before I decide to keep using it or going back to my Nikon D3300. So here we go...
Removing headliner:
First, turn down the sun visors and remove the two phillips head screws holding the pivots on. Unsnap the visors from the pivots in the center of the roof. Using a thin slotted screwdriver or similar tool, pry the "door" or flap open on the clips. Once open, you can access the phillips head screw that holds the clip in place.


With the visors and clips removed and set aside, turn to the grab handles on the roof above the door openings. Using a "cats paw", trim tool or other eans, pry up at the outer edge of the trim surround on each side of the handle. Once this has been pried out of the way and pushed back on the handle slightly, peel back the cover material to expose an 8mm sheet metal screw. Remove the screw on each side of the handle. Once the screws are removed, pull on the handle to remove it from the roof. It may seem tight, but that's because there are rubber pins on the handle that are pressed into holes in the roof that help to locate the handle.


Open the sunroof and run the sunroof about 2/3 of the way open. Grasp the leading edge of the headliner on the sunroof and pull down. There are 3-4 "Christmas tree" nylon pins on the leading edge of the sunroof headliner that hold in place. With the headliner disconnected from the sunroof move the sunroof all the way to the rear. Now you can slide the sunroof headliner up and out of the sunroof opening.
Now the fun begins! With your pry tool, head towards the cabin/reading light/sunroof switch panel in the front of the cabin roof. On the left side (this is important!!) carefully pry down at the top and bottom of the left side. This will release a pair of metal clips and allow the whole assembly to drop down as shown.

Carefully disconnect the connectors from the assembly as well as the rubber tube that is attached. Set it aside in a safe place, we'll be coming back to it later.
At the front of the sunroof opening is a metal strip that runs the width of the sunroof opening. It is secured by five phillips head screws. Remove the screws and carefully remove the metal strip.

Next, remove the rear view mirror. This is a slightly frightening (if you haven't done it before) brute force "yank" on the stalk of the mirror to remove it from the retaining plate where it's held in place with a strong spring. Once removed, you'll see a metal plate with three phillips head screws. remove these screws and the plate.

Now comes the tricky part, one of a couple in this job. First, grab and pull the windlace trim away from the top of the door opening. If that doesn't mean anything to you, think "fuzzy trim that goes around the door opening". It's called "windlace" and is molded rubber with fabric glued to it. It's held in place by a part of the trim that's molded to grip the weldment around the door openings. To remove the front trim panel, you'll have to push it forward slightly to disengage the clips that run across the front and top of the windshield opening. You can pull the panel down far enough to see them if you like to get an idea of where they are located. Once these are disengaged, you can pull the panel to the rear to disengage the clips in the top of the "A" pillars, shown in the picture below. Once this is done, the whole panel can be easily removed from the car.


Now move both front seats as far forward as possible and move to the rear seat.
Take off the grab handles in the rear as you did in the front.
Go to the bottom of the "B" pillars and locate the two holes for the screws that hold the plastic trim panel in place at the bottom of the pillar. Unscrew the phillips head screws and after pulling the windlace away from the B pillar trim remove the panels by pulling them down and out.


Next, look carefully at the B pillar cover about halfway up and you'll see a metal clip that holds the cover to the weldment on the door opening. Carefully pull the cover out of this clip. There is one on both sides, so be sure to get both. Next, pull up and out slightly on the panel to release the top spring clip to disconnect the cover from the B pillar. The seat belt will keep things in place for the most part, there's no need to remove it unless you're looking to take advantage of having the cover loose to reglue or recover the cover itself.


You're almost done....
And now to the rear interior light. Pry it out of the retaining clip with a trim tool. Disconnect the wires (the ground push on clip has a release you have to press down to remove it) and set aside. Look in the opening and you'll see a metal frame held to the roof with a phillips head screw. Remove it and the frame, which might take some wriggling to get loose from the headliner panel.


And now the last of the tricky parts....the C pillar covers or "sails" as they're sometimes referred to.
Make sure you've removed the windlace from the door opening where the C pillar panels are located. Carefully pull forward on the leading edge of the panel to release the three clips that are on the leading edge of the panel. You'll know they're loose as the front edge of the panel will come loose from the body. Next, with the front edge of the panel away from the body, carefully wiggle and pull the whole panel forward. If you're living right, the metal clip in the center of the panel will come loose from the hole in the body it's clipped to. More likely than not, this has been damaged from a previous removal and may not even be intact. I was 1 for 2 on mine, as one of my clips broke and the other came loose. Once free, the whole panel comes loose only to be held on with the seat belt. Pull the seat belt out a bit and with the slack in it move the panel to the parcel shelf to get it out of the way.


Almost there!
You've now got a headliner that's sagging all over the interior of the car, no doubt. This is the last step.
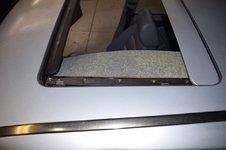
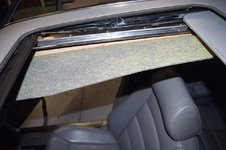
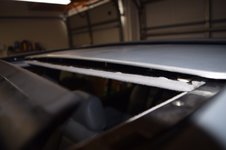
Go outside of the car and look down into the sunroof opening. On each side of the sunroof are some chrome strips with philips head screws in them. One side at a time, remove the screws. Note that the front one is a machine screw and the remaining four are sheet metal screws. With the screws removed, the metal strip will come out. Below that are two more metal strips, both of which should be removed. The last one is long and will take a little moving around to remove. Set these aside. You'll be able to see the edges of the headliner material. Carefully lift it up to release it from the panel. You'll probably have a fair amount of old powdered glue left, which needs to be cleaned off before the new headliner is installed. Do the other side. DO be aware you'll need to reinstall these if you need to close the sunroof while you're waiting for your headliner to be done.


Get back inside the rear of the car. It will be a bit crowded, but you can do it. Very carefully hold both sides of the headliner panel and move the whole thing forward. There is a metal strip that is glued to the headliner panel that hooks over the back edge of the sunroof opening. Moving the panel forward should disengage that strip. Often the glue will have failed and the strip just falls off - that's OK, as your headliner person will reattach it for you.
Now move to the front of the car and lower the front seat backs as far back as they will go - almost flat. From one of the rear doors, carefully rotate the headliner panel so that one of the forward "legs" sticks out one of the front doors. Then you can carefully rotate the whole panel around and out the rear door opening without bending it.
If you're bending it, STOP! Move it back and try again. It's a bit of a puzzle to do, but it can be done.
If you bend the headliner panel you risk cracking or breaking it, which will prevent the headliner from being installed properly.
And now you're done!! Almost -


Get a vacuum cleaner and vacuum up all the old yellow colored dust that's all over the interior of your car. That's old headliner glue, and you don't want it getting on anything and then getting wet, as it will stick and be near impossible to remove.
Now carefully load up your headliners and take them to your favorite upholstery shop to be recovered!
While that's being done, one maintenance item to address:
Take the courtesy light assembly and put it on your bench. Get a small flat bladed screwdriver or similar tool. Locate the air circulation fitting on the assembly, and carefully press the release hooks to remove the fitting.

See inside of the fitting? That's a thermistor that measures the cabin air temperature for the ACC. It's often filthy from the years of air that's passed over it. The accumulated dirt will affect the accuracy of the thermistor, so get some contact or electronic cleaner and spray it off and wipe it down carefully with a cotton swab. You can see the crud that was in mine. Not bad, but dirty, none the less.

And now cleaned.

And now I wait for my headliner to be replaced.
Dan


.jpg")
.jpg")
.jpg")
.jpg")


 ), sportline suspension, some special colors, "Final Edition" badges and a wood-leather steering wheel


 I've got inspections tomorrow for my standby generator, so I probably won't be able to get over there until next week to get it. Dang. If I could get it tomorrow I could have the car put back together this weekend...