• Hi Guest !

    Welcome to the 500Eboard forum.

    Since its founding in late 2008, 500Eboard has become the leading resource on the Internet for all things related to the Mercedes-Benz 500E and E500. In recent years, we have also expanded to include the 400E and E420 models, which are directly related to the 500E/E500.

    We invite you to browse and take advantage of the information and resources here on the site. If you find helpful information, please register for full membership, and you'll find even more resources available. Feel free to ask questions, and make liberal use of the "Search" function to find answers.

    We hope you will become an active contributor to the community!

    Sincerely,
    500Eboard Management

OWNER a777fan (E420)

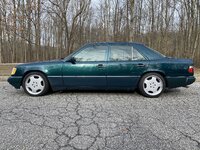
On my 94 034 I did a complete front and rear suspension rebuild 10-12? years ago and used Sportline parts for everything. While I haven’t measured the height, with one bump front and two bump rear pads it always sits with the rear just a hair higher than the front.

With the AMG front fender spacer kit (you can make one with, gasp, parts from Home Depot that’s really close) and rolling the fenders slightly, I have had zero rubbing with 17x7.5 wheels with ETs anywhere from the ET34 Aero3 on there now, to ET37 Flyweights, to ET42 Aero2 Monoblocks.

Although, for extra insurance I bought the Eastwood fender roller and used it before installing the ET34s. I followed the AMG docs on Dave’s site and it worked great without any issues. Many thanks again Dave!

The Eastwood made in USA roller, that can be had with their online coupons for around $70.

One change I highly recommend with a full Sportline suspension is swapping in a set of 500e sway bars. They are the icing on the cake.

🍻
Sweet stuff! I got ‘blue’ springs so ended up using the thinnest pads (‘one bump’ as you say) all around. I do have a set of ‘two bump’ pads in hand for the rear if I end up wanting to tweak. I do usually prefer the slightly ‘raked’ look, but we’ll see.

A 500e front bar went in this past weekend courtesy of @jonie13. Still on the hunt for the matching rear however!
 
Nice job and looks great with suspension update. What was the rough $ for the parts and specialized tools?
I’m debating if I want to take it on but I don’t drive much nowdays….
 
Hrm… i think i might need a new front wheel bearing. I noticed some odd noise while driving the other day, and I was able to shoot a video of this odd play today:


The wheel was torqued on the hub.

Thoughts?
Just curious, what is the measured play on that front wheel bearing? Is it per FSM spec with the dial gauge?
Also is there any play in the balljoints for the tie rods / drag link? Any vibrations in the steering wheel at speed?

I replaced my wheel bearings a few months ago at 7x,000 miles and honestly they probably did not need replacing.
I dont have a dial gauge to check at the moment… but the control arm is new and the tie rods, while not new, were nice and tight when i checked them during the suspension install.

The play in the video is most noticable when the wheel is held at the 12 o’clock and 6 o’clock positions and force is applied
 
It's normal to feel play by hand when pulling at 6 & 12. However... there usually is not an audible "click", which I think I hear in the video?

Time to measure end play with a dial gauge. Make SURE to bolt the rotor to the hub when doing this. <0.05mm is spec, when adjusting set at 0.01-0.02mm.

:detective:
Time to buy a dial gauge I guess!

There is most defo a click when ‘rocked’ at 12 and 6.
 
Time to buy a dial gauge I guess!

There is most defo a click when ‘rocked’ at 12 and 6.
Jon, Did you notice that clunk/noise before you installed the sport line suspension?

Remember what I said happened to me when I lowered my 300E and installed new Koni shocks. The clunk sounded exactly the same and was also on the right side. I had to go back an re-torque/over-torque the bolts. You should at least consider doing it.
Ah! Thanks for the reminder Terry! I’ll re-torque tomorrow to make sure this isn’t the culprit.
 
A couple of smaller items today…

I had previously replaced the o-ring on the dipstick, but apparently choose poorly in the size department, as this happened the next time I went to check the oil level.

3F8F76F6-3C2B-4585-A4AE-2EDDB917A015.jpeg
🤣

Ordered up a new one, and its an unfortunate brown color. :/

7B4B2732-7C06-4E46-AD1F-7D5E59989EBE.jpeg

Oh well.

As mentioned previously, got the rivets and clips for the rear window trim, so I went about drilling the old rivets out, and popping the new ones in.

27A03A4E-3426-409F-95B3-C291D87B0DE5.jpeg


Cleaned out all the gunk, then went about installation.

Placed a small dab of marine grade sealant on each rivet prior to insertion.

5573AC66-231D-4539-8A18-73C63DCAFDC9.jpeg

After the gun:

0C4BED5A-10FA-48B0-8168-4CD00117F229.jpeg

Wiped the excess goo away and was done. All went v smoothly and hopefully the trunk is again water tight.

FINALLY installed this repo sticker I bought a long time ago. :)

1ABB188C-1A0F-4A55-A70B-88A407FE3B26.jpeg
Mine had fallen off at some point.

Replaced the NSS. I had ordered one a while back, as I had a code for it (which has never actually come back… :shifty: )

Only took about .5 hour and was a little fiddly. The old one had corrosion growing on some of the connectors.

CD565509-CB9E-494B-8D18-E220B1D1C258.jpeg
 

Attachments

  • F7BA3A17-0AF7-4DE8-B2CD-3D8F3FE8591A.jpeg
    F7BA3A17-0AF7-4DE8-B2CD-3D8F3FE8591A.jpeg
    1.6 MB · Views: 21
especially when that washer is in the box from the filter manufacturer. I observed it thrown in the trash and asked - it was reported that often it isnt there, or wrong size so it is just best to use bulk. I asked for the discarded washer, I just got a nervous smile. :}
 
You guys still drain oil from the pan? Really ?!?

I have dozens of these washers that I'm HAPPY to send anyone who wants them for free. Given that they are in every oil filter box, and for decades I have drained oil with a vacuum system from above through the dipstick tube -- I have never had need for these washers, though I have saved them.
With the price of raw material these days, you’re a millionaire!!!
 
You guys still drain oil from the pan? Really ?!?

I have dozens of these washers that I'm HAPPY to send anyone who wants them for free. Given that they are in every oil filter box, and for decades I have drained oil with a vacuum system from above through the dipstick tube -- I have never had need for these washers, though I have saved them.
Yes the oil extraction from above sure is handy!

However, I have noted cases before where I have removed an oil pan after using the extractor and sludge was still there. (Once from destroyed m119 and another when I had just flushed an m113)

So yes I'll still use extractor for modern stuff I don't particularly care for but for my classics I am reverting to drop the sump plug, crawl on floor method until my lift is up.

I do believe having the engine warm, pulling the sump plug and leaving it to drain for an hour or two is more thorough and will wash out any sediment, sludge or impurities better than slow thin extractor pipe ever will.
 
Launched into a brake system refresh today:

View attachment 145680

New pads, rotors, hoses, caliper rebuild kits etc.

I haven’t gone to this level of detail before (never rebuilt calipers) so this should be fun.
AWESOME!!! Looks fun - my kind of project --- Not overly technical / requiring of skillz / experience that I don't have, but big enough to be satisfying!


BTW I do not mean to be debbie downer ---- but maybe you want to consider a dial gauge as opposed to a digital gauge? See this from @gsxr: Front Wheel Bearing Part Numbers | Brakes, Suspension and Steering
I thought about dial v. digital, but ended up going digital due to cost and availability via amazon. Totally understand how a dial would be more useful…

This thing was cheap enough to bin later if required. :)
 
I thought about dial v. digital, but ended up going digital due to cost and availability via amazon. Totally understand how a dial would be more useful…

This thing was cheap enough to bin later if required. :)
Or Prime free returns!

That being said you are an aircraft man. I suppose your demands for precision would be 1000x greater than someone like @gsxr. :stickpoke: JUST KIDDING! Maybe not? You know what you are doing 1000x more than moi. :-)
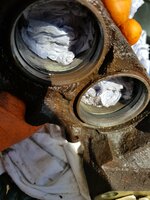
 
@a777fan, Jon the toughest thing about rebuilding calipers is getting the pistons out. I have always used compressed air. I put the caliper in my vice stuff a rag in front of the piston and apply air pressure to the assembly. It usually comes out with a POP! The rest is just cleanup and re-assembly. Just make sure the new O-Ring is seated properly.

I’m sure someone else has there own method.

Have Fun
Yes very true! Now I understand my conditions over here are much tougher on the calipers than in USA but the ONLY method to remove the pistons that works for me is to let the car do the work!

Hydraulic pressure. Eg on my S320 I will be rebuilding all 4x calipers. The problem occurs where the first outer section of the bore is behind the dust cover. It usually will have rusted and holds the piston from coming out.

I have still left the rear calipers attached to the hoses and before removing them I will do as follows:

Spray penetrating oil behind the dust boot first. Leave it a few hours. Then start to gently press the brake pedal and watch the pistons. As soon as the first one has moved almost out block it with a small g clamp. And so forth until all pistons are nearly fully out then remove the caliper from the car.

Photos from a previous caliper rebuild of mine:

20200413_155034.jpg20200413_155953.jpg20200413_172822.jpg20200413_172538.jpg20200414_101135.jpg

Just triple check the seal part numbers it varies with brand of caliper etc and can be hard to get correct.

I could do a How - To on caliper rebuilding at home
 
@a777fan, Jon the toughest thing about rebuilding calipers is getting the pistons out. I have always used compressed air. I put the caliper in my vice stuff a rag in front of the piston and apply air pressure to the assembly. It usually comes out with a POP! The rest is just cleanup and re-assembly. Just make sure the new O-Ring is seated properly.

I’m sure someone else has there own method.

Have Fun

Yes very true! Now I understand my conditions over here are much tougher on the calipers than in USA but the ONLY method to remove the pistons that works for me is to let the car do the work!

Hydraulic pressure. Eg on my S320 I will be rebuilding all 4x calipers. The problem occurs where the first outer section of the bore is behind the dust cover. It usually will have rusted and holds the piston from coming out.

I have still left the rear calipers attached to the hoses and before removing them I will do as follows:

Spray penetrating oil behind the dust boot first. Leave it a few hours. Then start to gently press the brake pedal and watch the pistons. As soon as the first one has moved almost out block it with a small g clamp. And so forth until all pistons are nearly fully out then remove the caliper from the car.

Photos from a previous caliper rebuild of mine:

View attachment 145687View attachment 145688View attachment 145689View attachment 145690View attachment 145691

Just triple check the seal part numbers it varies with brand of caliper etc and can be hard to get correct.

I could do a How - To on caliper rebuilding at home
Absolutely guys. Thanks for the tips. I don’t have shop air at home, but was able to use my little Milwaukee tire inflator for the same purpose. The multi piston calipers are a bit of a bear though! JC’s clamp tip is spot on.

This job has been a little more challenging than I was expecting. The front left caliper came apart ok, but the re-assembly isn’t nearly as easy. The instructions in the rebuild kit indicate the pistons should slide into the bores with new seals with minimal effort. That doesn’t seem to be the case here for some reason. I’ve tried with the seals flipped in both ‘directions’ in case they were tapered to facilitate piston retraction, but it was just as difficult either direction. This was all while using fresh brake fluid for lube, mind you.

I did manage to get all 4 pistons in with considerable effort, but ended up disassembling them again this morning after giving it some thought. Glad I did, as the new seals had sustained some damage upon installation. I’m planning on trying again with actual hydraulic assembly lube, as a test run with one of the pistons and the old ‘new’ seal seemed to go easier with the ‘proper’ lubrication, despite thousands of threads indicating brake fluid alone should be more than sufficent.

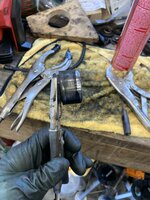
The piston removal process the second time required the use of vice grips, which, while covered in electrical tape, still managed to mar some of the top flanges on the pistons. I’m going to look for a new ‘used’ caliper to rectify the damage to this part of the car, and my ego.

While I locate a suitable used front caliper, I took the left rear caliper off for disassembly, and found one of the two pistons completely seized. Methinks Üter hasn’t gotten regular fluid changes. Gross bleeder screw.

9F694BAA-D323-4377-8150-8A4B3A8DD9A2.jpeg

Vice grips to the rescue:
706F5FEE-BE2C-4AF7-9586-38AE06BE5FF8.jpegC2F3EB4E-B51B-4E75-983A-B8F5F5C0D641.jpeg

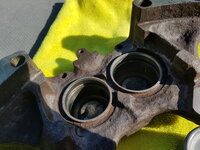
The bores don’t look great.
FE1B356E-DB0A-4106-A8AB-A04AD638AF9F.jpeg

DCAB4E1C-4CC3-4825-80E5-EDD23907D5E8.jpeg

The pistons themselves cleaned up fine.

I’m thinking I should just bin this caliper and get a rebuilt unit. What say the more experienced amongst you though?
 
Absolutely guys. Thanks for the tips. I don’t have shop air at home, but was able to use my little Milwaukee tire inflator for the same purpose. The multi piston calipers are a bit of a bear though! JC’s clamp tip is spot on.

This job has been a little more challenging than I was expecting. The front left caliper came apart ok, but the re-assembly isn’t nearly as easy. The instructions in the rebuild kit indicate the pistons should slide into the bores with new seals with minimal effort. That doesn’t seem to be the case here for some reason. I’ve tried with the seals flipped in both ‘directions’ in case they were tapered to facilitate piston retraction, but it was just as difficult either direction. This was all while using fresh brake fluid for lube, mind you.

I did manage to get all 4 pistons in with considerable effort, but ended up disassembling them again this morning after giving it some thought. Glad I did, as the new seals had sustained some damage upon installation. I’m planning on trying again with actual hydraulic assembly lube, as a test run with one of the pistons and the old ‘new’ seal seemed to go easier with the ‘proper’ lubrication, despite thousands of threads indicating brake fluid alone should be more than sufficent.

The piston removal process the second time required the use of vice grips, which, while covered in electrical tape, still managed to mar some of the top flanges on the pistons. I’m going to look for a new ‘used’ caliper to rectify the damage to this part of the car, and my ego.

While I locate a suitable used front caliper, I took the left rear caliper off for disassembly, and found one of the two pistons completely seized. Methinks Üter hasn’t gotten regular fluid changes. Gross bleeder screw.

View attachment 145754

Vice grips to the rescue:
View attachment 145755View attachment 145756

The bores don’t look great.
View attachment 145757

View attachment 145758

The pistons themselves cleaned up fine.

I’m thinking I should just bin this caliper and get a rebuilt unit. What say the more experienced amongst you though?
Jon, That caliper looks kinda tired. A rebuilt is probably best. Those new O-Rings can be PITA to install.

BTW, something I forgot was to mark the position of the piston as it relates to the cylinder. The piston should slide easier if put back in same position.
 
Absolutely guys. Thanks for the tips. I don’t have shop air at home, but was able to use my little Milwaukee tire inflator for the same purpose. The multi piston calipers are a bit of a bear though! JC’s clamp tip is spot on.

This job has been a little more challenging than I was expecting. The front left caliper came apart ok, but the re-assembly isn’t nearly as easy. The instructions in the rebuild kit indicate the pistons should slide into the bores with new seals with minimal effort. That doesn’t seem to be the case here for some reason. I’ve tried with the seals flipped in both ‘directions’ in case they were tapered to facilitate piston retraction, but it was just as difficult either direction. This was all while using fresh brake fluid for lube, mind you.

I did manage to get all 4 pistons in with considerable effort, but ended up disassembling them again this morning after giving it some thought. Glad I did, as the new seals had sustained some damage upon installation. I’m planning on trying again with actual hydraulic assembly lube, as a test run with one of the pistons and the old ‘new’ seal seemed to go easier with the ‘proper’ lubrication, despite thousands of threads indicating brake fluid alone should be more than sufficent.

The piston removal process the second time required the use of vice grips, which, while covered in electrical tape, still managed to mar some of the top flanges on the pistons. I’m going to look for a new ‘used’ caliper to rectify the damage to this part of the car, and my ego.

While I locate a suitable used front caliper, I took the left rear caliper off for disassembly, and found one of the two pistons completely seized. Methinks Üter hasn’t gotten regular fluid changes. Gross bleeder screw.

View attachment 145754

Vice grips to the rescue:
View attachment 145755View attachment 145756

The bores don’t look great.
View attachment 145757

View attachment 145758

The pistons themselves cleaned up fine.

I’m thinking I should just bin this caliper and get a rebuilt unit. What say the more experienced amongst you though?
Are you sure you had the correct new seal kit? It can be difficult to get the correct seals due to ATE or Lucas etc where did you get the part numbers?

I usually compare the new and old seals on top of each other to be sure they are a perfect match. In which case they should not bind or tear at all. I believe your seals are wrong ones and too small which happened to me before too.

Also I think brake fluid isn't a great lubricant I will probably use a little smear of silicone grease when assembling mine instead.

Finally you can polish and clean up the caliper pistons and bores with a fine Scotch pad and WD40.

If you have the old seals do compare old and new when you have a chance.
Joe-

The seal kit came right from MB, and I got the part number off ISPPI. I did overlay the old and new seals over the top of one another and they seem the same. I’ll have to get the ole micrometer out to check further though…
 
Along with Joe's advice, you may want to try heating the calipers in the oven (to a safe temperature for the seals) and cooling the pistons in the freezer before assembly.

You may find rebuilt calipers from the auto chains to still be very inexpensive if available. I think they still do OK with brake parts.
 
Typically the rebuilt calipers available in the McFLAPS stores are Cardone or other rebuilders. Generally they are reputable and of good quality, and priced decently as well. Not a bad way to go. You can also check the AutohauAZ and FCP Yurro type sources as well.

I rebuilt a couple of the calipers on my former 560SEL some years ago, and while it's not a horrible task, it's one that I decided not to do in the future, and just to purchase rebuilt calipers for.
 
Still waiting on additional brake parts, so I did a couple of other things this weekend.

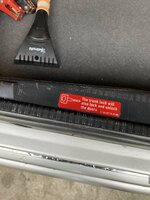
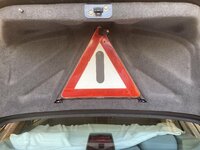
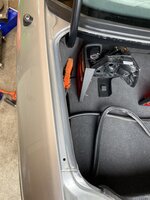
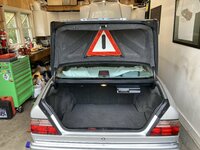
Finally installed my warning triangle in the trunk, which I had picked up from @captruff a LONG time ago.


IMG_6993.jpeg

Had to get a little 'crafty' with the slicing and dicing on the Boot lid cover, but I think it came out pretty well.

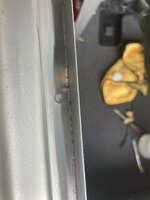
Addressing the dampness in the trunk a few weeks ago reminded me that I had some rust (spotted years ago) around the trunk seal that I needed to deal with. On the left side of the lip that retains the trunk seal:

IMG_7001.jpeg

IMG_7002.jpeg


IMG_7003.jpeg

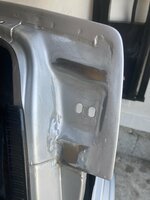
It hadn't gotten a whole lot worse, but still needed attention. I had to take off the trunk bump stops and their associated trims off to get the trunk seal out, and found some rust I wasn't expecting...

IMG_6999.jpeg

That corner of the car has gotten paint at some point, so perhaps the body shop didn't do a great job priming all of their work properly? Not sure how else to explain that. Started by sanding the rust back a bit in all locations.

Some pitting was present, even after sanding most of it back:
IMG_7009.jpeg

IMG_7010.jpeg
IMG_7012.jpeg
IMG_7006.jpeg

I had some POR-15 left over from a different project, so I degreased, prepped, and applied two coats. Nice plus, it was 'gray'


IMG_7039.jpeg

IMG_7037.jpeg

Hopefully its now gone for good. :)
 
One more for today....

A couple of weeks ago, I saw @RicardoD's excellent post about replacing his combination switch. You can find that excellent 'HOW-TO' here.

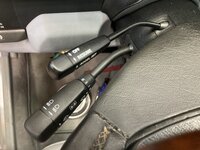
Unlike Ricardo, who had a perfectly good reason to replace his switch... I can't say that I did. Everything was working A-OK, but... the silkscreening (or whatever actual method which was used... paging @Jlaa...) was wearing thin. Just look at this travesty!

IMG_7059.jpeg

Unacceptable! 🤣

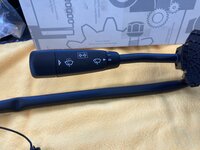
Now... lets all take a moment to soak in the majesty of the minty new switch...

IMG_7057.jpeg

Check out the crisp passing light and high beam logos... :) Awwww yeeeeah.

IMG_7056.jpeg

All went well with the install, thanks to Ricardos excellent thread.

Well, almost all...

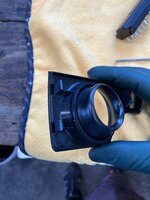
RIP Ignition switch trim panel... lol.

IMG_7069.jpeg

Still available. I'll have to add one to my next parts order.

And here it is all buttoned up.

IMG_7072.jpeg

Looks as good as new. :)

I'll have to wait till the car is road worthy again to see if there is any tactile difference, but my quick garage test drive leads me to believe the original switch still has quite a bit of life left in it. There is less of a 'snick-snick' difference than I would have expected. A real testament to the original build quality of the switch itself.
 
One more for today....

A couple of weeks ago, I saw @RicardoD's excellent post about replacing his combination switch. You can find that excellent 'HOW-TO' here.

Unlike Ricardo, who had a perfectly good reason to replace his switch... I can't say that I did. Everything was working A-OK, but... the silkscreening (or whatever actual method which was used... paging @Jlaa...) was wearing thin. Just look at this travesty!
Good job! Mine is almost as worn as yours --- but you know --- there is a name for "The one who searches ebaykleinanzeigenundotherzeigenundotherzeigenundmoreotherzeigenundallyourzeigensarebelongtous for optimal silk screened switches." That name is @TimL. 🤣 I do believe you are acquainted with your-local-brother TimL 🤣
 
Good job! Mine is almost as worn as yours --- but you know --- there is a name for "The one who searches ebaykleinanzeigenundotherzeigenundotherzeigenundmoreotherzeigenundallyourzeigensarebelongtous for optimal silk screened switches." That name is @TimL. 🤣 I do believe you are acquainted with your-local-brother TimL 🤣
It’s the pot calling the kettle black! You squeeze every last ounce of performance out of google translate to hunt for all sorts of unobtainium over there on the unpronounceable website! Good on you, I say!! 👍🏽👍🏽👍🏽 Thing is, your car needs NOTHING! It looks perfect in every photo I see of it

Jon, get those brakes done and let’s meet up- would love to see the sportline set up in person! 😍
 
Last edited:
@a777fan, Jon, Your spurring me on w/ that trunk shot. I have a new set of stops to install + I also have a Captruff triangle that’s been in my trunk for probably 6 years. Now I’m gonna have to get busy :jono:
Terry, I’ve heard you only need to cut three sides of the rectangular openings in the trunk lid liner for the warning triangle feet. Then the resulting flap just pushes in when you mount the triangle.
 
Thanks to Steve Geyer, I’ve been able to make progress on the brakes despite my mis-steps. He had a set of front calipers for sale.

Got everything on the front left back together:

FFA4115B-9482-478C-B09D-030A91EC5916.jpeg

I’m running Porterfield pads, and after reading the FSM, I have installed them completely dry, with no high temp brake lube anywhere.

Did I get that right? Or should I have placed strategic dabs in specific places?
 
Try 'em dry, and if you get funny noises, slide the pads out and add strategic dabs. If you have the stainless shims from old pads, use those with the Porferfields, assuming the R4S has no shims included.

:burnout:
 
Try 'em dry, and if you get funny noises, slide the pads out and add strategic dabs. If you have the stainless shims from old pads, use those with the Porferfields, assuming the R4S has no shims included.

:burnout:
Yep! Threw those shiny shims in. Okie doke. Will see how dry works out!
 
I like to add strategic dabs to the pad ears and the slide pins although the lubrication likely disapears quickly in a storm of brake dust. I imagine it may help a bit with initial bed - in.

I have always added a thin coat of lube along the points where the metal edges of the pads contact the calipers. And on the back of the pads/shims.
Absolutely agree this is essential in my opinion and does make a big difference to promote even wear and prevent calipers from sticking. Indeed I typically strip and re lube the brake pads in each car annually.

The are lots of varieties of pad grease including a nifty MB tub with inbuilt brush that I use.
 
One more for today....

A couple of weeks ago, I saw @RicardoD's excellent post about replacing his combination switch. You can find that excellent 'HOW-TO' here.
.......
Looks as good as new. :)
Great job and so satisfying!!!! Your picture baffles me (and my own car is not far behind). Your before picture :

1651291837697.png


Like how does the above even happen?!!?!?!? I mean I can understand if the headlight beam indicators get worn off, but how do the wiper 0 I II III markings get worn? I mean, how do your fingers even touch the III? Who's driving this car, like, Godzilla wearing mittens or something?!?!?! 😬🤣
 
Back
Top