• Hi Guest !

    Welcome to the 500Eboard forum.

    Since its founding in late 2008, 500Eboard has become the leading resource on the Internet for all things related to the Mercedes-Benz 500E and E500. In recent years, we have also expanded to include the 400E and E420 models, which are directly related to the 500E/E500.

    We invite you to browse and take advantage of the information and resources here on the site. If you find helpful information, please register for full membership, and you'll find even more resources available. Feel free to ask questions, and make liberal use of the "Search" function to find answers.

    We hope you will become an active contributor to the community!

    Sincerely,
    500Eboard Management

OWNER DJ RaMiN (E420)

Yup, you can use adapters... 4mm to 1mm pins. Problem is, figuring out which of the sockets is correct is a PITA. Soooo much easier to use the breakout box with numbered 4mm sockets.

:seesaw:
 
Oh, one thing I would like to add is that the idle issue is only present when car is cold. Once the car reaches the operating temperature the idle issue goes away!

BTW, Jon's @emerydc8 issue (link below) is very similar to my issue!


I gotta check the VR!

On the side note, what exactly is T/LLR module responsible for?
 
T/LLR is responsible for idle speed control (ISC) and cruise control (CC). This is the module that controls the electronics within the ETA.
 
Jono still does rebuilds AFAIK, or you can order the repair harness from Kurth Classics in Germany.
Nice!

Not sure how much Jono charges, but Kurth Classics price (about $235) isn't bad! But probably have to wait a month to get it, huh?

Screenshot_20230822-183026.png
 
Last edited:
Might only take 2-3 weeks? Some other forum members have purchased this but I forget how long delivery time is.
I found a post here that the OP mentioned he got it in 10 days!

So looking at photos in the posts, Jono's rebuild comes with the large positive cable & metal brackets, but for Kurth's you have to reuse the large positive cable & metal brackets. Shouldn't be that bad!
 
What's the deal with voltage regulators these days! Seems like everything is made in China/Taiwan nowadays!

Bosch (Taiwan), Beru (China), Huco/Hitachi (China)?

Bosch used to be good when it was made in India? I'm seeing the made in Taiwan ones are failing too soon!

Both the SL500 and and E420 have about 90k miles. Maybe I should get more VRs just in case the one on the SL500 goes bad soon! 🤔
 
Yeah... Bosch UK moved to Bosch India and now Taiwan/China. Even the OE/Genuine is made in Taiwan/China.

I hadn't heard of them failing too soon, if accurate, that's depressing. They are so cheap (<$15?) that it's probably worth keeping a spare on the shelf so you don't have to wait days to order a replacement.

:runexe:
Yeah! At that price, I gotta get a few!

But, I'm kinda concerned about the part numbers!

0021548506 is the old part number and 0021549206 is the new one, right?

Screenshot_20230823-164557.png

Not sure why some websites show 0021548506 is the correct one for my 94 E420 and some show 0021549206!

0021549206 is $10.81
Screenshot_20230823-163717.png
And 0021548506 is $43.16!
Screenshot_20230823-163647.png
 
Assuming a stock alternator, the EPC shows 002-154-85-06 superceding to 002-154-92-06. The #92 is NLA from MB but #85 is still available.

002-154-85-06 = Bosch 1-987-237-077
002-154-92-06 = Bosch 1-197-311-242, which supercedes to 1-987-237-075.

The 143A-150A alternators all specify #92 instead of #85. I don't know what the difference is.

:shocking:
 
Planning to do the lower wiring harness job this weekend following the "How to" thread. Any tips/recommendations?
Just that it's not a fun job... plan on quite a few hours, and take your time. Wouldn't hurt to snap a few photos of the routing in different places before you take it apart. The .034 routing is VERY different than the .036 routing, btw. Don't forget to disconnect the battery or you'll get a really nice light show.

:shocking:
 
Just that it's not a fun job... plan on quite a few hours, and take your time. Wouldn't hurt to snap a few photos of the routing in different places before you take it apart. The .034 routing is VERY different than the .036 routing, btw. Don't forget to disconnect the battery or you'll get a really nice light show.
Thank you, sir! I did the job finally. Will post updates soon! :cool1:
 
:update:

Updates, updates, updates!

It's been a while! Hope all is well with everyone!

Finally in the beginning of December of last year, I decided to do the necessary work on the E420. And by necessary I mean the lower wiring harness job. The car needed a smog inspection this month, so I had to get it running right.

As I mentioned before, my voltage regulator was toast so I started by replacing that one first. I saw some DIYs online that said you could replace it without removing the alternator, but that wasn't possible in my case. There was no room for the black plastic cover to come off the rear. Anyways removing it wasn't hard at all.

Alternator removed.

W124-1.jpg
W124-2.jpg


New vs. Old voltage regulator.

W124-3.jpg
W124-4.jpg

Now back to the lower wiring harness. I tied a long speaker wire that I had laying around to the top end of the old harness and pulled it down.

Nasty old harness!

W124-5.jpg
W124-6.jpg
W124-7.jpg
W124-8.jpg


I bought the harness from Kurth Classics in Germany and used the existing fat positive cables & metal brackets from the old harness. Used 3M Super 33+ and wrapped them together.

End result.

W124-9.jpg

Pulled the new wire up and connected everything up and started the car. It fired right up! Then I went and checked the voltage at the battery and it was within normal range!

Still no AC though! So I decided to remove the screws that hold the 15 amp fuse and see if it has a crack and it was cracked indeed! It looked so good and I couldn't even tell if it was cracked while in the car! Replaced that and AC works again!

W124-10.jpg
W124-11.jpg
 
The car needed new shoes. So initially I was planning to refinish the 8 hole 16s from my wife's R129 and use them, then I decided to do something else!

I got a good deal on a set of Maxilite Sador wheels. They're 8.25x17, same size and specs as EVO wheels and they dont look that bad in my opinion. For tire size I went with 225/45/17. So far so good! Definitely need to lower the car slightly and get AMG fender spacers.

W124-12.jpg


W124-13.jpg

W124-14.jpg
 
I forgot to post these here!

Jason Cammisa and Derek Tam-Scott had an informal get together to celebrate Bruno Sacco’s 90th bday in November in Berkeley. Here are some photos from the event. So many E500Es and a Nice E42 AMG!


PXL_20231112_172544331.jpg
PXL_20231112_173619439.jpg
PXL_20231112_174401423.MP.jpg PXL_20231112_174542350.MP.jpg PXL_20231112_174856085.jpg PXL_20231112_174913336.jpg PXL_20231112_174917657.jpg
PXL_20231112_181806803.jpg PXL_20231112_174435022.jpg PXL_20231112_174353122.jpg PXL_20231112_174936545.jpg PXL_20231112_175019664.jpg
PXL_20231112_175008264.jpg PXL_20231112_175001968.jpg PXL_20231112_174955370.jpg PXL_20231112_175118788.jpg PXL_20231112_180001021.jpg
 

Attachments

  • PXL_20231112_175011340.jpg
    PXL_20231112_175011340.jpg
    2.5 MB · Views: 14
  • PXL_20231112_175847586.jpg
    PXL_20231112_175847586.jpg
    3.8 MB · Views: 12
  • PXL_20231112_180015489.jpg
    PXL_20231112_180015489.jpg
    3.3 MB · Views: 13
  • PXL_20231112_174947656.jpg
    PXL_20231112_174947656.jpg
    3.7 MB · Views: 14
The 500SL is out of hibernation!

PXL_20240316_224957893.jpg

First thing I notice was the antenna wouldn't go up. I mean I coud hear the motor, but nothing happens. I got a spare mast, so I was like if its the mast, I could replace it. The actual removal and installation method for the mast wouldn't work of course, because it won't come up when you turn the radio on. Then I noticed I could pull the mast without any resistance when radio is off. Nothing seems to be wrong with the old mast. Tried to put it back, but it wont bite the tooth, tried with the new mast and stil won't bite.

Anyone ever had this issue? What could be the problem. I'm thinking to take the whole assembly apart and see what's happening inside of it.
 
The 500SL is out of hibernation! First thing I notice was the antenna wouldn't go up. I mean I coud hear the motor, but nothing happens. I got a spare mast, so I was like if its the mast, I could replace it. The actual removal and installation method for the mast wouldn't work of course, because it won't come up when you turn the radio on. Then I noticed I could pull the mast without any resistance when radio is off. Nothing seems to be wrong with the old mast. Tried to put it back, but it wont bite the tooth, tried with the new mast and stil won't bite.

Anyone ever had this issue? What could be the problem. I'm thinking to take the whole assembly apart and see what's happening inside of it.
Very common problem / failure mode. Sounds like one of the plastic gears inside has a broken tab. If so, you can fix this by replacing the plastic gears... either with good used ones from a junkyard, or buying new aftermarket/Chinese gears. I just did this on one of my cars a couple months ago...

:gsxrock:
Oh great, seems like an easy fix. I'll look into it! Thank you, sir! 🙏🏼🙏🏼
 
Some 190E update!

It has been a nice 7 years (Almost).
PXL_20240317_200821614.jpg
It's time to replace the battery on the 190E. It doesn't want to keep charge anymore.
 
On that subject, what do you guys think of Kurth Classics's replacement options for Hirschmann Auta 6000EL antenna?
Both of those are "universal" antennas and they WILL NOT fit like the OE/factory antenna. I would repair your existing one if possible. Next option is buying a used one (must be correct part number for your specific car/VIN).

:duck:
 
Both of those are "universal" antennas and they WILL NOT fit like the OE/factory antenna. I would repair your existing one if possible. Next option is buying a used one (must be correct part number for your specific car/VIN).
Oh, I see! They're kinda of like the universal one that Hirschmann offers then. Hirschmann Auta 2050. Alright, I'll just repair the old one. 🙏🏼
 
Hey guys! Hope all is well!

Did some work on the E420!

Swapped the LH module (got one with WOT enrichment)! I noticed a bit of gain at low RPM, but noticed it a lot at higher RPM, around 5-6k is the peak. So far, I love it!

Installed AMG fender spacers! Somehow I remember it was kinda easier on the 190E, even though 190E has more spacers. Or maybe I'm getting old! 😬😜

Before:
PXL_20240522_213208184.jpgPXL_20240522_213159455.jpg

After:
PXL_20240523_234559195.jpgPXL_20240523_234532431.jpg

PXL_20240524_165102168.jpg
 
Hey guys! How's it going? I don't have much of an update for car related stuff, but my wife and I are expecting our first baby this December! Exciting times, and I'm super busy getting baby's room ready. At the same time I'm trying to finish up some car work, because I won't have time for a while to do anything after the baby comes.

Anyways, I have few questions for you guys.

Lets say hypothetically :p, I install an AMG bodykit on the car. As for front bumper fog lights, I wasn't able to find anything on the web, related to the wiring for them.

I know there is a small wiring harness that connects the headlight to the fog light. So basically fog lights get their power from it.

FB_IMG_1728250164582.jpg

This harness (202 540 21 07) is NLA, so I'm trying to see if anyone has extra ones that want to sell.

The harness:
11e32-2-61.jpg

The second option is to make my own harness.

To build this, I'll need 2x of the plastic sockets: 012 545 46 28 and some of the male to female bushing pins: 010 545 52 28 and some wiring.

The socket housing:
FB_IMG_1728249124059.jpg

The pin:
0105455228~2.jpg

The socket housing 012 545 46 28 is NLA. So I can kinda fake it and use a regular 4 pin socket housing or 6 pin one (if I plan to do Euro headlights at some point) and drill holes on the back of it and use male to female pins.

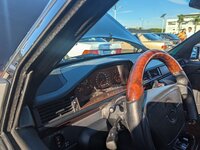
Now I need to know the pinout for the US headlight wiring (Standard w124 facelift), so I can figure out what wire is for the center fog lights, so I can use the same one for the bumper fog lights. Some say its the green wire, but I need confirmation. Thanks in advance!

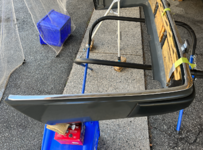
My other question is about the chrome strips on the bumpers.

Screenshot_20241006-134159.png

If I wanted to take them off and add them to the AMG bumpers, is there a method/template that is used to mark and make the holes on the new bumper? If not, I'll have to put the bumpers on top of each other and mark those holes on the new bumper, then make the holes.

Please advise, thank you!

***Photos added are from google.**
 
Last edited:
When I'm attempting this sort of thing where no pattern is available, I'll put a dab of colored grease or paint on every peg and then carefully align the piece from above and lower it onto the base piece (bumper) which will leave grease marks as hole indicators.
 
All by hand-eye co-ordination, mark and drill
Nice! I'll give that a try! 🙏🏼🙏🏼
When I'm attempting this sort of thing where no pattern is available, I'll put a dab of colored grease or paint on every peg and then carefully align the piece from above and lower it onto the base piece (bumper) which will leave grease marks as hole indicators.
I was thinking of the same method as well, I've done it before. 🙏🏼🙏🏼
I'm near certain I have spare 6 pin housings (with pins) should you need. The pins can be reused by unsoldering thanks to MBs excellent design. I'll confirm tomorrow.
That would be amazing if you got some! Please do let me know. 🙏🏼🙏🏼
 
It's been many years since I looked at these lighting connectors so I'm not sure what you are needing. What I have are two six pin female connectors with pins and pigtails as well as 4 male pins (no connector).

I do have a W210 E55 parts car. I don't know if a similar connector was used on it. If so, I have them, but it may be a week or three before I could retrieve them.
Hey! Thank you for getting back to me. I have a feeling we're not talking about the same connector housings. I think what you have is a regular 6 pin housing with female pins. The housing I'm talking about is what is used in between the headlight and the regular 6 pin connector and the pins in there are female to male pins (like what I posted above), So the female side of it goes on the headlight pins and then the regulator 6 pin house goes on the male side of it.

orca-image--539651688.jpeg

Just to be sure, could you please post some photos of them?

And as far as W210, I don't think they use similar connectors and housings.

Thank you! 🙏🏼🙏🏼
 
Hey guys, so I want to switch some wires around in the headlight connector housing. I want the center fogs (on headlights) to come on with high beams as aux high beams, and use the wire previously used for center fogs to hook up the bumper fogs.

So according to my research, this is the U.S. headlight wiring pinout:

Pin 1 - Fog light (Gray/Green)
Pin 2 - Ground (Brown)
Pin 3 - High beam (White/Black)
Pin 4 - Low beam (Yellow/Black)

The new wiring pinout:

Pin 1 - Fog light (Gray/Green), desolder the pin and use the wire for bumper fogs.
Pin 2 - Ground (Brown), solder in an additional new wire for bumper fog or just jump it from the body.
Pin 3 - High beam (White/Black), jump a tiny wire to pin 1 inside the socket housing? I'm open to suggestions. Trying to avoid taking the headlight out to make the connections inside the headlights.
Pin 4 - Low beam (Yellow/Black)

What do you guys think?
 

Who has watched this thread (Total: 5) View details

Back
Top