Navigation
Install the app
How to install the app on iOS
Follow along with the video below to see how to install our site as a web app on your home screen.
Note: This feature may not be available in some browsers.
More options
Style variation
-
Hi Guest !
Welcome to the 500Eboard forum.
Since its founding in late 2008, 500Eboard has become the leading resource on the Internet for all things related to the Mercedes-Benz 500E and E500. In recent years, we have also expanded to include the 400E and E420 models, which are directly related to the 500E/E500.
We invite you to browse and take advantage of the information and resources here on the site. If you find helpful information, please register for full membership, and you'll find even more resources available. Feel free to ask questions, and make liberal use of the "Search" function to find answers.
We hope you will become an active contributor to the community!
Sincerely,
500Eboard Management
You are using an out of date browser. It may not display this or other websites correctly.
You should upgrade or use an alternative browser.
You should upgrade or use an alternative browser.
OWNER a777fan (E420)
- Thread starter a777fan
- Start date
I also get about 20 MPG on my 95 E420 with mixed driving. The best I ever got was on my 800 mile road trip home after buying the car in Atlanta where I was at ~27 IIRC.
It was nice weather this weekend (who knows how many more of those we’ll have this year), so Üter got a full exterior detail. He’s been looking pretty sad recently. The ‘checking’ of the clear coat seems to be getting worse, and the last mobile “detailer” I had come by last year used some sh*tty product that left streaking on the clearcoat from the beltline down. Only on the drivers side tho. Oddly.
Anyway, wash, clay bar, and a two step polish on the drivers side to get rid of the streaks. Those suckers were on there. Took MULTIPLE passes with the cutting polish to get them out
This was my first attempt with a rotary polisher so I took it pretty easy. Overall I am really really happy with the results. I don’t think he’s ever looked this good. Bright sunlight ‘glamour’ shot.

X-treme close ups!
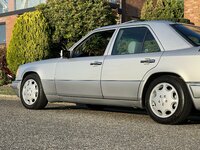

I ceramic coated after the polish. Also a first for me. We’ll see how it holds up, but since he’s an outside car, I’m looking forward to seeing how he weathers the winter.
Again- very happy with the result. Defo a solid 10 footer now. Couldn’t be happier.
Anyway, wash, clay bar, and a two step polish on the drivers side to get rid of the streaks. Those suckers were on there. Took MULTIPLE passes with the cutting polish to get them out
This was my first attempt with a rotary polisher so I took it pretty easy. Overall I am really really happy with the results. I don’t think he’s ever looked this good. Bright sunlight ‘glamour’ shot.

X-treme close ups!


I ceramic coated after the polish. Also a first for me. We’ll see how it holds up, but since he’s an outside car, I’m looking forward to seeing how he weathers the winter.
Again- very happy with the result. Defo a solid 10 footer now. Couldn’t be happier.
That car TOTALLY needs those!!@a777fan, are you planning to install the little sportline fender tags?

@a777fan, are you planning to install the little sportline fender tags?
I’ve thought about it, but I still have a few missing parts.That car TOTALLY needs those!!

Rear sway
320mm front disks and calipers
Would also LOVE to source the 4 place interior, but I might be crazy to think I could actually be successful there. Lol.
The interior isn't too crazy of an idea... especially if you don't require heated seats. Front seats will be easier to source than rears. However, it won't be a cheap endeavor. And, it may require getting new leather covers for the donor seats, depending on condition.
Front brakes are not too difficult to obtain, the NLA rear sway is a problem but see if Blue Ridge still has the custom aftermarket rear bars!

Front brakes are not too difficult to obtain, the NLA rear sway is a problem but see if Blue Ridge still has the custom aftermarket rear bars!

Yep! No bun warmers here sadly.The interior isn't too crazy of an idea... especially if you don't require heated seats. Front seats will be easier to source than rears. However, it won't be a cheap endeavor. And, it may require getting new leather covers for the donor seats, depending on condition.
Front brakes are not too difficult to obtain, the NLA rear sway is a problem but see if Blue Ridge still has the custom aftermarket rear bars!

And someone miiiight have a bead on a rear sway for me. We’ll see.
Also- forgot one item- isn’t there a sportline steering box too?
That will make it easier, as it opens up more donors from 6-cyl cars.Yep! No bun warmers here sadly.
Check with @jhodg5ck at Blue Ridge for grins, in case the 036 rear bar doesn't come through. I think he has larger (20mm?) available, if still in stock. Dunno pricing though.And someone miiiight have a bead on a rear sway for me. We’ll see.
Yep, rare bird. Didn't @TimL install this in his car recently? Assuming it's similar to 6-cyl models, the difference is quite subtle, making this one of the lowest ROI upgrades IMO. I've always wanted to try it though... and always wondered why MB did not make this box standard equipment on the 036.Also- forgot one item- isn’t there a sportline steering box too?

Have to disagree with you, @gsxr - in my book the steering box ranks as one of the best things I spend money on for this car so far. The steering has much more weight to it and it just feels so tight - very, very nice and would do it again in a heartbeat. It might be though that I'm comparing apples and oranges, as the steering box on my car was approximately 100k miles old before I had it replaced with a NOS sportline box, so some of the difference I feel might be due to new vs. old effect and not due to sportline vs. non sportline.Yep, rare bird. Didn't @TimL install this in his car recently? Assuming it's similar to 6-cyl models, the difference is quite subtle, making this one of the lowest ROI upgrades IMO. I've always wanted to try it though... and always wondered why MB did not make this box standard equipment on the 036.
@a777fan, you are welcome to try it out and drive my car the next time we see each other. Then you can determine if it's something you want to go look for
Tim, I wonder how much of the difference is the brand-spanking-new NOS-ness, vs the lower-numerical ratio? Then again, 124 boxes don't typically get sloppy with age (even to 200k, 300k or beyond) so it's unlikely your 100k box had any detectable play.
I've done the Sportline box upgrade on several 6-cylinder cars and while I did like it, the change never had any "wow!" factor. If I was closer I'd love to trade 036's for a short drive up a twisty road to compare!

I've done the Sportline box upgrade on several 6-cylinder cars and while I did like it, the change never had any "wow!" factor. If I was closer I'd love to trade 036's for a short drive up a twisty road to compare!

For sure, Dave. If your travels (fun or work) take you to Seattle, let me know and you take it for a spin. While the steering feels a little more direct, it is the increased heft that has come with the sportline box that I really enjoy.Tim, I wonder how much of the difference is the brand-spanking-new NOS-ness, vs the lower-numerical ratio? Then again, 124 boxes don't typically get sloppy with age (even to 200k, 300k or beyond) so it's unlikely your 100k box had any detectable play.
I've done the Sportline box upgrade on several 6-cylinder cars and while I did like it, the change never had any "wow!" factor. If I was closer I'd love to trade 036's for a short drive up a twisty road to compare!
Worth mentioning regarding 6-cylinder Sportline steering box upgrade…
For the coupe and cabrio, with their even slower than standard sedan/wagon boxes, the change to the sedan/wagon SL box (2 “clicks” quicker) is a big improvement.
I replaced mine with sedan SL at ~125K miles; the original was still tight as a tick but slow as a snail.
For the coupe and cabrio, with their even slower than standard sedan/wagon boxes, the change to the sedan/wagon SL box (2 “clicks” quicker) is a big improvement.
I replaced mine with sedan SL at ~125K miles; the original was still tight as a tick but slow as a snail.
Looks great.It was nice weather this weekend (who knows how many more of those we’ll have this year), so Üter got a full exterior detail. He’s been looking pretty sad recently. The ‘checking’ of the clear coat seems to be getting worse, and the last mobile “detailer” I had come by last year used some sh*tty product that left streaking on the clearcoat from the beltline down. Only on the drivers side tho. Oddly.
Anyway, wash, clay bar, and a two step polish on the drivers side to get rid of the streaks. Those suckers were on there. Took MULTIPLE passes with the cutting polish to get them out
This was my first attempt with a rotary polisher so I took it pretty easy. Overall I am really really happy with the results. I don’t think he’s ever looked this good. Bright sunlight ‘glamour’ shot.
View attachment 154248
X-treme close ups!
View attachment 154249
View attachment 154250
I ceramic coated after the polish. Also a first for me. We’ll see how it holds up, but since he’s an outside car, I’m looking forward to seeing how he weathers the winter.
Again- very happy with the result. Defo a solid 10 footer now. Couldn’t be happier.
What are those faint tiger lines below door handle on the front door and continuing on the rear door? Streaks or shadow or water drying… I can’t tell.
Thx!Looks great.
What are those faint tiger lines below door handle on the front door and continuing on the rear door? Streaks or shadow or water drying… I can’t tell.
Horizontally? Thats the trees from across the street.
Ha!Thx!
Horizontally? Thats the trees from across the street.
Why didn’t I think of them…color looks nice
Üter survived a ~350 mile trip down to Portland, OR last weekend and I am happy to report that all went quite well. The sportline setup rides great, and I love how it likes to just cruise at ~80 all day long. It wasn't 100% trouble free though, but more on that in a moment.
A couple of little things have cropped up, and I was able to address one of them today. My light switch finally started feeling 'weird'. The little clicks wern't as firm anymore, and one morning on my way to work the whole unit sounded a bit 'crunchy' when turning the lights on. I knew this was the end, and ordered a new one from mboemparts.com. I popped it in today, and it feels great. I had to dissect the old one though, just to 'see' ya know....

Typical 'crayon-y' mess inside, and all in some state of disintegration. Glad it gave me some warning signs, especially since we're heading into the winter season.
Back to the road trip observations/issues...
I went to fill-up before heading out of town, and was surprised to find the gas door locked shut. The actuator had stopped locking with the doors quite some time ago, so it was a bit of a shock (and frustrating) to find it in the permalock failure mode. I pulled it out of the trunk today, and while the membrane appears to be intact (holds vacuum with a mity-vac), the mechanism is VERY stiff. Not having another one to compare to, its tough to tell, but I would assume that it should be easier to move than it currently is. I'll have to check out how expensive it is, and might just grab a new one in my next order if its available and affordable enough.
The second issue: When we arrived in Portland and were driving around town, I noticed a slight 'knocking' noise coming from the right rear when going over some (but not all) bumps. It was very inconsistent, and it really sounded like it was coming from the area of the gas door. While on the trip, I mentally associated the knocking with the mis-behaving actuator (vacation optimism perhaps?) and did my best to ignore it. While fiddling with the actuator today however, I took a spin with the actuator removed from the car, and the noise was still there.
I jacked up the rear to take a peek, and nothing seemed amiss. Everything was nice and tight. I also took a look at the top of the right strut, and that was also well, nice and tight. Lots of dinking around, and i finally noticed that the rear sway bar bushings on the left side at the bar attach point looked 'tweaked' The captive bolt on the left side appeared to be being "pushed' back out of the bushing with the suspension loaded. This is not how the right side appeared. I jacked up the rear via the diff, and pulled the left sway link. I used my bench vice and a socket to push the captive bolt back 'in' to the bushing. I re-installed the left side, but left the hardware loose. I also loosened the hardware on the right side, both top and bottom. Then I went for a quick spin to let the suspension settle. I backed the car up on ramps and tightened the hardware on both sides down. Took it for a drive, and the noise was gone!
My only guess is that the rear sway needed to be 'reset' after the suspension install, given the slight adjustment in ride height? Regardless its nice to have it quiet again.
Oh - I also replaced the bulb in the shifter console, which had annoyingly burnt out. Check out the 'tan' line on the burl... lol

It's currently at ~149,350 miles. Not too far till 150k!
A couple of little things have cropped up, and I was able to address one of them today. My light switch finally started feeling 'weird'. The little clicks wern't as firm anymore, and one morning on my way to work the whole unit sounded a bit 'crunchy' when turning the lights on. I knew this was the end, and ordered a new one from mboemparts.com. I popped it in today, and it feels great. I had to dissect the old one though, just to 'see' ya know....

Typical 'crayon-y' mess inside, and all in some state of disintegration. Glad it gave me some warning signs, especially since we're heading into the winter season.
Back to the road trip observations/issues...
I went to fill-up before heading out of town, and was surprised to find the gas door locked shut. The actuator had stopped locking with the doors quite some time ago, so it was a bit of a shock (and frustrating) to find it in the permalock failure mode. I pulled it out of the trunk today, and while the membrane appears to be intact (holds vacuum with a mity-vac), the mechanism is VERY stiff. Not having another one to compare to, its tough to tell, but I would assume that it should be easier to move than it currently is. I'll have to check out how expensive it is, and might just grab a new one in my next order if its available and affordable enough.
The second issue: When we arrived in Portland and were driving around town, I noticed a slight 'knocking' noise coming from the right rear when going over some (but not all) bumps. It was very inconsistent, and it really sounded like it was coming from the area of the gas door. While on the trip, I mentally associated the knocking with the mis-behaving actuator (vacation optimism perhaps?) and did my best to ignore it. While fiddling with the actuator today however, I took a spin with the actuator removed from the car, and the noise was still there.

I jacked up the rear to take a peek, and nothing seemed amiss. Everything was nice and tight. I also took a look at the top of the right strut, and that was also well, nice and tight. Lots of dinking around, and i finally noticed that the rear sway bar bushings on the left side at the bar attach point looked 'tweaked' The captive bolt on the left side appeared to be being "pushed' back out of the bushing with the suspension loaded. This is not how the right side appeared. I jacked up the rear via the diff, and pulled the left sway link. I used my bench vice and a socket to push the captive bolt back 'in' to the bushing. I re-installed the left side, but left the hardware loose. I also loosened the hardware on the right side, both top and bottom. Then I went for a quick spin to let the suspension settle. I backed the car up on ramps and tightened the hardware on both sides down. Took it for a drive, and the noise was gone!
My only guess is that the rear sway needed to be 'reset' after the suspension install, given the slight adjustment in ride height? Regardless its nice to have it quiet again.
Oh - I also replaced the bulb in the shifter console, which had annoyingly burnt out. Check out the 'tan' line on the burl... lol

It's currently at ~149,350 miles. Not too far till 150k!
Hey terry!@a777fan, Jon, How did you remove the center console with out cracking the wood or finish?
I have to change my mirror joy stick and am afraid of damaging my perfect piece of burl wood paneling.
PS: What’s the little switch between the DS WDW switches for?
Its really easy.
First, lift up your arm rest. Second, open the roller top cubby. Inside you’ll see two black ‘Phillips’ style screws in the front which tie the cubby into the center console. They can be hard to see as its a black screw on black crushed ‘velour’ or whatever the interior is, but a flashlight will highlight them right away. Remove those two screws and the cubby can lift up from the front. Lift up and then pull forward to remove.
At that point you’ll see that there is a little tab on the burl trim which may or may not have a screw. Mine does not for whatever reason. If you have one, remove it. At this point, put the car in neutral and slowly and carefully start lifting towards the back of the trim. The shifter surround trim (black ring around the shifter) is the only thing holding the console wood trim down. I usually pull up on the console trim just enough to get the shifter surround trim to start coming up so i can get my fingers under it and remove it. Defo want to be careful here as you are essentially using the wood trim as a lever to remove the shifter surround trim, which it obviously wasn’t designed to do.
Once the shifter surround trim is out, the burl wood piece should be free to continue to lift up from the rear. It has two little ‘ears’ up front that tuck under the ashtray piece, but at this point its only the electrical connections physically attaching it to the car. Hope this helps!
The small switch is the rear window ‘lock’ i believe. Keeps those pesky kids from rolling down the windows and jumping out.
Helloooooo everyone.
Üters been sidelined since mid-December with the standard winter 'cap moisture' issues. I've been too busy with the bavarian brothers to take a look, but finally got a chance to pull him into the garage today. I've decided that its time to do a re-seal on the cam magnets for a couple reasons:
1) Makes the front of the engine and the associated wiring harness look pretty messy.
2) Our fearless technical leader @gsxr has postulated that leaky magnets might have something to do with the cap/rotor moisture issue.
Two really good write-ups already on this subject:
Was looking forward to pulling in the car and simply popping off the magnets, but opening the hood reminded me that on the drivers side, the pesky PS res was going to be in the way. :\
Finally back in the garage!

Lookin good. I need a Bavarian Break.
Passenger side and the harness connector. Which I've noticed I'm already missing an 'ear' on!!!


With the Spark Plug wire tray off, I noticed that there is some oil seepage/stain on the lower part of the block. Anyone have any ideas here? Do the accessory bracket bolts go through the timing covers, and could therefore be a source of a leak? It doesn't appear to be 'connected' to the cam magnet seepage, but could be wrong.

The bolts for the passenger side magnet were certanly sealed with koala goo:

Magnet removed. You can see that the area around the connector was koala 'sealed' which means that the oil source was coming out of the connector, as per the typical failure mode:

Magnet disassembly time. Fully loaded up with oil on the inside!
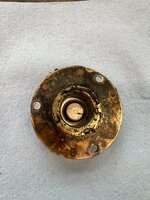


Drivers side was less of a mess, but similar:

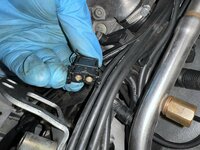


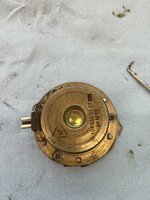
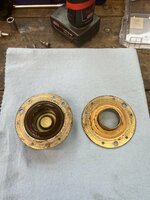

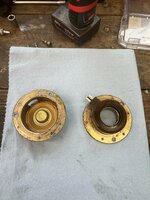
Outstanding questions for the peanut gallery:
1) I have a tube of the Koala Goo left over from when I had the magnets off last time during my top end re-fresh. I just checked it tonight, and its still viscous. Does it have a shelf life? Or should I be OK to proceed with using it.
2) The back of the magnets are seriously covered in this Koala crap. Any good tips to speed its removal?
Also - Does anyone have a good (unbroken) drivers side spark plug tray/distributor trim available for sale? P/N 119-158-06-85. The little 'door' on mine that keeps the spark plug wires in place has snapped off, as well as the clip that keeps the dress cover snugged down. I'll do a little searching, and then post a wanted ad, but if you got one burning a hole in your pocket. Let me know!
Üters been sidelined since mid-December with the standard winter 'cap moisture' issues. I've been too busy with the bavarian brothers to take a look, but finally got a chance to pull him into the garage today. I've decided that its time to do a re-seal on the cam magnets for a couple reasons:
1) Makes the front of the engine and the associated wiring harness look pretty messy.
2) Our fearless technical leader @gsxr has postulated that leaky magnets might have something to do with the cap/rotor moisture issue.
Two really good write-ups already on this subject:
Cam Magnets overhaul | M119 Engine
Everyone has a few leaky Cam Magnets. I took the magnets apart using a #40 drill. The rivets are #4, 0.125 inch. I cleaned the housings and magnets up with solvent, then alcohol. I utitlized MIL-PRF-8802 sealant- 450F, fuel and oil resistant. Made sure I had good squeeze out. Use...
www.500eboard.co
HOW-TO: Repairing leaking M119 cam advance solenoids / magnets | "HOW-TO" Tutorial Articles
Moderator edit: To replace with new solenoids/magnets instead of repairing, order 2 each of the following items: 119-051-00-77 magnet/solenoid, $109 MSRP 111-051-00-43 new style armature, $10 MSRP 104-990-10-04 single-use armature bolt, $3 MSRP...
www.500eboard.co
Was looking forward to pulling in the car and simply popping off the magnets, but opening the hood reminded me that on the drivers side, the pesky PS res was going to be in the way. :\
Finally back in the garage!

Lookin good. I need a Bavarian Break.
Passenger side and the harness connector. Which I've noticed I'm already missing an 'ear' on!!!


With the Spark Plug wire tray off, I noticed that there is some oil seepage/stain on the lower part of the block. Anyone have any ideas here? Do the accessory bracket bolts go through the timing covers, and could therefore be a source of a leak? It doesn't appear to be 'connected' to the cam magnet seepage, but could be wrong.

The bolts for the passenger side magnet were certanly sealed with koala goo:

Magnet removed. You can see that the area around the connector was koala 'sealed' which means that the oil source was coming out of the connector, as per the typical failure mode:

Magnet disassembly time. Fully loaded up with oil on the inside!


Drivers side was less of a mess, but similar:


Outstanding questions for the peanut gallery:
1) I have a tube of the Koala Goo left over from when I had the magnets off last time during my top end re-fresh. I just checked it tonight, and its still viscous. Does it have a shelf life? Or should I be OK to proceed with using it.
2) The back of the magnets are seriously covered in this Koala crap. Any good tips to speed its removal?
Also - Does anyone have a good (unbroken) drivers side spark plug tray/distributor trim available for sale? P/N 119-158-06-85. The little 'door' on mine that keeps the spark plug wires in place has snapped off, as well as the clip that keeps the dress cover snugged down. I'll do a little searching, and then post a wanted ad, but if you got one burning a hole in your pocket. Let me know!
Attachments
A couple of the bolts for the air pump bracket need KoalaGoo™ on the threads. See photo here. If they had no Goo, there will be an oil leak. Remove the bolts and see if they are covered in oil, or if they are dry - that will tell you if they are the source.With the Spark Plug wire tray off, I noticed that there is some oil seepage/stain on the lower part of the block. Anyone have any ideas here? Do the accessory bracket bolts go through the timing covers, and could therefore be a source of a leak?
I've used it 10+ years old without issues, but I was prepared to re-do the job if for some reason the goo didn't cure. Let it cure at least 24 hours, longer if possible, before starting the engine.Outstanding questions for the peanut gallery:
1) I have a tube of the Koala Goo left over from when I had the magnets off last time during my top end re-fresh. I just checked it tonight, and its still viscous. Does it have a shelf life? Or should I be OK to proceed with using it.
Wire brush is all I've used. The old stuff usually comes off very easily, compared to RTV (which you should NEVER use in this application, as it makes the solenoids almost impossible to remove next time).2) The back of the magnets are seriously covered in this Koala crap. Any good tips to speed its removal?
Post a WANTED ad in the classifieds. These can sometimes be obtained from the junkyard, just make sure the post/tab is not broken off. The "door" which locks under the tab and holds the wires in place, is sold separately. These are NLA of course, but if someone isn't already 3D printing them, here's a great opportunity! For some reason the driver side door/clip (119-158-01-73) is more likely to be missing, and rare to locate at the junkyard.Also - Does anyone have a good (unbroken) drivers side spark plug tray/distributor trim available for sale? P/N 119-158-06-85. The little door on mine that keeps the spark plug wires in place has snapped off, as well as the clip that keeps the dress cover snugged down. Ill do a little searching, and then post a wanted ad, but if you got one burning a hole in your pocket. Let me know!

I usually have a set or two of these on hand, I will check my stock. If so will send you a set gratis, as I've done with the @gsxr with a couple of sets over the years.For some reason the driver side door/clip (119-158-01-73) is more likely to be missing, and rare to locate at the junkyard.
Thanks v. much Gerry! Your generosity is un-matched.I usually have a set or two of these on hand, I will check my stock. If so will send you a set gratis, as Ive done with the @gsxr with a couple of sets over the years.
Thanks much for the feedback Dave. You posted the SAI bracket photo that I had lodged in my memory from previous views of your website. I appreciate the reminder.A couple of the bolts for the air pump bracket need KoalaGoo™ on the threads. See photo here. If they had no Goo, there will be an oil leak. Remove the bolts and see if they are covered in oil, or if they are dry - that will tell you if they are the source.
Ive used it 10+ years old without issues, but I was prepared to re-do the job if for some reason the goo didnt cure. Let it cure at least 24 hours, longer if possible, before starting the engine.
Wire brush is all Ive used. The old stuff usually comes off very easily, compared to RTV (which you should NEVER use in this application, as it makes the solenoids almost impossible to remove next time).
Post a WANTED ad in the classifieds. These can sometimes be obtained from the junkyard, just make sure the post/tab is not broken off. The door which locks under the tab and holds the wires in place, is sold separately. These are NLA of course, but if someone isnt already 3D printing them, heres a great opportunity! For some reason the driver side door/clip (119-158-01-73) is more likely to be missing, and rare to locate at the junkyard.

When pulling Üter in last night I finally decided that I’d had enough of looking at the junk pile that had become the space underneath my workbench.

Its a bit of a tricky spot given the way the previous owner had installed the workbench with simple 90 degree trusses from a hardware store. The supports basically divide up the space under the bench into five different areas. Luckily they (or the original construction crew that installed the studs in 1918…) were apparently a fan of symmetry, and installed all four supports at equal distances from one another. I spent some time digging on amazon and found a cheapy Chinese made shelf that fit the bill nicely. Just the right width to fit between the supports and the right height that clears the existing drawers! Bonus: the shipment qualified for free same day delivery. Ordered late last night, and they were in my porch when I got home.
The result:

It really is the little things!
I’m currently in the middle of a project that has turned into something quite complementary to the ‘top end refresh’ i did a few years ago. ‘Bottom end refresh’ doesn’t have the same ring to it tho .. 
I’ve been saving up images of the project thus far to make a larger post, but today I found something super interesting when I disconnected the drivers side coil wire:

It was so corroded that one of the two ‘ears’ on the plug itself fell out of the boot.
I unscrewed the plug from the wire, and the corrosion had made it all the way back:

Wth? I’ve never seen anything like this before. The cap itself felt like it was making a great seal with the coil, so I am at a loss on how water got in there.
I think the wire end should clean up fine. You can buy the boot connectors separately from Beru, but they are Oos at the moment. Does anyone have a spare one lying around that they would part ways with?
I’ve been saving up images of the project thus far to make a larger post, but today I found something super interesting when I disconnected the drivers side coil wire:

It was so corroded that one of the two ‘ears’ on the plug itself fell out of the boot.
I unscrewed the plug from the wire, and the corrosion had made it all the way back:

Wth? I’ve never seen anything like this before. The cap itself felt like it was making a great seal with the coil, so I am at a loss on how water got in there.
I think the wire end should clean up fine. You can buy the boot connectors separately from Beru, but they are Oos at the moment. Does anyone have a spare one lying around that they would part ways with?
That would be great North! Sending you a PM.As my 420 has moved on to slightly warmer climates I still have lots of stuff I no longer need.
Pair of Beru coil wires, no corrosion, pre-formed (i.e. not floppy), no electrical gremlins…
Yours for the asking.
Best regards.
View attachment 167530
Ok - I finally have some time to catch this thread up a little bit.
Firstly however, I'd like to note my sincere thanks to @northNH who came through with a set of caps and coil wires he had on the shelf. Many many thanks to you sir. You're a true reflection of everything that is great about this forum.
As I alluded to in my previous grouchy post, I'm currently in the middle of a job thats grown in scope pretty dramatically from where I started. Üters been down since the beginning of the year with additional mis-fire issues. As you've seen above, there is a good chance a lot of that was related to the degrading coil wire I found, but prior to its identification, I decided that it was a good time to finally repair my leaking coil magnets, which i also previously posted about. The leak hunting continued, and I pulled the smog pump and its bracket off, noting some wet-ness around some of the bolt holes in the timing case.

With the pump off, I finally was able to see what a mess the passenger side of the block actually was:


Note- at this point I had also removed the alternator, because, meh, why not?
While tediously cleaning the block, I remembered that a couple of years ago I had purchased a rebuilt MB water pump which I had never gotten around to installing. With the car somewhat apart, and craving more maneuvering room up front anyway, I went and drained the cooling system, and pulled the radiator out. Viscous fan, its bracket, and the vibration damper and pulley also came out.


The red paint mark on the damper (also a corresponding mark on the pulley) makes me think someones been in here before. The front part of the block wasn't as bad as the passenger side, but was still pretty oily.

Unclear on where all of it was originating, I booked an electronic consultation appointment with @gsxr , and came away determined to dig even deeper and replace the crank seal.
But first, I positioned a large rubbermaid container under the front of the engine and got out the SGE and a garden hose. (Water pump was also removed by this point:

Much better:

Ordered myself up a crank lock from samstag, and the crank seal installation tool right from MB.

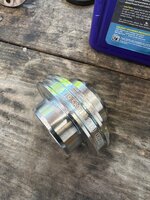
Also needed to get a torque wrench that could get up to 400nM. Treated myself with a Wera brand wrench, which while pricey, is a nice 'machine'

The whole crank seal process was a breeze. Marked the Belleville washers prior to disassembly so I didn't have to worry about remembering their direction.
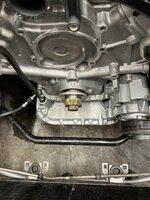
Put the crank lock tool in, and the bolt came out pretty easily with my 3/4in breaker bar and a cheater pipe.

Photo to document the depth the hub is pressed on to the crank

Used a 2 jaw puller to extract:

Top tip- get an old suspension nut you were going to toss anyway, and thread it onto your puller 'backward'. Gives the puller a nice flat spot to 'push' against:

Hub came off easy peasy.

Cleaned up a little. You can see where the old seal rode:
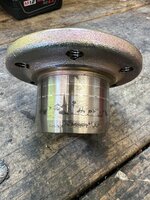
Measuring the depth of the seal before removal:

The seal appears to be in the original 'factory' position. Interestingly enough however, once I removed it it had a '120' PN, which per ISPPI seems to be a superceeded P/N.
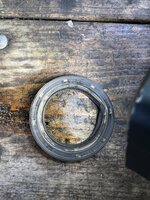
I am unclear if this is the original crank seal or not. That said, it was installed at the original factory depth (-ish). You can clearly see the wear spots on the crank hub, so I was keen to not install the new seal in the same spot. @gsxr has a great writeup on his technique where he leaves the seal proud of the timing covers a bit in order to maximize the distance between the old wear groove and the new wear groove. In the end I simply utilized the '3mm' depth side of the installation tool. I'll leave the @gsxr method available for the next time I need to replace the seal


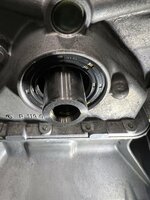
The tool makes it all quick work. Well worth it.
Check out these neat markings on the bellville washers:

Thought that was fun.
I used the toaster oven to heat up the crank hub to 50deg C. It slid onto the crank with little drama. A bit nerve wracking to make sure it had caught the woodruff key before cranking it down, but I compared the depth it was seated onto the crank prior to removal with where i was able to get it on all warmed up in order to confirm I has done it correctly.

I oiled up the bolt and washers and re-installed in their paint stripe order and torqued to 400nM. Was really quite easy!

Nice little torque stripe to finish it off.

Kinda neat to see how the washers rotate under torque.
I've got a ton more to cover, but I'm about typed out at the moment. More to come!
Firstly however, I'd like to note my sincere thanks to @northNH who came through with a set of caps and coil wires he had on the shelf. Many many thanks to you sir. You're a true reflection of everything that is great about this forum.
As I alluded to in my previous grouchy post, I'm currently in the middle of a job thats grown in scope pretty dramatically from where I started. Üters been down since the beginning of the year with additional mis-fire issues. As you've seen above, there is a good chance a lot of that was related to the degrading coil wire I found, but prior to its identification, I decided that it was a good time to finally repair my leaking coil magnets, which i also previously posted about. The leak hunting continued, and I pulled the smog pump and its bracket off, noting some wet-ness around some of the bolt holes in the timing case.

With the pump off, I finally was able to see what a mess the passenger side of the block actually was:


Note- at this point I had also removed the alternator, because, meh, why not?
While tediously cleaning the block, I remembered that a couple of years ago I had purchased a rebuilt MB water pump which I had never gotten around to installing. With the car somewhat apart, and craving more maneuvering room up front anyway, I went and drained the cooling system, and pulled the radiator out. Viscous fan, its bracket, and the vibration damper and pulley also came out.


The red paint mark on the damper (also a corresponding mark on the pulley) makes me think someones been in here before. The front part of the block wasn't as bad as the passenger side, but was still pretty oily.

Unclear on where all of it was originating, I booked an electronic consultation appointment with @gsxr , and came away determined to dig even deeper and replace the crank seal.
But first, I positioned a large rubbermaid container under the front of the engine and got out the SGE and a garden hose. (Water pump was also removed by this point:

Much better:

Ordered myself up a crank lock from samstag, and the crank seal installation tool right from MB.


Also needed to get a torque wrench that could get up to 400nM. Treated myself with a Wera brand wrench, which while pricey, is a nice 'machine'

The whole crank seal process was a breeze. Marked the Belleville washers prior to disassembly so I didn't have to worry about remembering their direction.

Put the crank lock tool in, and the bolt came out pretty easily with my 3/4in breaker bar and a cheater pipe.

Photo to document the depth the hub is pressed on to the crank

Used a 2 jaw puller to extract:

Top tip- get an old suspension nut you were going to toss anyway, and thread it onto your puller 'backward'. Gives the puller a nice flat spot to 'push' against:

Hub came off easy peasy.

Cleaned up a little. You can see where the old seal rode:

Measuring the depth of the seal before removal:

The seal appears to be in the original 'factory' position. Interestingly enough however, once I removed it it had a '120' PN, which per ISPPI seems to be a superceeded P/N.

I am unclear if this is the original crank seal or not. That said, it was installed at the original factory depth (-ish). You can clearly see the wear spots on the crank hub, so I was keen to not install the new seal in the same spot. @gsxr has a great writeup on his technique where he leaves the seal proud of the timing covers a bit in order to maximize the distance between the old wear groove and the new wear groove. In the end I simply utilized the '3mm' depth side of the installation tool. I'll leave the @gsxr method available for the next time I need to replace the seal


The tool makes it all quick work. Well worth it.
Check out these neat markings on the bellville washers:

Thought that was fun.
I used the toaster oven to heat up the crank hub to 50deg C. It slid onto the crank with little drama. A bit nerve wracking to make sure it had caught the woodruff key before cranking it down, but I compared the depth it was seated onto the crank prior to removal with where i was able to get it on all warmed up in order to confirm I has done it correctly.

I oiled up the bolt and washers and re-installed in their paint stripe order and torqued to 400nM. Was really quite easy!

Nice little torque stripe to finish it off.

Kinda neat to see how the washers rotate under torque.
I've got a ton more to cover, but I'm about typed out at the moment. More to come!
So- next catchup thread. Like I mentioned, I had an MB water pump on the shelf, and once I had the front of the block all degreased, it was time to install. Not much to it really. Just reference the FSM for the various bolt length locations, put the gaskets on and sinch it up:

Note, the ‘inlet pipe’ on top goes on last, as there is a bolt for the main water pump ‘hiding’ behind it.
Once installed, I went to install the thermostat. Easy right? Well:
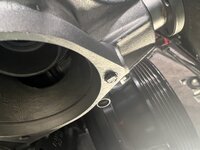

At the time, I had no idea what went wrong. Once I removed the water pump and chased out the other two holes, it seems as if the threads that were re-chased during the rebuild wern’t done properly. I got quite a bit of material out of them.

More than a little pissed, i ordered up a time-sert kit AND another WP from MB.
I haven’t done time-serts before, hence the ‘insurance’ from MB.
More to come …

Note, the ‘inlet pipe’ on top goes on last, as there is a bolt for the main water pump ‘hiding’ behind it.
Once installed, I went to install the thermostat. Easy right? Well:

At the time, I had no idea what went wrong. Once I removed the water pump and chased out the other two holes, it seems as if the threads that were re-chased during the rebuild wern’t done properly. I got quite a bit of material out of them.

More than a little pissed, i ordered up a time-sert kit AND another WP from MB.
I haven’t done time-serts before, hence the ‘insurance’ from MB.
More to come …
Thanks terry! I think its only the smog pump bracket that need koala goo. The FSM doesn’t mention anything about it with the WP bolts.@a777fan,
Jon, are any of the water pump bolts penetrating into the oil chases? I’m not sure but gsxr mentioned bolts on the alternator having to be sealed.
A reminder just in case.
lol
@a777fan,
Jon, are any of the water pump bolts penetrating into the oil chases? I’m not sure but gsxr mentioned bolts on the alternator having to be sealed.
A reminder just in case.
lol
The bolts that require the anaerobic sealant are the three smog pump bolts, the two intake cam solenoids and their bolts, and one of the tandem pump backing plate bolts (6mm Allen bolt). As well as, of course, the front covers of the cylinder heads, and their associated bolts.Thanks terry! I think its only the smog pump bracket that need koala goo. The FSM doesn’t mention anything about it with the WP bolts.
No orange anaerobic (koala claw) sealant is required for the water pump/thermostat/top inlet pipe bolts. It's a good idea to label/number where each bolt goes as there are several different lengths, and a minor PITA (even with the FSM reference) to figure out where each one fits. Torque spec is 21 Nm.
Note that if doing a major disassembly, two of the water pump bolts should not be immediately re-installed when putting a water pump back onto the car, as they hold on other items and go THROUGH the water pump housing. In Triple-Trouble's case here, this probably isn't a factor, except for maybe the bolt that goes through the fan clutch pulley holder, which should be installed last.
Water pump installation
Top inlet pipe & thermostat installation
Simple Green Extreme (safe for aluminum) teeth brushes and a Garden hose.what product did you use on the engine degreasing?
Next catchup installment...
As I mentioned, I ordered another rebuilt water pump which arrived fairly quickly, and I was back in business buttoning up the rest of the front end. New waterpump, thermostat housing (not stripped out this time! ) and viscous fan bracket re-installed:

Over the course of this 're-build' I attempted to re-fresh all of the various pulleys on the front of the engine. The only one that is still available from MB directly is the idler pulley, which I ordered and installed. I got a little sidetracked at one point when I was cleaning up the smog pump, and pulled it apart to see if I could find the correct replacement pulley size etc. It didn't sound awful when manually spun, but it definitely wasn't new either.
Based on threads from @gsxr and others, I found the correct NTN bearing number (which has been NLA for quite some time it seems) and did some ebay spelunking. I found a seller selling NTN bearings with what appeared to be the 'new' part number equivalent to the old. He was even touting that it was the correct bearing for the smog pump p/n in the ad. I ordered one, and nope, it wasn't correct. Here is what arrived:


It had a 32mm inner race diameter. I pulled the pulley off the pump carefully and took some measurements:

Whaa-Whaaa.
Short of the small expense wasted, there is another reason this likely wouldn't have been successful. The bearing is staked into the pulley, as you can see in this picture:
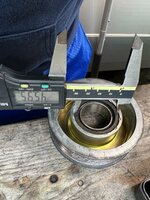
Even if the pulley had been the correct size, I wouldn't have installed it without some way of securing it into the pulley. No way I would grind out those stakes, press the bearing in, and just 'hope' that the pulley wouldn't walk its way off the bearing and pump over time. That would be a 'fun' failure mode. lol.
I did get a chance to disassemble and clean the pump thoroughly though.
Before:


And ready to re-install:


I also replaced the cracking harness insulation with some waterproof shrink tubing:

Before I move on, a top tip: Get yourself a cheap 30mm socket and an angle grinder. Works like a treat to get the bearing and pulley re-installed on the smog pump:

The alternator was not giving me troubles, but again the bearing did sound tired, so I took the opportunity to cross reference @gsxr, website and find his alternator cross reference sheet. I went with a 'plug and play' upgrade with a Bosch AL0162X. 150 A, compared to the stock units 110, and it does indeed drop right in with 0 modifications. A couple of photos:

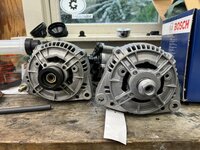
There is a slight difference in the 'clocking'/orientation of the rear of the alternator relative to the original (in the photo below), but this did not prove to be an issue. The lower harness had no difficulty reaching the new posts.
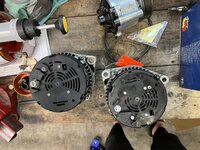
At this point with everything clean, it was just a matter of putting it all back together (new viscous fan belt too...):

I 'splashed out' and got myself a new PS Res. fluid level indicator:

Radiator and cooling system back together:

@northNH 's coil wire contribution is buried under the zoom toobe and distributor cover Oh - new distributor caps too.
I filled it up with coolant, changed the oil and filter (went with RedLine 10W-40 this time), disconnected the crank sensor, cranked it over till the oil pressure gauge pegged, re-connected the sensor, and cranked it over. Fired right up!
After all that though, it still had a warm mis-fire. I was pretty frustrated at this point, so I just threw some new rotors at it. And it ran great. *shrug* I did notice that the current rotor brackets were corroding (or something similar) though. They looked awful, both being covered in a weird white power:
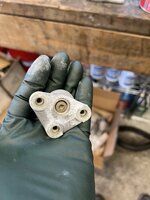


New ones from MB are NLA, but I did find a NOS pair on ebay from a great seller at a great price:
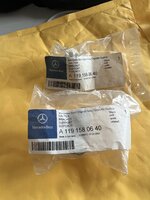
I installed them. No clue if the corrosion is a symptom/cause/unrelated to the voodoo that goes on in these distro caps, but I feel better with them replaced.
Thats all for now. One more installment and I think we'll be caught up.
As I mentioned, I ordered another rebuilt water pump which arrived fairly quickly, and I was back in business buttoning up the rest of the front end. New waterpump, thermostat housing (not stripped out this time!

Over the course of this 're-build' I attempted to re-fresh all of the various pulleys on the front of the engine. The only one that is still available from MB directly is the idler pulley, which I ordered and installed. I got a little sidetracked at one point when I was cleaning up the smog pump, and pulled it apart to see if I could find the correct replacement pulley size etc. It didn't sound awful when manually spun, but it definitely wasn't new either.
Based on threads from @gsxr and others, I found the correct NTN bearing number (which has been NLA for quite some time it seems) and did some ebay spelunking. I found a seller selling NTN bearings with what appeared to be the 'new' part number equivalent to the old. He was even touting that it was the correct bearing for the smog pump p/n in the ad. I ordered one, and nope, it wasn't correct. Here is what arrived:


It had a 32mm inner race diameter. I pulled the pulley off the pump carefully and took some measurements:

Whaa-Whaaa.
Short of the small expense wasted, there is another reason this likely wouldn't have been successful. The bearing is staked into the pulley, as you can see in this picture:

Even if the pulley had been the correct size, I wouldn't have installed it without some way of securing it into the pulley. No way I would grind out those stakes, press the bearing in, and just 'hope' that the pulley wouldn't walk its way off the bearing and pump over time. That would be a 'fun' failure mode. lol.
I did get a chance to disassemble and clean the pump thoroughly though.
Before:


And ready to re-install:


I also replaced the cracking harness insulation with some waterproof shrink tubing:

Before I move on, a top tip: Get yourself a cheap 30mm socket and an angle grinder. Works like a treat to get the bearing and pulley re-installed on the smog pump:

The alternator was not giving me troubles, but again the bearing did sound tired, so I took the opportunity to cross reference @gsxr, website and find his alternator cross reference sheet. I went with a 'plug and play' upgrade with a Bosch AL0162X. 150 A, compared to the stock units 110, and it does indeed drop right in with 0 modifications. A couple of photos:


There is a slight difference in the 'clocking'/orientation of the rear of the alternator relative to the original (in the photo below), but this did not prove to be an issue. The lower harness had no difficulty reaching the new posts.

At this point with everything clean, it was just a matter of putting it all back together (new viscous fan belt too...):

I 'splashed out' and got myself a new PS Res. fluid level indicator:

Radiator and cooling system back together:

@northNH 's coil wire contribution is buried under the zoom toobe and distributor cover
I filled it up with coolant, changed the oil and filter (went with RedLine 10W-40 this time), disconnected the crank sensor, cranked it over till the oil pressure gauge pegged, re-connected the sensor, and cranked it over. Fired right up!
After all that though, it still had a warm mis-fire. I was pretty frustrated at this point, so I just threw some new rotors at it. And it ran great. *shrug* I did notice that the current rotor brackets were corroding (or something similar) though. They looked awful, both being covered in a weird white power:


New ones from MB are NLA, but I did find a NOS pair on ebay from a great seller at a great price:

I installed them. No clue if the corrosion is a symptom/cause/unrelated to the voodoo that goes on in these distro caps, but I feel better with them replaced.
Thats all for now. One more installment and I think we'll be caught up.
Last edited:
Thanks dave!Nice work, Jon! Just curious... what brand were the old caps/rotors, and what brand were the new ones installed? Also, did you add the vent slots to the new caps?

Pretty sure the caps were from MB direct, and the rotors were beru. I grabbed a handful of the rotors awhile back when someone here found a ‘fire sale’ price at one of the online retailers.
I had slotted the old caps, but did not slot these. Going to see how it does with non-leaky cam solenoids, replacement rotor brackets and all new hardware first.
I had slotted the old caps, but did not slot these. Going to see how it does with non-leaky cam solenoids, replacement rotor brackets and all new hardware first.
This is how the accumulation of human experience, by curious intentionality or chance, may become common knowledge.
Last edited:
Final 'catchup' installment:
During the entirety of the waterpump fiasco had a little bit of time on my hands, and remembered that during last years suspension switch over to sportline I didn't touch any of the steering components. I had noted on previous visits under the car that the tie rods and drag links looked pretty original. The steering damper had been replaced by the PO when he purchased the car, sometime around 2014. While 'original' all the boots were still in good shape. I didn't have the parts at the time I was working on the sportline swap, so I had just decided to 'do it later'.
Well...

Looks like its 'later'! lol
It was kind of a perfect opportunity, since I was waiting for parts/tools to finish up the front end etc. Here is a shot of the old stuff and the dirty crossmember.

I bought new tie rods ( subbing the 129 part number for the NLA left side rod), new drag link, new damper and the idler arm bushing kit. In the past I have left the idler arm alone on my project cars, but after seeing an informative vid on youtube from our very own @lowman, I decided to give it a shot too.
Thinking about it now, there really wasn't too much to talk about, and the overall install went well. Old stuff out, and crossmember cleaned:
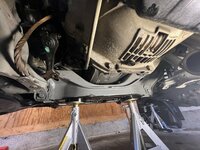
When I got to this point... I remember that I also had a set of new engine mounts I had purchased a couple of years ago, which I hadn't installed. Given what I thought was pretty good access at this point, I decided to throw those in as well.
I was able to use a floor jack and a piece of plywood under the oil pan to lift the engine. Don't worry, I was cringing the whole time, but I didn't have room to position the engine hoist in front of the car. The oil pan didn't come away with any new 'vents' or dents, so I'm counting that a win.
Despite what I felt was pretty good access with the steering components out, and the alternator un-installed on the passenger side, i still had to remove the block mount completely on the passenger side, and loosen it significantly on the drivers side to wiggle the existing mounts out. I got there though! Gratuitous old mount v. new mount shot:

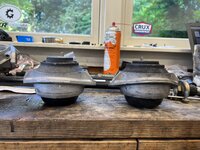
They were definitely collapsed, but not completely failed an in pieces. You can see how the drivers side mount had split on the top however. To my surprise, they were not original units, and had 2005 date stamps on them!

It was fiddly, but overall not an impossible job. Glad to have the new units in, and not just taking up shelf space.
The rest of the steering components went in with little issue. Some photos:
Old components:

Some idler arm photos showing disassembly of the original unit:


This came in really handy getting the top bushing out of the idler arm housing:
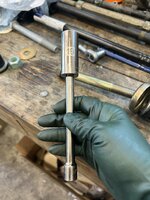
And all back together:

Inclusive of torque stripe!
I had to keep the oddball drivers side tie rod tube, so I swapped over the ends from the 129 part I purchased:
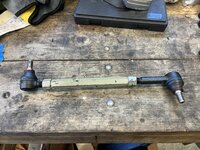
Everything went back together easily:

All clean and ready to go!
The last small item i have addressed is the small chrome cap on the antenna, which i had manhandled and snapped the top right off of some time ago. Its an interesting little piece, which seems to be two pieces (a small brass lower, and the chrome upper) fused together. You can see them both in this next photo, after I had extracted the lower part that snapped off inside the antenna mast housing:

You can't just get the little cap by itself. Additionally, all the various sellers on ebay have dubious descriptions and photos of the various antennas they have for sale. Its quite difficult to tell if the one you're looking at is the right one. I also felt silly buying an entire antenna assembly (even used), just to get the little cap, which depending on the model purchased, may or may not have worked. I then ran across this ebay ad:

The piece in question was shown prominently, and the price was right
I took it apart once it arrived, and the little cap was a solid enough piece. Built well. Not Exactly the same shape as the original that I had broken, but without a side by side comparison, very hard to tell any difference. I had no intention of using the aerial that came in the kit, so I disassembled the old antenna and tried fitting the new 'cap'. Sadly, the interior diameter was too small, and the OE antenna mast would not fit properly. Only just slightly though. Dremel to the rescue!
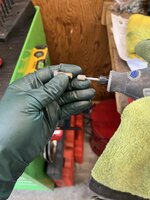 It needed a little massaging, but it went back together!

Back to normal.
During the entirety of the waterpump fiasco had a little bit of time on my hands, and remembered that during last years suspension switch over to sportline I didn't touch any of the steering components. I had noted on previous visits under the car that the tie rods and drag links looked pretty original. The steering damper had been replaced by the PO when he purchased the car, sometime around 2014. While 'original' all the boots were still in good shape. I didn't have the parts at the time I was working on the sportline swap, so I had just decided to 'do it later'.
Well...

Looks like its 'later'! lol
It was kind of a perfect opportunity, since I was waiting for parts/tools to finish up the front end etc. Here is a shot of the old stuff and the dirty crossmember.

I bought new tie rods ( subbing the 129 part number for the NLA left side rod), new drag link, new damper and the idler arm bushing kit. In the past I have left the idler arm alone on my project cars, but after seeing an informative vid on youtube from our very own @lowman, I decided to give it a shot too.
Thinking about it now, there really wasn't too much to talk about, and the overall install went well. Old stuff out, and crossmember cleaned:

When I got to this point... I remember that I also had a set of new engine mounts I had purchased a couple of years ago, which I hadn't installed. Given what I thought was pretty good access at this point, I decided to throw those in as well.
I was able to use a floor jack and a piece of plywood under the oil pan to lift the engine. Don't worry, I was cringing the whole time, but I didn't have room to position the engine hoist in front of the car. The oil pan didn't come away with any new 'vents' or dents, so I'm counting that a win.
Despite what I felt was pretty good access with the steering components out, and the alternator un-installed on the passenger side, i still had to remove the block mount completely on the passenger side, and loosen it significantly on the drivers side to wiggle the existing mounts out. I got there though! Gratuitous old mount v. new mount shot:


They were definitely collapsed, but not completely failed an in pieces. You can see how the drivers side mount had split on the top however. To my surprise, they were not original units, and had 2005 date stamps on them!

It was fiddly, but overall not an impossible job. Glad to have the new units in, and not just taking up shelf space.
The rest of the steering components went in with little issue. Some photos:
Old components:

Some idler arm photos showing disassembly of the original unit:


This came in really handy getting the top bushing out of the idler arm housing:

And all back together:

Inclusive of torque stripe!
I had to keep the oddball drivers side tie rod tube, so I swapped over the ends from the 129 part I purchased:

Everything went back together easily:

All clean and ready to go!
The last small item i have addressed is the small chrome cap on the antenna, which i had manhandled and snapped the top right off of some time ago. Its an interesting little piece, which seems to be two pieces (a small brass lower, and the chrome upper) fused together. You can see them both in this next photo, after I had extracted the lower part that snapped off inside the antenna mast housing:

You can't just get the little cap by itself. Additionally, all the various sellers on ebay have dubious descriptions and photos of the various antennas they have for sale. Its quite difficult to tell if the one you're looking at is the right one. I also felt silly buying an entire antenna assembly (even used), just to get the little cap, which depending on the model purchased, may or may not have worked. I then ran across this ebay ad:

OE Replacement Fit 92-02 Mercedes W202 W210 W140 W124 R129 Power Antenna Aerial | eBay
Find many great new & used options and get the best deals for OE Replacement Fit 92-02 Mercedes W202 W210 W140 W124 R129 Power Antenna Aerial at the best online prices at eBay! Free shipping for many products!
www.ebay.com
The piece in question was shown prominently, and the price was right
I took it apart once it arrived, and the little cap was a solid enough piece. Built well. Not Exactly the same shape as the original that I had broken, but without a side by side comparison, very hard to tell any difference. I had no intention of using the aerial that came in the kit, so I disassembled the old antenna and tried fitting the new 'cap'. Sadly, the interior diameter was too small, and the OE antenna mast would not fit properly. Only just slightly though. Dremel to the rescue!
 It needed a little massaging, but it went back together!
Back to normal.
@a777fan,
Nice work Jon! You should love that new feeling of the tight steering. I’m sure you’re headed to the alignment shop next.
I did the same suspension update a few years back. Actually around 8/2012. New Steering damper , tie rod bushings and the front stabilizer bar bushings along with an alignment. I would have to check the mileage but it’s not much since my car didn’t move much in 7 years (1,000 miles) from 6/10/16 to 4/17/23. So I’m delighted to report that everything is still tight and feels planted when driving. I had previously changed the motor and transmission mounts when I had my transmission serviced. I paid someone for that job along with stopping the leaking 4” PS pump connector hose. He really cursed that hose and said never again.
Anyway, Enjoy the ride!
Nice work Jon!
I did the same suspension update a few years back. Actually around 8/2012. New Steering damper , tie rod bushings and the front stabilizer bar bushings along with an alignment. I would have to check the mileage but it’s not much since my car didn’t move much in 7 years (1,000 miles) from 6/10/16 to 4/17/23. So I’m delighted to report that everything is still tight and feels planted when driving. I had previously changed the motor and transmission mounts when I had my transmission serviced. I paid someone for that job along with stopping the leaking 4” PS pump connector hose. He really cursed that hose and said never again.

Anyway, Enjoy the ride!


