• Hi Guest !

    Welcome to the 500Eboard forum.

    Since its founding in late 2008, 500Eboard has become the leading resource on the Internet for all things related to the Mercedes-Benz 500E and E500. In recent years, we have also expanded to include the 400E and E420 models, which are directly related to the 500E/E500.

    We invite you to browse and take advantage of the information and resources here on the site. If you find helpful information, please register for full membership, and you'll find even more resources available. Feel free to ask questions, and make liberal use of the "Search" function to find answers.

    We hope you will become an active contributor to the community!

    Sincerely,
    500Eboard Management

OWNER a777fan (E420)

It was beautiful today up here in the PNW, and i took advantage by washing off all the accumulated filth that had stacked up. We took the car on a trip over the mountains a few weeks ago, where we encountered rain, slush and snow. Its been gross since.

The interior needed a little love too. The dust was adding up.

Took it up to Golden Gardens for some pics after:

proxy.php


proxy.php


Sent from my iPhone using Tapatalk
 
The weather this past week remained beautiful, so I decided I was going take take advantage and finally change the transmission fluid. It was the one major item in the car that I had no service record for. The previous owner has owned the car since 110k miles and had never done it. Since I was rolling past 131k I figured I would baseline here. The pan was looking pretty neglected.

251.jpg

As i have mentioned multiple times, i still don’t have access to my garage thanks to another ongoing project, so the nice weather was a good reason as any to get off my duff and get this one done.

Overall, everything went really well. I parked the car on ramps the night previous and let it sit for a day prior to starting the procedure. The cross pipe bolts came out with no struggle at all. Thank god for California cars! :) I then drained the pan and the torque converter. The latter seems to drain as slow as molasses. The fluid was red, but not necessarily clear which re-enforced my hunch that it had been awhile since this procedure had been done.

252.jpg

My 9qt drain pan was QUITE full when it was through. I then dropped the pan. As all the tutorials mentioned there was still a good amount of fluid hanging around.

253.jpg

Sparkly valve body!

254.jpg

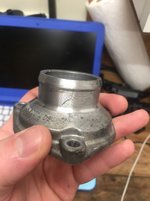
I then dropped the filter, which ended up being an MB part!

255.jpg

I’m really hoping this ISNT a date code.

256.jpg

5th week/month of 2002? :/

Anyhoo, i drained out the rest of the pan and took a look for sludge/debris.

257.jpg

The interior of the pan appears to have a speckled finish, so what initially looked like a TON of particles ended up mostly being the interior pan surface. There was a light dusting of particles on the bottom of the pan however.

I cleaned out the rest of the pan, threw my new magnets in and attached the new pan gasket. Man, thats an awesome gasket! Fits great and it a real quality piece of work.

258.jpg

I installed the new filter, popped the pan back on, and re-attached the cross pipe after painting on some anti-seize on the bolt ends. Gotta keep that California car luck goin!

I dumped in 5 quarts, fired it up, cycled through all the gears, turned it off, threw in 3 more quarts, and then hit the road. Man it shifts nice now.

Also fiddled with the Bowden cable adjustment today too. The points were a little mis aligned, and now the car seems to shift more normally at part throttle than it used to. It used to hang a bit on the 2-3 transition (or at least more than I would have expected). Now all part throttle upshifts occur quite readily.

I do still have a few things i need some advice on:

1. My first gear seems to upshift early most of the time on a WOT/kickdown acceleration run. It will get up to 5500 and then upshift. Oddly 2-3 is not affected and upshifts as expected at 6k. Additionally, I tried accelerating from a standstill today, and with this order of operations I got to 6k in first. Any thoughts on what is going on?

2. What governs the speed at which a kickdown from 2nd to 1st can occur? If i am cruising along at 40, should I expect it to grab first when i activate the kickdown switch? Or am I too close to 47 (redline) for it to kickdown? What could be causing it to not grab first in this scenario if it should?

3. What is the proper way to check the transmission fluid level? Engine on or off? I didnt see any guidance on this in the FSM. I checked it with the engine off and engine on today. Engine off when tranny was hot showed it massively overfilled. Engine on with it hot showed both massively overfilled and then a teensy bit over the 180 degree max line. I can’t seem to get a consistent bead on it right now, so any help would be appreciated.

4. I noticed that the electrical connector on the right side of the transmission housing is split. Big deal? Or no big deal?

259.jpg

5. Not transmission related! I looked at the steering gear while I was under the car and noticed there is a fair amount of play in the inner tie rod ends. I’m hoping someone could tell me if this is normal, or if it indicates its time for replacement.

Driving this thing is more and more of a joy every day. :D

[video=youtube;CPztF-GigBA]
 
Last edited by a moderator:
The shift point behavior you are describing regarding 1-2-1 is largely normal. It could be tweaked a little by turning the 2.5mm Allen screw next to the dipstick about 45 degrees counterclockwise. If you then find that it occasionally hits the rev limiter, you went to far and will need to turn it back clockwise about half that amount. It's a hair trigger adjustment and it's not likely worth doing since you are already back together.

You'd think that trans fluid level setting would be uncomplicated and non-critical, but this is a Benz, so it's a little tricky to do, and having it right IS critical.

This all may sound OTT, but here's the novice resistant methodology should someone need it. Read it, learn it, know it, do it, live it. Almost all hobbyists and many pros overfill the hell out of these transmissions, and the only reason I said "almost" is because I'd bet that Honch doesn't...

The fluid should only be corrected at full transmission operating temperature (ten miles should do it), with the engine at idle speed, and the vehicle on level ground. If it is a cool day, set the level at the low line of the high temperature marks. If it's a really hot day and you've been riding on the highway, near the middle is ok. ONLY put it at the high mark if it is a hot day and you've been on the highway for 20 miles or more (I call this the "rest area check"). If your dipstick has only two lines, those ARE high temperature lines. There is only about 4 to 8 ounces between the high and low level marks, so getting the level just so is tricky. You do NOT want it overfilled even a little. Make sure it's below the top line. If you get a slightly different level on each side of the dipstick, make an imaginary line midway between the to levels and use that as the measurement level. If you recheck it cold with the engine running it may appear WAY too low. That's normal. engine oil and transmission fluids expand greatly with heat. If you add or remove fluid, leave the engine running during that process and wait a couple or three minutes before you check it again. The residual fluid lining the filler tube walls just afterwards will get on the dipstick and really send you chasing your tail...
 
Last edited:
The shift point behavior you are describing regarding 1-2-1 is largely normal. It could be tweaked a little by turning the 2.5mm Allen screw next to the dipstick about 45 degrees counterclockwise. If you then find that it occasionally hits the rev limiter, you went to far and will need to turn it back clockwise about half that amount. It's a hair trigger adjustment and it's not likely worth doing since you are already back together.

You'd think that trans fluid level setting would be uncomplicated and non-critical, but this is a Benz, so it's a little tricky to do, and having it right IS critical.

This all may sound OTT, but here's the novice resistant methodology should someone need it. Read it, learn it, know it, do it, live it. Almost all hobbyists and many pros overfill the hell out of these transmissions, and the only reason I said "almost" is because I'd bet that Honch doesn't...

The fluid should only be corrected at full transmission operating temperature (ten miles should do it), with the engine at idle speed, and the vehicle on level ground. If it is a cool day, set the level at the low line of the high temperature marks. If it's a really hot day and you've been riding on the highway, near the middle is ok. ONLY put it at the high mark if it is a hot day and you've been on the highway for 20 miles or more (I call this the "rest area check"). If your dipstick has only two lines, those ARE high temperature lines. There is only about 4 to 8 ounces between the high and low level marks, so getting the level just so is tricky. You do NOT want it overfilled even a little. Make sure it's below the top line. If you get a slightly different level on each side of the dipstick, make an imaginary line midway between the to levels and use that as the measurement level. If you recheck it cold with the engine running it may appear WAY too low. That's normal. engine oil and transmission fluids expand greatly with heat. If you add or remove fluid, leave the engine running during that process and wait a couple or three minutes before you check it again. The residual fluid lining the filler tube walls just afterwards will get on the dipstick and really send you chasing your tail...

Thanks much Klink. What is the best way to lower the fluid level? Via the drain plug? Little bits at a time?


Sent from my iPhone using Tapatalk
 
To give my mind a rest from trying to figure out exactly how much my transmission is now over or under filled, I started to tear into the cooling system tonight. The goal was to replace the thermostat, but its really turned into a general system refresh.

I’ve ended up buying just about every hose and tank there is (expansion and overflow), and now that I have everything taken apart, I’m also going to change out my leaky power steering return hose which is making a mess of the drivers side bank. I’ll also re-seal the cam magnets while I am in there too. I hope to have it sparkly clean and put back together in the next few days.

Observations from to tonights disassembly:

1. One of the threads in the lower fan shroud ripped out and will have to be replaced. Its nice you can buy the lower half separately.

2. The thermostat hose was on there. Like, REALLY on there. Ended up cutting it off.

3. The carnage of removing that caused some victimization of the thermostat housing itself. :(
They seem to be quite cheap for a hunk of aluminum, so I just ordered a new one.

4. With the radiator and block drains, i think i was able to get 2-2.5 gallons out of the car. The PO looks to have had the system filled with Zerex G-05! :)

5. On the advice of Steve (SG-Motorsports) i caved and bought a new level sender. They apparently start to wick coolant through the electrical connections??​

Now that the block is drained, any harm in flushing it out with a garden hose? I figured I’d keep the block drains open and use the upper radiator connection to rinse everything out.


Sent from my iPhone using Tapatalk
 

Attachments

  • 3.jpg
    3.jpg
    357.8 KB · Views: 17
  • 2.jpg
    2.jpg
    346.1 KB · Views: 22
  • 1.jpg
    1.jpg
    446.3 KB · Views: 18
4. With the radiator and block drains, i think i was able to get 2-2.5 gallons out of the car.
That is normal. You'll get about the same amount back in. Make sure to pre-mix the coolant to 50/50 or whatever percentage you want and only pour in pre-mix. Fill the block through the upper radiator hose (4-5 quarts) then fill through the reservoir. It will take another quart or so after it reaches operating temp (wait until it cools before topping off). There should be multiple threads discussing this in more detail. Ignore the claimed spec in the manual about system capacity of ~16 qts, I believe that is an error, and actual is 12-13.


5. On the advice of Steve (SG-Motorsports) i caved and bought a new level sender. They apparently start to wick coolant through the electrical connections??
ALWAYS replace the sender if replacing the tank. You did the right thing.


Now that the block is drained, any harm in flushing it out with a garden hose? I figured I’d keep the block drains open and use the upper radiator connection to rinse everything out.
No harm at all. Flush the radiator too. The only concern normally is you only want to do this on a cold engine, which shouldn't be an issue.

:banana2:
 
Good work, Triple-Seven!! You’re doing it right.

Lower fan shroud strippage is a common issue. You can drill things out and replace with a nut/bolt/washer too. The part is cheap new, though. I replaced mine years ago.
 
honch, I cant believe we didn't get a yoink outta him! I did notice that shoes covered up the toes in one of the pictures, he learns fast.

I think ol’ Trip has been properly hazed, so I’ll move on to yoinking others.

Right now I’m on a jihad against flaky parts buyers. Tempted to name names but I won’t.

Aww. You guys!

:grouphug:


Sent from my iPhone using Tapatalk
 
A bit more progress tonight. I got all the old remnants of the cooling system out, and the overflow tank replaced.

The expansion tank was original.

proxy.php


And really gross looking in comparison.

proxy.php


Got the old overflow tank out too. Reminds me of a hospital device :gross:

proxy.php


The old overflow hose was just as brittle as can be. Everything from the expansion tank back was original methinks.

The new overflow tank tucked away behind the vacuum reservoir, both cleaned and the wheel well vacuumed out.

proxy.php


I’m still waiting in my coolant level sender so I wrapped up the night with some cleaning.

Before:
proxy.php


After:
proxy.php


Starting to sparkle a bit under the hood!


Sent from my iPhone using Tapatalk
 
Curiosity really did kill the cat...

proxy.php


I now practically have the front both of the heads off. The power steering hose made quite a mess in there, and just turned to dust when i tried to remove it. Broke into about 4 pieces or so. I have the ZF pump, which should be a lot more visible once I am able to take all that grime off.

I hope to clean everything up and re-seal the cam magnets tomorrow. I’m still waiting for additional cooling parts from mboemparts, so I’ll have a couple days for the anaerobic to cure. :)

It looks like several of the bolts that hold the PS reservoir to the head penetrate into oiled areas and had anaerobic on them as well... i’ll have to check the FSM to be sure...


Sent from my iPhone using Tapatalk
 
Oh also note that the plastic wire loom is just totally gone from those vacuum lines. Literally dust. I have some high temp stuff coming in tomorrow that will hopefully do the trick.


Sent from my iPhone using Tapatalk
 
Oh also note that the plastic wire loom is just totally gone from those vacuum lines. Literally dust. I have some high temp stuff coming in tomorrow that will hopefully do the trick.


Sent from my iPhone using Tapatalk

Where did you get the high-temp stuff?
 
Ooh. Question for the experts here. Is there any way to get the plug wire tray out of the car without pulling the fuel rail?

I can’t seem to get the geometry of that thing to work with the rail in place...


Sent from my iPhone using Tapatalk
 
I *think* a new X-tray can be twisted in place without pulling the fuel rail... however I'm not 100% certain. Trying to remove an old one will almost certainly result in breaking it, if the fuel rail isn't lifted up.

:duck:
 
+1. I replaced one of these x-trays 20 years ago on a 400E and I don't recall having to remove the fuel rail. If anything I just had to loosen a bolt or two on the front.
 
Soooo... things escalated rather quickly today.

proxy.php


This was NOT the plan I had for today. I was going to continue my cleaning from yesterday of the front of the engine only. Make the most of the available area etc. Weeeeeeellll... in the process if moving some of the vaccuum lines around while cleaning, two of the ones that run from the EZL area up and then under the manifold snapped right off. :/ Right AT the manifold.

proxy.php


proxy.php


Well fudge. I was planning on ripping the manifold off someday anyway to refresh the gaskets etc, but seriously. Not today. Oh well! Might as well refresh this too while I’m at it.

The manifold came off pretty easily. I separated the fuel rail first, then popped off the vacuum lines and disconnected the throttle and bowden cables, and then the coolant line. I undid all the fasteners and it pulled away easily. Then i spent the rest of the afternoon cleaning!

The cruddy intake gaskets:

proxy.php

proxy.php

proxy.php

proxy.php

proxy.php

proxy.php

proxy.php


Progress actually didn’t take that long. Half done!

proxy.php


How I finished the evening:

proxy.php


Pretty satisfying.

Some of the bolts that came OUT of the intake look really horrible.

proxy.php


Rusted out, threads covered in crud. While others are almost pristine! Anyone know if they are trying to tell me something?

Looks like I should at least chase out the threads in the head before re-installing right?

Then there is this lump:

proxy.php


Couple of questions for the experts:

1) Can the injectors be rebuilt? Is there a preferred shop for that?
2) Its the original ETA. I was going to re insulate one and throw it in when i had time, but with this out now, it seems like i should just find a re-built one and put it in. Thoughts?
3) I think i’m gonna pull the whole thing apart for a thorough cleaning. Good idea? Bad idea? Indifferent?
4) Now that I am this far. What else should I do ‘while I’m in there’?


Sent from my iPhone using Tapatalk
 
What is heat avoidance?
From the pics, can anyone tell if there was an intake leak?
As far as the rust on the bolts, seems a little suspect, but I will let the experts chime in.
The intake I pulled from a pick n pull had some rusted bolts and I suspected a small water leak....but I may be wrong.
 
Last edited:
Will you get the intake coated with heat avoidance like GVZ did on his C126?

Ah! Thanks for that reminder. I’ll have to dig through his thread to refresh the details. I remember reading it at some point.


Sent from my iPhone using Tapatalk
 
You might want to change the cam seals while they are easy to get to.

Maybe, although they aren’t leaking at the moment, so I’m most likely going to let sleeping dogs lie.

Sorry about not mentioning the heat resistant cable shrouding, but I didn’t even get a chance to open it today.


Sent from my iPhone using Tapatalk
 
What is heat avoidance?
From the pics, can anyone tell if there was an intake leak?
As far as the rust on the bolts, seems a little suspect, but I will let the experts chime in.
The intake I pulled from a pick n pull had some rusted bolts and I suspected a small water leak....but I may be wrong.

Thanks steve-ster. Yeah I was hoping someone would be able to comment on the general visual state of things from my pictures. I didn’t see anything obviously off, but I’m an M119 newb, so... ?


Sent from my iPhone using Tapatalk
 
Everything looks pretty much "as expected" to me -- I don't see anything that looks out of the ordinary. Should clean up nice, as you are finding.

You should definitely remove the ETA and MAF, and either get the ETA refurbished if it is original (LWB250 I think posted a guy in Alabama who does this for about $300), or clean it up and re-install it if it's a post-1998 date code.

The other couple of things you should really do, since you have the intake off the car, are:

  • Separate the two halves of the intake manifold and replace all of the rubber "donut rings" that mate them. This is a source of intake leaks, and it's very likely that these rings are fossilized. It's incremental labor and cheap parts cost.
  • Make sure that the EGR line is removed and totally cleared out. These get blocked with carbon over time, and tend to throw a CEL and Code 5 and sometimes 4, which is an EGR code and also "air injection inoperative".

I think nocfn was talking about getting the intake manifold heat-treated with a ceramic coating, to retard heat. I had my M117 intake manifold dual-coated with both ceramic (to retard heat) and Teflon on the top (to make cleaning easier) when I removed it from the engine back in 2010. It's probably a couple hundred dollars to do this. It's just sort of a neat thing to do, not sure there is any measurable performance benefit, but it makes for neater aesthetics and helps keep heat from affecting the intake air (in theory). You can see more in my M117 Top-End Rebuild thread in that sub-forum.

Good work so far, Trip !! Feels good to clean out that engine valley, eh?!?

Cheers,
Gerry
 
Soooo... things escalated rather quickly today. (snip) Couple of questions for the experts:

1) Can the injectors be rebuilt? Is there a preferred shop for that?
2) Its the original ETA. I was going to re insulate one and throw it in when i had time, but with this out now, it seems like i should just find a re-built one and put it in. Thoughts?
3) I think i’m gonna pull the whole thing apart for a thorough cleaning. Good idea? Bad idea? Indifferent?
4) Now that I am this far. What else should I do ‘while I’m in there’?

1) DO NOT REBUILD THE INJECTORS. When it's running again, put a full bottle of Red Line SI-1 in a tank of your favorite top-tier premium. Sleep well.

2) If the ETA is original... I'd send it out for a rebuild, probably try Don Roden at RFC Electronics, per Dan's recommendation here.

3) As Gerry mentioned, once you're in this far, I'd replace the 8 rubber donuts that connect upper/lower halves of the manifold. OE only... the aftermarket stuff is all Taiwan/China now.

4) While you're in this far, replace any and all PCV tubes that are not recent, and all Tecalan (plastic) vacuum tubes & rubber connectors.

Those intake ports/valves look very clean, btw. Nice to see that.

:banana2:
 
Everything looks pretty much "as expected" to me -- I don't see anything that looks out of the ordinary. Should clean up nice, as you are finding.

You should definitely remove the ETA and MAF, and either get the ETA refurbished if it is original (LWB250 I think posted a guy in Alabama who does this for about $300), or clean it up and re-install it if it's a post-1998 date code.

The other couple of things you should really do, since you have the intake off the car, are:

  • Separate the two halves of the intake manifold and replace all of the rubber "donut rings" that mate them. This is a source of intake leaks, and it's very likely that these rings are fossilized. It's incremental labor and cheap parts cost.
  • Make sure that the EGR line is removed and totally cleared out. These get blocked with carbon over time, and tend to throw a CEL and Code 5 and sometimes 4, which is an EGR code and also "air injection inoperative".

I think nocfn was talking about getting the intake manifold heat-treated with a ceramic coating, to retard heat. I had my M117 intake manifold dual-coated with both ceramic (to retard heat) and Teflon on the top (to make cleaning easier) when I removed it from the engine back in 2010. It's probably a couple hundred dollars to do this. It's just sort of a neat thing to do, not sure there is any measurable performance benefit, but it makes for neater aesthetics and helps keep heat from affecting the intake air (in theory). You can see more in my M117 Top-End Rebuild thread in that sub-forum.

Good work so far, Trip !! Feels good to clean out that engine valley, eh?!?

Cheers,
Gerry

1) DO NOT REBUILD THE INJECTORS. When it's running again, put a full bottle of Red Line SI-1 in a tank of your favorite top-tier premium. Sleep well.

2) If the ETA is original... I'd send it out for a rebuild, probably try Don Roden at RFC Electronics, per Dan's recommendation here.

3) As Gerry mentioned, once you're in this far, I'd replace the 8 rubber donuts that connect upper/lower halves of the manifold. OE only... the aftermarket stuff is all Taiwan/China now.

4) While you're in this far, replace any and all PCV tubes that are not recent, and all Tecalan (plastic) vacuum tubes & rubber connectors.

Those intake ports/valves look very clean, btw. Nice to see that.

:banana2:

Thanks much Gents! Cleaning out all that crud does peg the ol'e satisfaction meter. In fact, the clean block is now one of my desktop pictures on my work computer. In a sick puppy way, I am glad the vacuum lines snapped... its almost like my inner psyche it did it on purpose! :duck:

A few more niggling questions and comments...

1) Dave, thanks for the feedback on the injectors. I was planning to (at least) replace all the external O-rings at the fuel rail and intake ports. Is that OK to do?
2) I'll have to reach out to Don on the ETA. I have a spare 'old' ETA lying around that I can easily ship off pretty quick. Hopefully that will hasten the turn around time.
3) I was planning on replacing all the PCV hoses & connectors. You guys would recommend the plastic vacuum lines too eh? They already seem higher quality than what I have seen in other automotive applications, but I guess I wouldn't mind all new in there. The rubber L shaped connectors definitely need to be replaced. I should have looked closer when I was draining the transmission, but are the tranny vacuum lines replaceable with the transmission still IN the car?
4) What tool should I use to chase the intake threads in the head with? I was going to just use a tap, but is there something out there more specific for this type of job that would do better?
5) How clean does the mating surface need to be on the heads and the bottom half of the intake manifold. Even after cleaning with degreaser, and then acetone yesterday, there was still some staining/discoloration on the head side of things, which is visible in some of the 'final' photos above.
6) Can someone point out the EGR tube that gets clogged and needs to be cleaned?
7) Donuts will be replaced. They have got to be fossilized by now.

I'm sure there will be more. As usual... thanks much everyone for all the helpful comments and feedback!
 
New O-rings on the injectors is fine - and probably smart. For the plastic tubes, use your judgment... if they are old & brittle, replace. Fresh & flexible, you can probably leave them alone. Also depends on which ones you are looking at, and how hard they will be to R&R once the engine is back together. The trans vac tubes (1 each side) can be done with the trans in the car, these may be OK (not brittle) and could be left alone for now.

I use a tap to chase threads, but I think there is a more proper thread-chaser that doesn't cut as much. Just be careful, use a bit of cutting oil to lube the tap, clean the flutes frequently, yadda x3. You can clean the bolt threads with a die, or buy new bolts. The gasket surfaces can be discolored but you don't want any residue stuck on either surface, and hopefully no nicks/gouges either.

The EGR tube is the metal pipe that goes inside the lower manifold, visible when you remove the ETA. You can remove the EGR valve to access the top side. The EGR valve gasket may be re-usable if it doesn't rip.

:sawzall:
 
Back with a not-so-top gear top tip: When removing the fuel lines for any length of time from the fuel rail, make sure to loosen your gas cap. Otherwise, you’ll return home after work on a warm may afternoon wondering why the backyard smells like a gas station. You’ll very quickly realize that its the puddle of gas dripping from under the hood of your MB! :doh:


Sent from my iPhone using Tapatalk
 
LOLOL! Woooops. Another tip is to have the fuel tank near empty when you need to remove the lines, as when the tank is full you can end up with a similar mess. Oh, and remove the gas cap before removing the hoses too, as the tank is often pressurized!

:duck:
 
Back with a not-so-top gear top tip: When removing the fuel lines for any length of time from the fuel rail, make sure to loosen your gas cap. Otherwise, you’ll return home after work on a warm may afternoon wondering why the backyard smells like a gas station. You’ll very quickly realize that its the puddle of gas dripping from under the hood of your MB! :doh:

That is A Only Do That Once moment that most of have done in the past. Glad you caught it before the vapors built up.

:bbq:
 
I attempted to take the intake manifold apart tonight, but the residual gas fumes from yesterday must still be lingering around. I managed to strip out one of the 4 bolts that hold the manifold halves together! :doh:

proxy.php


On top of that, my cordless was out of juice, so my attempts with an easy out ended pretty quickly. I’ll have to try it again tomorrow.


The injectors popped out without a fuss, and the ports look pretty good! One out of the 8 as an example:

proxy.php


They all pretty much look like that.

I did get some of the other pieces off, like all the remaining hoses (which had to be cut off they were so hard) and the egr valve to take a peek in there.

proxy.php


I’ll test the valve out with my mitty vac to make sure its still operational.

The MAF was trickier than I thought. I wasn’t comfortable with the amount of prying required to get it out of the rubber boot, but finally just wrestled out of there.

Then. The ETA. Its still nestled down there as I was unable to figure out the jenga move required to extract it. There is no way I’d be able to figure this out while on the car. I’ll definetley be getting the spare rebuilt, so I can install before I pop this sucker back in. I have contacted Don in AL and started that process.

proxy.php


Blerg!


Sent from my iPhone using Tapatalk
 
Thanks for sharing and good luck with the work you do. Gives me courage to also do this next year. follow it with great interest. [emoji106]
 
Thanks for sharing and good luck with the work you do. Gives me courage to also do this next year. follow it with great interest. [emoji106]

Thanks much!!!

These machines are great things and are put together so well, they are a joy to take apart and fix. Even when things go wrong like today.

Add in this great website, and it’s an unbeatable combo IMHO.

Love your car btw. Bril sil for the win!
 
A quick trick: if you don't have success using an easy out to remove that 6mm allen bolt, you can hammer a 12-point 12mm socket over the outside shoulder of it. Sounds crazy, but it works awesome! If you need to borrow one stop by the shop tomorrow on your way home.
 
A quick trick: if you don't have success using an easy out to remove that 6mm allen bolt, you can hammer a 12-point 12mm socket over the outside shoulder of it. Sounds crazy, but it works awesome! If you need to borrow one stop by the shop tomorrow on your way home.

:plusone:

How I get striped alan bolts like that out is get a torx or any similar slightly larger bit and a large persuader (AKA- Hammer). Drive it home into the rounded slot and the bolt should come right out. I would not use an easy out just because they never work for me and usually end up getting snapped off and stuck in the slot. The hammering also helps to loosen the bolt. By bit I mean a peice from a kit like this

20180505_132042.jpg
 
For me, the easy outs make for bigger holes. The torx or the 12pt socket works and with less frustration.
 
Soak it with a bit of Kroil or PB Blaster for an hour or so before you go for the extraction. I've used both Steve's and JC's methods and in varying circumstances, they work just fine. My success rate with purpose-built EZ-Outs is about 20-25% in real life.
 
For the ETA extraction, see step #8 in the FSM procedure that states how to rotate it for R&R:
https://www.500eboard.com/Manuals/Servicev3.2/W124/w124CD1/Program/Engine/119/30-1262E.pdf


This type of extractor (designed for stripped hex-head nuts/bolts) may also work on the stripped manifold bolt... handy item to have in your toolbox:
https://www.amazon.com/IRWIN-BOLT-GRIP-Extractor-Expansion-394002/dp/B000QW6K8I
https://www.amazon.com/HANSON-Professionals-Industrial-Extractor-54113/
https://www.amazon.com/Tools-Performance-Extractor-14-Piece-1859153/dp/B00LFRS0LS/

:spend:
 
Nice! The Jury has spoken!

Looks like I'll attempt the socket extraction method after soaking. I do have some cheap sockets I don't mind blowing too. Thanks for all the advice and offers!!!
 

Who has viewed this thread (Total: 6) View details

Who has watched this thread (Total: 5) View details

Back
Top