• Hi Guest !

    Welcome to the 500Eboard forum.

    Since its founding in late 2008, 500Eboard has become the leading resource on the Internet for all things related to the Mercedes-Benz 500E and E500. In recent years, we have also expanded to include the 400E and E420 models, which are directly related to the 500E/E500.

    We invite you to browse and take advantage of the information and resources here on the site. If you find helpful information, please register for full membership, and you'll find even more resources available. Feel free to ask questions, and make liberal use of the "Search" function to find answers.

    We hope you will become an active contributor to the community!

    Sincerely,
    500Eboard Management

OWNER LWB250 (E420)

Took care of a few minor things today after work:

Got the front of the car up on ramps and had a really serious going-over of the bottom of the engine compartment and transmission area. No surprises, thankfully. I was a little disappointed to see that the time the car spent in the Midwest did take it's toll on the heat shields around the crossover pipes. There are a number of areas where there is perforation of the shield from rust through. The pipes themselves are good, but the heat shield is rough in spots. Oh, well.

Power steering pump reservoir hose is probably leaking. Return and pressure lines both look good, thank goodness. They're both pigs to replace as many of us know. In fact, from what I could see of the return hose it appears to have been replaced at some point in time as the rubber and clamps on it look quite new.

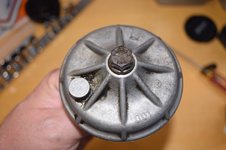
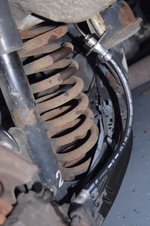
Got a new Stabilus steering damper, as it the one on the car appears to be the original. I'm pretty sure it was after taking it off:

1995 420E 05042020 - 1.jpg 1995 420E 05042020 - 2.jpg

Not only was it leaking, it had the resistance of a wet noodle. Yeah, I called that one. Looking forward to driving the car with the new damper, I'm sure it will make a difference.

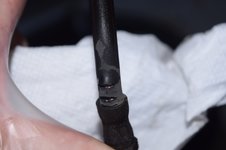
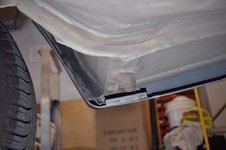
Idler arm bushings looked good, and I was pleased to see all the little heat shields around the tie rod ends were still in place. While I was poking around I saw this sitting on the left side engine mount:

1995 420E 05042020 - 3.jpg

Looks like the end of my former "go tubes" that was patched with a Solo cup. The piece must have come off the end of the tube when someone removed it and fell down into the engine compartment. I wonder how long it was there...

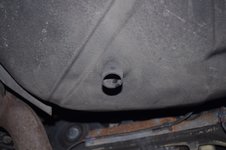
Cleared out the evaporator drains, which had a boatload of detritus in them for some reason. I don't think I've ever seen that before. Weird.

Noticed that the bushings on the ends of the sway bar were pretty sloppy. I guess I'll get a complete set of new bushings, drop the bar and replace them all at once. While I was there I applied a liberal amount of Kroil to all of the fasteners in anticipation of the job.

Had to give the oil drain plug another bump. Still dripping ever so slightly. I'm going to win this battle, I don't want to put that aftermarket plug back on the car.

Lastly, as I was closing up the trunk, I pulled the tool kit out of the spare tire bucket. It seems that at some point someone got what appears to be a W140 tool kit and put it under the cover where the spare tire bucket opens up. Of course it doesn't fit and makes a large hump in the trunk carpet, so I took it out. What's weird is that the bottom "tray" that the foam piece holding the tools fits in is nothing like any W140 tool kit I've seen. I tinkered with things for a minute or two, and its clear that this tray would never fit in the spare tire bucket under the circular access door in the spare tire cover.

I'll post pictures here so people (Gerry?) can try and identify where this tool kit came from. It's nearly complete, and even has a tow hook, which I've rarely seen. I'm pretty sure I've got the missing wrenches for it in my parts stash, too. If it does fit this car I'm not sure how.

1995 420E 05042020 - 4.jpg

Tomorrow a major road test! I have an appointment to get my title, registration and plates tomorrow morning, so the car will get a good shakedown on both city streets and highway and I'll have a chance to top off the tank with some TopTier fuel at Costco. Fun!

Dan
 
Apparently, that is indeed the mindset. I've read multiple answers on Quora from Americans that worked in engineering with Germans/In Germany, that this is the German mentality. According to such a mentality, the fact that water destroyed your antenna board is YOUR fault, not engineer's 😁

Here is one example


That's an awesome example. This is so so so so so so so so so true.

Germans love rules. They follow those rules. German engineers expect people to follow their rules.

When Japanese engineers go on to design a product they ask themselves: “How will the customers use it? How can I prevent failure if they abuse it?”

The German engineer: “I made this machine and it has to be used in this particular way. If the customer abuses it and it fails it is his fault, not mine”.
 
Had to give the oil drain plug another bump. Still dripping ever so slightly. I'm going to win this battle, I don't want to put that aftermarket plug back on the car.
Check the torque spec, and use a torque wrench next... make sure it's fully at spec. Also check to see if the copper seal ring is distorting (out of round) under pressure. There's a tiny chance the issue could be on the pan side, not the drain plug. Which reminds me, if there's no record of chain rails or lower pan dropped, I really like to pull the bottom pan and inspect inside for plastic debris. And then replace the level sender O-ring, which always leaks if original.


Lastly, as I was closing up the trunk, I pulled the tool kit out of the spare tire bucket. It seems that at some point someone got what appears to be a W140 tool kit and put it under the cover where the spare tire bucket opens up. Of course it doesn't fit and makes a large hump in the trunk carpet, so I took it out. ... I'm pretty sure I've got the missing wrenches for it in my parts stash, too. If it does fit this car I'm not sure how.
The W140 kit won't fit into a W124 bucket. Need both piece to make them nest neatly. I can't help identify the source of the toolkit, but if it's not 140, perhaps 220...?
 
Check the torque spec, and use a torque wrench next... make sure it's fully at spec. Also check to see if the copper seal ring is distorting (out of round) under pressure. There's a tiny chance the issue could be on the pan side, not the drain plug. Which reminds me, if there's no record of chain rails or lower pan dropped, I really like to pull the bottom pan and inspect inside for plastic debris. And then replace the level sender O-ring, which always leaks if original.

Yeah, I probably should use a torque wrench to be sure. Brand new sealing ring, so I think it's OK. I suspect there may be an issue on the pan side, which is why it had the weird oversized plug with the big "O" ring on it.

The W140 kit won't fit into a W124 bucket. Need both piece to make them nest neatly. I can't help identify the source of the toolkit, but if it's not 140, perhaps 220...?

I know, that's what puzzled me. The pan, or plastic "dish" the foam insert sits in, is a flat dish with a rim that's punctuated about 8 places around the edge with square notches. I knew as soon as I saw it there was no way it was a W140 kit or that it would fit in the bucket.

Dan
 
Took the car on it's first shakedown cruise this morning. For the most part all went well.

I have to preface this by stating that I can't believe what an amazing pleasure it is to drive this car. It's "like buttah". So smooth, so easy, no harshness, noises, rattles, etc. Almost as "cloud-like" as a W140, but far more responsive, lighter and "tight" from a performance standpoint. Really nice. So, so different from my S210 or R129 - in a very good way.

The car ran flawlessly the whole trip. The only issue I had was the failure of the AC compressor to engage. Not sure why, I could hear it try but was getting a squeal. This could be a belt issue or a slipping clutch from PS fluid that's dripped on it. I'm going to investigate this tonight or over the weekend. It was working previously so I'm not terribly concerned at this point. Just another thing to sort out, that's all.

With an ambient temperature in the mid 80s (F) I was getting idle oil pressures at 1.0 bar, moving up to full scale immediately upon acceleration. Cooling system was pretty much nailed to 82C the whole trip with minor variations at stops. As I have no idea what kind of oil is currently in the car, I'll probably change it this weekend and go with Mobil 1 0W-40 since I normally stock 20 quarts in the garage. Had oil pressure been lower at idle I might have gone with 15W-50, which I have run in other M119s in this climate, but all of those had far more miles on them, too.

Other than the lack of AC it was a very pleasurable drive. Stopped at the tax collector's office first to take care of the title and registration. Had to get a VIN and mileage verification, which is required for any car with an out of state title. Sadly, when the car changed hands as it left the state the mileage was flagged as "exempt", meaning they don't record it on the title due to age or being in excess of the odometer limits. Bummer. But, I had it on the VIN verification so now there's a record of it at least.

From there it was a quick pop around the corner to our Emergency Operations Center, also known as "PSOC".

PSOC.jpg

The PSOC is a hardened facility that can withstand CAT5 hurricanes. We have a data center here for our production systems. It's also where all of our security related systems are housed as well. Had to do some surveying of rack space as we've got two new systems we're getting ready to deploy in the next couple of weeks. Fun!

From PSOC it was a nice blast across Tampa on I-4 and I-275 to Mercedes of Tampa to pick up parts. Lots of grommets, shock boot, some coolant, etc. You'll be seeing all of that in the next couple of days.

MBoT.jpg

From MBoT it was a 40 minute run across I-275 to downtown Tampa and onto the Crosstown (Salmon) Expressway. Too bad the reversible lanes were closed as this is an absolutely spectacular place to run a car at high speed around here. Three lanes wide, wide, sweeping turns, minimal traffic right now. The big, wide elevated straight section you see in the picture is approximately 9 miles long and is regularly tested by folks with both cars and motorcycles as there is almost no law enforcement on it. My last 420E ran over 130 mph here early one morning before sunrise, about as fast as I was willing to push it. (Or before I chickened out!)

Reversible-express-lanes.jpg

A quick stop at Costco to top off the tank with some TopTier premium unleaded, and then the remaining nine miles back to the ranch.

All in all it was a great drive, even if I had to do some of it with my windows down and sunroof popped. It reminded me what great cars these are and how lucky I am to have this one.

Maybe some work tonight on some minor stuff, we'll see.

Dan
 

Yeah, it really is. I had forgotten what a great car the W124 is with an M119 in the chassis. It's such a pleasure to drive when it's sorted. I would liken it to a "sporty" S-class based on my experience.

There were many smiles for the miles, for sure.

Thanks!

Dan
 
I can absolutely relate as my DD is 400E. With so much less traffic now, I purposely drive to Walmart that's 35 min away from me, instead of one that's 20 minutes away, just drive my car for longer
 
In high school I worked at a "arcade", which was viewed upon as a den of iniquity, of course, where I repaired and maintained pinball and arcade games. Later on I used to buy/sell/restore EM games years ago, like in the 1980s. Back then everyone wanted electronic games, so the electromechanical pinball machines were plentiful and cheap. I used to go to a regional auction the coin-op people would have every 2-3 months and bring home a U-Haul truck full of games. Clean them up, keep the ones I liked and sell the others. I usually held up until November and then would run ads in the local paper to sell them for Christmas.

I was keeping an eye out on PinSide for something in my area that was reasonably priced and needed some love. I ended up finding a Williams "Klondike" only a mile away from my house! Got ahold of the pinball parts guys in Poughkeepsie, NY to find that they still had my account information from decades ago. Amazing.

I have the playfield stripped down and am cleaning it a little at a time. I've got to go completely through the score wheels and steppers and it should be good to go. I had new artwork made by a local vinyl sign place to replace the aging artwork on the playfield "slot machine" wheels.

View attachment 103095

Not many of us around that can still read a ladder diagram that's six feet long...

Dan

Dan,

When I was a 16-17 year old kid growing up in New Orleans (before 1960). There were Bally Nickel Pinball Machines that you could bet on.

They had 12 hole x 12 hole boxes that you could rotate in quads from what I remember. Anyway you played them like TicTac To. You won by lining up the balls in the same fashion.

To get odds you kept putting in nickels. Sometime you could win $50 to $100. They were a lot of fun and costly if you got hooked on them.

Have you ever seen any like that?

My wife and I sold antiques for many years. We were always at auctions and I’ve looked for one forever.

They seem to have disappeared. Maybe they were all destroyed because of gambling.
 
Last edited:
Dan, the oil pressure readings can be lower than actual, if the sending unit is old or original. Sometimes just replacing the sender will boost readings a half-bar. I'd run 15W-50 in that engine in FL, but that's just me.

Sure you don't want to upgrade to a 5.0L with 2.82 gears? The 500E turns your driving experience described above up to "eleven".

:3gears:
 
Dan, the oil pressure readings can be lower than actual, if the sending unit is old or original. Sometimes just replacing the sender will boost readings a half-bar. I'd run 15W-50 in that engine in FL, but that's just me.

Sure you don't want to upgrade to a 5.0L with 2.82 gears? The 500E turns your driving experience described above up to "eleven".
:3gears:

Yeah, I know this one all too well having owned a number of W140s with M119s. I gave the sender a cursory look the other day but will look at it more closely this weekend. I'm guessing it's probably the original. VDO or OE only!

I also happened to notice that the lower harness appears to have been replaced, too. nice. I might still go to 15W-50. I wonder if they have it in those big boxes now, too?
I'm happy with the way it drives. I'm not letting Mrs. Dan drive it. She would want the 2.82 in it, for sure... :gsxracer:

Dan
 
So after a very long work day ending at 5:00 pm (I start at 06:30 am!) I wandered out to the garage to dig through the parts I picked up today to figure out what sort of low impact stuff I could do.

Here's what I pulled out of the box that looked easy:

1995 420E 05152020 - 1.jpg

On the left are the grommets for the windshield washer heater tubes. In the center the seal for the windshield washer reservoir cap, and next to that the cap. This should be pretty straightforward.

This is why I replace these grommets:

1995 420E 05152020 - 3.jpg

If you look closely, you'll see that they're dried out and portions are even missing, most likely in the bottom of the washer reservoir. First thing is to remove the hoses.

1995 420E 05152020 - 4.jpg

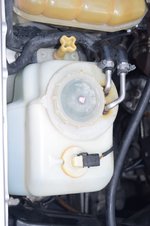
Yes, they're mushroomed out from some gorilla cranking down on the clamps. Not a lot you can do about it unless you want to replace the hoses, which is not a fun undertaking. My attitude is that if they're not leaking leave well enough alone, as unsightly as they are. Once the clamps and hoses are off, pry the cover loose and very carefully lift and rotate the heater tubes about 45 degrees to the right so they'll clear the float switch in the reservoir. And here you have it!

1995 420E 05152020 - 5.jpg

Know what that black plastic thing is? A thermostat. It controls the flow of coolant through the tubes based on the temperature of the coolant. Carefully lift and rotate the cover to remove it from the tubes. You might want to take a small screwdriver or other pointed tool to break up what's left of the old grommets, as this will facilitate the removal of the cover. Pay attention to the position of the tubes, too, as you could potentially install them 180 degrees wrong. Not fun to correct.

1995 420E 05152020 - 6.jpg

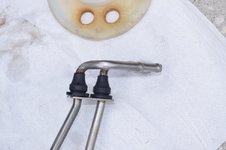
The tubes and cover separated. Now the fun begins. Lube the grommets up with something slippery, spit, oil, whatever. You're going to need it. Note that the tapered end of the grommets face "up" towards the cover. Slide both of the grommets on the tubes.

1995 420E 05152020 - 7.jpg

Look nice, don't they? Now the fun begins. Making sure you've oriented the cover properly, place it back over the tubes and grommets. But wait - the grommets don't seal to the cover! You have to get them pressed into the openings in the cover! Be careful here, as you can do some damage. With the grommet in the closest position to the cover, get the cover pressed down as close to it as possible. Using a flat bladed screwdriver, get between the bottom of the grommet and the metal plate or bar that they rest on, and lever it into place carefully. DO NOY PRY! If you use the screwdriver blade to pry the grommet or push it into place, you'll tear it or poke a hole in it. Believe it or not, if you use the flat side of the screwdriver to press upward towards the cover and work your way around the grommet, it will press into place. Note that the grommets can move up and down the tube slightly, too, so be sure to use this to your advantage as you get things in place. When complete they'll look like this:

1995 420E 05152020 - 8.jpg 1995 420E 05152020 - 10.jpg

Now it's time to put the heater tube back into the reservoir. But first, take a look at something.

1995 420E 05152020 - 12.jpg 1995 420E 05152020 - 13.jpg

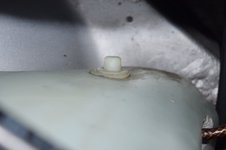
In the first picture, you can see the thermostat and a small pin sticking out of it. That's a locating pin. Now look down on the side of the reservoir, the side that faces the engine. You can see a dimple or a "cup" molded into the side of the reservoir. That's where the pin goes when the tube is positioned correctly in the reservoir. So how do you get it there?

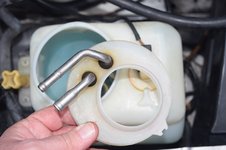
Put the tube and cover into the reservoir at a 45 degree angle to the left, like this:

1995 420E 05152020 - 11.jpg

This allows the tube to drop down below the low level float switch and into the bottom of the reservoir. Once it's in, rotate it to the right and move it around a little. use a flashlight to see into the reservoir if necessary. You'll feel the pin fall into the cup, effectively holding the lower portion of the tube in place so it's not flopping around unsupported and putting all of the weight and stress on the grommets and cover. It's not a tight fit, it just sort of supports the pin. You'll know it when the pin is in place, as the tube will be well supported on the bottom.

Reconnect your hoses, tighten your clamps, and put your new (or old if you didn't replace it) cap on the reservoir.

1995 420E 05152020 - 15.jpg

A couple of things I had forgotten I ordered - seals for the false firewall. These are the grommets or seals that seal up the gap between the false firewall and the fender while allowing the hoses and wiring harnesses to pass through. The originals typically had the hoses and harnesses threaded through them during assembly, but the parts were molded so the replacements could be carefully split if necessary to install replacements after the fact. Here are both right and left side seals:

1995 420E 05152020 - 16.jpg 1995 420E 05152020 - 17.jpg 1995 420E 05152020 - 18.jpg 1995 420E 05152020 - 19.jpg

Yeah, I'm keeping those for another day/time when I'm really looking for something involved to do. I did notice that I don't have any hood wedges, that is, the wedge-shaped rubber bumpers on the outer edge of the inside of the hood that index with these to seal the engine compartment. Knowing that the car had bodywork done in it's past tells me they got taken off and not replaced. Another item for the dealer parts order next week.

Lastly, I took a look at the AC compressor. I think I've identified why it was unhappy.

I was dousing a lot of the front area of the engine compartment with water last week while I was doing a coolant change. When I engaged the AC I got a nasty squeal and could see the compressor turning, but clearly not at the speed of the belt drive/engine. Upon close inspection, it appears that there is rust or corrosion in-between the clutch and driven plate of the compressor. I'm thinking that all of the water I ran over the area last week cause the mating parts to rust, and in doing so, when I tried to engage it today they didn't come together tightly and slipped due to the rust on the surfaces. I would draw a parallel to a rusty brake disc and pads.

I'll get under the car this weekend and run some emery cloth in between the plates and then rinse with some brake cleaner. I'm guessing that should make it happy (I hope!) Considering that it was running fine and making ice cubes last week I think my hypothesis has some merit.

Dan
 
Dan,

I've been wondering if those rubber blocks were available. One of mine looks kind of ratty. What are the part numbers for those rubber block seals. I can see the numbers on one but not the other.

Also, read my question in post #109. Re the pinball machines.
 
Dan,

I've been wondering if those rubber blocks were available. One of mine looks kind of ratty. What are the part numbers for those rubber block seals. I can see the numbers on one but not the other.

Also, read my question in post #109. Re the pinball machines.

The part numbers are 124 997 30 81 and 124 997 32 81.

I'm not familiar with the games you describe. Best I can think of would be Bally's "bingo" games, but I don't believe those used coins.

The history of pinball machines is a very bizarre one, involving politics, gambling, the Mob, etc., etc. I never got into any of the vintage stuff like wood rails (early pre-flipper games) or the gambling stuff. Sorry.

Dan
 
Did an oil change and a few other things this evening. Been wanting to give my new HF oil evacuator a spin, so I did...

Here's the filter I took out of the car:

1995 420E 05162020 - 1.jpg

I can't say that I know of any filter suppliers that have their filters made in China. Hmm. So here is what we'll replace it with:

1995 420E 05162020 - 3.jpg

Right out of the gray and blue box. Made in Austria. I feel better already. The oil evacuator, charged and ready to go:

1995 420E 05162020 - 2.jpg

I was surprised at how quickly it built up vacuum, and how quiet it was doing so. From what I can tell it uses a venturi to create a vacuum, but it seems to have a good muffler as it makes almost no noise. With my 15 gallon compressor at 80 psi it got up to the end of the green area on the gauge in a matter of maybe 10-15 seconds. Not long at all.

Got the filter cover on the bench to remove old O rings and clean it up.

1995 420E 05162020 - 4.jpg 1995 420E 05162020 - 5.jpg

Not too grungy, seen them a lot worse. Much cleaner after a round with some brake cleaner and a brass brush. Got the old O rings off and the new filter prepped for installation.

1995 420E 05162020 - 6.jpg

New O rings installed on the cover, ready to go.

1995 420E 05162020 - 7.jpg

I couldn't have asked for better entertainment while I was working. Nyuk, nyuk, nyuk!

1995 420E 05162020 - 8.jpg

Oil extracted. Took about 20 minutes. I didn't have the engine that warm, which is probably why it took so long. I also used the tubing that was the same size as the tubing on my previous extractor. This one had a larger diameter tube but I didn't try it. After I was done I checked it out to see if it would fit and it did, so I'll use the larger tubing on my next oil change. That should speed it up some as well.

1995 420E 05162020 - 9.jpg

Not sure I understand the scale measuring volume in tenths, but looking at the gauge it would appear that I got about seven quarts out. I did have the car on ramps and tilted slightly, as I needed to get the drain plug out, too. As a result there was probably another 20 ounces in the oil pan the extractor couldn't get.

I also used the tube to slurp the oil out of the filter housing, too.

1995 420E 05162020 - 10.jpg

I discovered why my stock oil drain plug and copper washer didn't seal well. With the drain plug removed, I could see a scratch or gouge in the metal around the drain plug opening. Not sure how it would have gotten there, but you could run a fingernail over it and feel the damage to the metal. I guess I could take a file or sanding block and try to clean things up, but I left well enough alone and put the old oversized plug with the big sealing ring on it back in. At least I know it won't drip.

Got the car level again and filled it up with 15W-50 Mobil 1. Got eight quarts and change in it with the level at the middle of the dipstick. Don't think I've ever gotten that much oil in an M119 before. Having it tipped up like that must have really done the job.

I looked at the AC clutch and really couldn't determine anything. I didn't have a value for the clutch gap so I just slipped a piece of emery cloth into the gap and ran it back and forth as best as I could. I did some research tonight and came up with the values for the gap, so I'll check it maybe tomorrow. Looks like I can remove the clutch plate in frame and replace shims should I need to, so hopefully that will allow me to make the AC happy again. I hope! The compressor turned by hand easily so I'm pretty confident that it's OK.

Determined that the little hose between the PS reservoir and pump is leaking as they all do, so I checked my hose stock to be sure I had a piece of 15mm hose, which I did. I think I'm going to tackle that job tomorrow. I hate the mess on the side of the engine from that hose leaking. Grr.

Dan
 
A good day already...

Did my usual early Sunday morning grocery run and took the 420E since I can, now that it's registered.

During my research last night over the AC compressor clutch issue, I read a section on AC compressor clutch issues in a technical bulletin from a tool company that made clutch removal tools. One of the things they said about slipping clutches if the gap was correct (and I assume it is since I haven't changed anything and the system was working previously) was to "burnish" the clutch by cycling the compressor 40-50 times at 5-10 second intervals at an RPM of 2,700 or more.

As my trip is on surface streets in a residential area for the most part I couldn't achieve that sort of RPMs without driving the car in a low gear, so instead I cycled it as I was driving at a somewhat lower RPM range.

After about a mile of this (while scaring the heck out of the early morning walkers/joggers with the screeching :agree: ) the clutch started engage!! Woo-hoo! When I pulled into the driveway and dropped to idle it did slip/screech again for a moment, so it's not completely burnished.

I'm going to take the car out later today on a much higher speed run where I'll "burnish" again.

Excellent! :wootrock:

Dan
 
Since I don't have the stuff to do the PS reservoir hose replacement or the new upper strut bumpers, I decided to replace my brake hoses. The fronts were, well, I would hesitate to call them "good", but they weren't cracked or damaged, just old and no doubt the originals. The rear hoses, however, are in pretty bad shape as you'll see.

I'll expound on the replacement of both sets later today, suffice to say the fronts went extremely well thanks to liberal applications of Kroil over the last week. Hopefully the rears will respond accordingly.

As an aside, I considered getting some stainless steel braided hoses, but since this is a lowly .034 and I'm not an aggressive driver I figured it really wasn't worth it. So Mercedes hoses for all four corners! :wahoo:

More details later today.

Dan
 
Today was a pretty good day in the garage. I was able to replace all four brake hoses without issue, drain and refill the differential, and replace a nearly failed exhaust donut. Got some road time in as well. But first, a suggestion for anyone who has or is considering to perform any sort of work on a Mercedes...

If you don't have either of these tools, you need a blow on the head.

View attachment Blow on the head1.mp4


2760_1.jpg This is a Hazet 2760 drain plug wrench.

1995 420E 05172020 - 7.jpg This is a Mercedes wheel alignment pin.

No one reading this who has lifted a wrench on a Mercedes should be without either one. If you're living right, your Mercedes tool kit has the alignment pin. If not, buy one from your dealer - they're cheap as wine. I apologize for not having the part number - I couldn't find it in hurry. Note that there is a 12mm x 1.5 and a 14mm x 1.5 - for W124 and earlier cars you want the 12mm x 1.5. The Hazet wrench is available through any number of outlets and is invaluable.

Now that's out of the way, let's have at it...

Pretty straightforward today. Get an axle in the air after breaking loose the lug bolts, take off the wheels, soak the fittings with some Kroil (again!) and go at it. Some things to be aware of:

Have a drain pan underneath and paper towels or shop rags ready. Make sure your brake fluid reservoir is topped off. Have the new hose within reach.

Break the fitting at the caliper first and make sure you can get it loose. If you get in a pinch with the line nut up top you can always retreat and tighten.

Use a flare nut wrench on the brake line nut. This will get you the most purchase on a very small but critical fastener. When breaking it loose, back up the hose with a wrench on the hose fitting, a 17mm on the fronts and 14mm on the rears. DO NOT apply pressure to the line nuts without backing up the hoses! If you do you risk rounding off the line nut as the hose fitting will try to rotate out of the supporting bracket that is holding it in place.

I like to get both wrenches within about 10 degrees of each other so I can "squeeze" them together to break the line nut loose. Here's a front line nut and hose at the top of the picture.

1995 420E 05172020 - 1.jpg

When you break the line nut loose brake fluid is going to start dripping out of the fitting. Ignore it and keep unscrewing the line nut until it's free of the hose fitting. Once the hose is free, start unscrewing the hose at the caliper. Drop the old hose into your drain pan.

Get the new hose in hand and thread the line fitting into the caliper. Tighten it to spec, or very snug. No gorilla stuff here, you don't need it, the line fitting has to seat and be tight, that's all.

Thread the hose fitting that mates with the line nut through the supporting bracket and the spring clamp. Push up on the hose and turn it slightly until you feel it drop into the supporting bracket, which has a serrated sort of hole for the hose fitting that holds it in place and prevents it from turning.

The line will be in the hose fitting at this point. Carefully turn the line nut by hand to start the threads. You may have to tip the hose fitting around a little, you'll be able to feel it. What's important is to keep it in the serrations in the bracket so it won't turn. Thread the line nut down as far as you can by hand, then go at it with the flare nut wrench.

The whole time the fitting will be leaking brake fluid. It seems like a lot, but in reality it will probably be about a tablespoon. Yeah, it's messy, but there's no way around it. Gloves are a good idea, and for gosh sakes don't touch any painted surfaces with your hands as brake fluid will destroy paint in short order.

Rinse, lather and repeat for the other side.

When both are done, go to the wheel farthest from the brake reservoir and get ready to bleed. Hook up your pressure bleeder and pressurize it.

1995 420E 05172020 - 3.jpg

Of course your bleeder screw has a cover (000 421 08 87) on it, right? I thought so. Take it off, get your siphon bottle, hose and 8mm wrench ready.

1995 420E 05172020 - 4.jpg

Crack the bleeder screw and let her rip! Again, rinse, lather, repeat for the other side. Pat yourself on the back for a job well done and put the wheel alignment pin into one of the lug bolt holes, ideally the one closest to 12 o'clock. Roll the wheel over and put it on the pin, then start a couple of lug nuts to hold the wheel on the hub.

But wait! What's wrong with this wheel/tire on the right rear of the car? (A hint: location is key!)

1995 420E 05172020 - 12.jpg

A peek at one of the new rear hoses:

1995 420E 05172020 - 11.jpg

Here are some of the old hoses:

1995 420E 05172020 - 13.jpg 1995 420E 05172020 - 16.jpg

Yeah, not good. Both of the rears were split at the bottom fitting.

Now for a road test. I took the car out for a good 15 mile run on some 50 mph roads to get it warmed up and make sure the brakes are good - they are. Back into the garage and the rear goes up on ramps. Get out the creeper and have a look see below decks.

Hmm, an albino exhaust hanger?

1995 420E 05172020 - 18.jpg

Not any more.

1995 420E 05172020 - 24.jpg

That's real German rubber. DO NOT scrimp here. You will regret it, I guarantee you.

On to the differential, which I'm going to drain and refill with Mobil 1 75W-90W synthetic gear lube. First order of business, and a critical issue whenever draining and refilling a differential or manual gearbox - Always remove the filler (highest) plug FIRST! Why? Because if you remove the drain plug and drain the differential or gearbox and then discover you can't get the filler plug out, YOU CAN'T FILL IT BACK UP. I'm not trying to be a jerk by "shouting" here, but as logic would dictate, you can see why this is important...

A liberal spray of Kroil on the filler and drain plugs.


1995 420E 05172020 - 21.jpg 1995 420E 05172020 - 23.jpg

The Hazet 2760 comes out as does a 3 pound dead blow hammer. Sometimes you need a little force to get these plugs to start turning. And because you're working upside down, remember your "righty-tighty, lefty-loosey" before you start in on them.

No need to document the draining, I think everyone can visualize. Here's how I fill a differential:

1995 420E 05172020 - 28.jpg

That OTC sucker hand pump and a long piece of large diameter clear tubing. I suck nearly a whole bottle of gear lube into the hand pump, take the hose and insert it into the fill hole. I can fill a differential with about three "sucks" before it starts draining out the fill hole. I typically overfill it slightly and then let it drain until it stops. Then I thread the filler plug in, tighten it up with the Hazet 2760, and I'm done.

While I'm under the car I like to look at drains. It's part of that Mercedes Martha Stewart thing I do.

1995 420E 05172020 - 25.jpg 1995 420E 05172020 - 26.jpg

First one is the drain in the spare tire well. It's intact and clear. Nice. If not, these are cheap and easy to replace. Second one is one of the side depression areas of the trunk inside of the fender. These are more likely to get grungy as they're in the direct line of fire from the rear tires. If these get clogged and your antenna grommet is leaking, you'll have some nice rust begin in that area.

So all in all a pretty good day. Nothing too high impact but al important, none the less.

Dan
 
Low impact stuff today. Even got some road time, too.

Was going to go to the dealer around 11:00 today to pick up my weekly parts order. Jumped into the S210 and backed out. Drove down the street and noticed that it seemed a little low in the right front and was pulling slightly. Got off the road and looked - tire is about 50% inflated. Grr. Carefully turned around and went home.

Transferred all of my stuff to the 420E E420 and took off. Nice ride.

Got to the dealer and they didn't have all my stuff as expected. Grr again. Not a big deal, but it was a couple things I wanted for the weekend, like the PS reservoir gasket, for example. Poo. Oh well, I'll take what I can and work with it.

Nice drive home on the interstate and toll road (Crosstown Expressway). Hot, but not totally unbearable. Yeah, it appears that the AC compressor clutch has puked, so I've got to deal with that, too. Ugh.

Get home, unload everything and get back to my desk and sit through some meetings. Zzzzzz

After work was over I went out and put a new wiper blade on the 420E E420. Not bad - OE is only $16. Can't beat that. Not much else to do without a major undertaking, so I turn to the S210. Roll it out and get the tire off. Yikes! A screw like dead center in the tread. Yup, that would do it. Put the spare on it and get the bad tire ready to go to Costco for repair tomorrow. I guess you can carry in a road hazard repair, I don't know, I've never done one with them...

While I'm on the S210, I had a new (used) driver's exterior mirror for the car, as the one that was on it has turned almost black from the self-dimming fluid failing. No leaks, thank goodness, just so dark you can't see anything in it.

Get the old mirror out, which was an ordeal as there was double sided tape between it and the plate of the adjuster motor. I won't regale you with all the gory details, but I ended up swapping the mounting plate off the old (used) mirror that the parts scrounger didn't bother to remove - they clearly just yanked the mirror out of the housing and tore it off the motor. I was able to successfully transplant the mounting plate from the new used mirror to the old motor without damage.

Then came the fun part - getting the mirror back on. It's weird - I've had mirrors that have gone onto a car in a matter of seconds, and others that I struggled with for 10 minutes only to have them pop off a few minutes later. This was the latter. Thought I had it on, it moved around properly, then while I'm pulling the car into the garage and admiring my handiwork, "boing" and off it comes. Dang it. I'm done for the night.

So I'm going to check again on Friday on parts - if they've come in I'll have front sway bar bushings, a PS pump reservoir hose replacement, and some diagnostic work on the AC clutch for this weekend. Oh - I did get the black third brake light painted gray this afternoon, too, so I'll pop that in as well.

Dan
 
Every time my son. comes to visit he has at least one slow leak. Easy fix with the tool, plg and ruber cement. One tire has 4 Plugs in it, still strong.
 
Dan, thanks for sharing. I'm waiting on a PS reservoir gasket as well. Any idea as to the logic behind it's $27 wholesale price. Most of the time, part prices for our cars seem within the limits of my imagination if what's reasonable/appropriate. But on occasion, like with this tiny PS reservoir paper gasket, it's bewildering why it'd be $27 wholesale, $34 or so MSRP
 
Every time my son. comes to visit he has at least one slow leak. Easy fix with the tool, plg and ruber cement. One tire has 4 Plugs in it, still strong.

I've got road hazard on these tires, so I'll let Costco take care of it. I've got the stuff to plug tires but I prefer to leave that to a professional, especially when a warranty is part of the deal.

Dan
 
Dan, thanks for sharing. I'm waiting on a PS reservoir gasket as well. Any idea as to the logic behind it's $27 wholesale price. Most of the time, part prices for our cars seem within the limits of my imagination if what's reasonable/appropriate. But on occasion, like with this tiny PS reservoir paper gasket, it's bewildering why it'd be $27 wholesale, $34 or so MSRP

None at all. I was a bit taken aback by it when I saw the price as well. It's a paper gasket with some formed sealant or something on it, but it's certainly nothing special. If I didn't want to risk another leak I would reuse the one on the car. It would probably work just fine...

And there there's the wiper blade that's $16. You can't buy one of those fancy Bosch mono blades for that (not that I would ever put one on one of my cars!)

I don't get it sometimes.

Dan
 
I am re-using the PS gasket on my Top end rebuild, it was new back in 2014 or so and in good condition still. You can also get a good aftermarket gasket for a normal price. I went Factory and will reuse mine. It’s in the bin ready to go back on when I reinstall the reservoir.
 
I am re-using the PS gasket on my Top end rebuild, it was new back in 2014 or so and in good condition still. You can also get a good aftermarket gasket for a normal price. I went Factory and will reuse mine. It’s in the bin ready to go back on when I reinstall the reservoir.

I would rather not roll the dice on this one as I'm almost positive it will be the original. I think that after 25 years it's prudent to replace it.

Dan
 
Time for a "Duh-oh!" moment. Was doing some research on the S210 mirror last night and discovered that I could remove the mirror cover with the mirror in place, and vice-versa.

Spent about five minutes popping the cover, getting the mirror properly mounted and clipped in place, and replacing the cover. Dang. I figured there was something like this available.

Dan
 
Dan, not to get off 124 topic, but do you have any sources for replacement 210 mirrors? I've had the same problem with them either turning dark, or turning bronze. Complicating things is there is standard glass, and auto-dim glass (my '97 has the latter). My glass died late last year and I haven't yet replaced it. Think I have a used one that's tolerable but still bronzed a bit, not perfectly clear. New are NLA and were stupid money.

:strawberry:

I have a search set up on eBay. I've asked our purveyor of Northern California salvage yards, but he says it's unlikely he would ever come across a decent one. I just came across this one the other day, which was quite a find, I thought, because it was self dimming as well as heated (most aftermarket replacements are heated only, not self dimming.)

MERCEDES W210 E Class Left Driver Side Mirror Glass Heated Auto Dim 2108100121 for sale online | eBay

It's perfectly clear with no indications of bronzing. I'll keep an eye out for you, but be aware I need one for the youngest's 2002 E320 as his is getting the "tunnel" look to it where it's bronzing around the edges. Mine just went across the board, so badly you couldn't see reflections in the daylight.

Dan
 
Did you buy that one Dan? That was a score! Looks like it was dated 2011. And I was wrong, these aren't NLA (yet)... just spendy.

:deniro:
 
Did you buy that one Dan? That was a score! Looks like it was dated 2011. And I was wrong, these aren't NLA (yet)... just spendy.

:deniro:

Yes, I did. It's already on my S210.

No, they're not NLA, just stupid priced. You'll see a lot of used ones listed for stupid money as a result, too. I'll keep an eye out... :detective:

Dan
 
Low impact day for a number of reasons. Had to work in the data center this morning getting some new hardware "racked and stacked". Nice to see some coworkers in the flesh for a change, even if we did have to wear masks. Hot as Hades today, too, high 90s, not conducive to working in the garage.

Anyway, I started in on taking on my antenna issues. I don't have any pictures but will tomorrow. I was so focused on what I was doing I didn't take pictures, what can I say...

A forum member was so very kind to share three salvage yard antennas with me to pick parts from. I tested all and every one of them had a good motor. My issue was the little electronics box on top of the motor, however. I tried all three and found one that worked. Great! Got it plugged into my antenna and powered it up. Success! Sort of.

The second section of the mast is frozen solid. The black part goes up and the third section, but the second section won't move. Stuck solidly inside the third section. I pulled the mast and noticed that the tip of the toothed "tail" is gone, no doubt inside the motor case (I'll need to fish that out.) I inverted the mast and dripped Kroil into it and left it inverted for about 30 minutes. Came back and using the top section did sort of a "slide hammer" action with the top section to no avail. Dang it. Tried to lightly grasp it with any number of tools I had on hand to get some purchase on the second section to break it loose, no joy.

I left it to soak overnight. I figure that worst case I'll have an antenna mast that doesn't fully extend. Not a big deal, really.

Looking for something I knew I could get an easy win from, I saw my recently painted third brake light assembly. Oh, yeah...

First, the original third brake light was in pretty bad shape. Looks like filament tape was used on it, and the lamp melted some of the housing, a common occurrence.

1995 420E 05222020 - 1.jpg 1995 420E 05222020 - 2.jpg

To remove the third brake light housing, you need to carefully grasp it on both sides and pull straight back towards the front of the car. You might want to grab it with one hand and use the other to hold the base so it doesn't move. It's unlikely to, but the plastic in these areas can be extremely brittle, so I like to hedge my bets. When you pull the housing off the base, you'll get a surprise.

1995 420E 05222020 - 3.jpg

Those two metal strips are springs that index in the bottom of the housing and hold it in place. Notice the rectangular holes in the middle of the base - those are where the metal "fingers" on the bottom of the housing go to make contact with the brake light circuit.

Here's the new housing ready to install. Get some automotive glass cleaner and clean the interior glass where the third brake light was located. I had to take a scraper to my glass in one areas as the old rubber seal had stuck to the glass. Be careful, as the defroster lines are in this area and can be damaged with sharp objects. Avoid them whenever possible.

1995 420E 05222020 - 4.jpg

I got some overspray on two of the "vanes". I tried everything I could throw at this to get it off, sandpaper, solvents, etc., and nothing worked. It stinks, but at this point I'll live with it so I've got a good third brake light. Time to install it.

Take the housing and hold it directly above the base. Tip the front bottom edge (the part farthest away from you) down and then lower the housing onto the springs in a sort of "scooping" motion. This gets the springs located into the slots in the bottom of the housing. You'll know they're in place because you'll feel the resistance as you rotate the housing forward towards the rear window. As you're rotating and moving the housing close to the window, flatten out your rotation so the bottom of the housing comes down on the base and the metal contact "fingers" in the bottom of the housing will go into their respective holes in the base.

1995 420E 05222020 - 5.jpg

You'll hear a ratcheting noise as you do this. You might have heard it when you were removing the housing from the base. That's those flat springs running up against pawls in the housing that allow the springs to catch and hold the housing up against the rear window tightly. If there's a gap between the housing and the window, keep pushing - it's not completely seated.

1995 420E 05222020 - 6.jpg

And now there's a new and far better looking third brake light (even with the overspray - grr) in place of the old one. A little tear in the rubber seal I've got to address, too. It's always something...

1995 420E 05222020 - 7.jpg

With that I called it a day. I had done enough damage.

Dan
 
Low impact day for a number of reasons. Had to work in the data center this morning getting some new hardware "racked and stacked". Nice to see some coworkers in the flesh for a change, even if we did have to wear masks. Hot as Hades today, too, high 90s, not conducive to working in the garage.

Anyway, I started in on taking on my antenna issues. I don't have any pictures but will tomorrow. I was so focused on what I was doing I didn't take pictures, what can I say...

A forum member was so very kind to share three salvage yard antennas with me to pick parts from. I tested all and every one of them had a good motor. My issue was the little electronics box on top of the motor, however. I tried all three and found one that worked. Great! Got it plugged into my antenna and powered it up. Success! Sort of.

The second section of the mast is frozen solid. The black part goes up and the third section, but the second section won't move. Stuck solidly inside the third section. I pulled the mast and noticed that the tip of the toothed "tail" is gone, no doubt inside the motor case (I'll need to fish that out.) I inverted the mast and dripped Kroil into it and left it inverted for about 30 minutes. Came back and using the top section did sort of a "slide hammer" action with the top section to no avail. Dang it. Tried to lightly grasp it with any number of tools I had on hand to get some purchase on the second section to break it loose, no joy.

I left it to soak overnight. I figure that worst case I'll have an antenna mast that doesn't fully extend. Not a big deal, really.

Looking for something I knew I could get an easy win from, I saw my recently painted third brake light assembly. Oh, yeah...

First, the original third brake light was in pretty bad shape. Looks like filament tape was used on it, and the lamp melted some of the housing, a common occurrence.

View attachment 104040 View attachment 104041

To remove the third brake light housing, you need to carefully grasp it on both sides and pull straight back towards the front of the car. You might want to grab it with one hand and use the other to hold the base so it doesn't move. It's unlikely to, but the plastic in these areas can be extremely brittle, so I like to hedge my bets. When you pull the housing off the base, you'll get a surprise.

View attachment 104042

Those two metal strips are springs that index in the bottom of the housing and hold it in place. Notice the rectangular holes in the middle of the base - those are where the metal "fingers" on the bottom of the housing go to make contact with the brake light circuit.

Here's the new housing ready to install. Get some automotive glass cleaner and clean the interior glass where the third brake light was located. I had to take a scraper to my glass in one areas as the old rubber seal had stuck to the glass. Be careful, as the defroster lines are in this area and can be damaged with sharp objects. Avoid them whenever possible.

View attachment 104043

I got some overspray on two of the "vanes". I tried everything I could throw at this to get it off, sandpaper, solvents, etc., and nothing worked. It stinks, but at this point I'll live with it so I've got a good third brake light. Time to install it.

Take the housing and hold it directly above the base. Tip the front bottom edge (the part farthest away from you) down and then lower the housing onto the springs in a sort of "scooping" motion. This gets the springs located into the slots in the bottom of the housing. You'll know they're in place because you'll feel the resistance as you rotate the housing forward towards the rear window. As you're rotating and moving the housing close to the window, flatten out your rotation so the bottom of the housing comes down on the base and the metal contact "fingers" in the bottom of the housing will go into their respective holes in the base.

View attachment 104044

You'll hear a ratcheting noise as you do this. You might have heard it when you were removing the housing from the base. That's those flat springs running up against pawls in the housing that allow the springs to catch and hold the housing up against the rear window tightly. If there's a gap between the housing and the window, keep pushing - it's not completely seated.

View attachment 104046

And now there's a new and far better looking third brake light (even with the overspray - grr) in place of the old one. A little tear in the rubber seal I've got to address, too. It's always something...

View attachment 104047

With that I called it a day. I had done enough damage.

Dan

Small wins - big satisfaction. Good job! Shall we ring up Ms. Martha Stewart and ask her how she feels about that overspray? :stickpoke: Certainly Ms. Marie Kondo would not approve.....
 
Actually, the overspray has been bugging me since last night. Woke up this morning thinking about it. I believe I may have a fix for it I'll address later today.

Martha
 
I got it sorted and back on the car. Details to follow....

Dan
 
The other avatar was Patton right, what about this one?

Goodness, no, although that would be a good choice. My father considered Patton almost a deity (WWII veteran). It was George C. Scott playing General "Buck" Turdgison in "Dr. Strangelove". Scott played a mean Patton, too.

This one is Morty Junior from the Rick and Morty episode "Raising Gazorgazorp". I tend to have somewhat esoteric taste at times.

Dan
 
I thought Dan looked pretty good as Martha Stewart, though perhaps from his photo doing the third brake light, a manicure or fake nails could be in order. Bring back that avatar !!!
 

Who has viewed this thread (Total: 2) View details

Who has watched this thread (Total: 1) View details

Back
Top